The Fetch API’s introduction changed how JavaScript developers handle HTTP requests. Now, developers don’t need to use third-party packages to make an HTTP request. This is especially good news for front-end developers because the fetch function is only for browser use.
Backend developers used to need different third-party packages until node-fetch was introduced. Node-fetch brings the same fetch API functionality to the backend that browsers have. In this article, we’ll look at how you can use node-fetch for web scraping.
Prerequisites
Before you start, make sure you meet all the following requirements:
- You’ll need Node.js installed on your machine. Download it from the official Node.js download page. This tutorial uses Node.js version 20.12.2 with npm 10.7.0, the latest LTS version at the time of writing.
- You’ll need a code editor like VS Code or Atom installed on your machine.
- You should have experience writing ES6 JavaScript, understanding promises, and async/await.
Understanding the node-fetch
The Fetch API provides an interface for making asynchronous HTTP requests in modern browsers. It is based on promises, making it a powerful tool for working with asynchronous code.
Node Fetch is a widely used lightweight module that brings the Fetch API to Node.js. It allows you to use the fetch function in Node.js as you would use window.fetch in native JavaScript but with a few differences.
One can connect to remote servers and fetch or post data from an external web server or API, making it a suitable tool for various tasks, including Node.js web scraping.
Read More: Web Scraping with Node.Js
How to use node-fetch?
npm install node-fetch
npm install node-fetch@2
					import fetch from 'node-fetch';

const response = await fetch('<https://github.com/>');
const body = await response.text();

console.log(body);
Basics of Cheerio
load() function. This function takes a string containing the HTML as an argument and returns an object.
					import cheerio from 'cheerio';

const htmlMarkup = `<html>
  <head>
    <title>Cheerio Demo</title>
  </head>
  <body>
    <p>Hello, developers!</p>
  </body>
</html >`;

const $ = cheerio.load(htmlMarkup);
					import cheerio from 'cheerio';

const htmlMarkup = `
  <html>
    <head>
      <title>Cheerio Demo</title>
    </head>
    <body>
      <p>Hello, developers.</p>
      <p>Coding is fun.</p>
      <p>Code all day and night.</p>
    </body>
  </html>
`;

const $ = cheerio.load(htmlMarkup);

const $paragraphs = $('p');
console.log($paragraphs.text());
					import cheerio from "cheerio";

const htmlMarkup = `
  <body>
    <h3 class="country-list">List of Countries:</h3>
    <ul>
      <li class="country">India</li>
      <li class="country">Canada</li>
      <li class="country">UK</li>
      <li class="country">Australia</li>
    </ul>
  </body>`;

const $ = cheerio.load(htmlMarkup);

const listItems = $('li');
listItems.each((index, element) => {
  console.log($(element).text());
});
Building a Simple Web Scraper
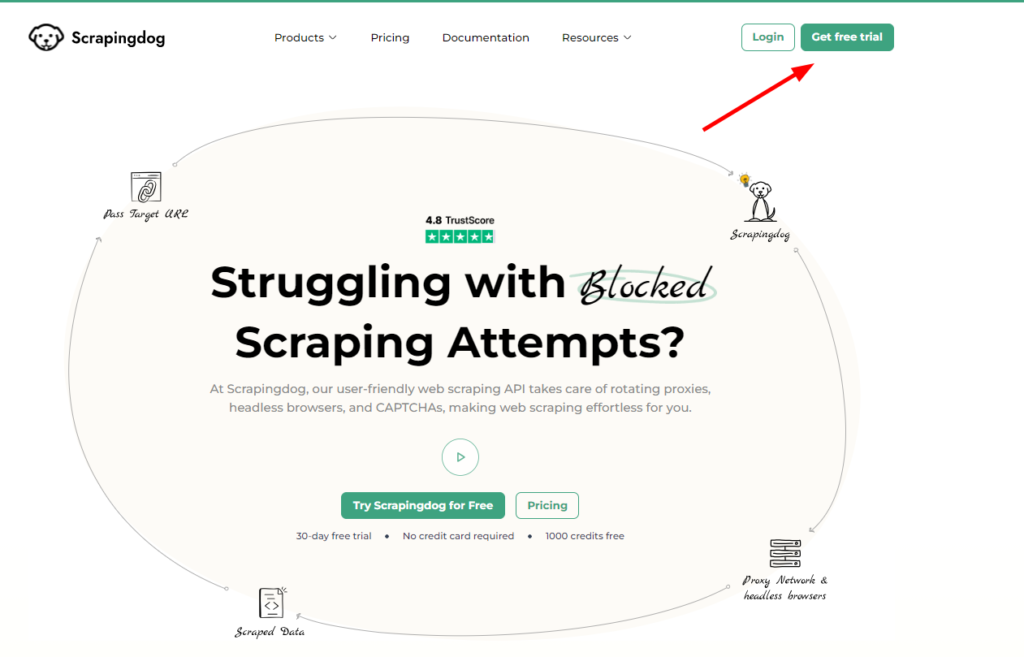
Let’s build a web scraper in Node.js using Node-fetch and Cheerio. We’ll target the Scrapingdog homepage and use these libraries to select HTML elements, retrieve data, and convert it into a useful format.
Step 1: Initial Setup
To begin with, you need to create a folder for your Node.js web scraping project. You can do this by running the following command:
mkdir nodejs-webscraper
cd nodejs-webscraper
npm init -y
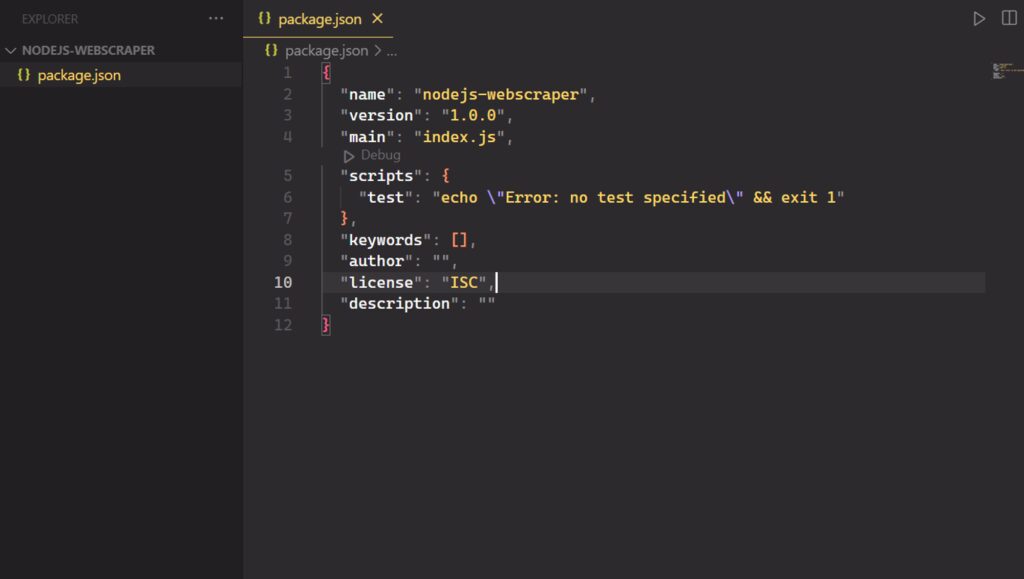
Now, create an index.js file in the root folder of your project.
Step 2: Install node-fetch and Cheerio
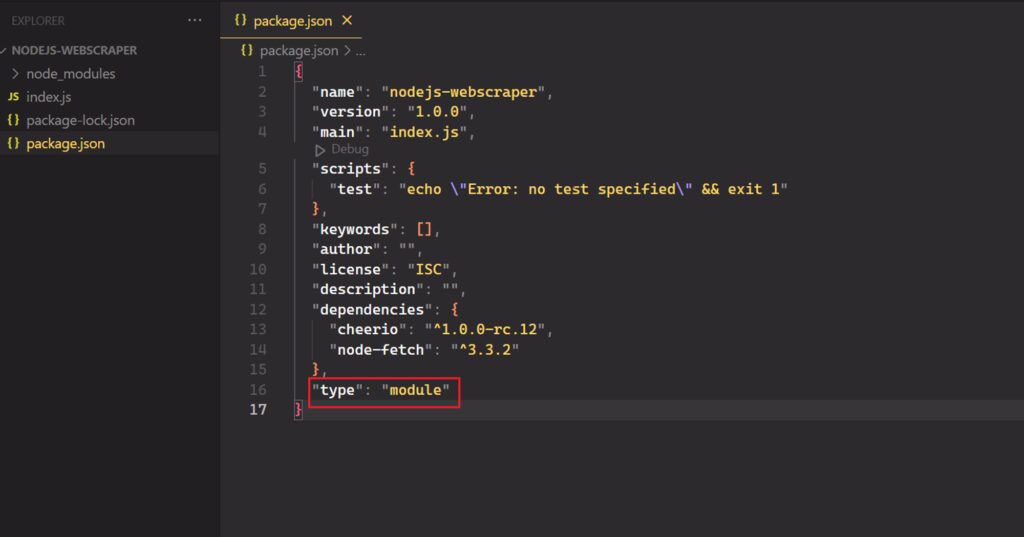
Install the dependencies required for the Node.js web scraper: cheerio and node-fetch.
npm install node-fetch cheerio
"type": "module",
					// index.js

import fetch from 'node-fetch';
import cheerio from 'cheerio';
Step 3: Download your target website
Now, use node-fetch to connect to your target website.
					const response = await fetch('<https://www.scrapingdog.com/>', {
    method: 'GET'
});
Step 4: Inspect the HTML page
If you visit the Scrapingdog homepage, you’ll see a list of dedicated scraper APIs for web scraping offered by Scrapingdog. Right-click on one of these HTML elements and select “Inspect”:
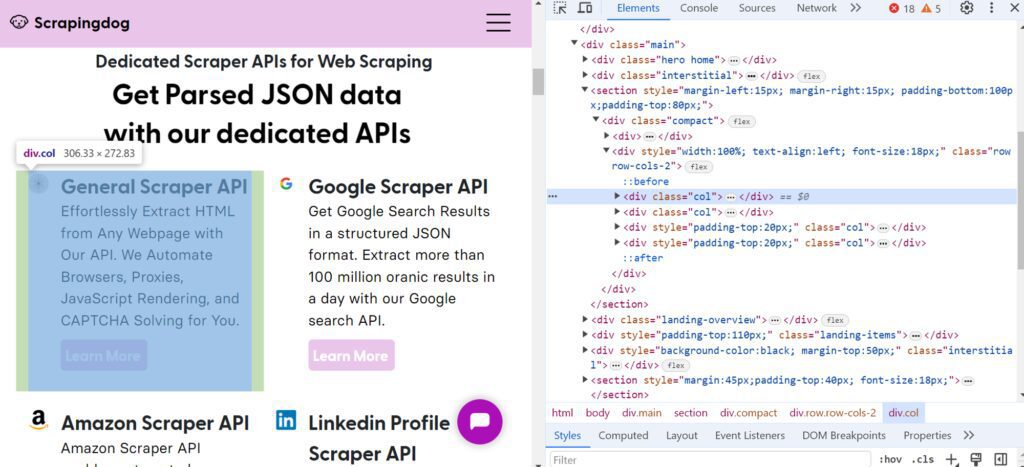
These APIs are organized into sections, each representing a specific scraper. Each section is contained within a <div> element with the class col. Within each section, you’ll find a title (using the <strong> element) and a description (using the <p> element).
Similarly, you can scrape additional data, such as:
- Information about satisfied customers.
- Insights into how customers use Scrapingdog.
Step 5: Select HTML elements with Cheerio
Cheerio loads HTML as a string and returns an object for data extraction using its built-in methods. It offers several ways to select HTML elements, including tag, class, and attribute value.
You can load the HTML using the load function. This function takes a string containing the HTML as an argument and returns an object. The resulting object is assigned to the variable $, which is a common convention used to refer to jQuery objects in JavaScript. In Cheerio, it acts as a reference to the parsed HTML document.
const $ = cheerio.load(html);
$ object provided by Cheerio.
To select elements with class names, use the . (dot) followed by the class name selector. For example, if you want to get elements with the class name “hero-title”, use the selector .hero-title. In Cheerio, the .text() method is used to extract the text content of an HTML element.
const title = $('.hero-title').text();
Step 6: Scrape data from a target webpage with Cheerio
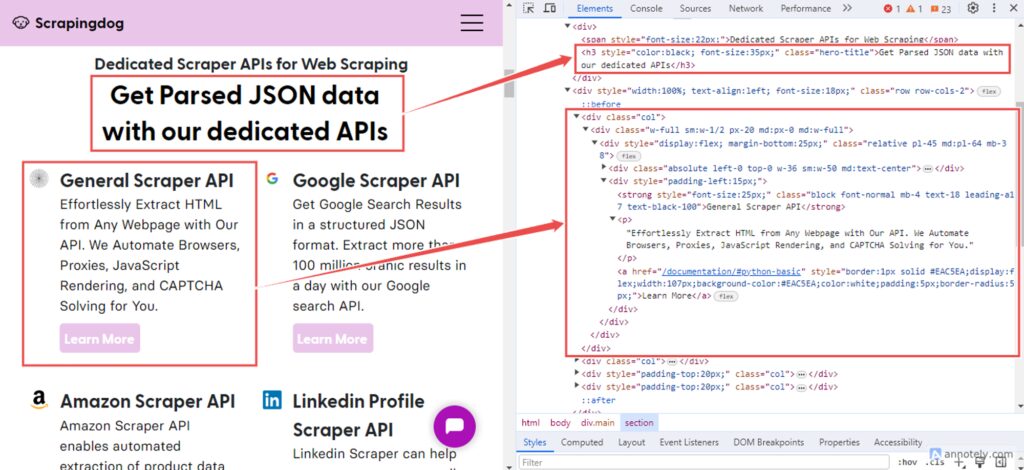
You can expand the above logic to extract the desired data from a webpage. First, let’s see how to scrape all dedicated scraper APIs for web scraping.
The hero-title class holds the title. Each col class represents a section with details about a Scraper API. It contains a strong element (<strong>) for the API title and a paragraph (<p>) for the description.
					const scraperAPIs = [];

const title = $('.hero-title').text().trim();

$('.col').each((index, element) => {
    const api = {};
    api.title = $(element).find('strong').text().trim();
    api.description = $(element).find('p').text().trim();
    scraperAPIs.push(api);
});
The .hero-title selector targets elements with the class hero-title, which likely contains subtitles. The .text() method extracts the text content of these elements.
The .col selector targets elements with the class col, representing individual sections with information about different Scraper APIs. Here, the .each() method iterates over each selected element. Within this loop, .find('strong') selects the <strong> element within each .col, typically containing the API title. Similarly, .find('p') selects the <p> element containing the API description.
The .find method helps us to further filter out the selected elements based on any selector. It searches for matching descendant elements at any level below the selected element.
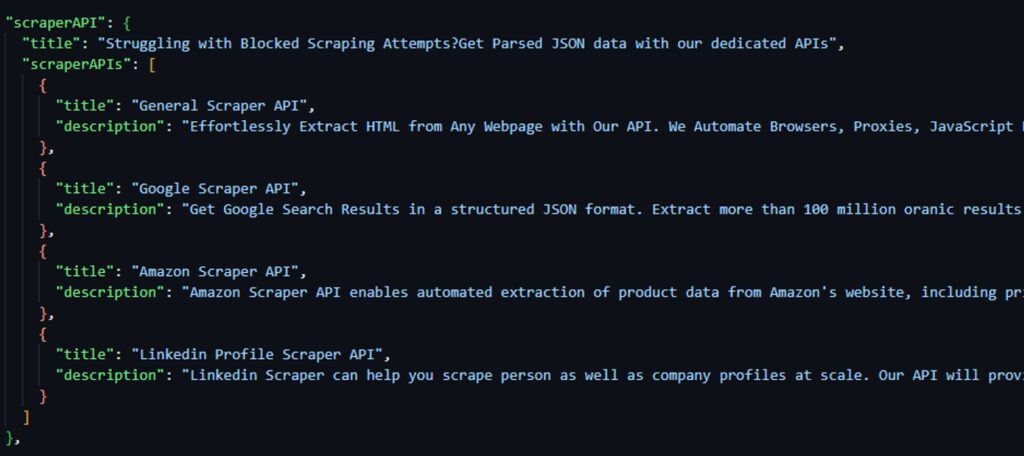
The result of extracted data would be:
Similarly, you can extract the data on how customers use Scrapingdog. For this, you have to extract data from each < div> element within the class landing-overview. Then iterate through each < div> and retrieve the title from the < h3> tag and the description from the < p> tag.
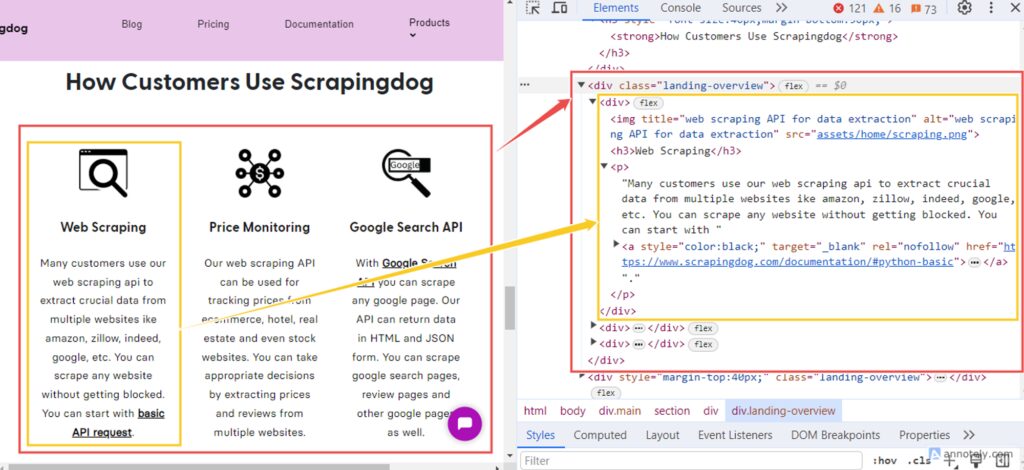
					const customerUsageData = [];

$('.landing-overview div').each((index, element) => {
    const titleElement = $(element).find('h3');
    const title = titleElement.text().trim();

    if (titleElement.length && title.length > 0) {
        const descriptionElement = $(element).find('p');
        const description = descriptionElement.text().trim();

        customerUsageData.push({ title, description });
    }
});
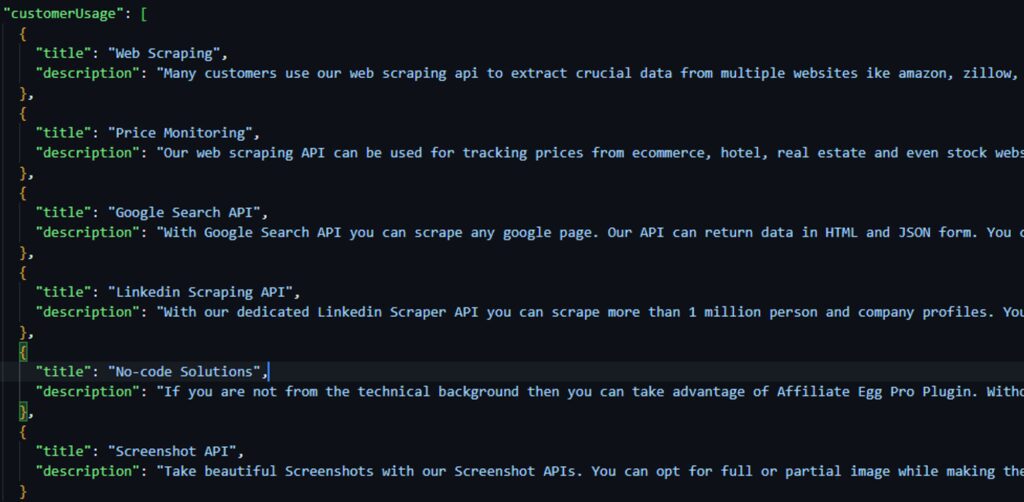
This code snippet extracts data from each <div> element within the class landing-overview. It iterates through each <div> and retrieves the title from the <h3> tag and the description from the <p> tag. If both the title and description are found, they are pushed into the “customerUsageData” array.
The result is:
Lastly, you can extract the data of satisfied customers of scrapingdog. For this, you have to fetch the absolute paths of images (< img> elements) that are descendants of < div> element with the class interstitial-companies.
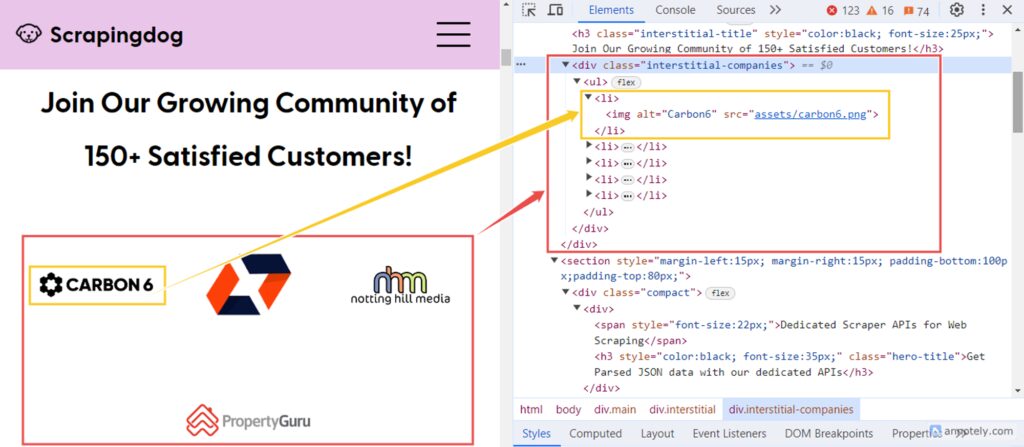
					const satisfiedCustomersData = [];

$('div.interstitial-companies img').each((index, element) => {
    const relativePath = $(element).attr('src');
    const absolutePath = new URL(relativePath, url).href;
    satisfiedCustomersData.push(absolutePath);
});

Step 7: Convert the extracted data to JSON
JSON is one of the best data formats for storing scraped data on your local machine. You can use the built-in fs module in Node.js. It allows you to interact with the computer’s file system. Here’s how you can modify the code to write the data to a JSON file:
					const data = {
  customerUsage: customerUsageData,
  scraperAPI: scraperAPIData,
  satisfiedCustomers: satisfiedCustomersData
};

const jsonData = JSON.stringify(data); // Convert the object to JSON format

fs.writeFile('data.json', jsonData, () => {
  console.log('Data written to the file.');
});
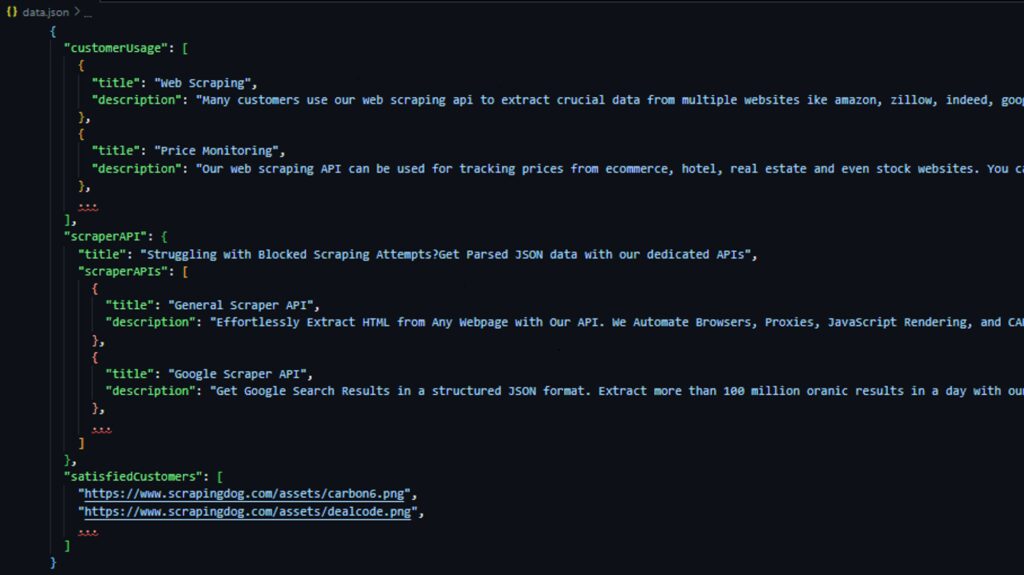
First, you need to create a JavaScript object to hold all the scraped data. Then, you can convert that object into JSON format using JSON.stringify(). The writeFile function takes three arguments: the filename, the data you want to write, and an optional function (called a callback) that gets executed after the writing is complete.
Here’s the JSON data stored in a data.json file:
Putting it all together
					import fetch from 'node-fetch';
import cheerio from 'cheerio';
import fs from 'fs';

async function customerUsage(url) {
    const response = await fetch(url);
    const html = await response.text();
    const $ = cheerio.load(html);
    const customerUsageData = [];

    $('.landing-overview div').each((index, element) => {
        const titleElement = $(element).find('h3');
        const title = titleElement.text().trim();

        if (titleElement.length && title.length > 0) {
            const descriptionElement = $(element).find('p');
            const description = descriptionElement.text().trim();

            customerUsageData.push({ title, description });
        }
    });

    return customerUsageData;
}

async function scraperAPI(url) {
    const response = await fetch(url);
    const html = await response.text();
    const $ = cheerio.load(html);
    const scraperAPIs = [];

    const title = $('.hero-title').text().trim();
    $('.col').each((index, element) => {
        const api = {};
        api.title = $(element).find('strong').text().trim();
        api.description = $(element).find('p').text().trim();
        scraperAPIs.push(api);
    });

    return { title, scraperAPIs };
}

async function satisfiedCustomers(url) {
    const response = await fetch(url);
    const html = await response.text();
    const $ = cheerio.load(html);

    const satisfiedCustomersData = [];

    $('div.interstitial-companies img').each((index, element) => {
        const relativePath = $(element).attr('src');
        const absolutePath = new URL(relativePath, url).href;
        satisfiedCustomersData.push(absolutePath);
    });

    return satisfiedCustomersData;
}

async function writeDataToJsonFile() {
    const url = '<https://www.scrapingdog.com/>';
    const customerUsageData = await customerUsage(url);
    const scraperAPIData = await scraperAPI(url);
    const satisfiedCustomersData = await satisfiedCustomers(url);

    const data = {
        customerUsage: customerUsageData,
        scraperAPI: scraperAPIData,
        satisfiedCustomers: satisfiedCustomersData
    };

    fs.writeFile('data.json', JSON.stringify(data, null, 2), (err) => {
        if (err) {
            console.error('Error writing JSON file:', err);
        } else {
            console.log('Data has been written to data.json');
        }
    });
}

writeDataToJsonFile();
As shown here, Node.js web scraping allows you to download and parse HTML web pages, extract their data, and convert it into a structured JSON format – all with the help of libraries like Cheerio and node-fetch.
Finally, launch your web scraper with:
npm run start
Handling Exceptions and Errors
Your requests can sometimes fail for a variety of reasons, including small errors within the fetch() function, internet connectivity issues, server errors, and so on. You need a way to handle or detect these errors.
You can handle runtime exceptions by adding catch() at the end of the promise chain. Let’s add a simple catch() function to the code:
					fetch(url)
  .then(response => response.json())
  .then(data => console.log('Data:', data))
  .catch(error => console.error('Error:', error));
It is not recommended to ignore and print errors, but instead, have a mechanism to handle them effectively. One way to ensure failed requests throw an error is to check the HTTP status of the server’s response.
If the status code doesn’t indicate success (codes outside the 2xx range), you can throw an error, and .catch() will catch it. You can use the ok field of Response objects, which equals true if the status code is in the 2xx range.
					fetch(url)
  .then(res => {
    if (res.ok) {
      return res.json();
    } else {
      throw new Error(`The HTTP status of the response: ${res.status} (${res.statusText})`);
    }
  })
  .then(data => {
    console.log('Data:', data);
  })
  .catch(error => {
    console.error('Error:', error);
  });
					async function customerUsage(url) {
  return fetch(url)
    .then(response => {
      if (!response.ok) {
        throw new Error('Network response was not ok');
      }
      return response.text();
    })
    .then(html => {
      const $ = cheerio.load(html);
      const customerUsageData = [];

      $('.landing-overview div').each((index, element) => {
        const titleElement = $(element).find('h3');
        const title = titleElement.text().trim();

        if (titleElement.length && title.length > 0) {
          const descriptionElement = $(element).find('p');
          const description = descriptionElement.text().trim();

          customerUsageData.push({ title, description });
        }
      });

      return customerUsageData;
    })
    .catch(error => {
      console.error('There was a problem with the fetch operation:', error);
    });
}
The code uses fetch(URL) to make an asynchronous HTTP request to the specified URL. It returns a Promise that resolves to the response. The .then() method is chained to handle the response. Inside this block, the status code is checked using response.ok. If the status code isn’t in the 200-299 range (success), an error is thrown.
Following the .then() block, the .catch() method catches any errors during the fetch or subsequent Promise chain. If an error occurs, this block logs it to the console using console.error().
Avoiding Blocks
Note that, websites often implement anti-scraping measures to prevent unauthorized data collection. A common method involves blocking requests that lack a valid User-Agent HTTP header and the use of proxies. To bypass these anti-bot mechanisms, ensure you use a real user agent and proxies.
For example, Node-Fetch includes the following user-agent in the request it sends:
"User-Agent": "node-fetch"
This user agent identifies requests made by the Node-Fetch library, which makes it easy for websites to block scraping.
Setting a fake user-agent in Node-Fetch is simple. You can create an options object with the desired user-agent string in the headers parameter and pass it to the fetch request.
					const options = {
  method: "GET",
  headers: {
    'User-Agent': 'Mozilla/5.0 (Windows NT 6.3; WOW64) AppleWebKit/537.36 (KHTML, like Gecko) Chrome/38.0.2125.111 Safari/537.36'
  }
};
					import fetch from 'node-fetch';

(async () => {
    const url = '<http://httpbin.org/headers>';
    const options = {
        method: 'GET',
        headers: {
            'User-Agent': 'Mozilla/5.0 (Windows NT 6.3; WOW64) AppleWebKit/537.36 (KHTML, like Gecko) Chrome/38.0.2125.111 Safari/537.36'
        }
    };

    try {
        const response = await fetch(url, options);
        const data = await response.json();
        console.log(data);

    } catch (error) {
        console.log('error', error);
    }

})();
Using proxies with the Node-fetch library allows you to distribute your requests over multiple IP addresses, making it harder for websites to detect and block your web scrapers.
However, Node-fetch does not natively support proxies. There is a workaround, though: you need to integrate a proxy server using the HTTPS-proxy-agent library. Install it using the command below:
npm install https-proxy-agent
Once installed, you need to create a proxy agent using HttpsProxyAgent and pass it into your fetch request using the agent parameter.
					import fetch from 'node-fetch';
import { HttpsProxyAgent } from 'https-proxy-agent';

(async () => {
    const targetUrl = '<https://httpbin.org/ip?json>';
    const proxyUrl = '<http://20.210.113.32:80>';

    const agent = new HttpsProxyAgent(proxyUrl);
    const response = await fetch(targetUrl, { agent });
    const data = await response.text();

    console.log(data);
})();
Depending on your specific needs, setting up a Node-fetch proxy may not be enough to avoid being blocked. If you make too many requests from the same IP address, you could get blocked or banned.
One way to avoid this is by rotating proxies, which means each request will appear to come from a different IP, making it difficult for websites to detect. However, manually rotating proxies has its drawbacks. You will need to create and maintain an updated list yourself.
Also, when you are setting user-agents to your scraper, the same principle applies!
Scrapingdog simplifies web scraping. You no longer need to manually configure proxy rotation using open-source libraries which are less updated. Scrapingdog handles all of this for you with its user-friendly web scraping API. It takes care of rotating proxies, headless browsers, and CAPTCHAs, making the entire process effortless.

