TL;DR
- Node-Unblocker: Node.js proxy middleware for
Expressthat routes scraping traffic via a proxy; good for basic logins / AJAX, not Google / Facebook. - Set up locally, deploy to
Heroku, then route requests through your proxy client. - Limits: no
OAuth/postMessage; big sites often fail; scaling a proxy fleet is heavy. - For production scale, use Scrapingdog’s network; first 1,000 requests free.
In this blog, we will be using Node Unblocker for web scraping, and at the end, we are going to host our server on the Heroku app.
As you know, proxies and VPNs are used to make your web browsing safe and secure against common network threats. Once you switch on your VPN your traffic will pass through some random IP which helps in keeping your identity safe by hiding your IP and country of origin.
Various VPNs can also be used for accessing websites that are either geo-restricted or banned by your central government.
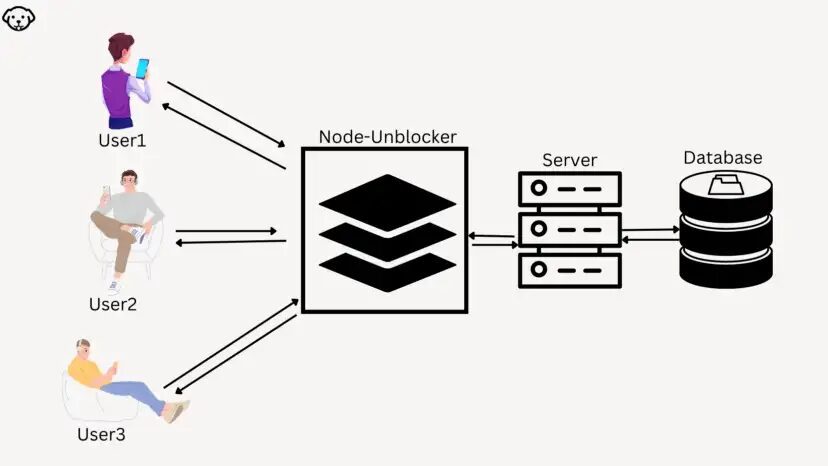
But how can you use this functionality in an API while web scraping? To overcome this hurdle you can use node-unblocker for web scraping. Node-unblocker can unlock rate-limiting doors of any website.
No matter what website you are trying to scrape, node-unblocker will add a layer to pass all the incoming requests through a proxy. This helps in scraping websites without getting blocked.
Web Scraping using node-unblocker has some advantages and disadvantages. In this post, we will first learn how we can use it, and then we’ll analyze its pros and cons.
What is node-unblocker & how to access blocked sites without restrictions with it?
Well, it is a kind of web proxy designed in Nodejs which can be used in the Express framework to bypass every incoming request through a proxy. They claim to be the fastest proxy available in the market today.
If you want to scrape something behind the login wall or if you want to scrape websites using AJAX calls for data rendering then this proxy can do wonders for you but if your target website is Facebook or Google then this proxy will not work.
Read more: How To Scrape Data Behind Authentication Using Python
But the overall impression of node-unblocker is that it can increase the rate limit (I would not say remove the rate limit). Let’s see how we can implement this in our express API.
How to use node-unblocker?
I am assuming that you have already installed Nodejs and npm on your computer. Then create a folder and install the required libraries.
					mkdir playground
npm i unblocker express --save
Using the express framework we will be able to setup up a web server and using unblocker we can send an anonymous request to our target websites. Create a file inside this folder by any name you like.
I will be using unblocker.js. Let’s build a sample web server step-by-step.
					var express = require('express')
var Unblocker = require('unblocker');
We have created a function reference using require of express and unblocked.
					var app = express();
var unblocker = new Unblocker({prefix: '/proxy/'});
Now, we have created express and unblocker instances. Unblocker provides you with multiple config options like:
- clientScripts — It is a boolean through which you can inject Javascript.
- requestMiddleware — It is an array of functions that are used for processing the incoming request before sending it to the host server.
As of now, we will only use the prefix property of unblocker. Currently, we have set the prefix as /proxy/ and this is the path where we can access the proxy.
Now, to mount the middleware at the specified path we will use app.use() function.
app.use(unblocker);
Now, let’s use listen() function to listen to the incoming connection on a specified host and port.
app.listen(process.env.PORT || 8080).on('upgrade', unblocker.onUpgrade);
Now, the server will run on a PORT address provided by the environment variable and by default on 8080. We have used an upgrade handler to proxy every websocket connection.
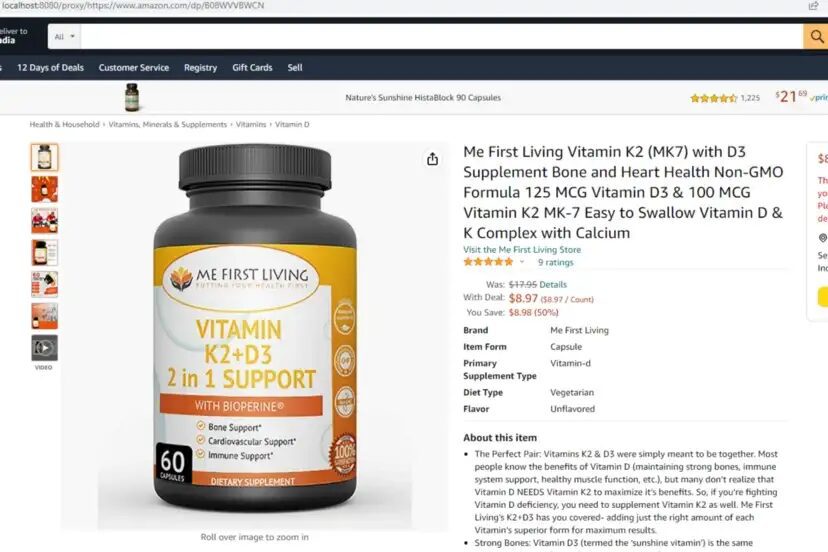
Let’s run this by passing a sample target URL from amazon.com.
node unblocker.js
Once your server is up and ready open this URL on your browser or POSTMAN.
http://localhost:8080/proxy/https://www.amazon.com/dp/B08WVVBWCN
This will open an Amazon page and the Amazon server will see the IP address of your node-unblocker server.
Since you are running on a local machine then the IP will not change but once you have hosted it on some VPS then you can use it as a proxy server.
Complete Code
In this code, you can make a few changes to make it more production ready. But so far the code will look like this.
					var express = require('express')
var Unblocker = require('unblocker');
var app = express();
var unblocker = new Unblocker({prefix: '/proxy/'});


app.use(unblocker);


app.listen(process.env.PORT || 8080).on('upgrade', unblocker.onUpgrade);
Node-Unblocker Proxy Network
I hope you have got an idea of how node-unblocker really works. Now, what if you want to use it for commercial purposes? Well for that you have to host a bunch of node-unblocker servers and through that, you have to pass all the incoming traffic.
Let’s host one node-unblocker server on Heroku and then use it as a proxy server.
Deploy node-unblocker on Heroku
Before you start you have to do two things.
- Sign up on Heroku.
- Install Heroku CLI.
Before deploying the code on the server we have to configure package.json file. This will help Heroku to install and run necessary things.
					{
  "name": "play",
  "version": "1.0.0",
  "description": "",
  "main": "unblocker.js",
  "engines": {
    "node": "14.x"
  },
  "scripts": {
    "test": "echo \"Error: no test specified\" && exit 1",
    "start": "node unblocker.js"
  },
  "author": "",
  "license": "ISC"
}
We have made two changes in our package.json file.
- We have added an engines object which will help Heroku identify which version of the node needs to run.
- Another thing that we have added is the start tag. This will help Heroku to start the main file.
We have to create a .gitignore file with which we can avoid sending unnecessary folders to the server
					!node_modules/

node_modules/*
!node_modules/module-a/
Once you sign up for Heroku you have to create an app. I have named it as play-unblocker.
Now, we can use the below steps to push our code to the Heroku server.
heroku login
heroku login command will help us to identify our identity to Heroku.
Now, we will initialize the git repository in the directory where our play-unblocker server is located. The second step will be to set the Heroku remote to the app we created in our Heroku dashboard. In our case it is play-unblocker.
Now, the only part left is to push the code to the server.
					git add .
git commit -am "first deploy"
git push heroku master
Once you deploy your server, you will be able to access your app at https://play-unblocker.herokuapp.com/proxy/https://scrapingdog.com/. Any URL you pass after the proxy will pass through a proxy layer.
Since everything is set now, we can create a nodejs script where we will use this server as a proxy.
Using Node-Unblocker as a Proxy for Web Scraping
We’ll use unirest for making the GET HTTP request to the target website. You can install unirest like this.
npm i unirest --save
Let’s write a basic script to use the above server as a proxy.
					var unirest = require('unirest');


async function test(){
  let data = await unirest.get('https://play-unblocker.herokuapp.com/proxy/https://www.amazon.com/')
  console.log(data)
  return 1
}


let scraped_data = test()
Once you run this code you will get the HTML data of your target website.
Limitations of Node-Unblocker
As far as the setup is concerned then node-unblocker gets ten on ten but if you want to use it as the stand-alone proxy for your scraping projects then according to me it’s a big NO.
Running a scraper smoothly requires extensive background checks on the proxy pool as well as the data stream. Let’s check what its limitations are in detail.
Bypassing OAuth
Node-Unblocker will not work with pages using OAuth forms. On top of that, it won’t work with any page which supports postMessage method as well. So, you can only use it with normal login forms and AJAX content.
Read More: How To Scrape Data Behind OAuth Wall using Python
Not Capable of big websites
Websites like Amazon, Google, Facebook, etc will not work with node-unblocker. If you try to scrape it there will be no TCP connection. These websites will either throw a captcha or it will end the connection right at the beginning.
Even if you can scrape a website with node-unblocker then the biggest question will be the number of proxies and their maintenance. Since you will need a large pool of proxies for scraping you will not create millions of servers as we created above. This will increase the cost of maintenance multi-fold.
Maintaining a large proxy cluster is always a headache so in place of that, you can use Scrapingdog’s Scraping API which provides you with millions of proxies at a very economical cost.
Scrapingdog will handle all the hassle and deliver the data in a seamless manner. You can take a trial where the first 1,000 requests are on us. Using this service you can scrape any website without restriction.
Here are Some Key Takeaways:
The guide explains how to use a Node.js unblocker solution to bypass basic bot protections and access web pages that block automated requests.
It shows how an unblocker can help make your scraping requests appear more like a real browser by rotating IPs, headers, and other request attributes.
You learn how to integrate the unblocker with your Node.js scraping scripts so you can fetch content from sites that otherwise deny bots.
The tutorial covers how to handle common scraping challenges like captchas, rate limits, and server blocks using the unblocker.
Using an unblocker makes web scraping more reliable and helps you collect data at scale from sites with basic anti-bot defenses.
Conclusion
Similarly, you can create more servers like this and then use it as a proxy pool in your scraping script. You can rotate these servers on every new request so that every incoming request will pass through a new IP.
Node-Unblocker will act as a backconnect proxy and you need millions of them if you want to scale some websites at scale. Obviously, you won’t host millions of servers to create your own proxy pool.
I hope now you have a good idea of what node-unblocker is and how it can be used in your node server.
Please do share this blog on your social media platforms. Let me know if you have any scraping-related queries. I would be happy to help you out.
Additional Resources
Here are a few additional resources that you may find helpful during your web scraping journey: