In this post, we will learn how to use Python to scrape data behind an authentication wall.
We will discuss various methods of authentication and how to use Python to scrape the data behind that auth wall.
Is it even possible to scrape data that is behind the login wall?
Yes, you can definitely scrape that data but to be honest the method is not so simple and straightforward. If you are a beginner then you should have a basic understanding of how web scraping with Python works.
You can also read a guide on web scraping with Python and Selenium to better understand the role of headless browsers when scraping a website protected by WAF.
Authentication Mechanism
There are several common mechanisms through which authentication takes place. We will discuss all of them one by one. I will explain to you how websites using these methods for authentication can be scraped using Python.
What methods we are going to discuss?
- Basic Authentication
- CSRF Token Authentication
- WAF Authentication
Basic Authentication
The most basic form of authentication is the username/password combination. This is the most common method for logging into websites, and it can also be used to access APIs.
Usually, there is a GET or a POST API on the host website which is expecting a username and a password to let you access their portal.
Let’s understand this by an example. We are going to scrape httpbin.org for this example.
Example
requests library which will be used for making connections with the host website. Also, don’t forget to create a folder for this tutorial. After creating a folder you have to create a python file inside it.
mkdir auth-tutorial
After creating the folder you can install the requests library inside that using the below command.
pip install requests
Once this is done we are ready to write the Python code.
					import requests
from requests.auth import HTTPBasicAuth

# Define your credentials
username = 'user'
password = 'password'

# URL of the httpbin endpoint that requires Basic Authentication
url = 'https://httpbin.org/basic-auth/web/scraper'

# Send a GET request with Basic Authentication
response = requests.get(url, auth=HTTPBasicAuth(username, password))

# Check if the request was successful (status code 200)
if response.status_code == 200:
    print('Authentication successful!')
    # Print the response content
    print(response.text)
else:
    print(f'Authentication failed. Status code: {response.status_code}')
I know I know you must be wondering why I have written complete code at once. Well, let me explain the code step by step.
- We import the
requestslibrary to make HTTP requests to the website. - The
HTTPBasicAuthclass fromrequests.authis used to provide Basic Authentication credentials. - You define your username and password. In this example, we use ‘web’ and ‘scraper’ as placeholders. Replace them with your actual credentials.
- Then we define the URL of the website you want to scrape. In this case, we’re using the “httpbin” service as an example, which supports Basic Authentication.
- We use the
requests.get()method to send a GET request to the specified URL. - The
authparameter is used to provide Basic Authentication credentials. We pass theHTTPBasicAuthobject with the username and password. - We check the HTTP status code of the response. A status code of 200 indicates a successful request.
- If the authentication is successful, it prints a success message and the response content, which may include user information.
- If authentication fails or if the status code is not 200, it prints an authentication failure message.
Scraping websites with CSRF token Protection
CSRF is a popular authentication protocol that provides an extra layer of protection from bots and scrapers. This is the protocol that’s used by sites like Github and Linkedin to allow users to log in with their existing accounts. You’ll need to obtain these tokens through the login pageand use them in your requests.
You have to send that token along with your Python request in order to log in. So, the first step is to find this token.
There is one question that you should ask yourself before proceeding and the question is how to identify if the website uses CSRF tokens. Let’s find the answer to this question first and then we will proceed with Python coding.
We will scrape GitHub in this example. We can take LinkedIn instead but their login process expects too many details. So, we are going to scrape github.com. Now, coming back to the question, how to identify if the website is using a CSRF token for login?
Well CSRF protection is often implemented using tokens that are included in forms. Inspect the HTML source code of web pages and look for hidden input fields within forms. These hidden fields typically contain the CSRF tokens. Open https://github.com/login and then click inspect by right-clicking on the mouse.

This proves that GitHub uses csrf token for login. Now, let’s see what happens in the Network tab when you click Sign in button(keep the username and password box empty). You will definitely see a POST request to this /session endpoint. This is our target endpoint.
Once you click the sign-in button, in the headers section you will find a POST request was made to this https://github.com/session.

Now, let’s see what payload was being passed in order to authenticate the user.
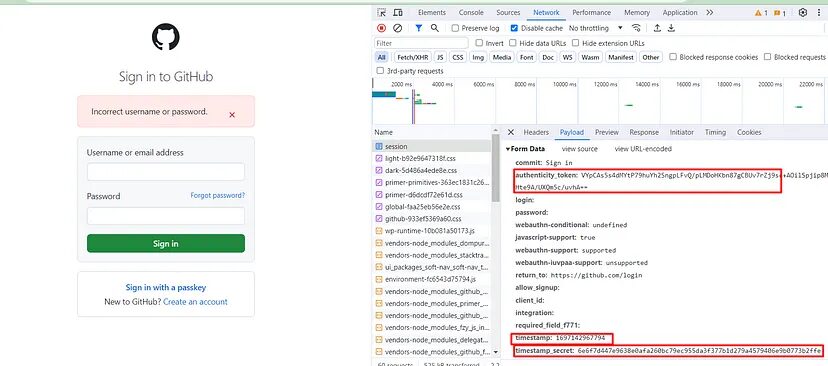
You can see that multiple payloads are being passed to authenticate the user. Now, of course, we need this token in order to log in but we cannot open this network tab again and again once the session expires. So, we have to establish a process that can extract this token automatically. I mean not just the token but other payloads as well. But the question is how.
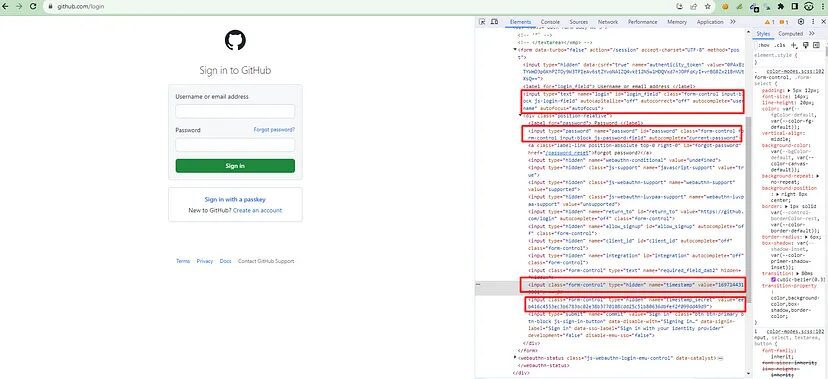
The answer to this question lies in the HTML source code of the login page. Let’s jump back to the HTML code of the login page.
This proves that GitHub uses csrf token for login. Now, let’s see what happens in the Network tab when you click Sign in button(keep the username and password box empty). You will definitely see a POST request to this /session endpoint. This is our target endpoint.
Once you click the sign-in button, in the headers section you will find a POST request was made to this https://github.com/session.
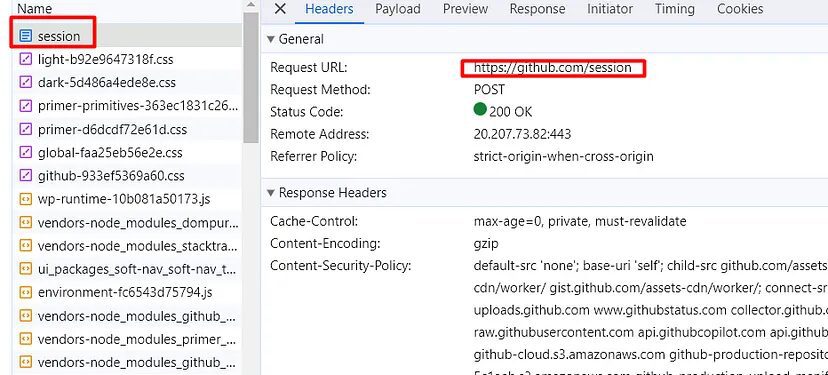
Now, let’s see what payload was being passed in order to authenticate the user.
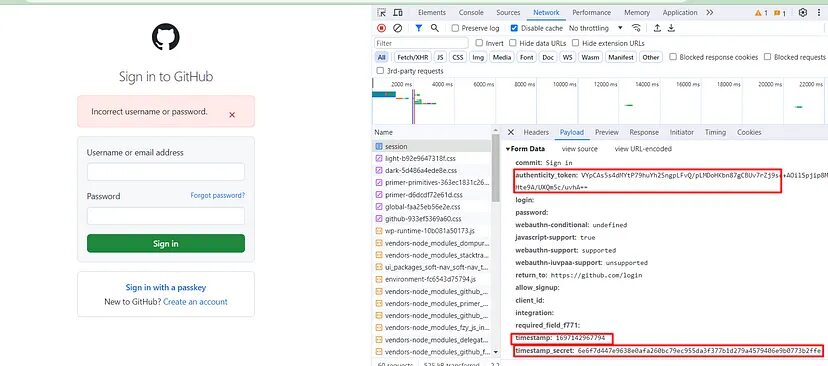
You can see that multiple payloads are being passed to authenticate the user. Now, of course, we need this token in order to log in but we cannot open this network tab again and again once the session expires. So, we have to establish a process that can extract this token automatically. I mean not just the token but other payloads as well. But the question is how.
The answer to this question lies in the HTML source code of the login page. Let’s jump back to the HTML code of the login page.
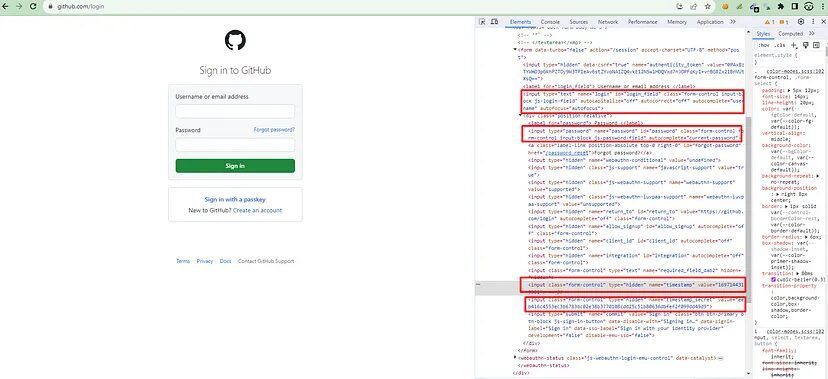
You can see that the values of timestamp, timestamp_secret and csrf token are already in the HTML source code. All we have to do is scrape this login page and extract all this payload information using BeautifulSoup. Let’s do that.
Before writing the code you have to install beautifulsoup. You can do it like this.
pip install beautifulsoup4
Let’s code now.
					import requests
from bs4 import BeautifulSoup

url = 'https://github.com/login'

# Send a GET request
resp = requests.get(url)
soup=BeautifulSoup(resp.text,'html.parser')

# Check if the request was successful (status code 200)
if resp.status_code == 200:
    csrf_token = soup.find("input",{"name":"authenticity_token"}).get("value")
    timestamp = soup.find("input",{"name":"timestamp"}).get("value")
    timestamp_secret = soup.find("input",{"name":"timestamp_secret"}).get("value")
else:
    print(f'Authentication failed. Status code: {resp.status_code}')


print("csrf token is ", csrf_token)
print("timestamp is ", timestamp)
print("timestamp secret is ", timestamp_secret)
As you can see in the above image every payload is located inside an input field with name attribute. So, we extracted each of these data using .find() method provided by BS4. Amazing, isn’t it?
Now, only one thing is left and that is to make the POST request to /session using our actual username and password.
					import requests
from bs4 import BeautifulSoup
session = requests.Session()

url = 'https://github.com/login'

# Send a GET request
resp = session.get(url)
soup=BeautifulSoup(resp.text,'html.parser')

# Check if the request was successful (status code 200)
if resp.status_code == 200:
    csrf_token = soup.find("input",{"name":"authenticity_token"}).get("value")
    timestamp = soup.find("input",{"name":"timestamp"}).get("value")
    timestamp_secret = soup.find("input",{"name":"timestamp_secret"}).get("value")
else:
    print(f'Authentication failed. Status code: {resp.status_code}')


payload={"login":"your-username","password":"your-password","authenticity_token":csrf_token,"timestamp":timestamp,"timestamp_secret":timestamp_secret}
print(payload)
head = {"User-Agent":"Mozilla/5.0 (Windows NT 10.0; Win64; x64) AppleWebKit/537.36 (KHTML, like Gecko) Chrome/117.0.0.0 Safari/537.36","Content-Type":"application/x-www-form-urlencoded"}

resp = session.post('https://github.com/session', data=payload, headers=head)
print(resp.url)
print(resp.status_code)
Here I have created a payload object where all the information like username, password, csrf token, timestamp and timestamp_secret are stored.
Then I created a headers object in order to make this request look legit. You can pass other headers as well but I am passing User-Agent and Content-Type.
Then finally I made the POST request to the /session endpoint. Once you run this code you will get this.
As you can see we are currently on github.com and the status code is also 200. That means we were successfully logged in. Now, you can scrape GitHub repositories and other stuff.
Finally, we were able to scrape a website that supports csrf authentication.
Scraping websites with WAF protection
What is WAF Protection?
WAF acts as a protective layer over web applications, helping filter out malicious bots and traffic while preventing data leaks and enhancing overall security.
If a request contains payloads or patterns associated with common attacks (SQL injection, cross-site scripting, etc.), the WAF may return a 403 Forbidden or 406 Not Acceptable error.
These websites cannot be scraped with a combination of Requests and BeautifulSoup. WAF protected websites require a headless browser because we have to fill in username/email and password by typing to make it look legit. WAF is not a normal site protection and the success rate of scraping such websites is super low. But we will create a Python script through which you will be able to login to any such website with ease.
Requirements
In this case, we are going to use selenium. Selenium will be used to control the Chrome driver. Remember to keep the version of the chrome driver and your Chrome browser the same otherwise your script will not work.
You can install selenium like this.
pip install selenium
Scraping a website with Python
For this tutorial, we are going to scrape https://app.neilpatel.com/. It is a keyword finder tool.
- Create an account at https://app.neilpatel.com/
- Try to log in using selenium.
- Scrape the dashboard once logged in.
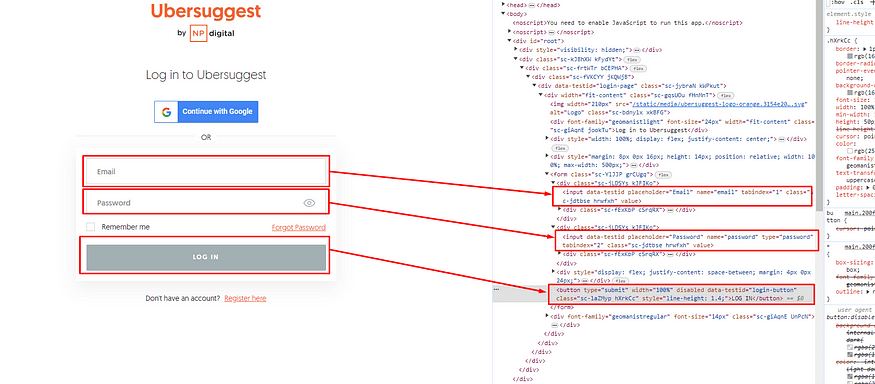
Using Selenium we first have to fill the email box then the password box and then click on the login button. Let’s code now.
					from selenium import webdriver
from selenium.webdriver.common.keys import Keys
import time
from bs4 import BeautifulSoup

PATH = 'C:\Program Files (x86)\chromedriver.exe'

# Set up the Selenium WebDriver
options = webdriver.ChromeOptions()
options.add_argument("--headless")
driver = webdriver.Chrome(executable_path=PATH, options=options)
- Import Necessary Libraries- The code begins by importing the required libraries, including
seleniumfor web automation using a WebDriver, andtimefor adding pauses. - Set Up Selenium WebDriver- The code sets up a Selenium WebDriver for Chrome. It specifies the path to the ChromeDriver executable (replace ‘C:\Program Files (x86)\chromedriver.exe’ with the actual path on your system) and configures the WebDriver to run in headless mode (without a visible browser window).
driver.get("https://app.neilpatel.com/en/login")
The WebDriver navigates to the login page of the website using driver.get(). In this example, it navigates to “https://app.neilpatel.com/en/login,” which is the login page for Neil Patel’s platform (you could replace it with the URL of your target website).
					email = driver.find_element_by_name("email")
password = driver.find_element_by_id("password")
email.send_keys("place-your-email-here")
password.send_keys("place-your-password-here")
driver.find_element_by_css_selector('button[data-testid="login-button"]').click()
The code uses driver.find_element_by_name() and driver.find_element_by_id() to locate the email and password input fields, respectively. It then simulates typing an email and password into these fields.
Then finally the code finds the login button using a CSS selector with the attribute [data-testid="login-button"]. It then simulates clicking on this button to submit the login form.
time.sleep(5)
A pause of 5 seconds (time.sleep(5)) is added to allow the login process to complete successfully.
driver.get("https://app.neilpatel.com/en/ubersuggest/keyword_ideas?ai-keyword=waf&keyword=scraping&lang=en&locId=2356&mode=keyword")
After logging in, the WebDriver navigates to a protected page. In this example, it goes to “https://app.neilpatel.com/en/ubersuggest/keyword_ideas?ai-keyword=waf&keyword=scraping&lang=en&locId=2356&mode=keyword,” which appears to be a specific URL within Neil Patel’s platform. You should replace it with the URL of the protected page you want to scrape.
					time.sleep(2)
if "https://app.neilpatel.com/en/ubersuggest/keyword_ideas?ai-keyword=waf&keyword=scraping&lang=en&locId=2356&mode=keyword" in driver.current_url:
    print("Login successful")
else:
    print("Login failed")
After opening the protected page, I check the URL of the current page to make sure we are logged in successfully.
					driver.get("https://app.neilpatel.com/en/ubersuggest/keyword_ideas?ai-keyword=waf&keyword=scraping&lang=en&locId=2356&mode=keyword")

# Extract data from the protected page
soup = BeautifulSoup(driver.page_source, 'html.parser')


print(soup)

# Close the browser
driver.quit()
The code uses BeautifulSoup to parse the HTML content of the protected page and store it in the soup variable. In this example, it prints the entire parsed HTML to the console. You can modify this part to extract specific data from the page as needed.
Finally, the WebDriver is closed using driver.quit() to clean up resources.
Once you run this code you should be able to see Login Successful written on your cmd along with its raw HTML code. Further, you can use .find() functions of BS4 to extract specific information.
So, we were able to scrape a WAF-protected website as well.
Conclusion
In this article, we understood how we can scrape data using Basic Authentication, CSRF tokens, and WAF-protected websites. Of course, there are more methods but these are the most popular ones.
Now, you can of course use logged-in cookies from these websites and then pass them as headers with your request but this method can get your data pipeline blocked.
For mass scraping, you are advised to use web scraping APIs like Scrapingdog which will handle proxies and headless browsers for you. You just need to send a GET request to the API and it will provide you with the data.
If you like this then please share this article on your social media channels. You can follow us on Twitter too. Thanks for reading!
Additional Resources
And there’s the list! At this point, you should feel comfortable writing your first web scraper to gather data from any website. Here are a few additional resources that you may find helpful during your web scraping journey:
- How To Scrape Data Behind Authentication & Extract LinkedIn Profiles using Python
- How To Scrape LinkedIn Jobs and Extract Data Behind Authentication using Python
- How to Use A Proxy with Python Requests
- How to Send a Post Request with Python
- Web Scraping with XPath & Python
- BeautifulSoup Tutorial: Web Scraping
- Know the Best Python Web Scraping Libraries
