TL;DR
- Build a Scrapy spider (Lonely Planet demo) with CLI args to crawl “experiences” and yield items.
- Add a custom downloader middleware to route requests via Scrapingdog rotating proxies (basic auth) to beat CAPTCHAs / blocks.
- Export with
-otoCSV/JSON/XML. - Tips: use SelectorGadget / DevTools for selectors; respect
robots.txtand pacing.
Scrapy is one of the most powerful web scraping frameworks in Python, but the moment you point it at a real-world website, you’ll hit a wall. CAPTCHAs, IP bans, and rate limiting can stop your spider dead in its tracks within the first few requests.
In this tutorial, you’ll learn how to build a Scrapy spider from scratch, integrate web scraping APIs to bypass CAPTCHAs, and export your scraped data to CSV, JSON, or XML, that too all in under 50 lines of Python code.
For this walkthrough, we’ll scrape data from the lonelyplanet, which is a travel guide website. Specifically, the experiences section. We’ll extract this data and store it in various formats such as JSON, CSV, and XML. The data can then be analyzed and used to plan our next trip!
Here’s what we’ll cover:
- What Scrapy is and why it’s the right tool for large-scale scraping
- How to set up a Scrapy project and write your first spider
- How to configure a scraping API to beat CAPTCHAs
- How to export scraped data to CSV, JSON, and XML
What’s Scrapy and Why Should I Use It
Scrapy is a fast, high-level web crawling and scraping framework built for extracting structured data from websites at scale. It’s widely used across a range of applications, from data mining and price monitoring to automated testing and research.
What makes Scrapy stand out is its asynchronous architecture. It handles all your requests concurrently without requiring you to manage threads, processes, or synchronization manually. This makes it significantly faster than most custom-built crawlers. If you were building something similar from scratch, you’d either have to implement async logic yourself or rely on a third-party library. Scrapy gives you all of that out of the box, and it’s completely open-source.
Now that you have a solid understanding of Scrapy, let’s walk through how to build a crawler using Scrapy.
Setup
To get started, we’ll need to install the Scrapy library. Remember to separate your Python dependencies by using virtual environments. Once you’ve set up a virtual environment and activated it, run:
pip install scrapy
Next, head over to the ScrapingDog website and grab your API key. You’ll need this to access their CAPTCHA-solving service, which we’ll integrate into our spider later in this walkthrough.
Initializing the project
With the installation steps complete, you’re ready to set up the web crawler. Run the following command to initialize a new Scrapy project:
					scrapy startproject projectName
```

This generates a Scrapy project with the following structure:
```
├── scrapy.cfg
└── trips
    ├── __init__.py
    ├── items.py
    ├── middlewares.py
    ├── pipelines.py
    ├── settings.py
    └── spiders
        └── __init__.py
Next, create a new file inside the spiders folder and name it destinations.py. This file will contain the core logic for your web scraper.
Here’s what the initial source code in destinations.py looks like:
					from scrapy import Request, Spider

from ..items import TripsItem

class DestinationsCrawl(Spider):
    name = 'destinations'
    items = TripsItem()

    allowed_domains = ['lonelyplanet.com']
    url_link = 'https://www.lonelyplanet.com/europe/activities'
    start_urls = [url_link]

    def __init__(self, name, continent, **kwargs):
        self.continent = continent
        super().__init__(name=name, **kwargs)

    def start_requests(self):
        if self.continent:  # taking input from command line parameters
            url = f'https://www.lonelyplanet.com/{self.continent}/activities'
            yield Request(url, self.parse)
        else:
            for url in self.start_urls:
                yield Request(url, dont_filter=True)

    def parse(self, response):
        experiences = response.css("article.rounded.shadow-md")
        items = TripsItem()
        for experience in experiences:
            items["name"] = experience.css(
                'h2.text-xl.leading-tight::text').extract()
            items["experience_type"] = experience.css(
                'span.mr-4::text').extract()
            items["price"] = experience.css("span.text-green::text").extract()
            items["duration"] = experience.css(
                "p.text-secondary.text-xs::text").extract()
            items["description"] = experience.css(
                "p.text-sm.leading-relaxed::text").extract()
            items["link"] = (
                f'https://{self.allowed_domains[0]}'
                f'{experience.css("a::attr(href)").extract()[0]}'
            )
            yield items
The code might look like a lot at first glance, but don’t worry, we’ll walk through it step by step.
DestinationsCrawl(Spider)— Defines the spider class, inheriting Scrapy’s built-inSpiderfunctionality.name = 'destinations'— Unique identifier used to run the spider viascrapy crawl destinations.allowed_domains— Restricts crawling tolonelyplanet.comonly, blocking any external links.start_urls— The default URL the spider visits if no custom input is provided.__init__ — Accepts acontinentargument from the command line and stores it for later use.start_requests— Dynamically builds the target URL based on thecontinentargument, or falls back tostart_urlsif none is provided.parse— Core scraping method that extracts name, experience type, price, duration, description, and link from each listing on the page.TripsItem— A structured data container defined initems.pythat holds all the scraped fields for each record.yield items— Passes each scraped record to Scrapy’s pipeline for storage or further processing.
Web Scraping with Scrapy
Let’s walk through the full logic of the destinations.py file to understand how the spider works.
					class DestinationsCrawl(Spider):
    name = 'destinations'
    items = TripsItem()

    allowed_domains = ['lonelyplanet.com']
    url_link = 'https://www.lonelyplanet.com/europe/activities'
    start_urls = [url_link]

    def __init__(self, name, continent, **kwargs):
        self.continent = continent
        super().__init__(name=name, **kwargs)

    def start_requests(self):
        if self.continent:  # taking input from command line parameters
            url = f'https://www.lonelyplanet.com/{self.continent}/activities'
            yield Request(url, self.parse)
        else:
            for url in self.start_urls:
                yield Request(url, dont_filter=True)
The DestinationsCrawl class inherits from Scrapy’s Spider class and serves as the blueprint for our web scraper.
The name variable identifies the spider and is used when executing it from the command line. The url_link variable points to the default URL, while start_urls holds the list of URLs Scrapy uses to generate the initial requests.
We override the start_requests() method to accept a continent argument from the command line, making the spider dynamic. Instead of writing a separate scraper for every continent, you can simply pass the continent name as a parameter and the spider builds the target URL automatically.
Now let’s look at the core of the spider, the parse() method.
					def parse(self, response):
    experiences = response.css("article.rounded.shadow-md")
    items = TripsItem()
    for experience in experiences:
        items["name"] = experience.css(
            'h2.text-xl.leading-tight::text').extract()
        items["experience_type"] = experience.css(
            'span.mr-4::text').extract()
        items["price"] = experience.css("span.text-green::text").extract()
        items["duration"] = experience.css(
            "p.text-secondary.text-xs::text").extract()
        items["description"] = experience.css(
            "p.text-sm.leading-relaxed::text").extract()
        items["link"] = (
            f'https://{self.allowed_domains[0]}'
            f'{experience.css("a::attr(href)").extract()[0]}'
        )
        yield items
As Scrapy’s documentation describes, the parse() method is responsible for processing the response and returning scraped data and/or additional URLs to follow.
By identifying patterns in the page’s underlying HTML, we can automate data extraction. We use a browser extension like SelectorGadget or the browser’s built-in developer tools to inspect the page and identify the right elements. In this case, each destination is wrapped in an article element with the classes rounded and shadow-md, so response.css("article.rounded.shadow-md") retrieves all matching elements.
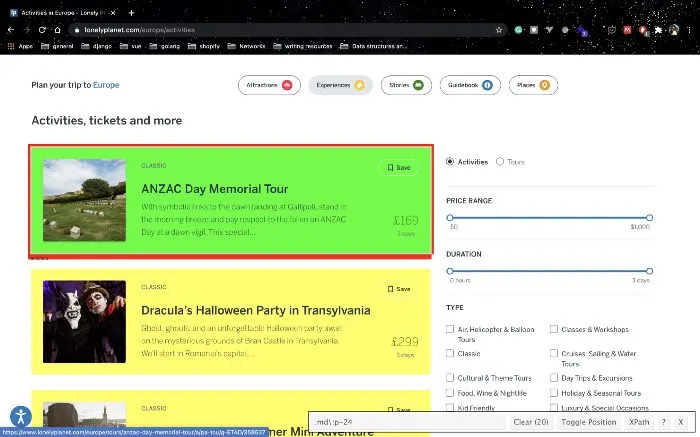
We then loop through each result, extracting the trip name, experience type, price, duration, description, and a full link to the listing page on Lonely Planet.
Before moving on, let’s take a quick look at the TripsItem class imported at the top of the script:
					import scrapy

class TripsItem(scrapy.Item):
    name = scrapy.Field()
    experience_type = scrapy.Field()
    description = scrapy.Field()
    price = scrapy.Field()
    duration = scrapy.Field()
    link = scrapy.Field()
TripsItem is a structured data container that holds all the scraped fields for each record. By mapping extracted values to these fields, Scrapy can automatically export the data in CSV, JSON, or XML format.
Running the Spider
To run the spider and export data in CSV format:
scrapy crawl destinations -a continent=asia -a name=asia -o asia.csv
The -a flag passes arguments to the spider’s __init__ method. These arguments are optional; you can also run the spider without them, and it will fall back to the default Europe URL:
scrapy crawl destinations -o europe.csv
For other output formats:
					scrapy crawl destinations -a continent=africa -a name=africa -o africa.json

scrapy crawl destinations -a continent=pacific -a name=pacific -o pacific.xml
Limitations of This Approach
While this setup works well for straightforward scraping tasks, it does have its limitations. Many websites employ aggressive bot-detection mechanisms, including IP-based rate limiting, browser fingerprinting, and CAPTCHA challenges, that can block your spider after just a few requests. Managing rotating proxies, handling CAPTCHAs, and mimicking real browser behavior adds significant complexity to your scraper. This is where a dedicated scraping API like ScrapingDog comes in. ScrapingDog handles all of this for you under the hood, rotating proxies, CAPTCHA solving, and JavaScript rendering, so you can focus on extracting data rather than fighting bot detection.
Integrating ScrapingDog with Scrapy
To integrate ScrapingDog with your Scrapy spider, you’ll need your ScrapingDog API key. If you haven’t grabbed one yet, head over to the ScrapingDog dashboard and sign up for a free account.
The integration is simple, instead of sending requests directly to your target URL, you route them through ScrapingDog’s API endpoint, which handles all the heavy lifting for you.
Start by creating a config.py file in the same directory as destinations.py to store your API key:
					# Don't commit this to version control.
# Use a tool like python-decouple and store sensitive data in a .env file.

API_KEY = 'your_scrapingdog_api_key'
Next, update your destinations.py to route requests through ScrapingDog’s API:
					from scrapy import Request, Spider
from ..items import TripsItem
from .config import API_KEY

class DestinationsCrawl(Spider):
    name = 'destinations'

    allowed_domains = ['lonelyplanet.com']
    url_link = 'https://www.lonelyplanet.com/europe/activities'
    start_urls = [url_link]

    def __init__(self, name, continent, **kwargs):
        self.continent = continent
        super().__init__(name=name, **kwargs)

    def _build_url(self, target_url):
        return f'https://api.scrapingdog.com/scrape?api_key={API_KEY}&url={target_url}&dynamic=false'

    def start_requests(self):
        if self.continent:
            target_url = f'https://www.lonelyplanet.com/{self.continent}/activities'
            yield Request(self._build_url(target_url), self.parse)
        else:
            for url in self.start_urls:
                yield Request(self._build_url(url), dont_filter=True)

    def parse(self, response):
        experiences = response.css("article.rounded.shadow-md")
        items = TripsItem()
        for experience in experiences:
            items["name"] = experience.css(
                'h2.text-xl.leading-tight::text').extract()
            items["experience_type"] = experience.css(
                'span.mr-4::text').extract()
            items["price"] = experience.css("span.text-green::text").extract()
            items["duration"] = experience.css(
                "p.text-secondary.text-xs::text").extract()
            items["description"] = experience.css(
                "p.text-sm.leading-relaxed::text").extract()
            items["link"] = (
                f'https://{self.allowed_domains[0]}'
                f'{experience.css("a::attr(href)").extract()[0]}'
            )
            yield items
The key change here is the _build_url() helper method, which wraps any target URL into a ScrapingDog API request. Setting dynamic=false is sufficient for pages that don’t require JavaScript rendering. If your target site is JavaScript-heavy, switch this to dynamic=true and ScrapingDog will handle the rendering for you.
With this integration in place, every request your spider makes is automatically routed through ScrapingDog’s infrastructure, giving you rotating proxies, CAPTCHA bypass, and bot detection evasion without any additional configuration on your end. You can now run the spider exactly as before:
scrapy crawl destinations -a continent=asia -a name=asia -o asia.csv
Key Takeaways
- Scrapy’s asynchronous architecture makes it faster and more efficient than custom-built crawlers.
- A well-structured Scrapy project separates logic across spiders, middlewares, pipelines, and settings for easier maintenance.
- Command-line arguments make your spider dynamic and reusable across multiple targets.
- CSS selectors combined with tools like SelectorGadget make data extraction straightforward.
- Scrapy’s
Itemcontainers ensure scraped data is consistently structured and export-ready. - Basic scraping without evasion leaves your spider exposed to IP bans, rate limiting, and CAPTCHAs.
- ScrapingDog handles rotating proxies, CAPTCHA bypass, and JavaScript rendering with minimal code changes.
Conclusion
Web scraping can be a great way to automate tasks or gather data for analysis. Scrapy and Beat Captcha can make this process easier and more efficient. With a little practice, anyone can learn to use these tools to their advantage.
In this article, we understood how we can scrape data using Python’s scrapy and the web scraping service.
Feel free to comment and ask our team anything. Our Twitter DM is open for inquiries and general questions.
Thank you for your time.
Additional Resources
And there’s the list! At this point, you should feel comfortable writing your first web scraper to gather data from any website. Here are a few additional resources that you may find helpful during your web scraping journey:

