In today’s blog, we’ll be diving into web scraping Google Search results, here we will use Python and BeautifulSoup to extract valuable information. We will make a Google Search scraper of our own that can automate the process of pulling organic data from search results. I have made a dedicated tutorial on BeautifulSoup for web scraping. Do check that out too after completing this article.
As we move forward, you will learn how to effectively scrape data from Google search results, gaining the ability to gather large amounts of data quickly and efficiently. Get ready as we unfold the steps to extract data from Google search results, transforming the vast ocean of information available into a structured database for your use. Additionally, if you are scraping Google search results for SEO, you should have some website optimization checklist already made with you to follow the process along the line.
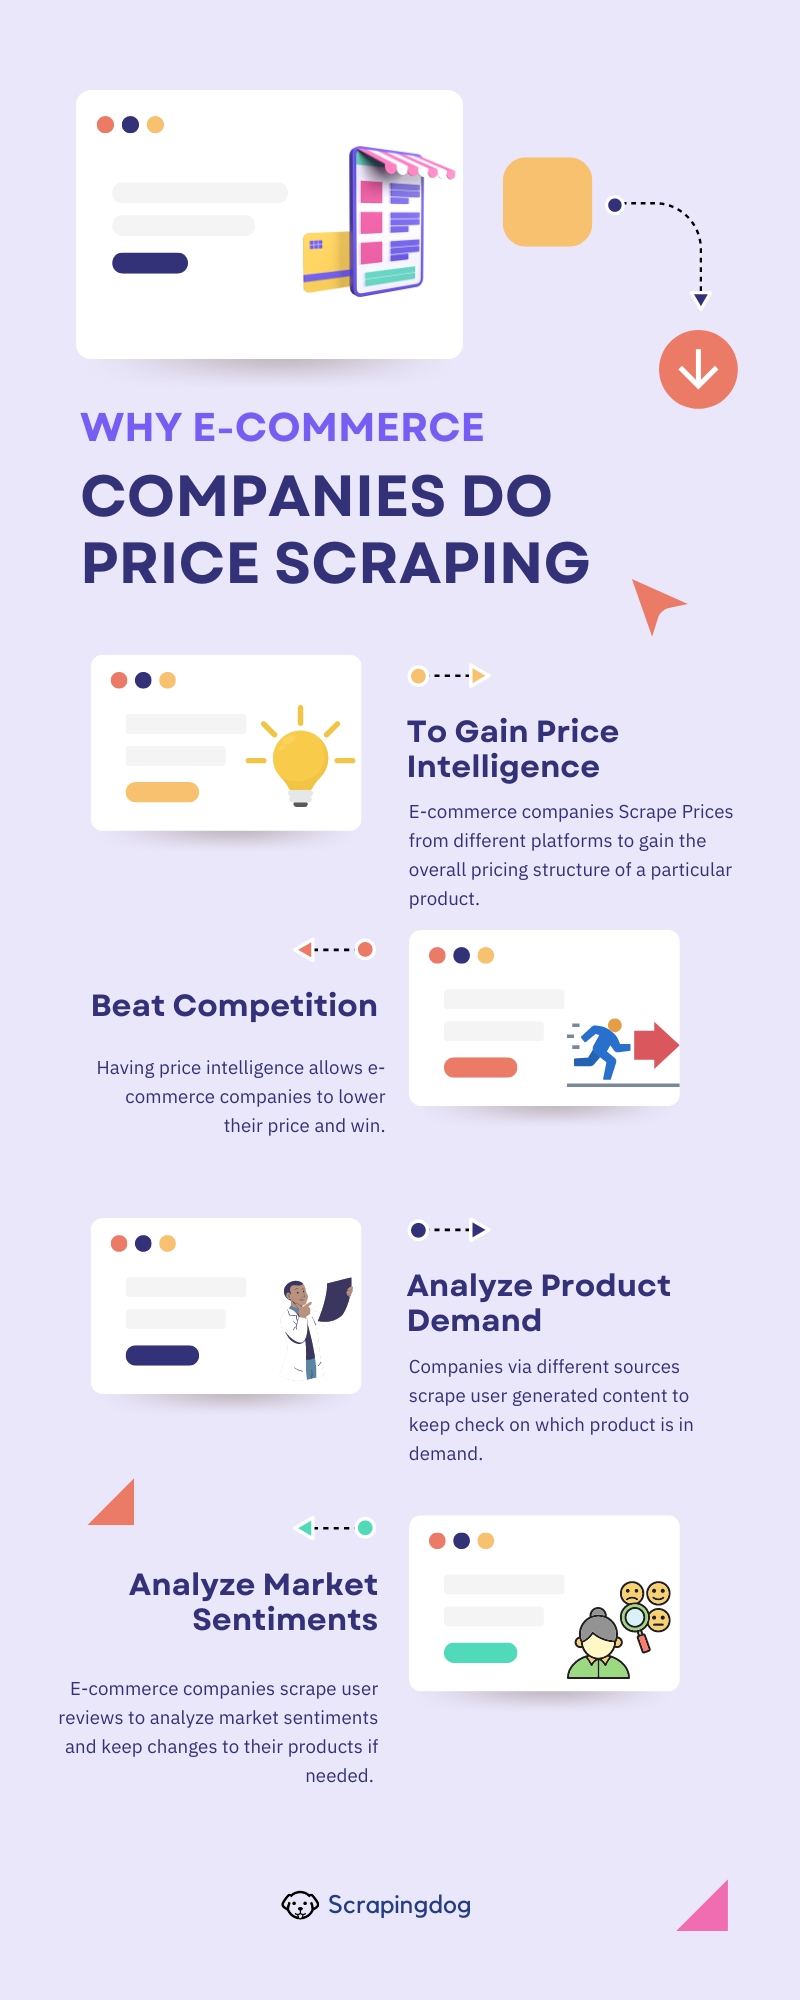
Use Cases of Scraping Google Search Results
Google Scraping can analyze Google’s algorithm and identify its main trends.
It can gain insights for Search engine optimization (SEO) — monitor how your website performs in Google for specific queries over some time.
It can analyze ad ranking for a given set of keywords.
SEO tools web scrape Google search results and design a Google search scraper to give you the average volume of keywords, their difficulty score, and other metrics.
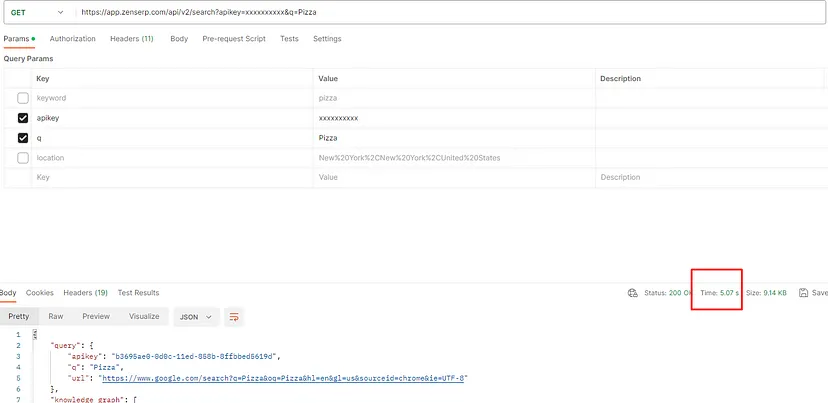
Also, if you are in a hurry and straight away want to extract data from Google Search Results. I would suggest you use Google Search Scraper API. The output you get is in JSON format.
Python is a widely used & simple language with built-in mathematical functions. Python for data science is one of the most demanding skills in 2023. It is also flexible and easy to understand even if you are a beginner. The Python community is too big and it helps when you face any error while coding.
Many forums like StackOverflow, GitHub, etc already have the answers to the errors you might face while coding when you scrape Google search results.
You can do countless things with Python but for now, we will learn web scraping Google search results with it.
Let’s Start Scraping Google Search Results with Python
In this section, we will be scraping Google search results using Python. Let’s focus on creating a basic Python script & designing a basic scraper that can extract data from the first 10 Google results.
What are we going to scrape?
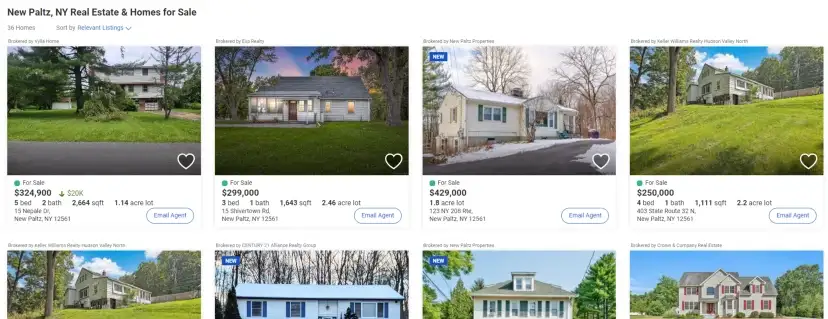
Google Search Result Page
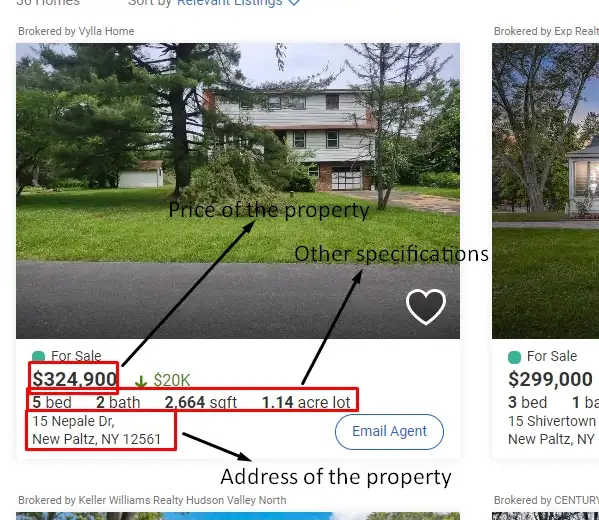
For this tutorial, we are going to scrape these 4 things.
Position of the result
Link
Title
Description
It is a good practice to decide this thing in advance.
Prerequisite to scrape Google search results
Generally, web scraping with Python is divided into two parts:
Fetching/downloading data by making an HTTP request.
Extracting essential data by parsing the HTML DOM.
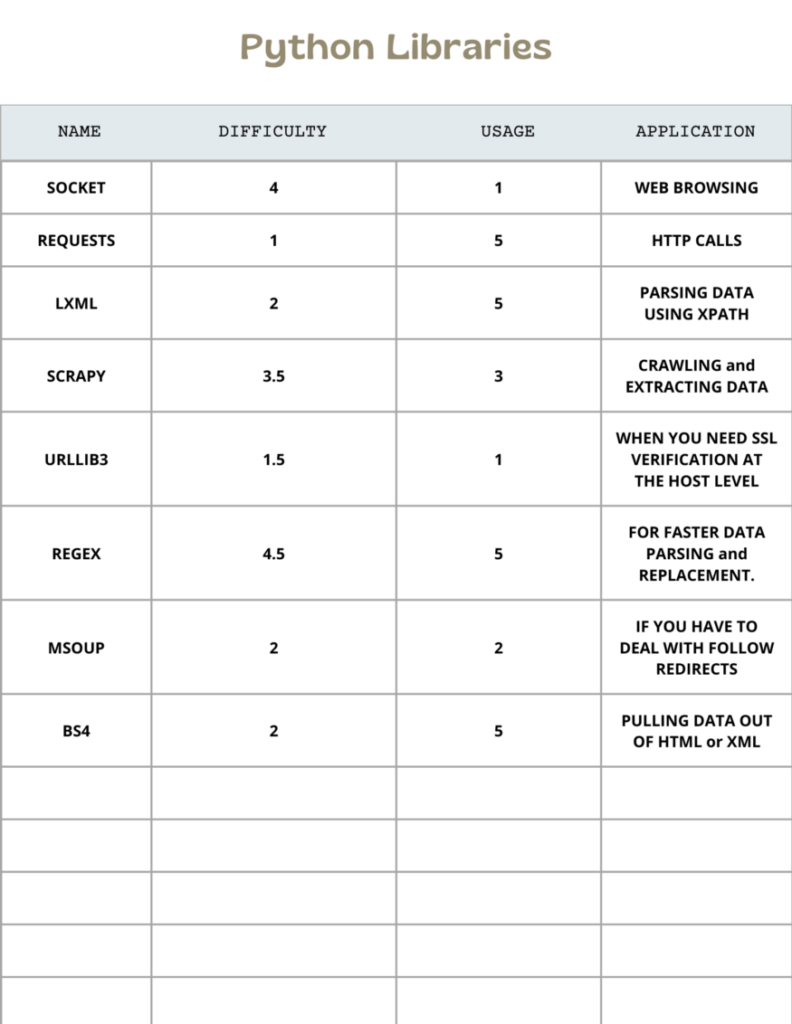
Libraries & Tools
Beautiful Soupis a Python library for pulling data out of HTML and XML files.
Requests allow you to send HTTP requests very easily.
Setup
Our setup is pretty simple. Just create a folder and install Beautiful Soup & requests. To create a folder and install libraries type below given commands in your command line. I am assuming that you have already installed Python 3.x.
Now, create a file inside that folder by any name you like. I am using google.py.
Import the libraries we just installed in that file.
from bs4 import BeautifulSoup
import requests
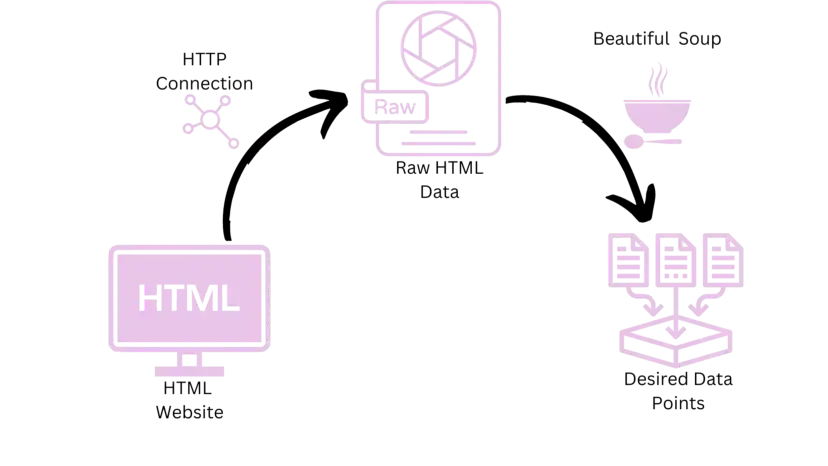
Preparing the Food
Now, since we have all the ingredients to prepare the scraper, we should make a GET request to the target URL to get the raw HTML data. We will scrape Google Search results using the requests library as shown below.
We will first try to extract data from the first 10 search results and then we will focus on how we can scrape country-specific results.
headers={'User-Agent':'Mozilla/5.0 (Windows NT 10.0; Win64; x64) AppleWebKit/537.36 (KHTML, like Gecko) Chrome/74.0.3729.169 Safari/537.36'}
url='https://www.google.com/search?q=pizza&ie=utf-8&oe=utf-8&num=10'
html = requests.get(url,headers=headers)
print(html.status_code)
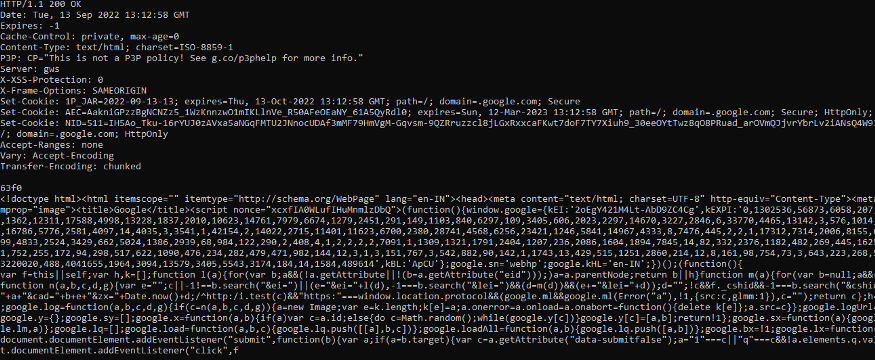
This will provide you with an HTML code for that target Google page. After running this code if you get a 200 status code then that means you have successfully scraped Google. With this our first step to download the raw data from Google is complete.
Our second step is to parse this raw HTML and extract the data as discussed before. For this step, we are going to use BeautifulSoup(BS4).
soup = BeautifulSoup(html.text, ‘html.parser’)
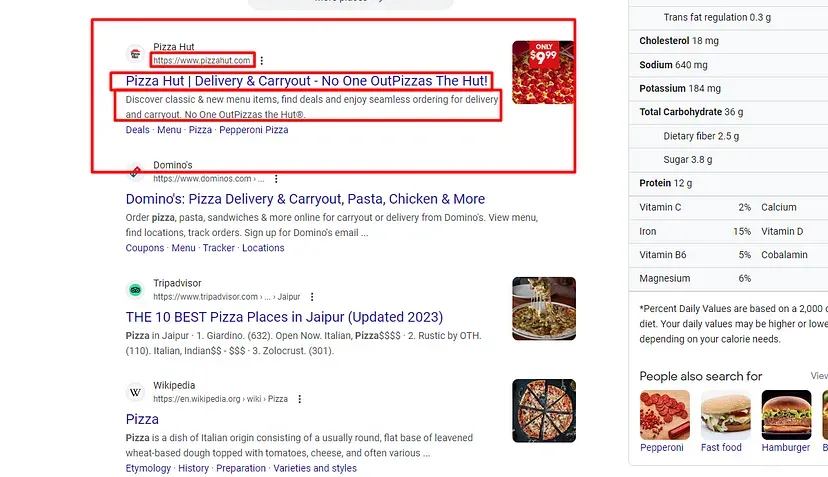
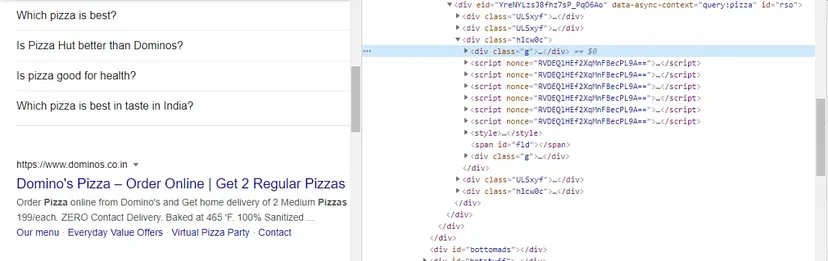
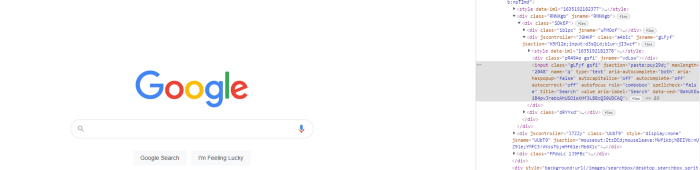
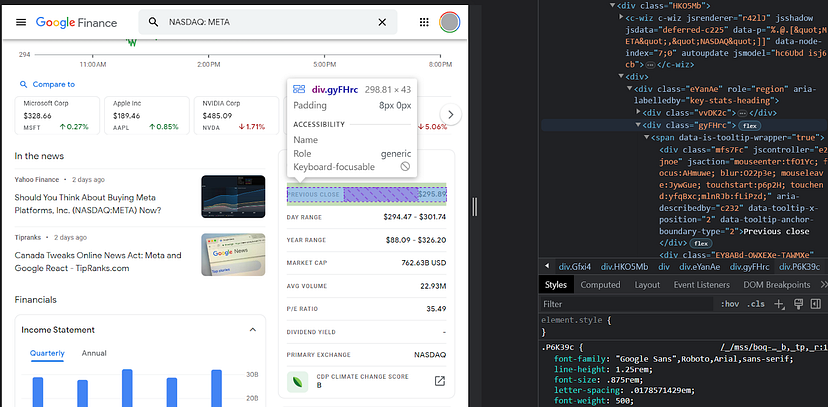
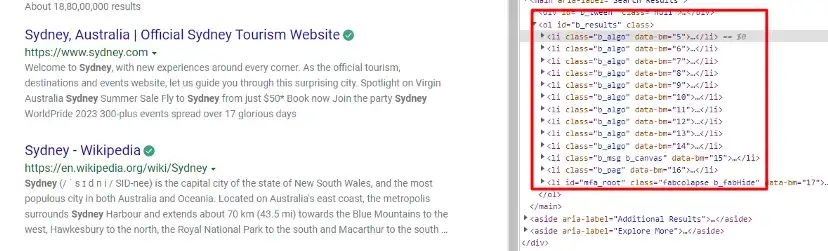
When you inspect the Google page you will find that all the results come under a class g. Of course, this name will change after some time because Google doesn’t like scrapers. You have to keep this in check.
With BS4 we are going to find all these classes using its find_all() function.
allData = soup.find_all(“div”,{“class”:”g”})
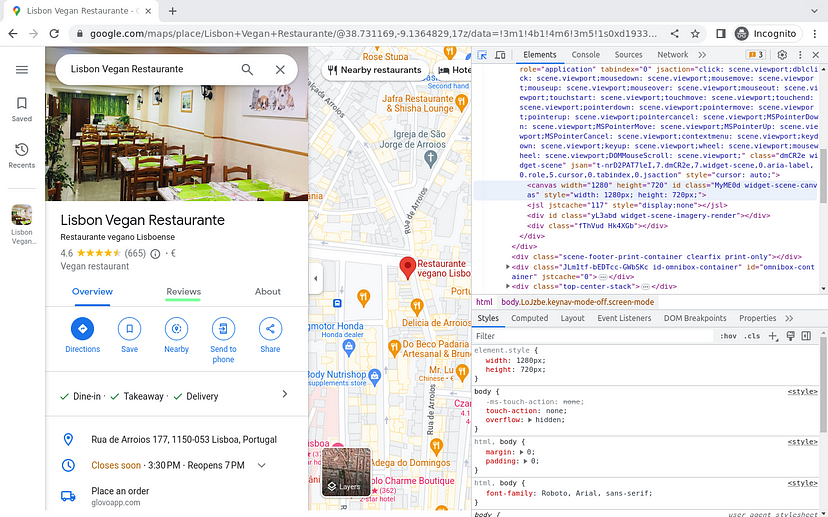
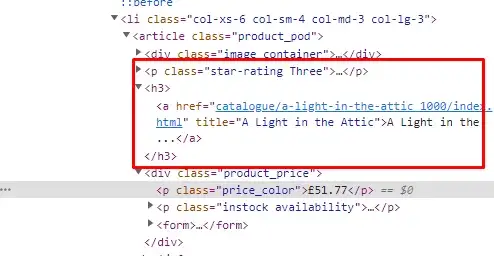
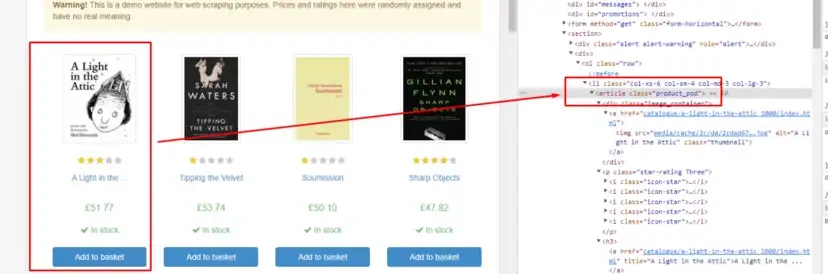
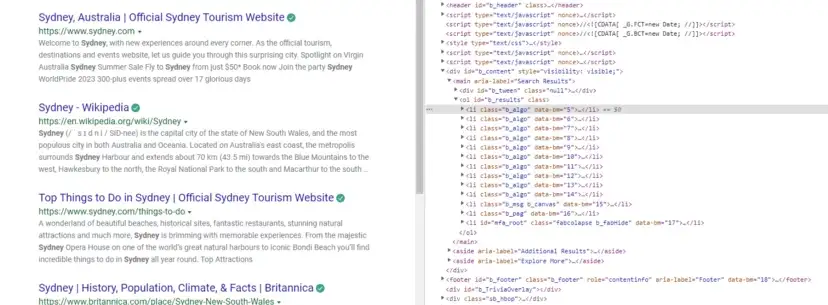
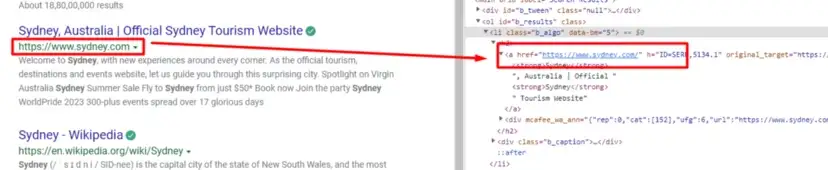
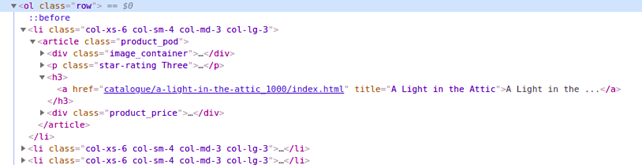
Now, we will run afor loop to reach every item in the allData list. But before we code let’s find the location of the link, title, and description of each search result.
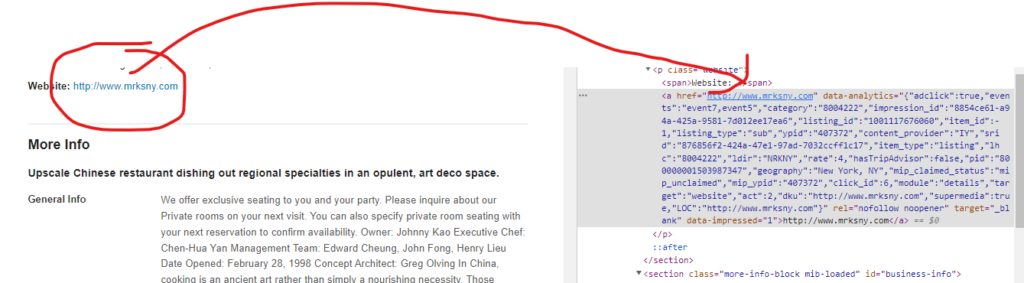
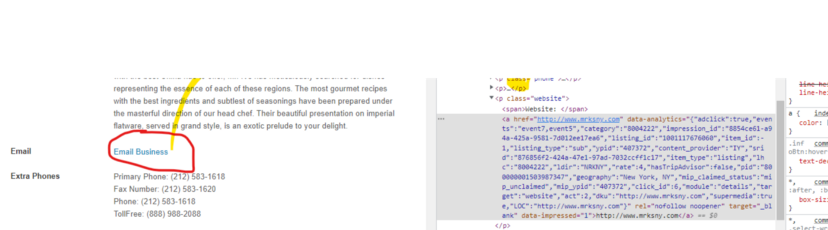
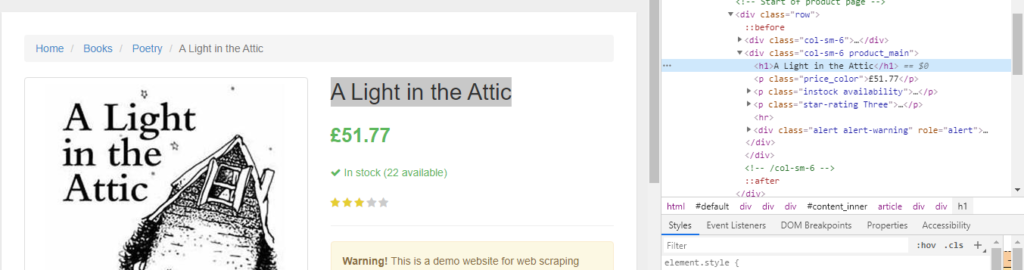
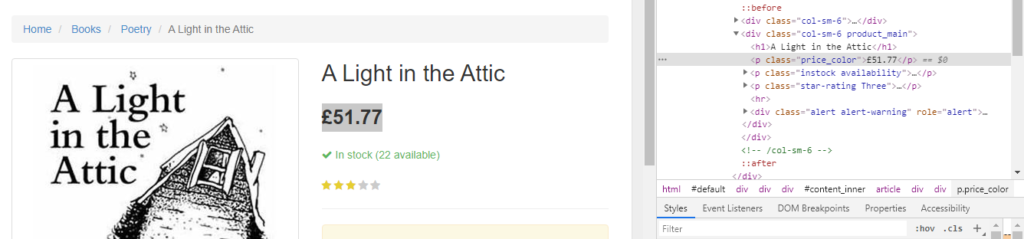
As you can see in the above image, the link is located inside the a tag with attribute href.
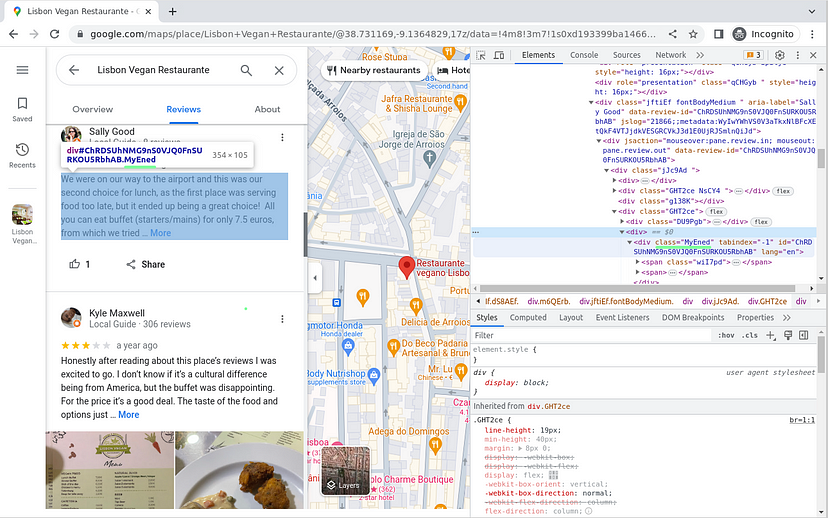
The title is located inside the h3 tag with the class DKV0Md.
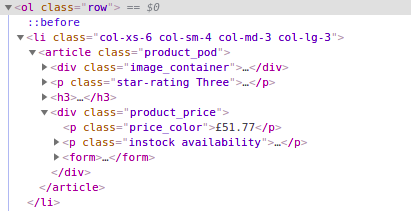
The description is stored inside the div tag with the class VwiC3b.
Now, we have the location of each element. We can use the find() function of BS4 to find each of these elements. Let’s run thefor loop and extract each of these details.
g=0
Data = [ ]
l={}
for i in range(0,len(allData)):
                    link = allData[i].find('a').get('href')

                    if(link is not None):
                        if(link.find('https') != -1 and link.find('http') == 0 and link.find('aclk') == -1):
                            g=g+1
                            l["link"]=link
                            try:
                                l["title"]=allData[i].find('h3',{"class":"DKV0Md"}).text
                            except:
                                l["title"]=None

                            try:
                                l["description"]=allData[i].find("div",{"class":"VwiC3b"}).text
                            except:
                                l["description"]=None

                            l["position"]=g

                            Data.append(l)

                            l={}

                        else:
                            continue

                    else:
                        continue
The code is pretty simple but let me explain each step.
After running the for loop, we extract the link, title, and description of the result.
We are storing each result inside the object l.
Then finally we store the object l inside the list Data.
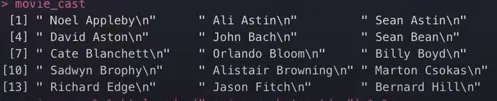
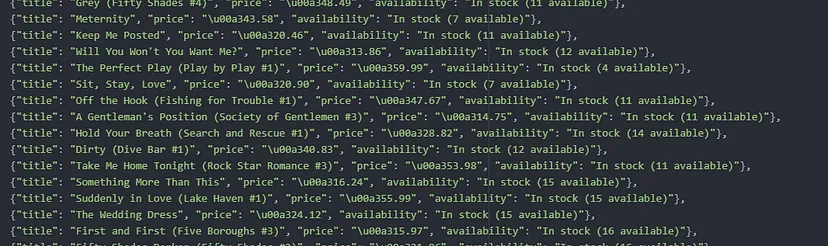
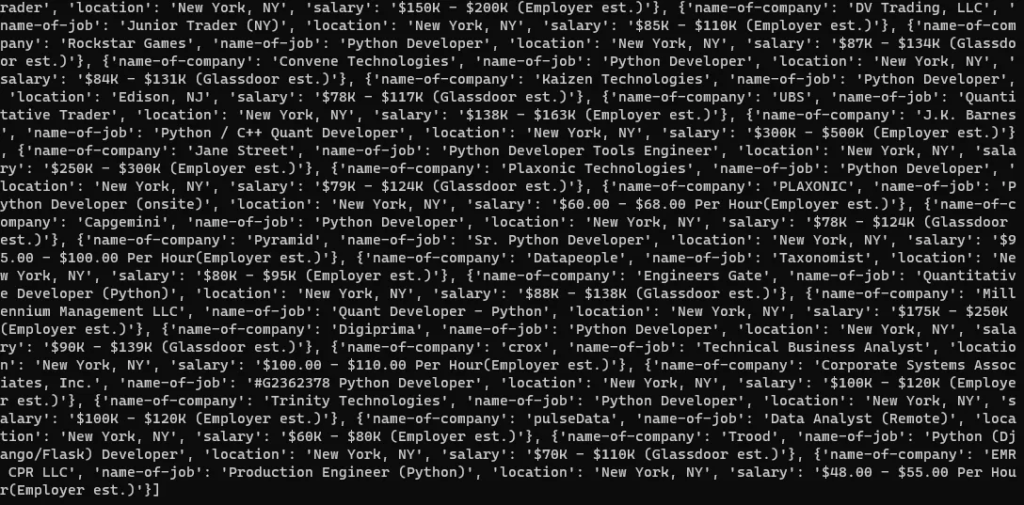
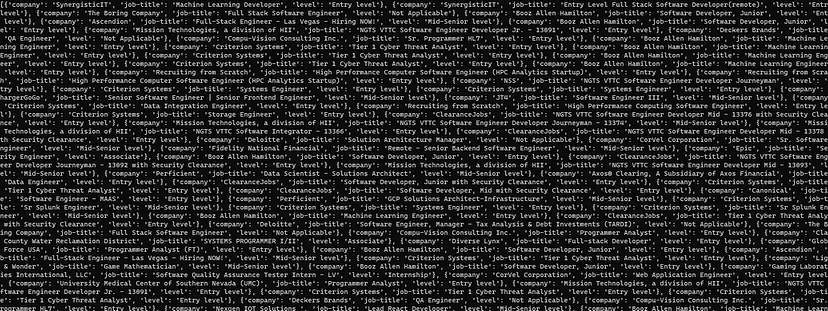
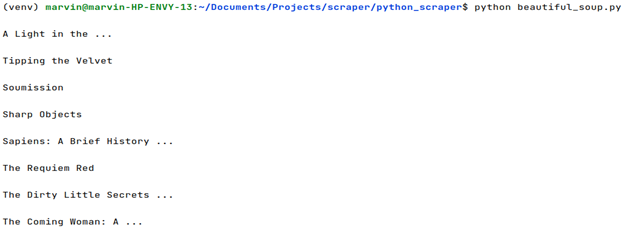
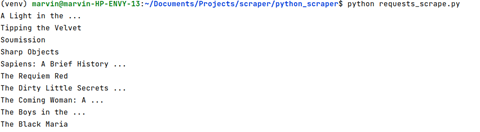
Once the loop ends you can access the results by printing the list Data.
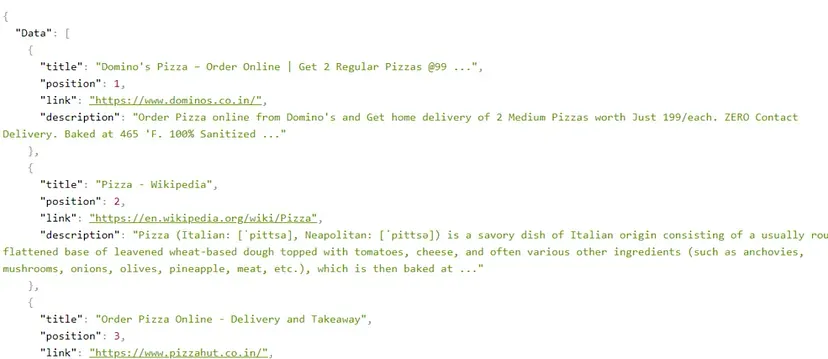
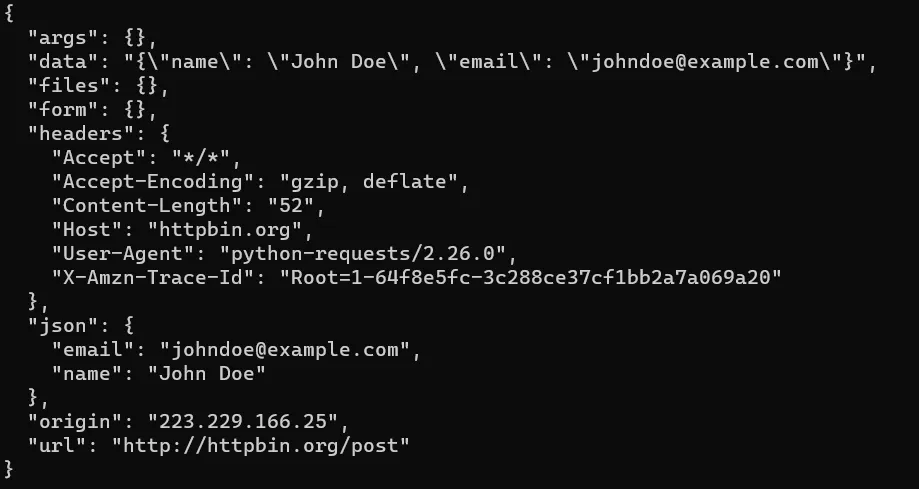
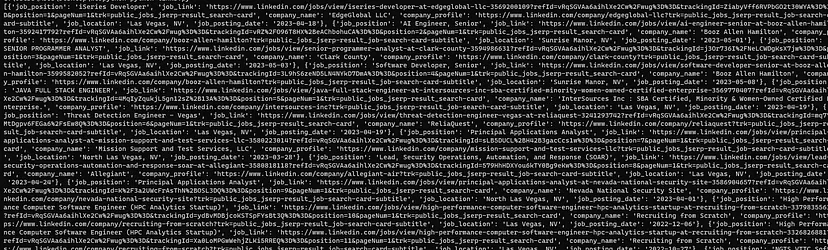
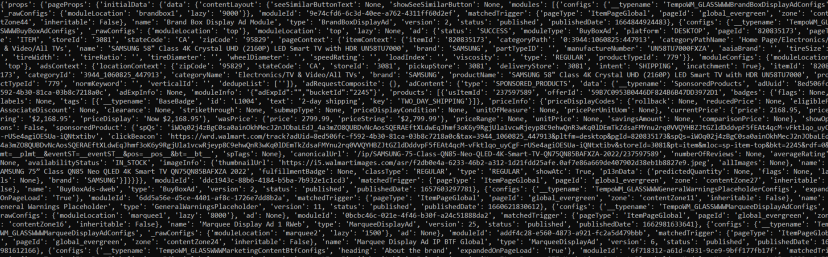
On printing the list Data the output will look like this.
Finally, we were able to extract Google search results.
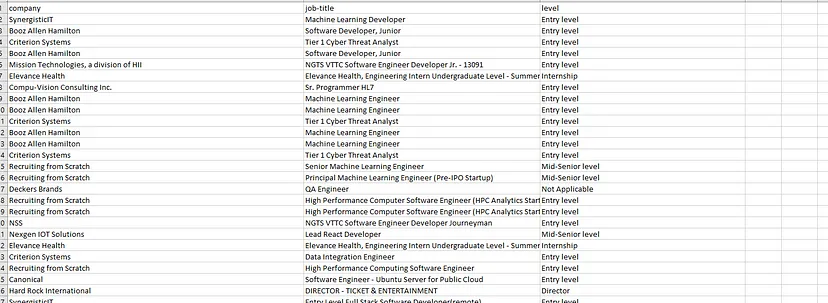
Now let’s see how we can save this data to a CSV file.
Storing data to a CSV file
We are going to use the pandas library to save the search results to a CSV file.
The first step would be to import this library at the top of the script.
import pandas as pd
Now we will create a pandas data frame using list Data.
Again once you run the code you will find a CSV file inside your working directory.
Complete Code
You can surely scrape many more things from this target page, but currently, the code will look like this.
from bs4 import BeautifulSoup
import requests
headers={'User-Agent':'Mozilla/5.0 (Windows NT 10.0; Win64; x64) AppleWebKit/537.36 (KHTML, like Gecko) Chrome/74.0.3729.169 Safari/537.36'}
url='https://www.google.com/search?q=pizza&ie=utf-8&oe=utf-8&num=10'
html = requests.get(url,headers=headers)
soup = BeautifulSoup(html.text, 'html.parser')
allData = soup.find_all("div",{"class":"g"})
g=0
Data = [ ]
l={}
for i in range(0,len(allData)):
link = allData[i].find('a').get('href')
if(link is not None):
if(link.find('https') != -1 and link.find('http') == 0 and link.find('aclk') == -1):
g=g+1
l["link"]=link
try:
l["title"]=allData[i].find('h3',{"class":"DKV0Md"}).text
except:
l["title"]=None
try:
l["description"]=allData[i].find("div",{"class":"VwiC3b"}).text
except:
l["description"]=None
l["position"]=g
Data.append(l)
l={}
else:
continue
else:
continue
print(Data)
df = pd.DataFrame(Data)
df.to_csv('google.csv', index=False, encoding='utf-8')
Well, this approach is not scalable because Google will block all the requests after a certain number of connections. We need some advanced scraping tools to overcome this problem.
Limitations of scraping Google search results with Python
Although Python is an excellent language for web scraping Googlesearch results still there are some limitations to it. Since it is a dynamic language it can lead to runtime errors and it cannot handle multiple threads as well as other languages.
Further, a slow response rate is observed while using Python for scraping Google search results.
Other than that you cannot mass scrape Google with the above code because Google will ultimately block your script for such a large amount of traffic from just one single IP.
With Scrapingdog’s Google Scraper API, you don’t have to worry about proxy rotations or retries. Scrapingdog will handle all the hassle and seamlessly deliver the data.
Let’s see how we can use Scrapingdog to scrape Google at scale.
Scraping Google Search Results without getting blocked
Now, that we know how to scrape Google search results using Python and beautifulsoup, we will look at a solution that can help us scrape millions of Google pages without getting blocked.
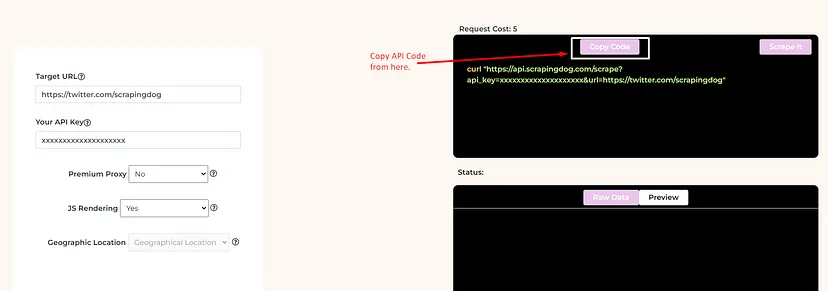
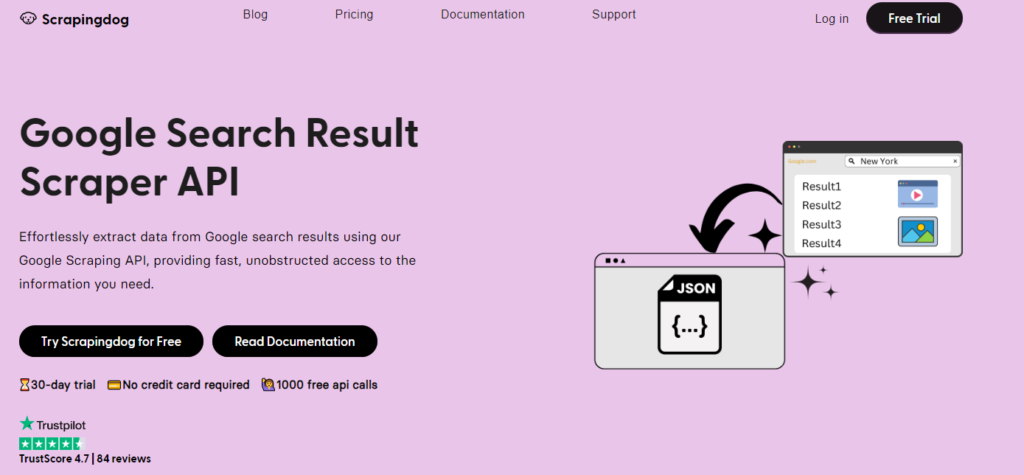
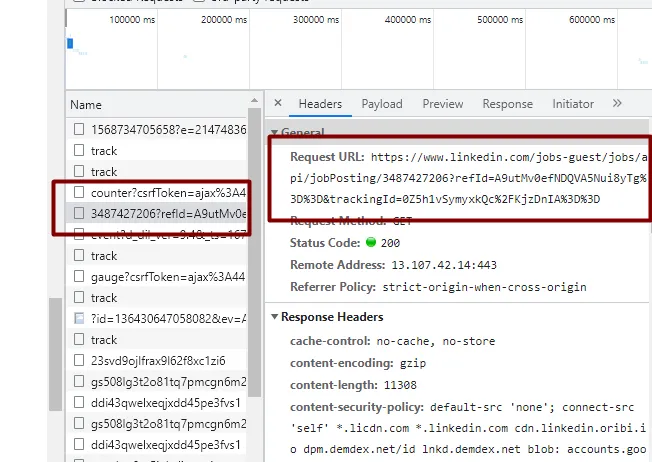
We will use Scrapingdog’s Google Search Result Scraper API for this task. This API handles everything from proxy rotation to headers. You just have to send a GET request and in return, you will get parsed JSON data.
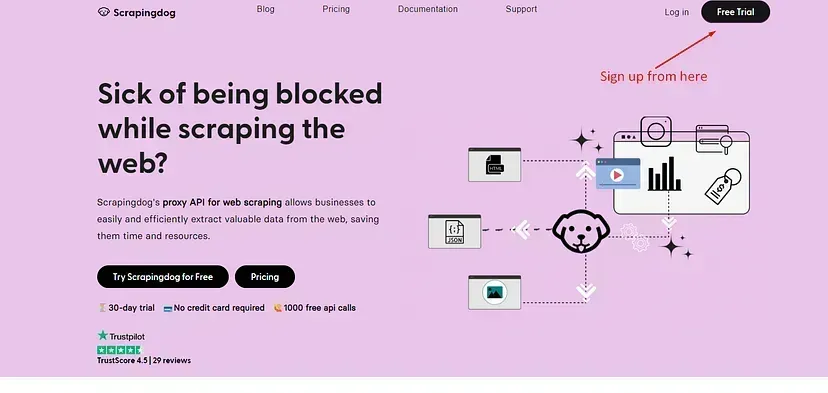
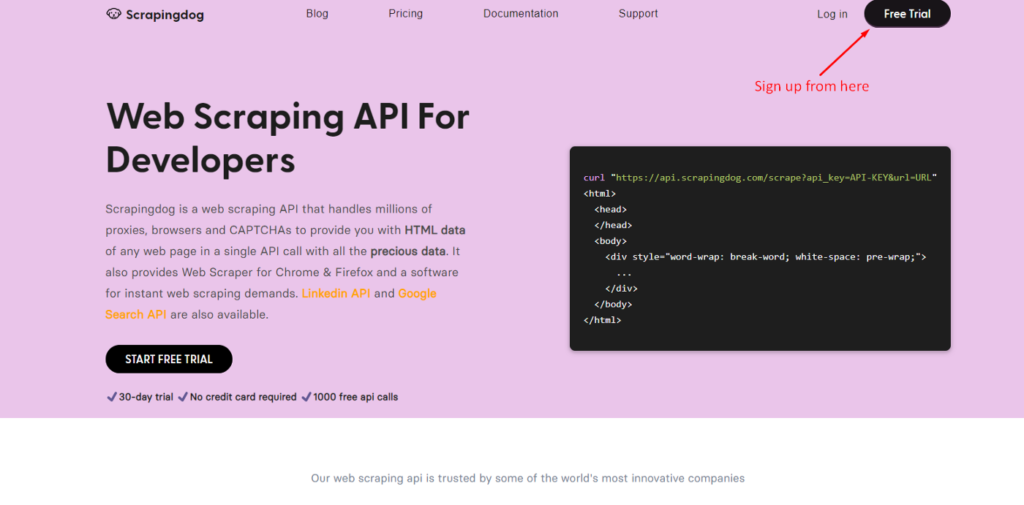
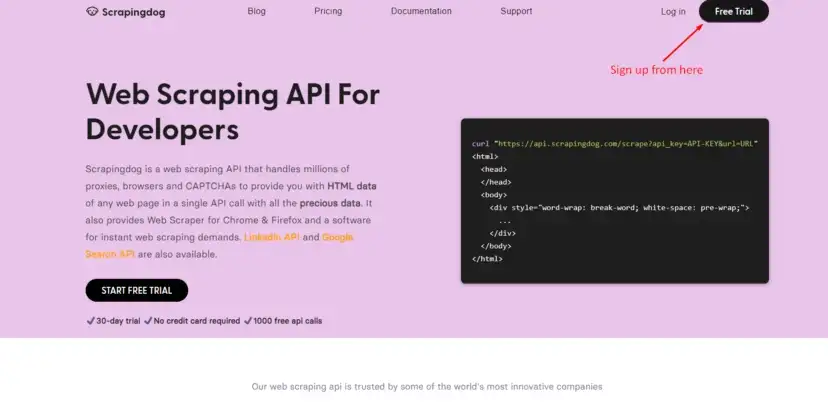
This API offers a free trial and you can register for that trial from here. After registering for a free account you should read the docs to get the complete idea of this API.
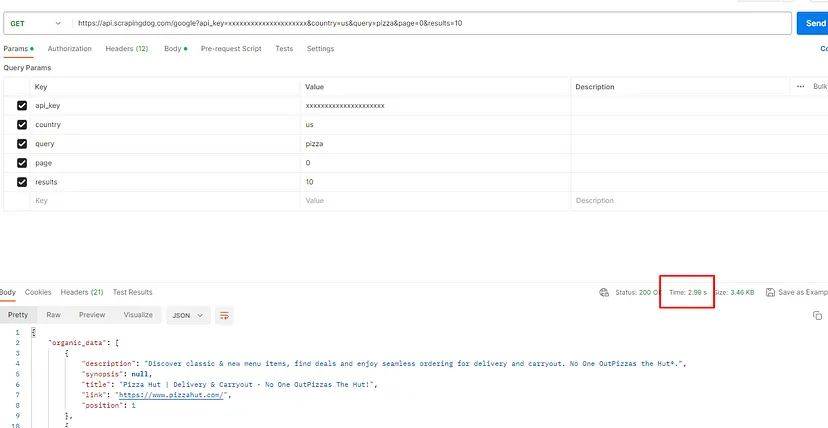
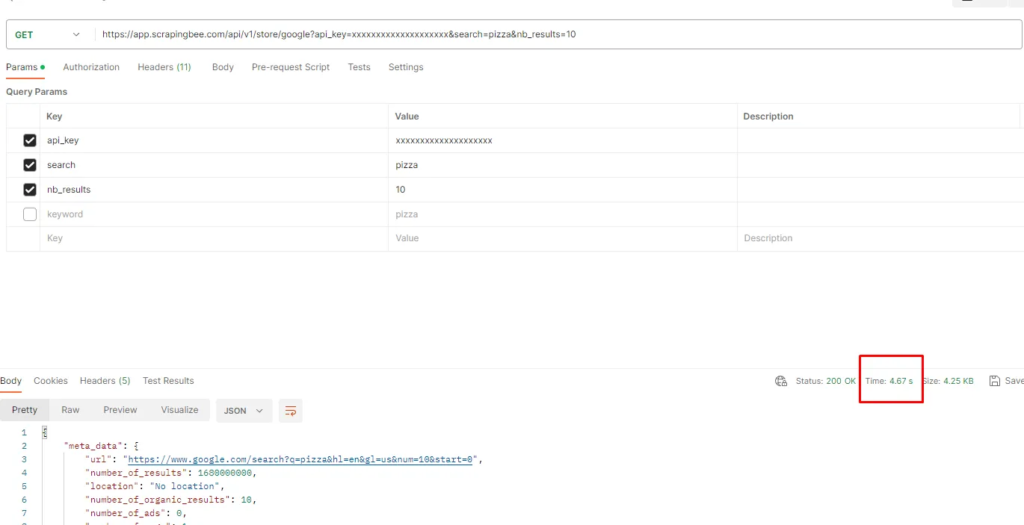
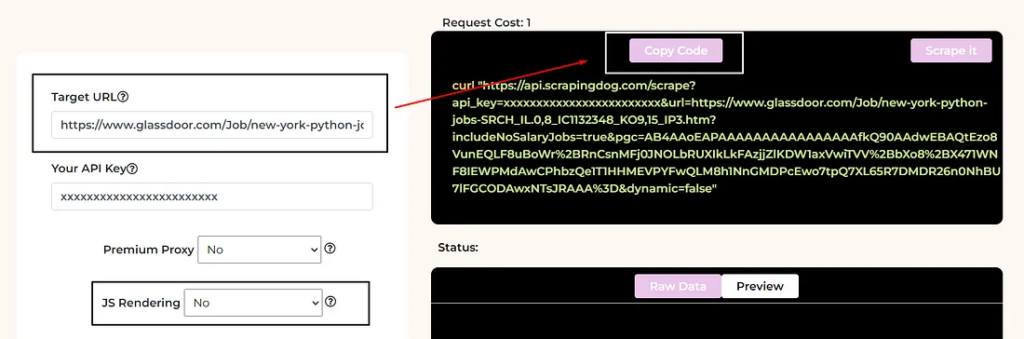
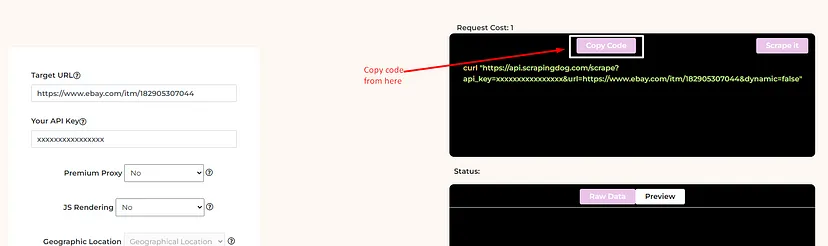
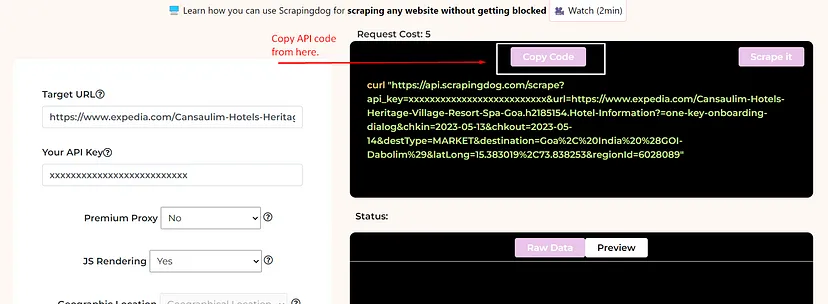
The code is simple. We are sending a GET request to https://api.scrapingdog.com/google/ along with some parameters. For more information on these parameters, you can again refer to the documentation.
Once you run this code you will get a beautiful JSON response.
What if I need results from a different country? As you might know google show different results in different countries for the same query. Well, I just have to change the country parameter in the above code.
Let’s say you need results from the United Kingdom. For this, I just have to change the value of the country parameter to gb(ISO code of UK).
You can even extract 100 search results instead of 10 by just changing the value of the results parameter.
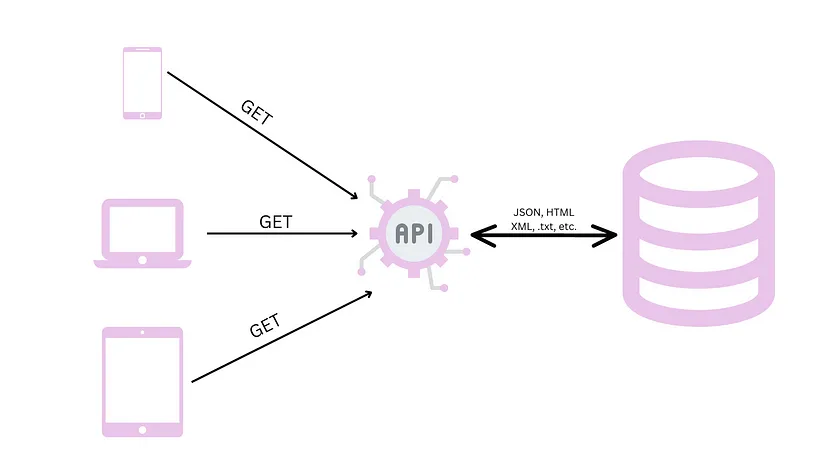
Using Google’s API to Scrape Google Search Results
Google offers its API to extract data from its search engine. It is available at this linkfor anyone who wants to use it. However, the usage of this API is minimal due to the following reasons: –
The API is very costly — For every 1000 requests you make, it will cost you around $5, which doesn’t make sense as you can do it for free with web scraping tools.
The API has limited functionality— It is made to scrape only a small group of websites, although by doing changes to it you can scrape the whole web again which would cost you time.
Limited Information — The API is made to provide you with little information, thus any data extracted may not be useful.
Conclusion
In this article, we saw how we can scrape Google results with Python and BS4. Then we used web scraping API for scraping Google at scale without getting blocked.
Google has a sophisticated anti-scraping wall that can prevent mass scraping but Scrapingdog can help you by providing a seamless data pipeline that never gets blocked.
If you like this article please do share it on your social media accounts. If you have any questions, please feel free to reach out to me.
When you send google request from the same IP, it ultimately bans you. However, by using a google scraper API, you can scrape the google search results fast and without getting blocked.
Airbnb is one of the major websites that travelers go to. Scraping Airbnb data with Python can give you a lot of insights into how the travel market is working currently. Further, trends can be analyzed in how the pricing deviates over the period.
Web Scraping Airbnb Data
Alrighty, now before diving into the main context of this blog, If you are new to web scraping, I would recommend you to go through the basics of web scraping with Python.
Let’s get started!!
Setting up the prerequisites for scraping Airbnb
For this tutorial, you will need Python 3.x on your machine. If it is not installed then you can download it from here. We will start by creating a folder where we will keep our Python script.
mkdir airbnb
Inside this folder, we will install two libraries that will be used in the course of this tutorial.
Selenium– It is used to automate web browser interaction from Python.
Beautiful Soupis a Python library for parsing data from the raw HTML downloaded using Selenium.
Chromium– It is a web browser that will be controlled through selenium. You can download it from here.
pip install bs4
pip install selenium
Remember that you will need the exact version of the Chromium driver as your Chrome browser. Otherwise, it will not run and throw an error like below.
Once all the libraries are installed we can now create a Python file where we will write the code for the scraper. I am naming this file as scraper.py.
What are we going to scrape?
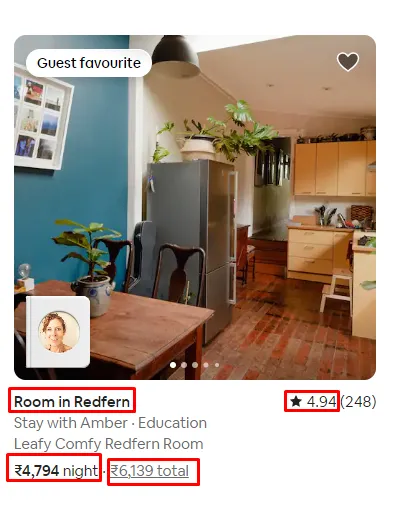
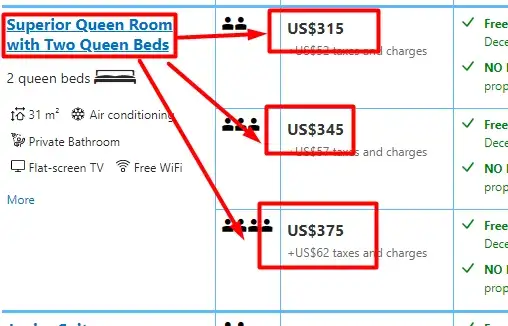
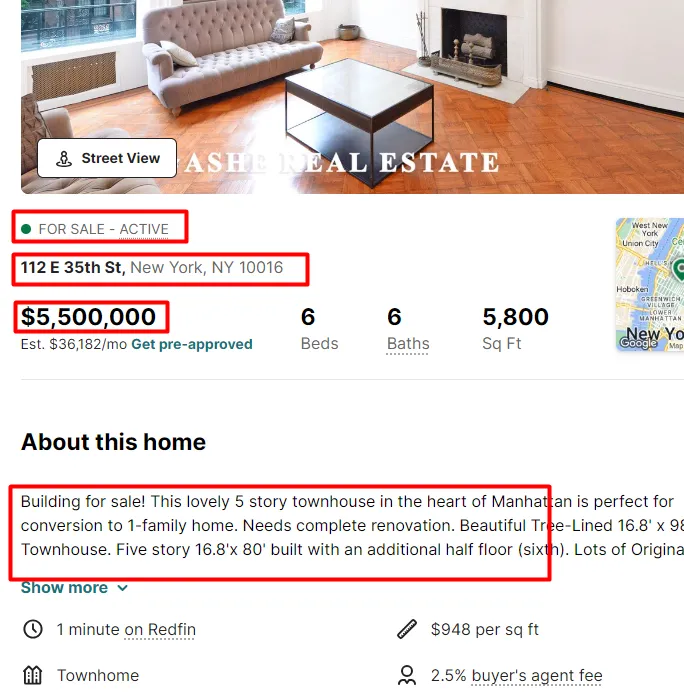
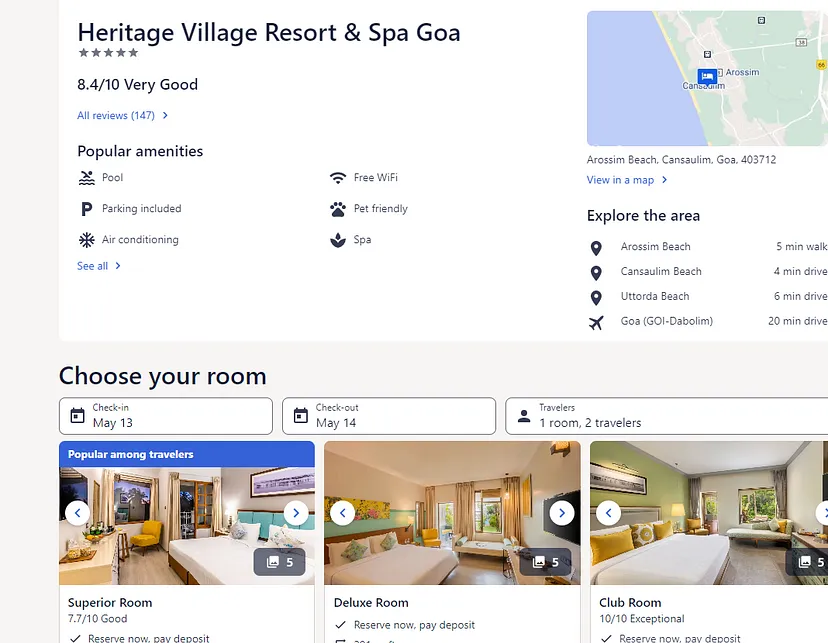
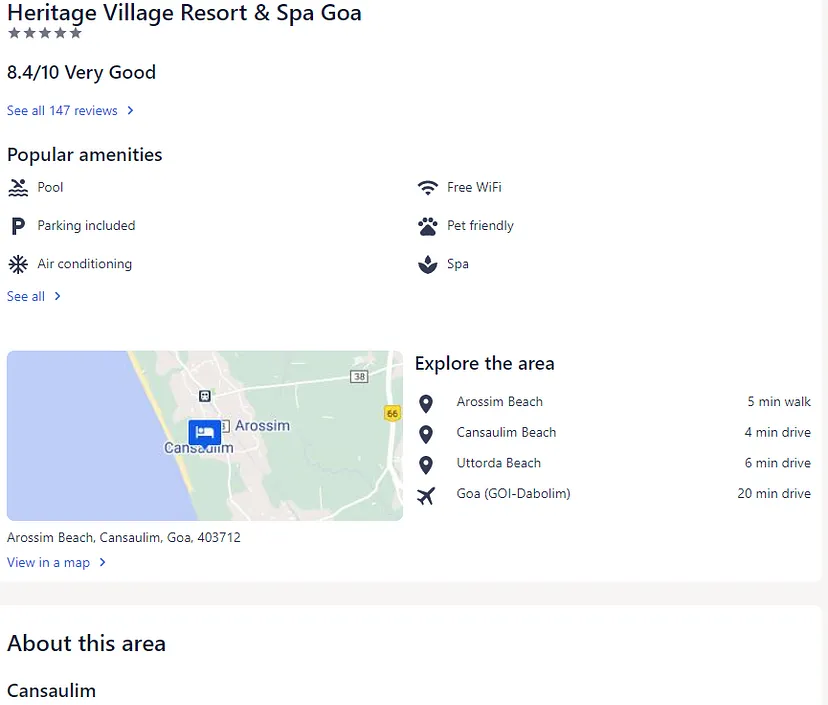
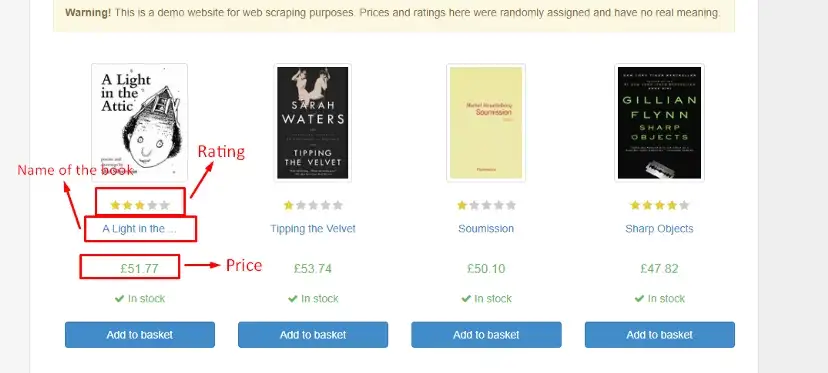
For this tutorial, we are going to scrape this page.
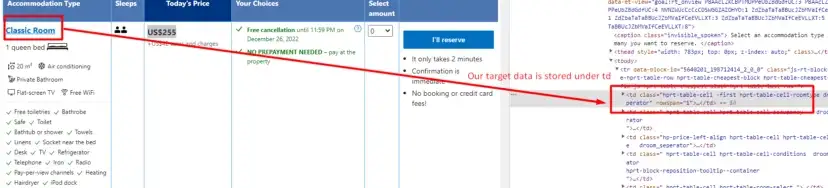
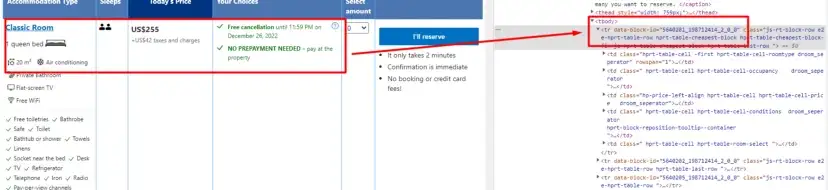
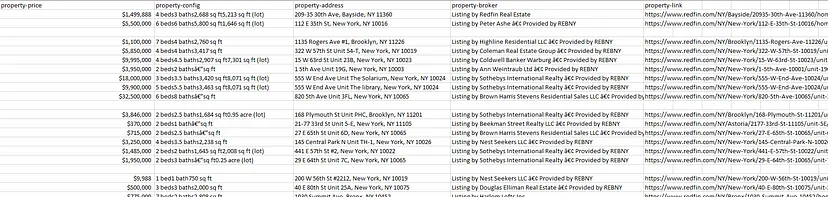
Data Points We Are Extracting from Airbnb
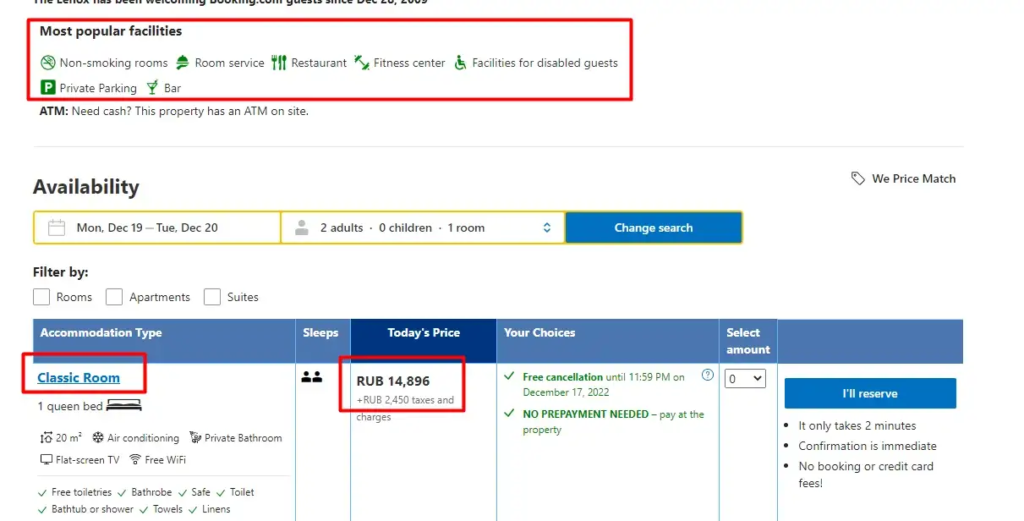
We are going to scrape mainly four data points from this page.
Name of the property
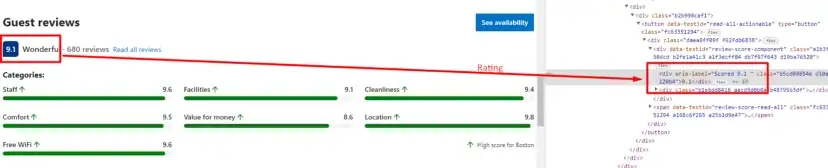
Rating
Price per night
Price per night with tax
The procedure to execute this task is very simple.
First, we are going to download the raw HTML using Selenium.
Then using BS4 we are going to parse the required data.
Downloading the raw data using Selenium
Before writing the script let’s import all the libraries that will be used in this tutorial.
from bs4 import BeautifulSoup
from selenium import webdriver
from selenium.webdriver.chrome.service import Service
import time
from bs4 import BeautifulSoup Imports the BeautifulSoup class from the bs4 module. BeautifulSoup is a popular Python library for parsing HTML and XML documents.
from selenium import webdriver Imports the webdriver module from the selenium package. Selenium is a web automation tool that allows you to control web browsers programmatically.
from selenium.webdriver.chrome.service import Service Imports the Service class from the selenium.webdriver.chrome.service module. This is used to configure the ChromeDriver service.
import time Imports the time module, which provides various time-related functions. We will use it for the timeout.
PATH = 'C:\Program Files (x86)\chromedriver.exe'
Then we have declared a PATH variable that shows the location of the chrome driver. In your case, the location string can be different.
service = Service(executable_path=PATH)
options = webdriver.ChromeOptions()
driver = webdriver.Chrome(service=service, options=options)
The executable_path parameter specifies the path to the chromedriver executable file. This is necessary for Selenium to know where to find the chromedriver executable.
The second line creates a new instance of ChromeOptions, which allows you to configure various options for the Chrome browser.
The third line creates a new instance of the Chrome WebDriver. It takes two parameters: service, which specifies the ChromeDriver service that was set up earlier, and options, which specifies the ChromeOptions object that was created. This line effectively initializes the WebDriver with the specified service and options.
# Navigate to the target page
driver.get("https://www.airbnb.co.in/s/Sydney--Australia/homes?adults=1&checkin=2024-05-17&checkout=2024-05-18")
time.sleep(5)

html_content = driver.page_source
print(html_content)

driver.quit()
The first line tells the WebDriver to navigate to the specified URL, which is an Airbnb search page for homes in Sydney, Australia. It includes query parameters for the number of adults and the check-in and check-out dates.
This second line pauses the execution of the script for 5 seconds, allowing time for the webpage to load completely. This is a simple way to wait for dynamic content to be rendered on the page.
The third line retrieves the HTML content of the target webpage using the page_source attribute of the WebDriver.
The last line closes the browser and terminates the WebDriver session. This line is necessary because it can save your memory too while doing mass scraping.
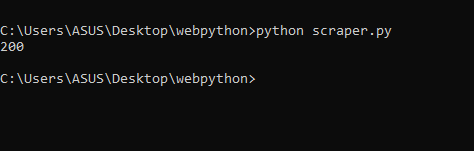
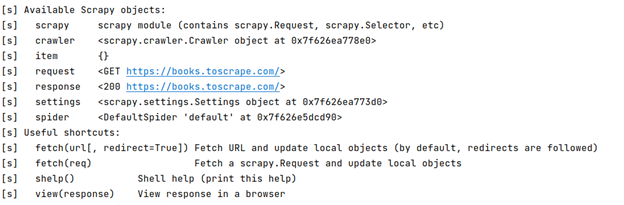
Once you run this code you will see this on your console.
We have successfully managed to download the raw HTML from our target page. Now, we can proceed with the next step of parsing.
Parsing the data with BS4
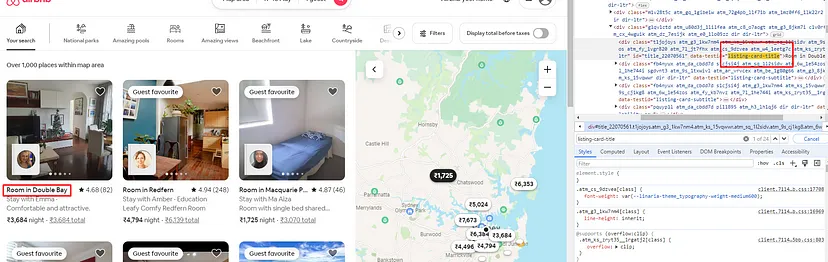
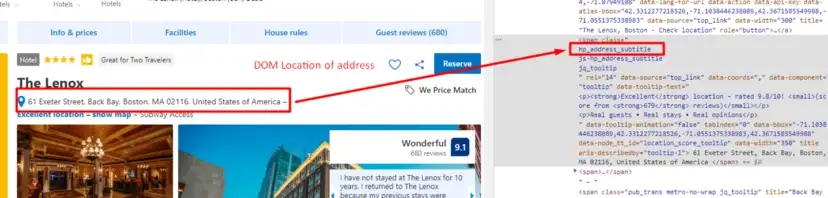
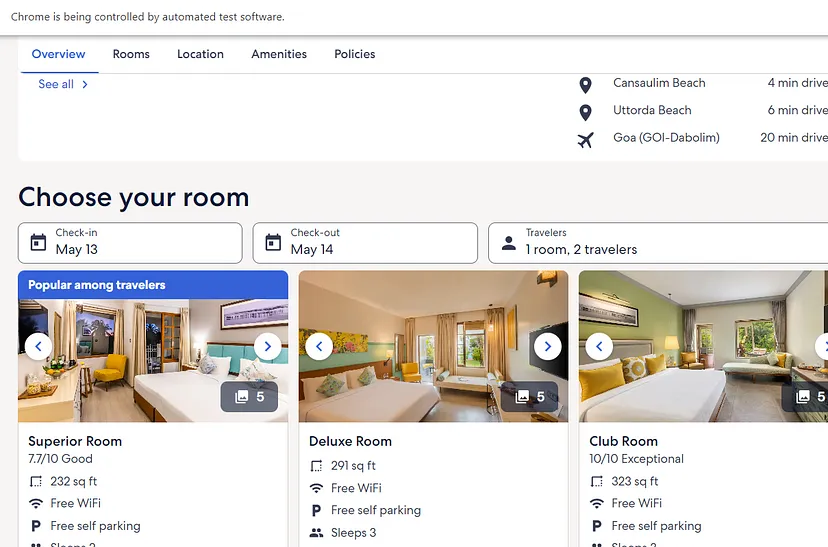
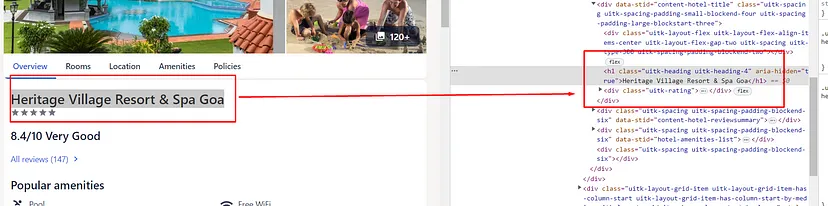
Before we write the code for parsing, let’s find out the DOM location of each target data point.
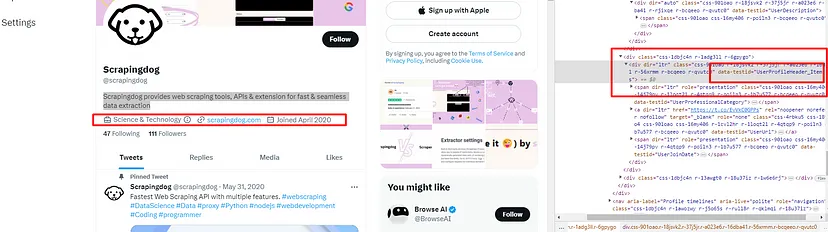
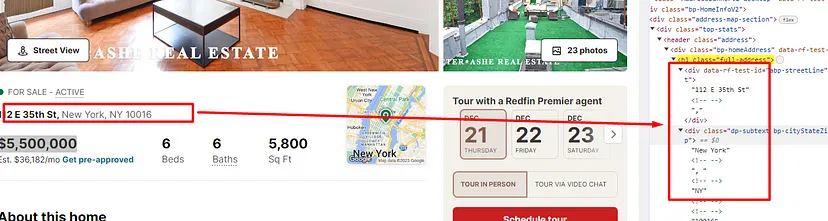
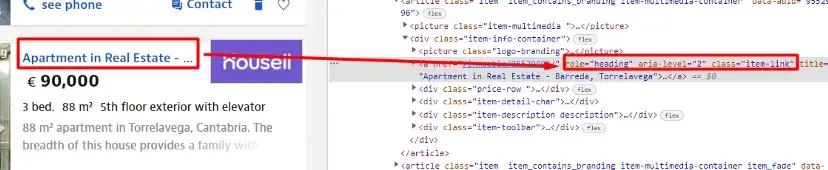
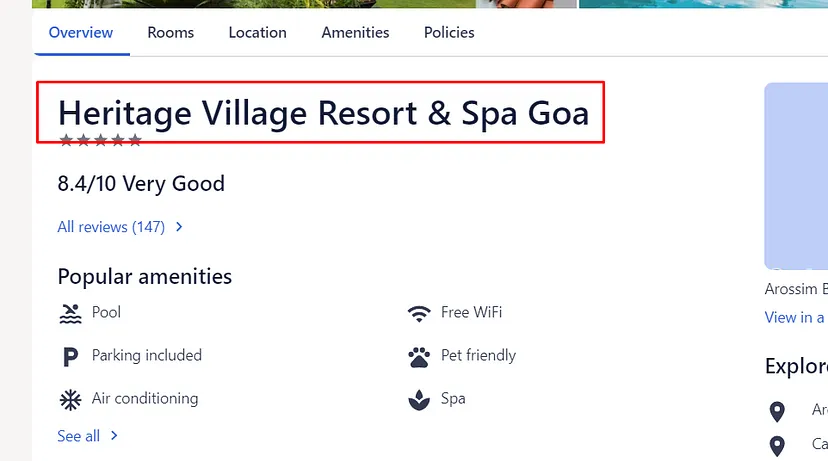
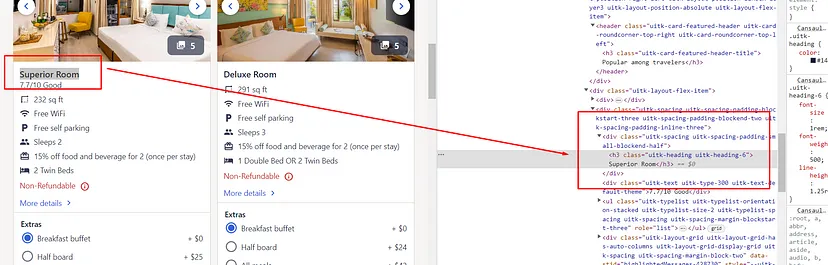
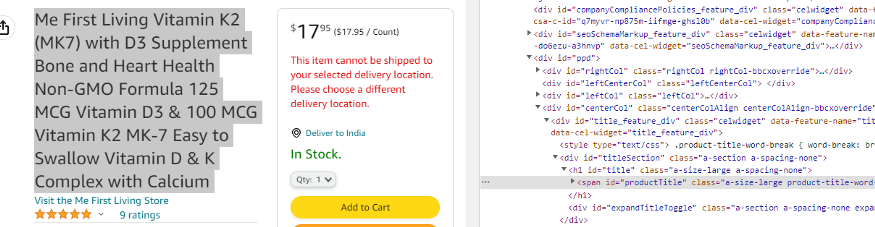
Finding the Property Title
As you can see in the above image, the title of each property is located inside the div tag with attribute data-testid and value listing-card-title.
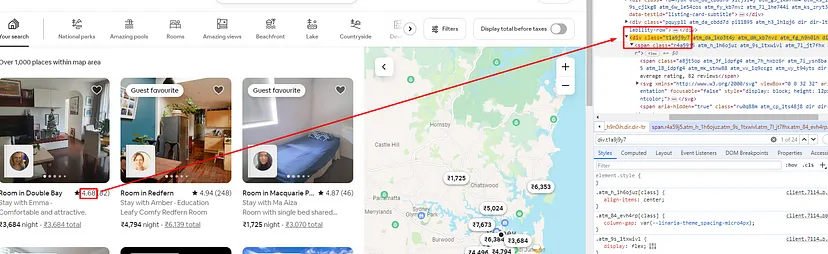
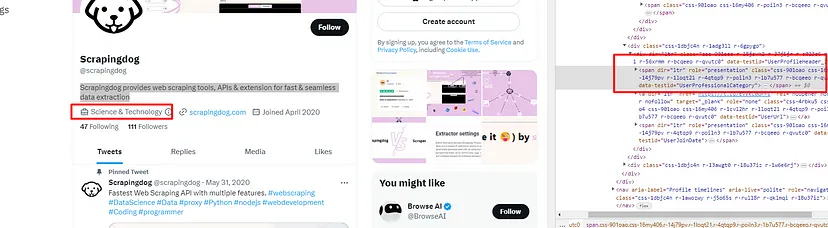
Finding the Rating
The rating can be found inside a div tag with class t1a9j9y7.
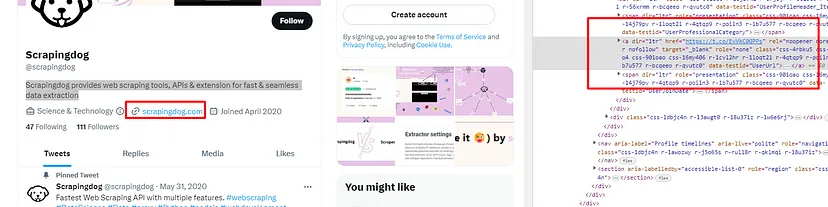
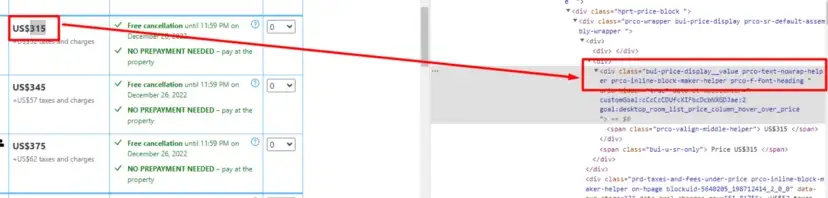
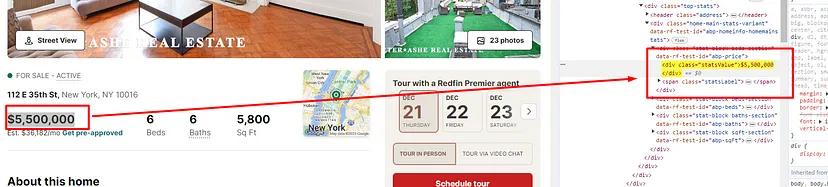
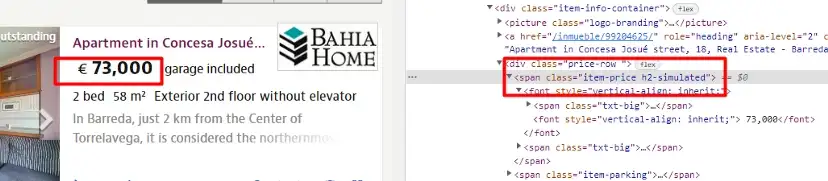
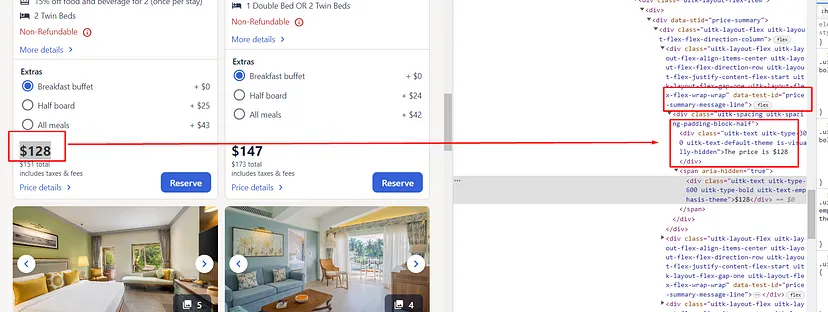
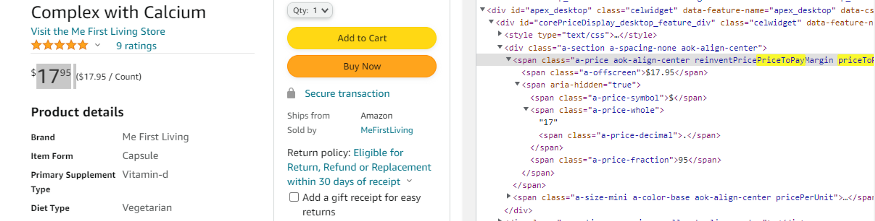
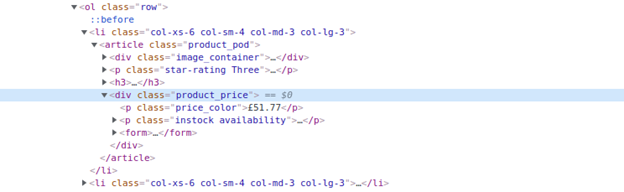
Finding the Price Without Tax
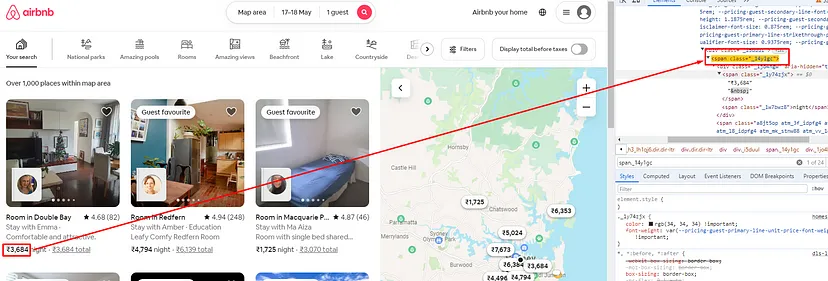
Price without tax can be found inside a span tag with class _14y1gc.
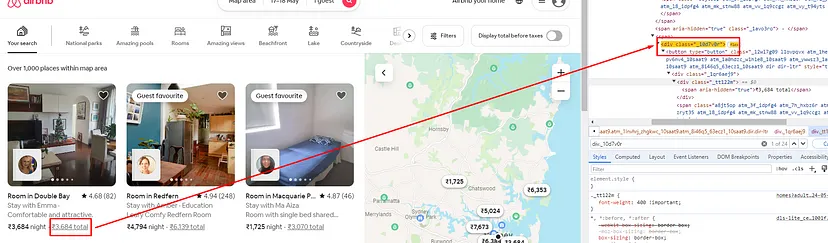
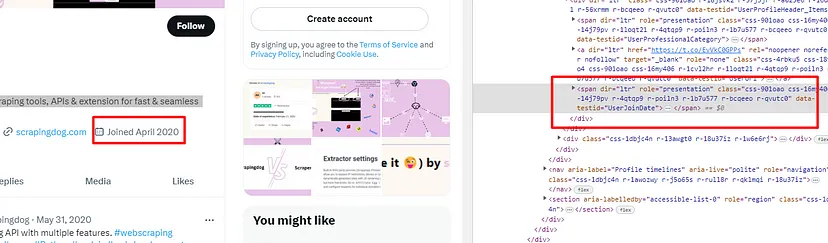
Finding the Price with Tax
Price with tax can be found inside a div tag with class _10d7v0r.
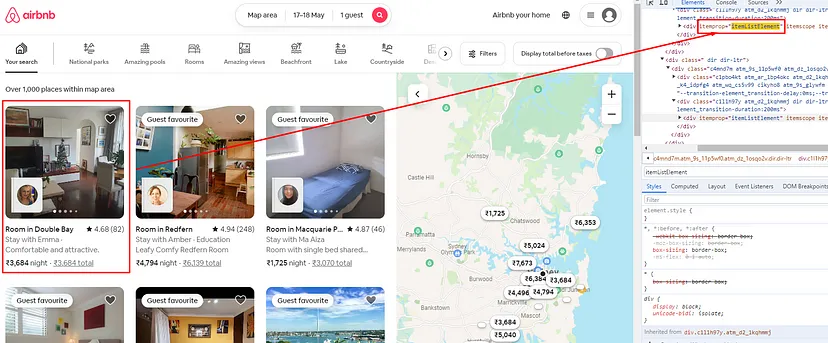
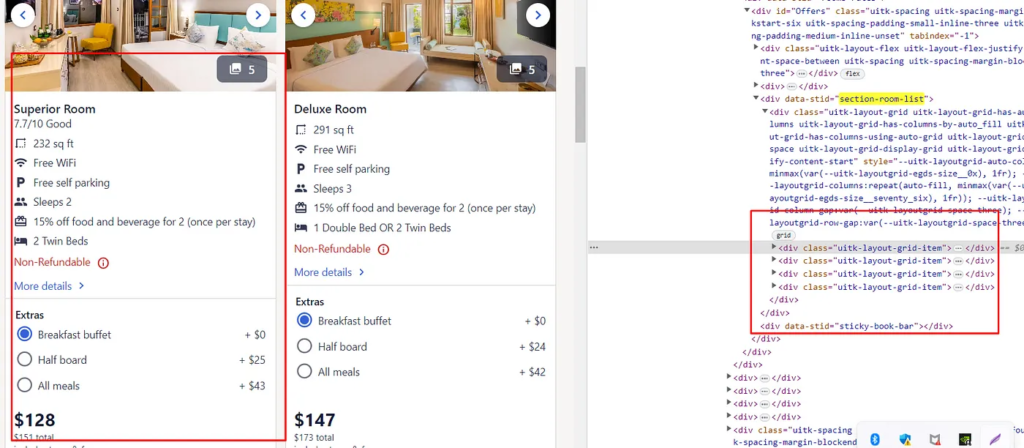
Finding all the property Boxes
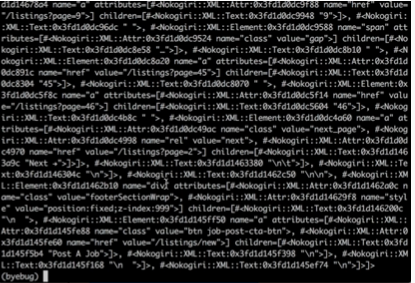
Now on every page, there are a total of 24 properties and to get data from each of these properties we have to run a for loop. But before that, we have to find the location where all these property boxes are located.
All these properties are located inside a div tag with an attribute itemprop and value itemListElement.
soup=BeautifulSoup(html_content,'html.parser')
Here we have created an instance of BS4 to parse the data from the raw HTML.
Then we search for all the properties present on that particular target page.
for i in range(0,len(allData)):
try:
o["property-title"]=allData[i].find('div',{'data-testid':'listing-card-title'}).text.lstrip().rstrip()
except:
o["property-title"]=None
try:
o["rating"]=allData[i].find('div',{'class':'t1a9j9y7'}).text.split()[0]
except:
o["rating"]=None
try:
o["price"]=allData[i].find('span',{"class":"_14y1gc"}).text.lstrip().rstrip().split()[0]
except:
o["price"]=None
try:
o["price_with_tax"]=allData[i].find('div',{'class':'_i5duul'}).find('div',{"class":"_10d7v0r"}).text.lstrip().rstrip().split(" total")[0]
except:
o["price_with_tax"]=None
l.append(o)
o={}
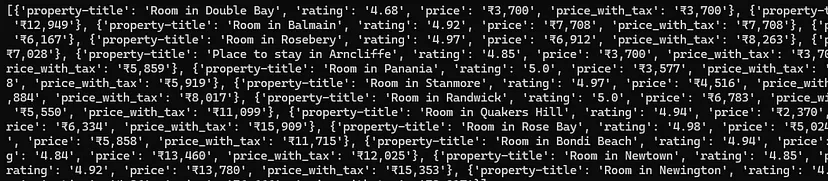
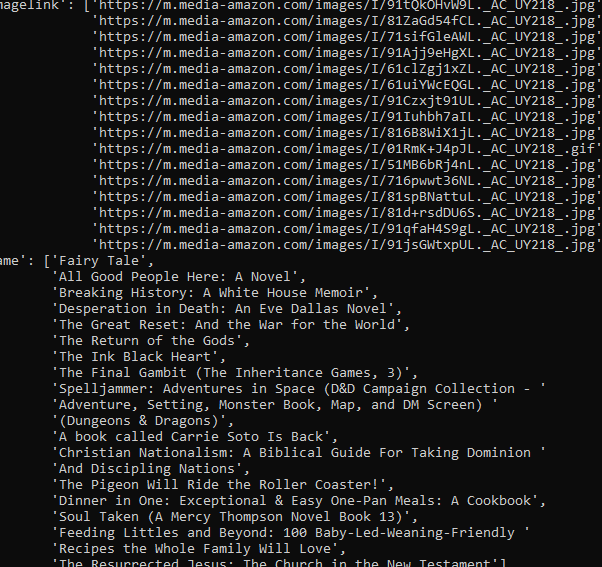
print(l)
Then we are running a for loop to extract the data from their respective locations. Finally, we store all the data inside a list l.
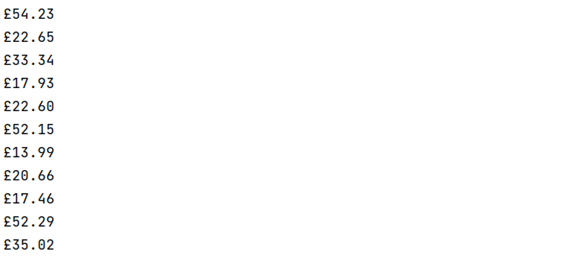
Once you run this code you will see an array with all the data on your console.
Saving the data to a CSV file
We can save this data to a CSV file by using the pandas library. You can install this library like this.
Now, import this library at the top of your script.
import pandas as pd
First, we have to create a Pandas DataFrame named df from the list l. Each element of the list l becomes a row in the DataFrame, and the DataFrame’s columns are inferred from the data in the list.
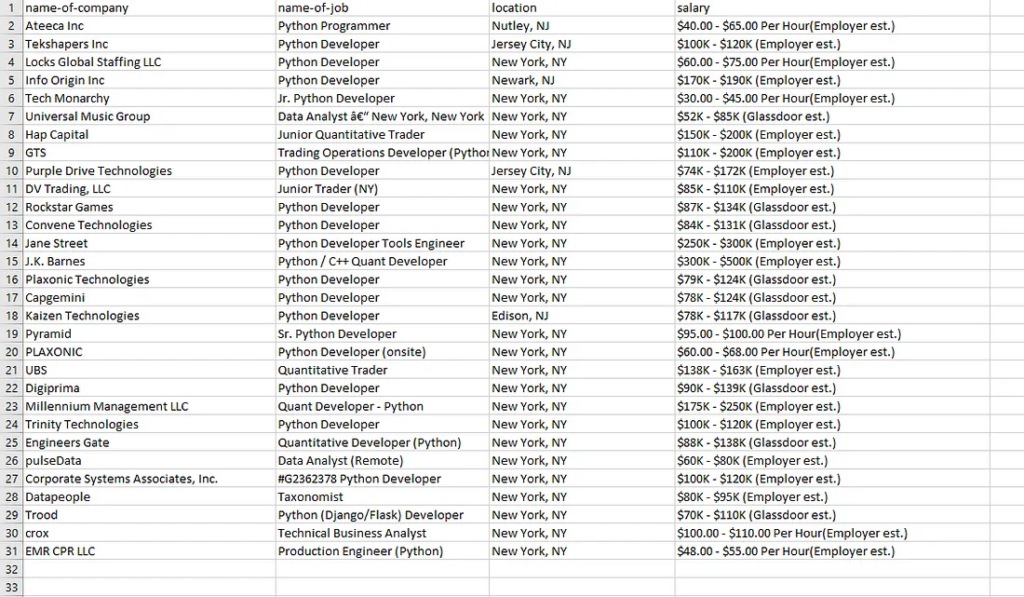
The second line exports the DataFrame df to a CSV file named “airbnb.csv”. The to_csv() method is used to save the DataFrame to a CSV file.
Again once you run the code you will find a CSV file inside your working directory.
Complete Code
You can scrape many more data points from this page but for now, the code will look like this.
from bs4 import BeautifulSoup
from selenium import webdriver
from selenium.webdriver.chrome.service import Service
import time
import pandas as pd
l=[]
o={}
PATH = 'C:\Program Files (x86)\chromedriver.exe'
service = Service(executable_path=PATH)
options = webdriver.ChromeOptions()
driver = webdriver.Chrome(service=service, options=options)
driver.get("https://www.airbnb.co.in/s/Sydney--Australia/homes?adults=1&checkin=2024-05-17&checkout=2024-05-18")
time.sleep(2)
html_content = driver.page_source
driver.quit()
soup=BeautifulSoup(html_content,'html.parser')
allData = soup.find_all("div",{"itemprop":"itemListElement"})
for i in range(0,len(allData)):
try:
o["property-title"]=allData[i].find('div',{'data-testid':'listing-card-title'}).text.lstrip().rstrip()
except:
o["property-title"]=None
try:
o["rating"]=allData[i].find('div',{'class':'t1a9j9y7'}).text.split()[0]
except:
o["rating"]=None
try:
o["price"]=allData[i].find('span',{"class":"_14y1gc"}).text.lstrip().rstrip().split()[0]
except:
o["price"]=None
try:
o["price_with_tax"]=allData[i].find('div',{'class':'_i5duul'}).find('div',{"class":"_10d7v0r"}).text.lstrip().rstrip().split(" total")[0]
except:
o["price_with_tax"]=None
l.append(o)
o={}
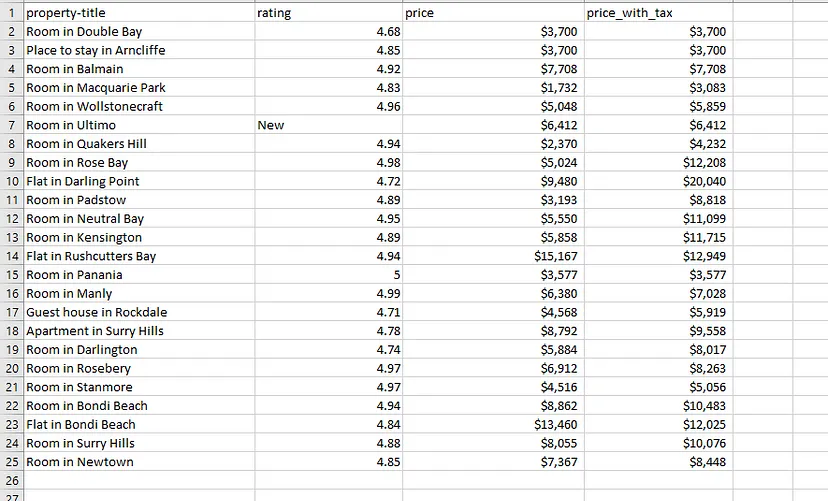
df = pd.DataFrame(l)
df.to_csv('airbnb.csv', index=False, encoding='utf-8')
print(l)
Limitations
The above approach for scraping Airbnb is fine but this approach will not work if you want to scrape millions of pages. Airbnb will either block your IP or your resources will not be enough for you to get the data at high speed.
To overcome this problem you can use web scraping APIs like Scrapingdog. Scrapingdog will handle all the hassle of JS rendering with headless chrome and rotation of IPs. Let’s see how you can use Scrapingdog to scrape Airbnb at scale.
Scraping Airbnb with Scrapingdog
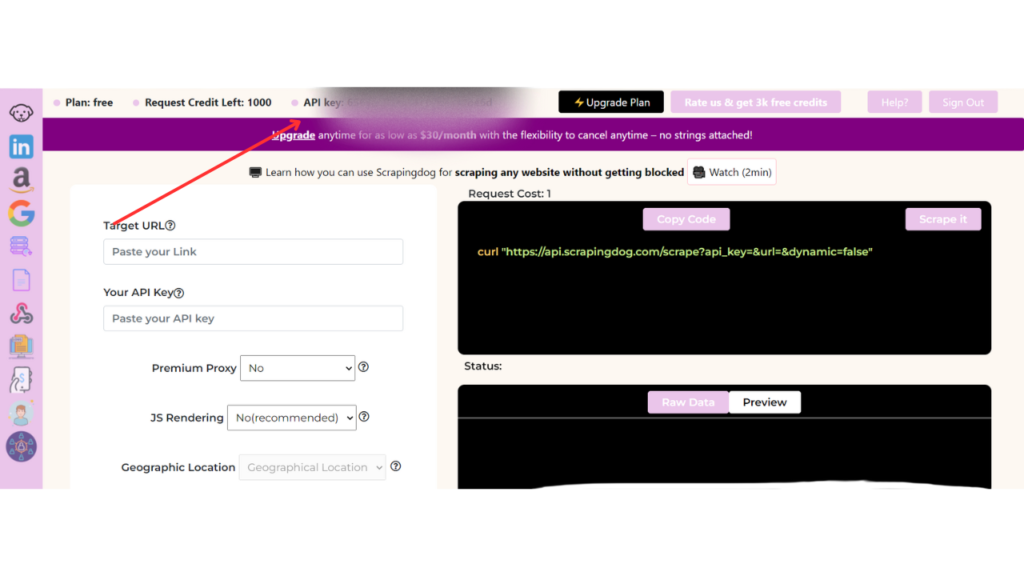
Using Scrapingdog is super simple. To get started with Scrapingdog you have to sign up for an account. Once you sign up you will get free 1000 API credits which is enough for initial testing.
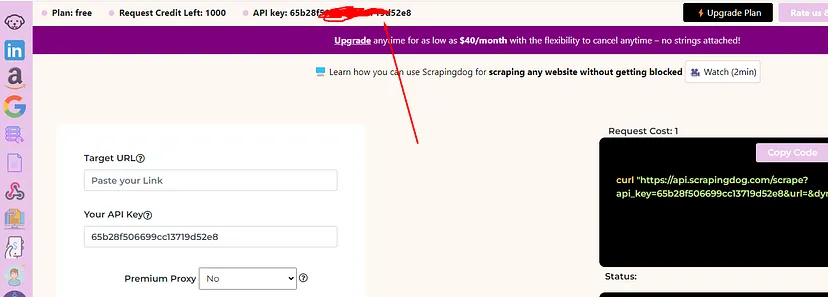
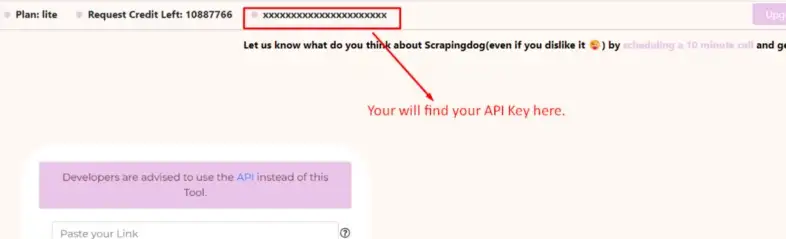
On successful account creation, you will be redirected to your dashboard where you will find your API key.
Using this API key you can easily integrate Scrapingdog within your coding environment. For now, we will scrape Airbnb using Scrapingdog in our Python environment. You can even refer to this Web Scraping API Docs before proceeding with the coding.
import requests
from bs4 import BeautifulSoup
import pandas as pd

l=[]
o={}


target_url="https://api.scrapingdog.com/scrape?api_key=YOUR-API-KEY&url=https://www.airbnb.co.in/s/Sydney--Australia/homes?adults=1&checkin=2024-05-17&checkout=2024-05-18&wait=3000"


resp = requests.get(target_url)

soup=BeautifulSoup(resp.text,'html.parser')

allData = soup.find_all("div",{"itemprop":"itemListElement"})


for i in range(0,len(allData)):
    try:
        o["property-title"]=allData[i].find('div',{'data-testid':'listing-card-title'}).text.lstrip().rstrip()
    except:
        o["property-title"]=None

    try:
        o["rating"]=allData[i].find('div',{'class':'t1a9j9y7'}).text.split()[0]
    except:
        o["rating"]=None

    try:
        o["price"]=allData[i].find('span',{"class":"_14y1gc"}).text.lstrip().rstrip().split()[0]
    except:
        o["price"]=None

    try:
        o["price_with_tax"]=allData[i].find('div',{'class':'_i5duul'}).find('div',{"class":"_10d7v0r"}).text.lstrip().rstrip().split(" total")[0]
    except:
        o["price_with_tax"]=None

    l.append(o)
    o={}


df = pd.DataFrame(l)
df.to_csv('airbnb.csv', index=False, encoding='utf-8')
print(l)
As you can see we have removed Selenium and in place of that we have imported requests library that will be used for requesting the Scrapingdog Scraping API. Scrapingdog will now handle all the JS rendering and IP rotation.
Conclusion
In this tutorial, we learned how we can create a scraper for Airbnb using Selenium and BS4. We also covered how using Scrapingdog, we can bypass the limitations of a Python Scraper.
I hope you like this little tutorial and if you do then please do not forget to share it with your friends and on social media.
Yes, Airbnb may detect the scraping when you do this process on a large scale. With a Web Scraping API, you can extract bulk data without getting blocked.
Of course, we offer 1000 free API credits to spin our API. This way you can check the accuracy and response and buy a paid plan if you are satisfied with it. You can sign up for free from here.
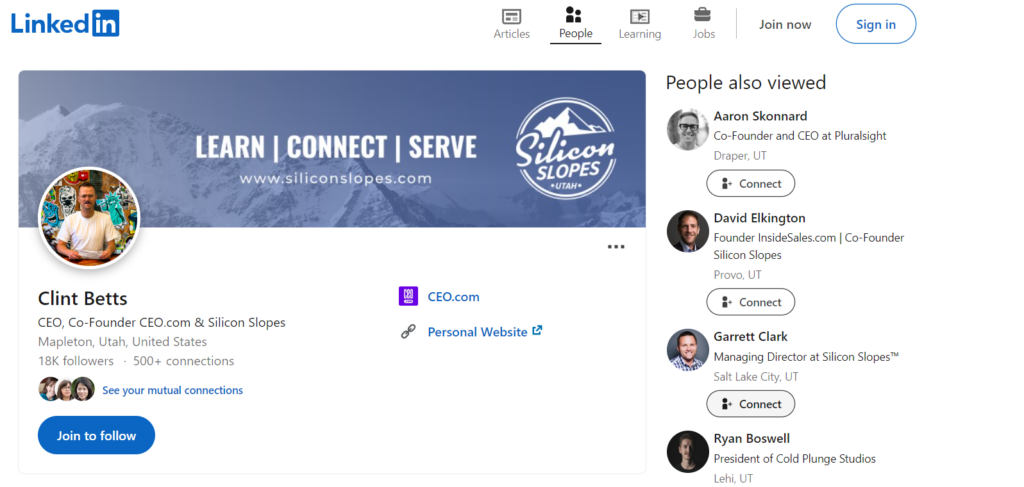
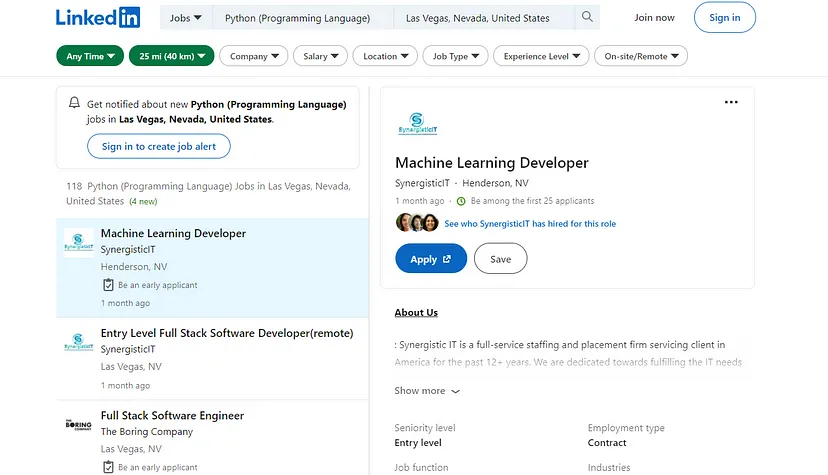
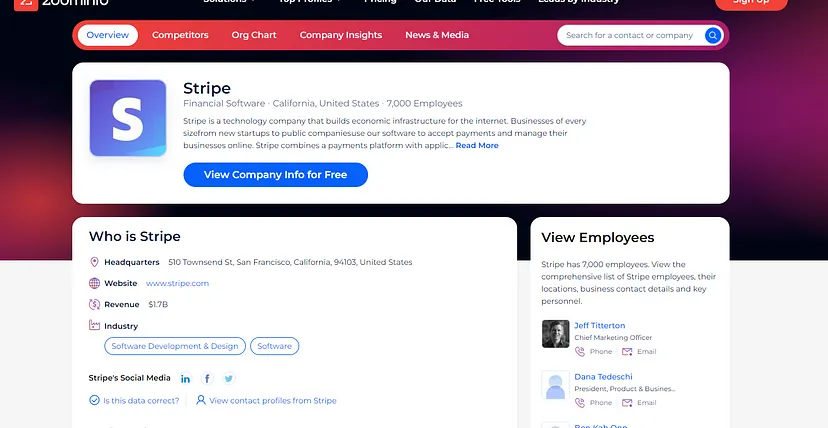
LinkedIn is the best platform when it comes to finding new clients, new employees, etc. It has around 1 Billion users from more than 200 countries. Data from LinkedIn can enrich any data pipeline because it provides fresh information on any individual or company. You can find out who works where, what skills they have, where were they working a year back, where they graduated, etc.
This information helps managers or marketing teams find the best prospects for their product, and hiring or consultancy firms can find the best employee for any job vacancy in their company. There are many use cases for scraping LinkedIn. Let’s discuss that in detail.
Use cases of Scraping LinkedIn
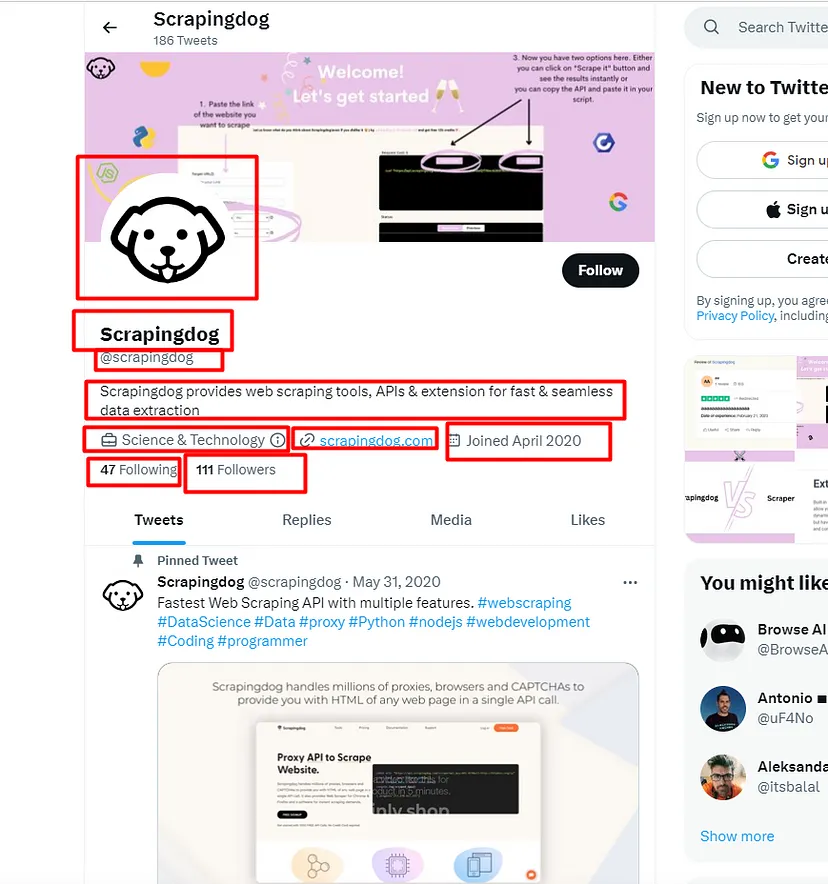
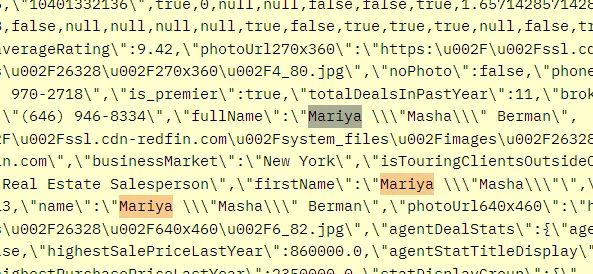
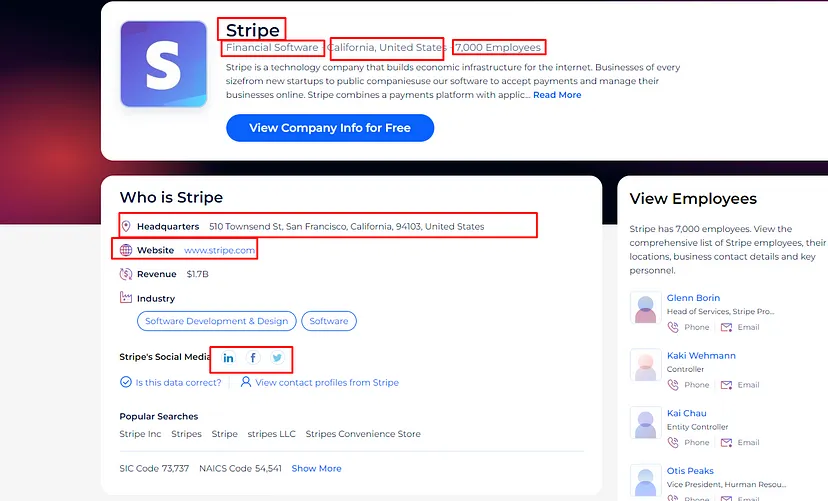
You can build products that can help marketing teams find leads by scraping LinkedIn at scale. Once you scrape any profile you will get information like where he/she works, what experience they hold, how many followers/connections they have, etc.
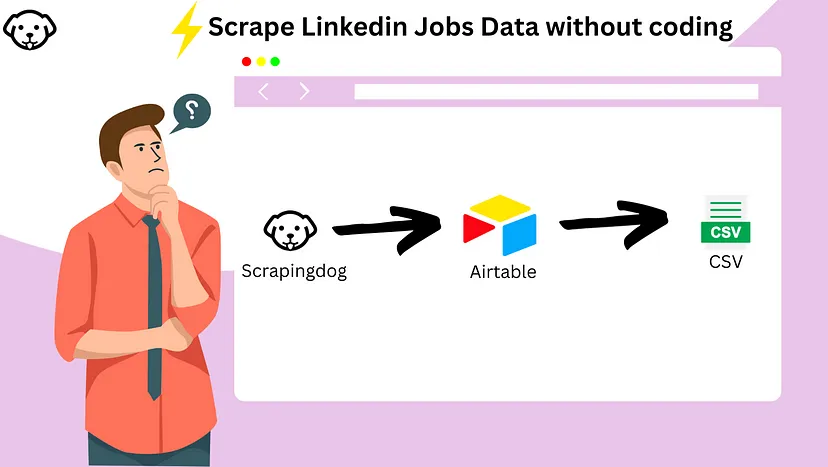
You can scrape LinkedIn Jobs to find the desired sector you would want to go in.
You can identify people with just their emails by scraping LinkedIn profiles. This is called enrichment. You can identify who the person is behind a certain email.
You can find out sector-wise companies. Then you can target them through cold emails to sell your B2B products.
You can find contact details like emails and phone numbers by scraping LinkedIn.
Investors can find a suitable company for their next investments. They just have to filter out data and they select companies from the list. Like if they want to find companies in Mumbai, India then they can filter it out.
You can analyze the sentiments of any individual through his/her activity on LinkedIn. What kinds of comments they make, and what kinds of articles they like can help you identify the person better.
Other data like volunteer work can help you identify which prospect has done social work in the past.
Certificates can help one identify which person has what kind of specialization.
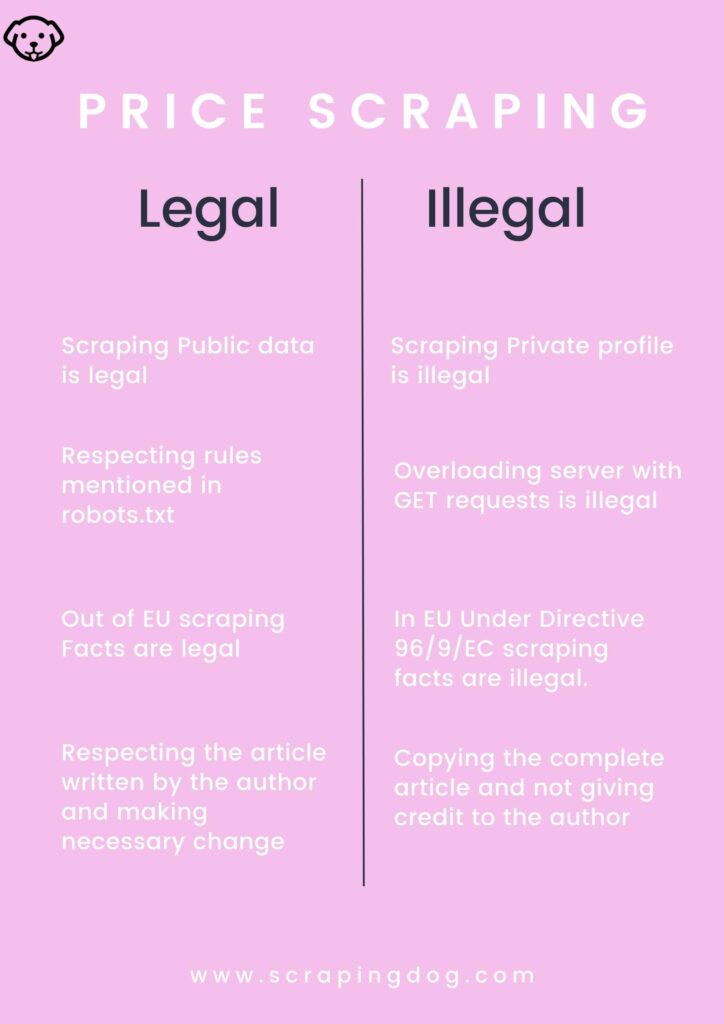
Is It Legal to Scrape LinkedIn?
Yes, It is legal to scrape LinkedIn if you are doing it ethically. I would help you with this by giving a few examples that have happened in the past that would help you to clear your doubts.
Some companies like Mantheos a Singapore-based company faced the heat from Linkedin for Scraping its data. You can read more about the case over here. Mainly they were using fake cards to bypass their payment system and they were then using the premium plans of Linkedin to scrape prospect details from it. This type of method is of course illegal and the person behind this idea should be punished.
The fact is Google also works by crawling over all the websites/domains. It has large crawlers that keep scraping websites to make its search result algorithm smarter. But they are quite large and they can deal with legal matters very easily as compared to small companies or any individual.
There is another ongoing matter between hiQ and LinkedIn. hiQ was scraping LinkedIn by creating fake accounts. In November 2022 the court said that “hiQ already knew that they were illegally acquiring Linkedin’s data through web scraping”. But but but… in 2022 California District Court found some evidence of the exchange of emails among LinkedIn employees where it was very clear that LinkedIn was aware of this scraping back in 2014 and let it happen until 2017. In the end, both parties agreed to a private settlement.
Scraping the public web is still 100% legal in the US as per HiQ v LinkedIn. 🙂
A Twitter User Sharing Opinion on LinkedIn Scraping
This whole mess concludes that you should not do the following:
Do not create fake accounts on Linkedin.
Do not bypass their payment wall with fake credit cards.
Respect server bandwidth.
This is what you can do:
You can scrape everything available to the public according to the Computer Fraud and Abuse Act(CFAA). This can be concluded by hiQ vs LinkedIn case as both the parties had a very weak allegation against each other.
Limitations of Scraping LinkedIn
LinkedIn has placed a limit of 50 profiles per user in recent years. This means that you can only scrape 50 profiles in a day. But LinkedIn is too smart and it will block your account because of data extraction activity.
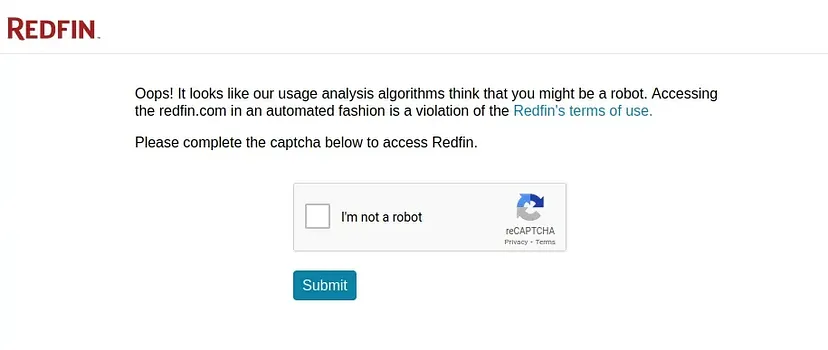
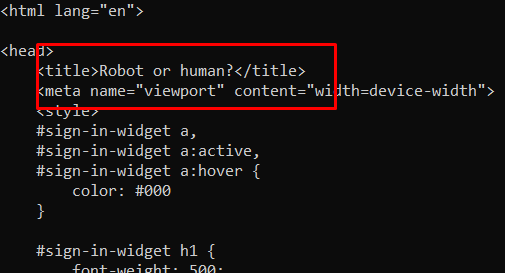
Other than this if you are willing to scrape LinkedIn without creating a user then Linkedin will redirect you to either a Login screen or it will through a captcha like this.
LinkedIn Throwing Captcha While Scraping
So, it is next to impossible to scrape LinkedIn at scale with a normal infrastructure on your own.
Quick Solution To Scraping LinkedIn at Scale
Scrapingdog can help you scrape LinkedIn at scale without you getting blocked. By using Scrapingdog you will never face any kind of legal issues as your IP will never be used. You can scrape up to 1 Million profiles per day and our scraper is capable of bypassing any kind of captcha.
Other than Scrapingdog there is Brightdata which offers Linkedin Scraper but it is too expensive. Our per profile cost is $0.009 and goes below that if you want to scrape more than 100k profiles per month. On the other hand, Bightdata will charge you $0.01 per profile which makes it extremely expensive.
There are other solutions also in the market but they provide data from 2016 and this makes it very old.
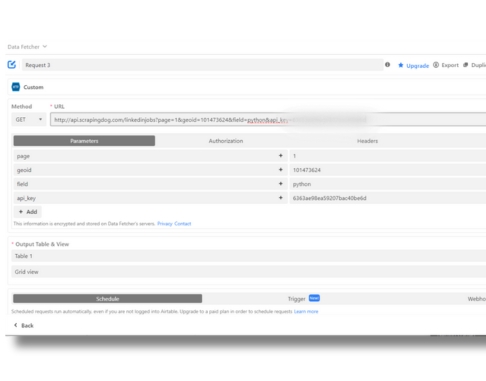
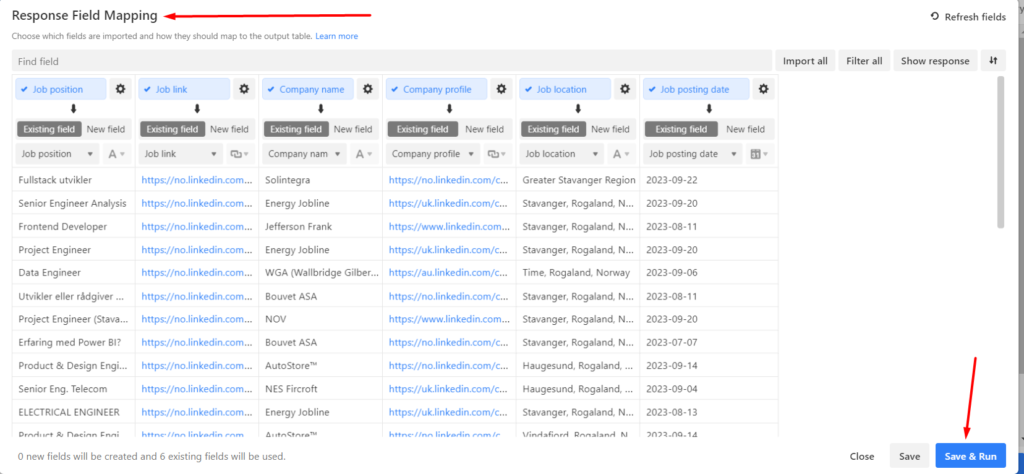
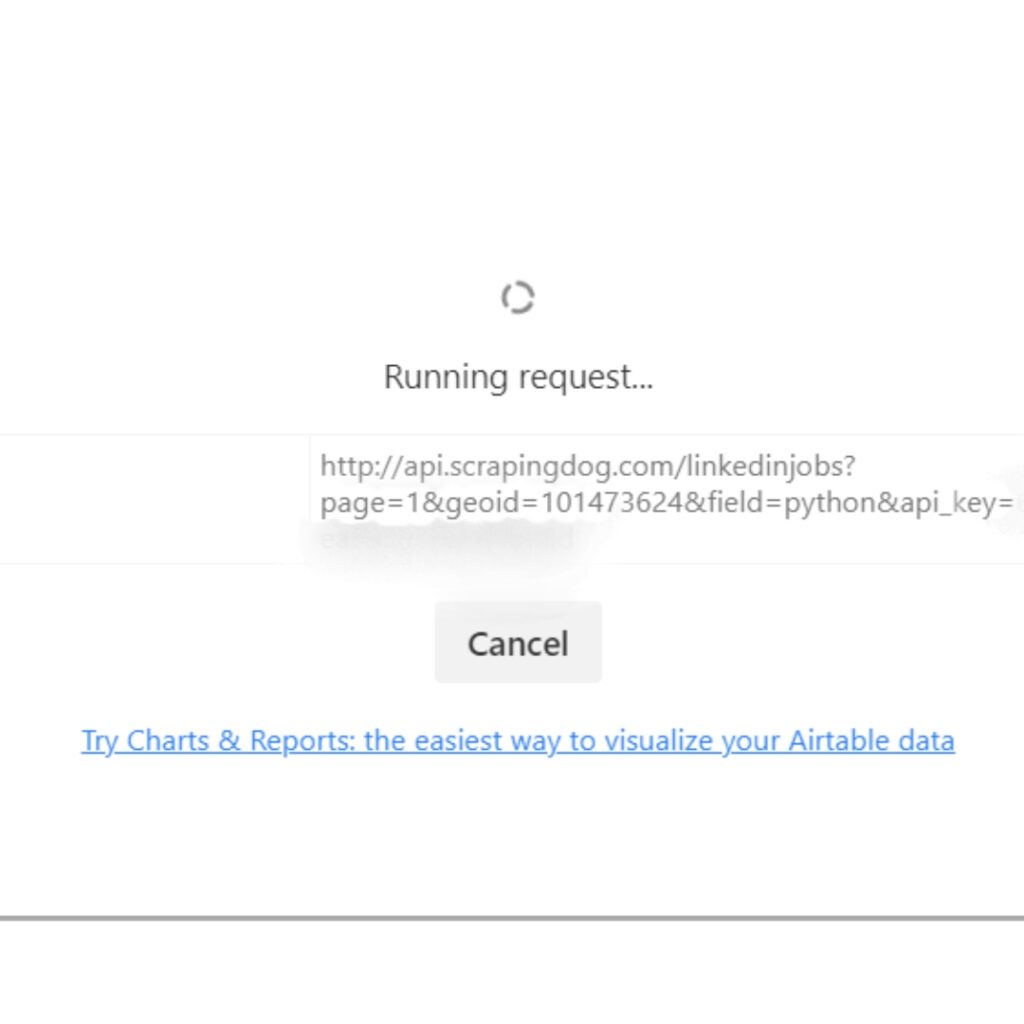
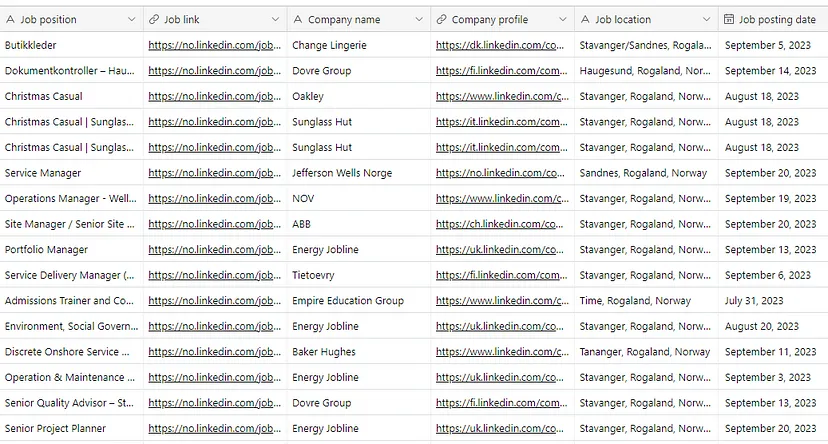
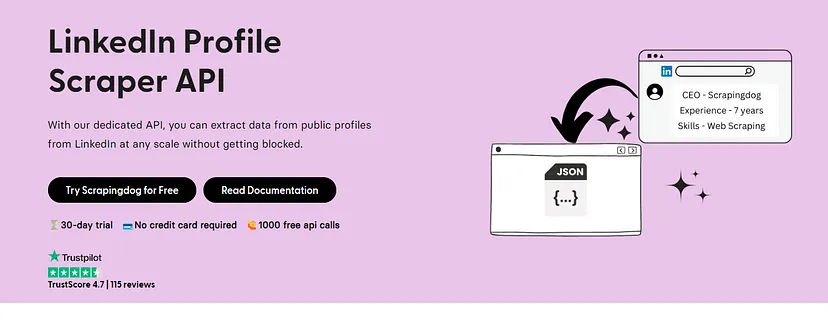
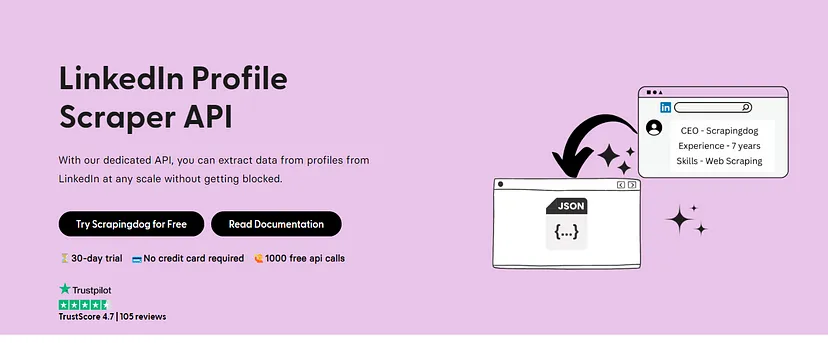
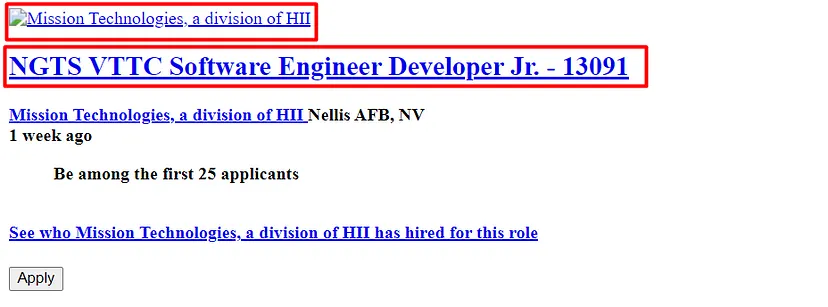
Scrapingdog also offers a generous free pack through which you can test the LinkedIn Profile Scraper API. Other than this we also offer a LinkedIn Jobs Scraping API which can be used for scraping LinkedIn Jobs at scale with a simple GET request.
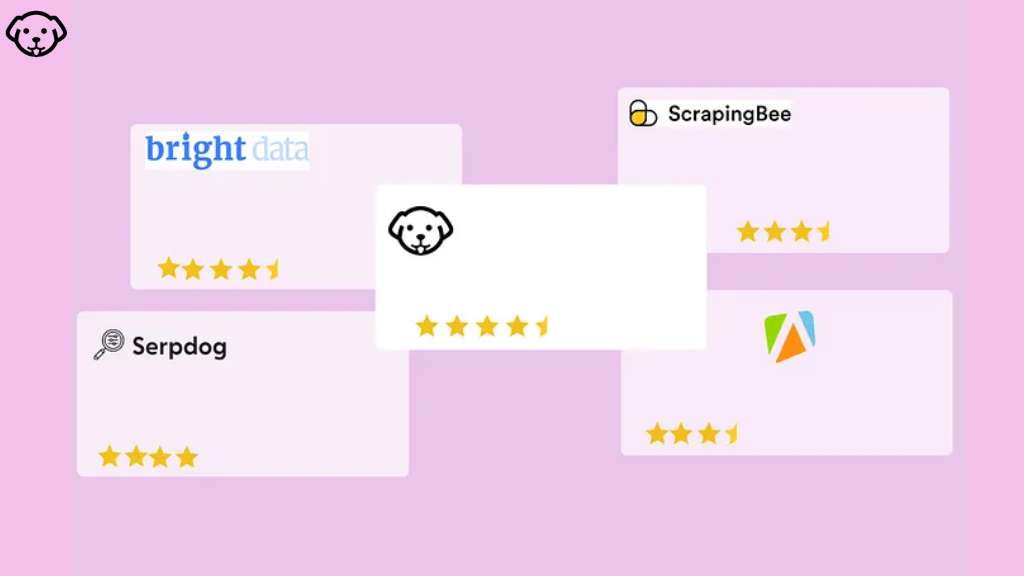
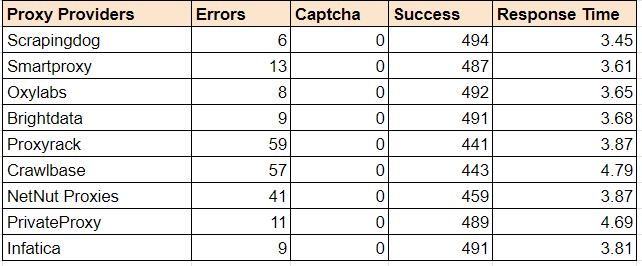
Bright Data provides a large proxy pool and various tools for web scraping with flexible plans. This is great, but their high prices and complicated tool management can be frustrating at times.
Best Bright Data Alternatives
So, why not look at the alternatives to Bright Data? There may be other options that offer similar capabilities at a lower cost and with easier-to-use tools.
By looking at these alternatives, you might find a better fit for your specific needs and budget.
Let’s jump in.
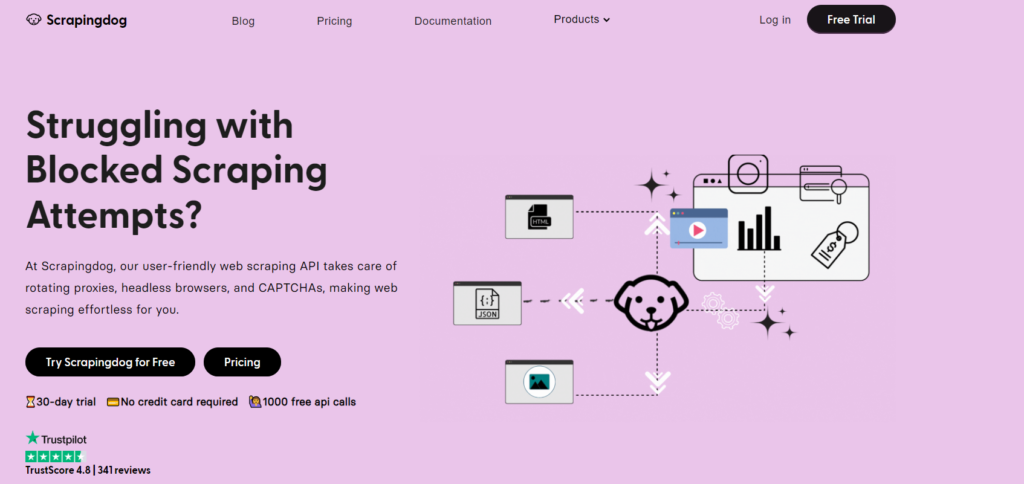
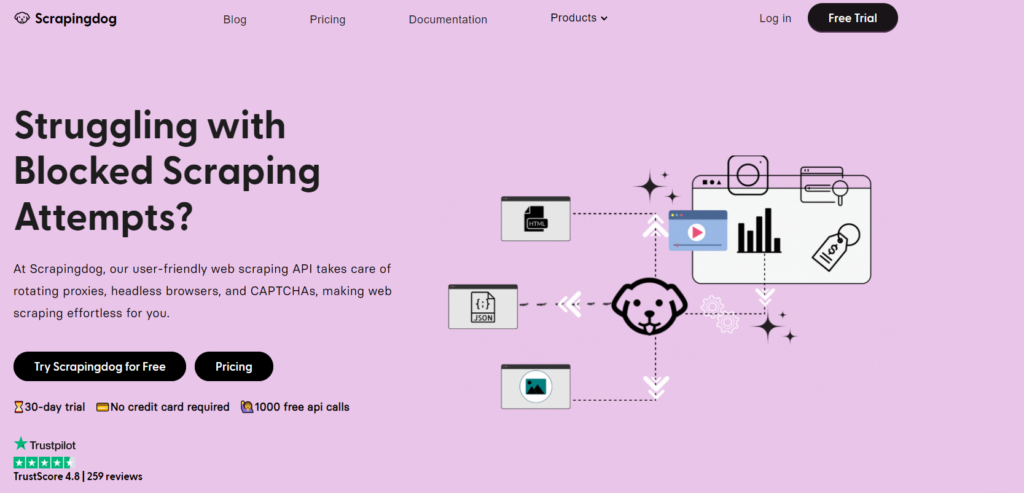
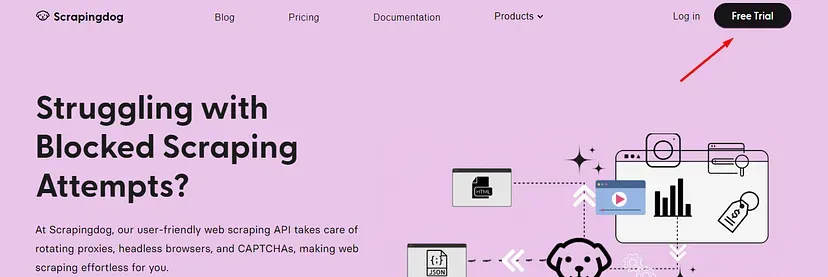
Scrapingdog
Scrapingdog
Scrapingdog is a web scraping API and can be used to scrape almost any website. If you are currently on Bright data plan and looking for a better alternative for web scraping you should give it a try.
The API takes care of rotating proxies, headless browsers, & CAPTCHAs thus making it easy for you to do blockless data extraction.
With that being said, we provide dedicated APIs for different sources to get the output in JSON format.
Other than that, we also provide unmetered datacenter proxies, that can be used in large-scale data extraction. The proxies are set to have 99.99% uptime. We have around 15 Million sets of these proxies so that if some of them get detected, your scraping process doesn’t get disturbed.
Datacenter Proxies
Scrapingdog has an average rating of 4.8 stars on Trustpilot. You can check the reviews to see how satisfied the customer is with the service.
Oxylabs
Oxylabs
The second on this list is Oxylabs. The product has pricing in the premium segment offering almost all types of proxies & has multiple APIs for web scraping.
They offer proxies from over 192+ countries making them one of the largest proxy pools.
They do provide dedicated scraper APIs, but proxies being their main strength, the APIs aren’t the best when compared to top players.
Oxylabs takes a different approach to pricing compared to Bright Data. It offers a subscription model for all its services, while residential and mobile proxies are available on a pay-as-you-go basis.
Some proxies are priced per GB of data, while others are charged per IP address. They are upfront about their pricing, with no hidden costs or upsells. Additionally, you can save 10% by opting for an annual subscription.
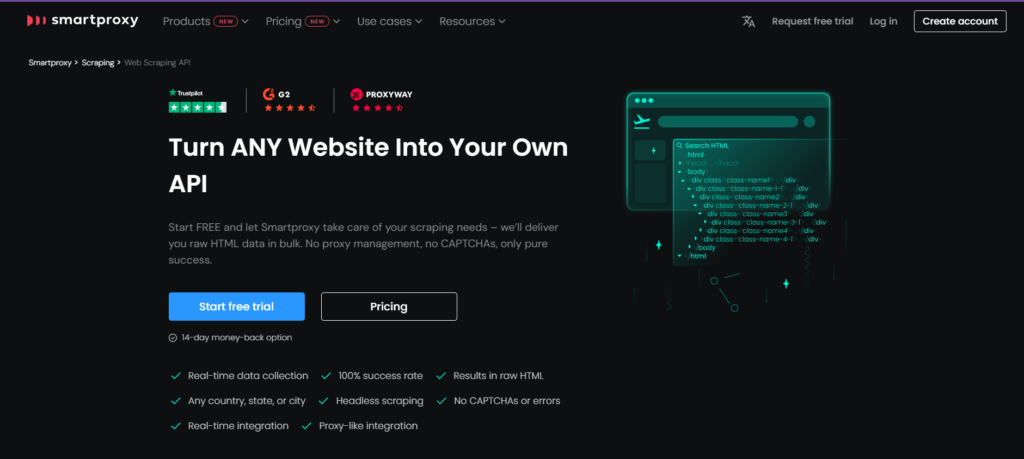
Smartproxy
Smartproxy
It can be one of the best options to save money if you are looking for a pool of rotating proxies.
Smartproxy offers around 40 Million residential proxies. They offer cheaper smaller plans as compared to other proxy providers.
After successfully driving customers to their proxy business, they are now also providing APIs for scaping. Some of them are, social media scraping APIs, SERP APIs, and no code scraper. They offer best-in-class proxies, but the dedicated APIs are mediocre.
A great proxy provider and they are very old in the business. NetNut can be your best choice if you are looking for a provider with a high volume of proxies. They offer guaranteed uptime and request-based plans.
With a proxy pool of 85M+ residential proxies, they claim to be the fastest proxy provider around the globe.
Their interactive dashboard offers real-time proxy management, an analytics tool and you can easily customize your proxies via the setting option. Other than the proxies they offer, they do offer a dedicated API for search engine scraping.
SOAX Proxy
SOAX Proxy
Compared to other proxy providers SOAX proxies is very new. They provide residential proxies, ISP proxies, and Mobile proxies. However, the proxy provider doesn’t provide datacenter and dedicated proxies.
Offering 24/7 support depending upon the type of plan you choose. Having residential proxies with over 155M +, they are a good choice for startups and medium-sized companies.
On their website, you can find quick start guides, an FAQ section, and setup instructions so it is easy for users with minimal to no experience with proxies. Besides having a blog, they now run a podcast that talks about the proxies and related stuff.
Wrapping Up: Brighdata Alternatives
Bright Data is one of the well-known proxy provider in the domain. It has a large proxy pool and some of the great features. However, as said before, the cost is one of the factors that users would switch to an alternative.
In this article, we have provided some of the best brightdata alternatives that are known well and are economical as compared to Brightdata. To choose the best one, give a test trial to each of them & see what goals you have and which of them solves all of these.
Having this clarity will let you select the perfect proxy solution for you.
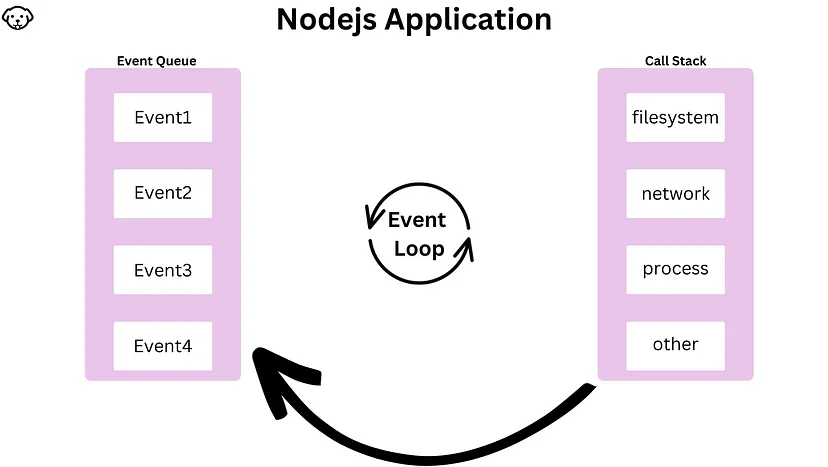
In today’s online world, there’s a lot of information out there, but finding and organizing it can be tough. That’s where web crawlers come in. These are tools that go through the internet to find and collect data for us like the ones search engines use to know what’s on the web. JavaScript, a prevalent programming language, especially with Node.js, makes building these web crawlers easier and more effective.
Web Crawling using Javascript & NodeJs
In this blog, we will be using javascript to create a web crawler and further we will understand how to store this data.
Setting Up the Environment
Before you start to build a JavaScript web crawler, you need to set up a few things on your system. For starters, you will need to have Node.js and npm set up locally to create and develop the project.
Once you have these in place, you can start by creating a new project. Run the following commands to create a new directory for your project and initialize a new Node.js project in it:
mkdir js-crawler
cd js-crawler
npm init -y
Once the NPM project is initialized, you can now start by creating a new file named app.js in the project directory. This is where you will write the code for the JavaScript web crawler.
Before you start to write the code, you should install two key dependencies you will use for this tutorial: Axios for HTTP requests and Cheerio for HTML parsing. You can do that by running the following command:
npm install axios cheerio
Now, you are ready to start building your JavaScript web crawler.
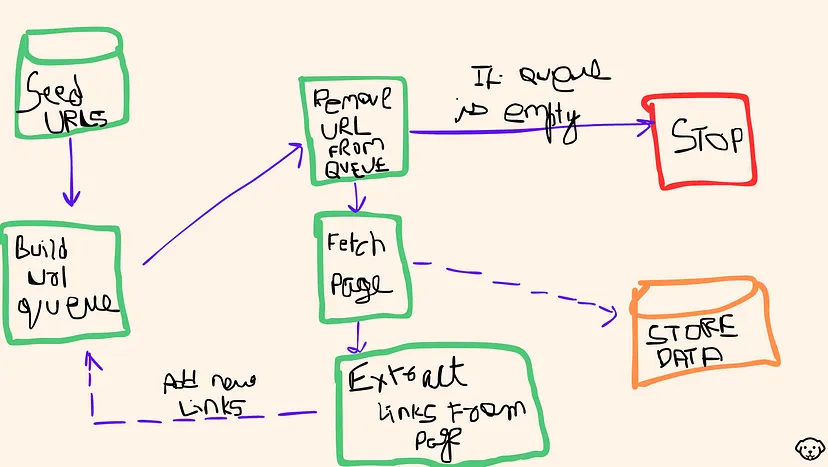
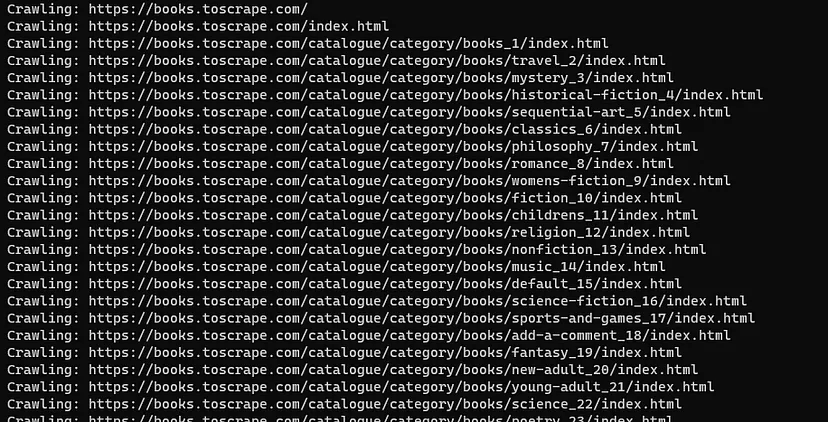
Crawling Basics
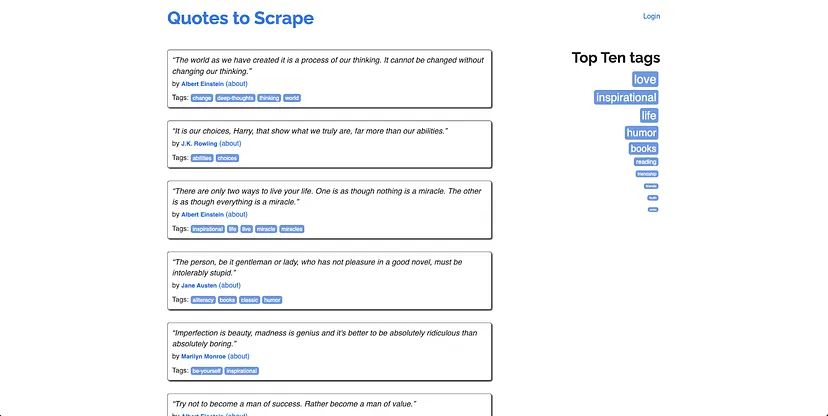
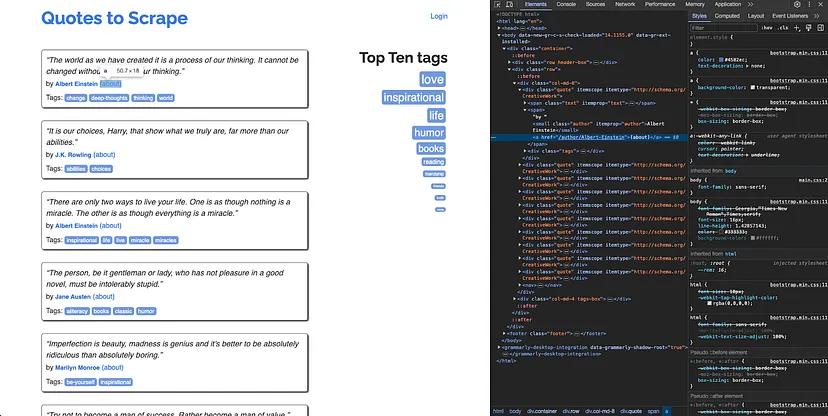
In this section, you will learn how to set up a Node.js script that crawls through all the pages under the scraping sandbox https://quotes.toscrape.com/. This page lists quotes from famous people and links to their about pages. There are multiple quotes from the same people, so you will learn how to handle duplicate links and there is a link to the source of the quotes (GoodReads) as well to help you understand how to handle external links.
Here’s what the homepage looks like:
Fetching a Web Page
To fetch the homepage, you will need to paste the following code snippet in your app.js file:
This will retrieve the HTML of the page at https://quotes.toscrape.com/ and store it in pageHTML. You can now use Cheerio to traverse through the DOM and extract the data that you need. To initialize Cheerio with the HTML of the quotes page, update the code in app.js to look like the following:
const axios = require("axios")
// Add the import for Cheerio
const cheerio = require("cheerio");

const baseURL = "https://quotes.toscrape.com"

function main() {
    const pageHTML = await axios.get(baseURL + "/")

    // Initialize Cheerio with the page's HTML
    const $ = cheerio.load(pageHTML.data)
}

main()
You can now use the $ variable to access and extract HTML elements similar to how you would work with jQuery. You will learn more about how to extract links and text in the following sections.
Extracting Links
The next step is to start extracting links from the page. There are three types of links that you will extract from this website:
/author: These are URLs for author profile pages. You will collect these from quotes and use these to extract author information.
/tag: These are URLs for tag pages. You will find quotes that are related to a particular tag on these pages. You can use these to extract lists of related quotes.
/page: These are URLs to help you navigate through the pagination of the website. You will need to collect and use these to navigate through the website and collect all quotes.
First of all, create two arrays to store pagination URLs and visited URLs and two Sets to store author page URLs and tag URLs in the main() function:
const paginationURLs = ["/"]
    const visitedURLs = []

    const authorURLs = new Set()
    const tagURLs = new Set()
The visitedURLs array will help avoid crawling the same URL twice. The reason for using Sets instead of arrays for author and tag URLs is to avoid storing the same URL twice in the list. Set automatically removes duplicate elements from the list.
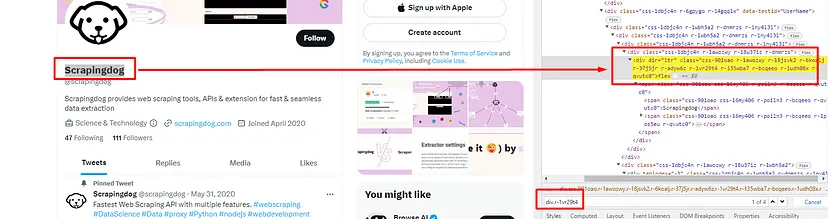
The next step is to identify the locators for the links from the page. You will need to inspect the HTML of the webpage in a web browser and find the appropriate class names, IDs, and elements to locate the elements.
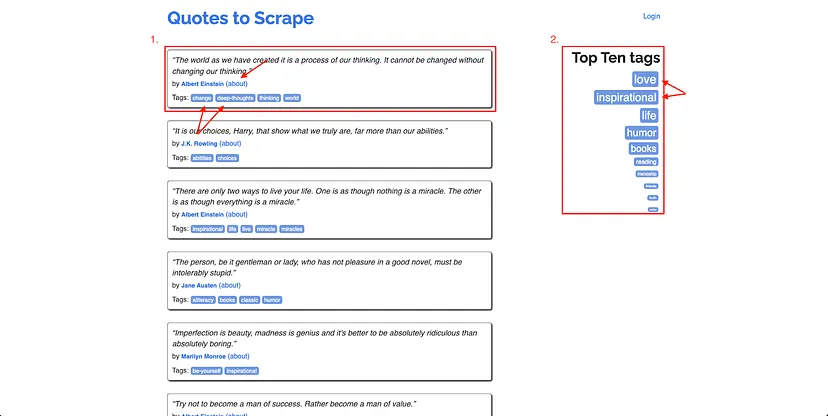
As mentioned before, you will be extracting author profile links and tags from quotes and tag links from the “Top Ten tags” list on each page:
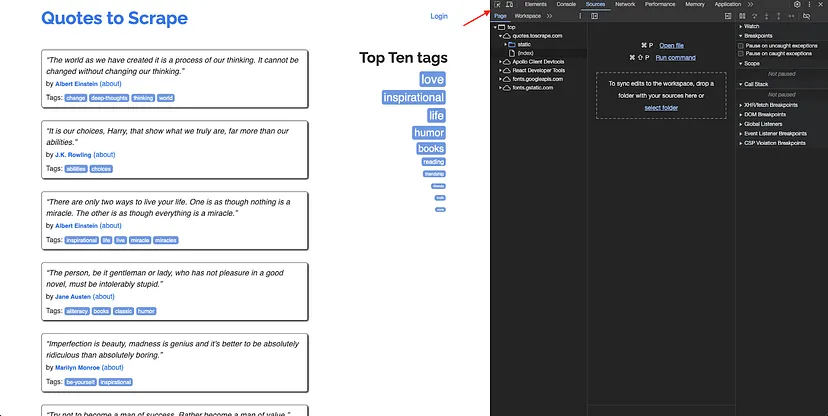
To write the selector for extracting the author profile link from a quote, right anywhere on the webpage and click Inspect. The developer tools window will open. On this window, click on the Sources tab and click on the Inspect button at the top:
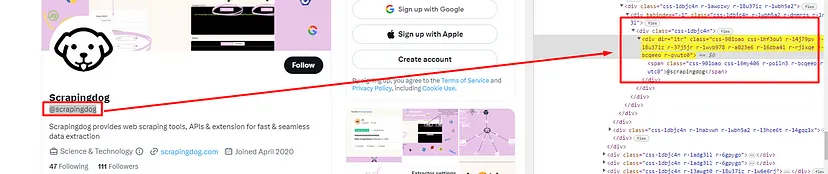
Now, click on the author link to view its source in the developer tools window:
You can now use the DOM structure to write a selector query for this element. For instance, a selector query that works for this element would be .quote a. However, this will also extract links from the tags as well. It is not possible to make the query more specific since the target anchor element does not have any ID or class added to it. Therefore, you will need to filter out the tags’ URLs while processing the results of the extraction from Cheerio.
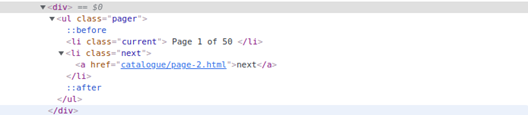
Following a similar process, you will need to write the selector queries for the top ten tags and pagination as well. A selector query that works for Top Ten tags is .tag-item a and one that works for pagination is .pager > .next a. You can use these to write the logic for extracting and filtering the links.
Next, create a new function named crawlQuotes and define it as the following:
const crawlQuotes = async (paginationURLs, visitedURLs, authorURLs, tagURLs) => {

    let currentURLIndex = 0

    while (visitedURLs.length !== paginationURLs.length) {

        const pageHTML = await axios.get(baseURL + paginationURLs[currentURLIndex])

        const $ = cheerio.load(pageHTML.data)

        // Whenever a URL is visited, add it to the visited URLs list
        visitedURLs.push(paginationURLs[currentURLIndex])

        // Extracting all author links and tag links from each quote
        $(".quote a").each((index, element) => {
            const URL = $(element).attr("href")

            if (URL.startsWith("/tag")){
                if (URL.endsWith("/page/1/"))
                    tagURLs.add(URL.split("/page/1/")[0])
                else
                    tagURLs.add(URL)
            } else if (URL.startsWith("/author"))
                authorURLs.add(URL)

        })

        // Extracting all tag links from the top ten tags section on the website
        $(".tag-item a").each((index, element) => {
            const URL = $(element).attr("href")

            if (URL.startsWith("/tag")) {
                if (URL.endsWith("/page/1/"))
                    tagURLs.add(URL.split("/page/1/")[0])
                else
                    tagURLs.add(URL)
            } else if (URL.startsWith("/author"))
                authorURLs.add(URL)
        })

        // Extracting the links from the "next" button at the bottom of the page
        $("li.next a").each((index, element) => {
            const URL = $(element).attr("href")

            if (URL.startsWith("/page"))
                paginationURLs.push(URL)
        })

        // Once the processing is complete, move to the next index
        currentURLIndex += 1
    }
}
This function takes care of extracting all tags, authors, and page links from the homepage. It also takes care of iterating over all page links to extract all data from the website, and the use of Sets in the URL queues for author and tag pages ensures that any link encountered twice does not end up creating duplicate entries in the queue.
You can run this function by updating your main() function to look like this:
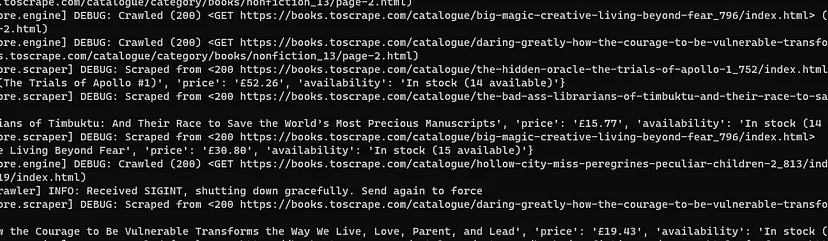
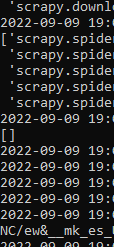
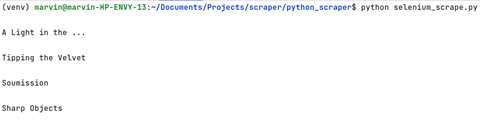
You can run the script by running the command node app.js in a terminal window. You should see the extracted author, tag, and pagination URLs in the output:
This confirms that your web crawler is working correctly. As you saw, designing a web crawler greatly depends on the structure of the target website. Studying the DOM structure and writing the right selector queries is an integral part of the process.
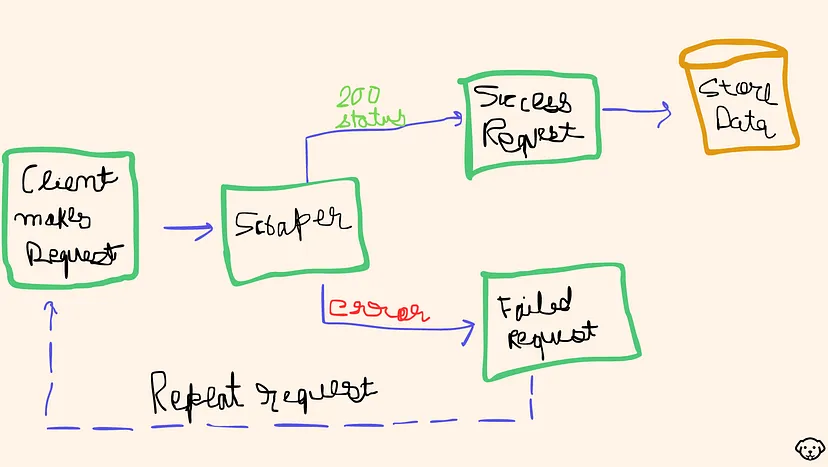
Scheduling and Processing
While you have a working web crawler already, there are good chances it will run into errors and rate limits in real-world use cases. You need to prepare for such cases as well.
It is considered a good practice to avoid overloading target servers by sending too many requests simultaneously. To do that, consider introducing a delay in your pagination loop. You can use a “waiting” function like the following:
function halt(duration) {
  return new Promise(r => setTimeout(r, duration))
}
Calling the halt function with a duration like 300 or 400 will help you slow down the rate at which your code crawls through the entire target website. The duration can be adjusted based on the estimated number of URLs to be crawled and any known rate limits of the target website.
Error handling is important to ensure the smooth functioning of your web crawlers. Make sure to always wrap network requests in try-catch blocks and provide appropriate error handling logic for known issues, like HTTP 403 (forbidden) or HTTP 429 (rate limit exceeded).
Data Extraction and Storage
Now that you have a set of URLs extracted from the target website, it becomes very easy to extract information from those pages using Cheerio. For instance, if you want to extract the details of each author and store it in a JSON file locally, you can do that with a few lines of code with Cheerio.
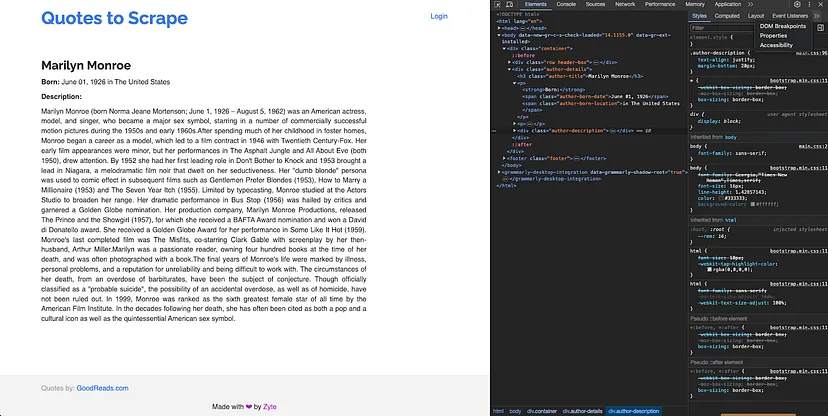
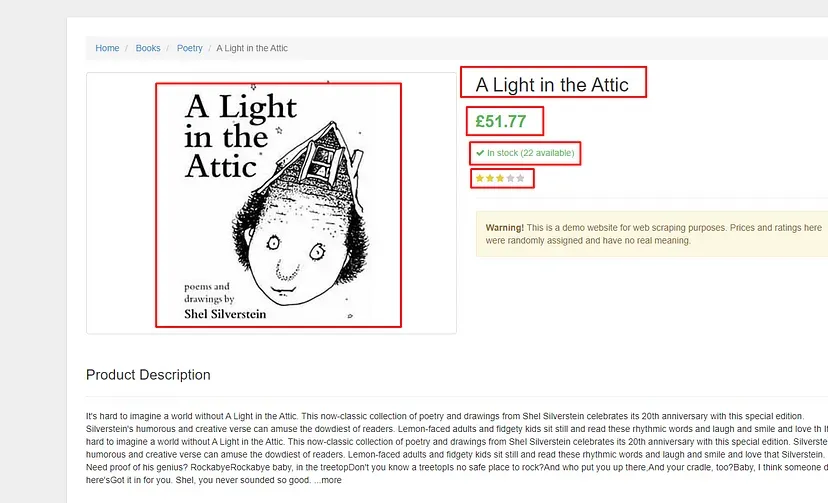
First of all, open an author page to understand its structure and figure out the right Cheerio selectors.
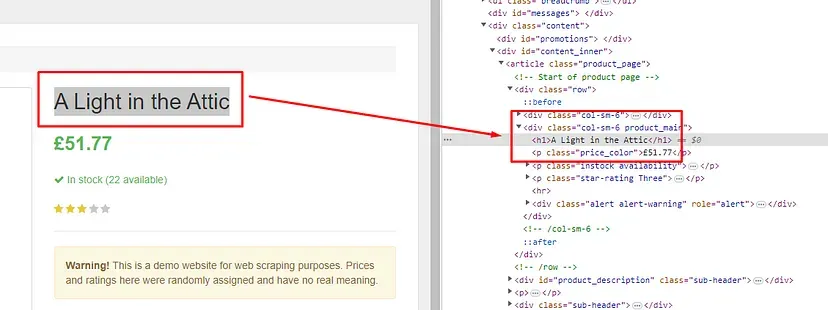
You will notice that the name, date of birth, location of birth, and a description of the author can be found under an H3 with the class “author-title”, a span with the class “author-born-date”, a span with the class “author-born-location”, and a div with the class “author-description” respectively. You can use these selectors to write a new function in the same index.js file that iterates over all author URLs and extracts this information:
You can then update your main() function to call this function right after the crawlQuotes function:
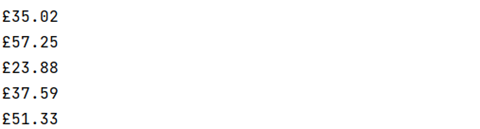
Now when you run the app (using node index.js), you will be able to view the information for all authors printed as an array of author objects in the terminal. You can now choose to store this in a database or a JSON file as you require.
You can find the complete code developed in this tutorial in this GitHub repo.
Conclusion
This article has shown you the basics of building a web crawler using JavaScript and Node.js. Web crawlers are essential for sorting through massive amounts of data online, and with JavaScript and Node.js, you have a powerful set of tools to do just that.
Keep practicing and experimenting with what you’ve learned. The more you work with these tools, the better you’ll get at managing and making sense of the web’s enormous resources.
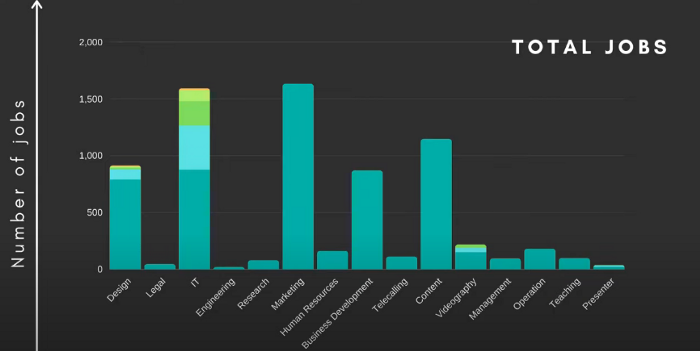
Indeed is one of the biggest job listing platforms available in the market. They claim around 300M visitors on their website every month. As a data engineer, you want to identify which job is in great demand. Well, then you have to collect data from websites like Indeed to identify and make a conclusion.
Building an Indeed Scraper using Python
In this article, we are going to web scrape Indeed & create an Indeed Scraper using Python 3.x. We are going to scrape Python jobs from Indeed in New York.
At the end of this tutorial, we will have all the jobs that need Python as a skill in New York.
Why Scrape Indeed Jobs?
Scraping Indeed Jobs can help you in multiple ways. Some of the use cases for extracting data from it are: –
With this much data, you can train an AI model to predict salaries in the future for any given skill.
Companies can use this data to analyze what salaries their rival companies are offering for a particular skill set. This will help them improve their recruitment strategy.
You can also analyze what jobs are in high demand and what kind of skill set one needs to qualify for jobs in the future.
Setting up the prerequisites
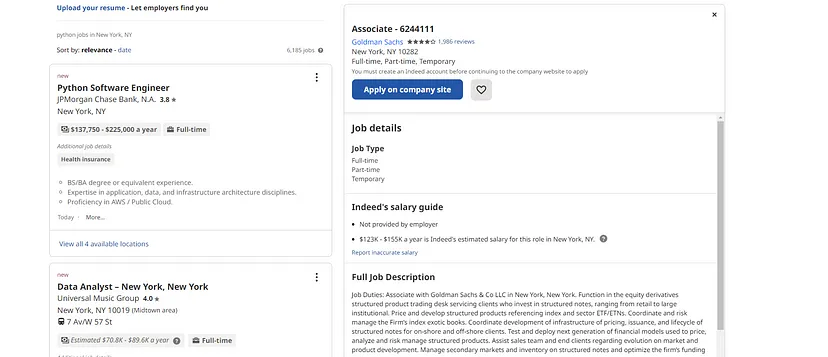
We would need Python 3.x for this project and our target page will be this one from Indeed.
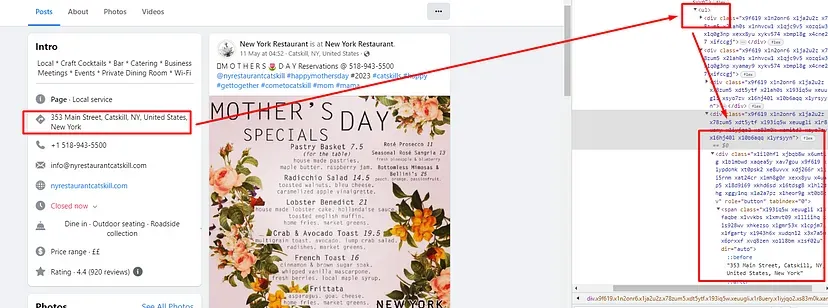
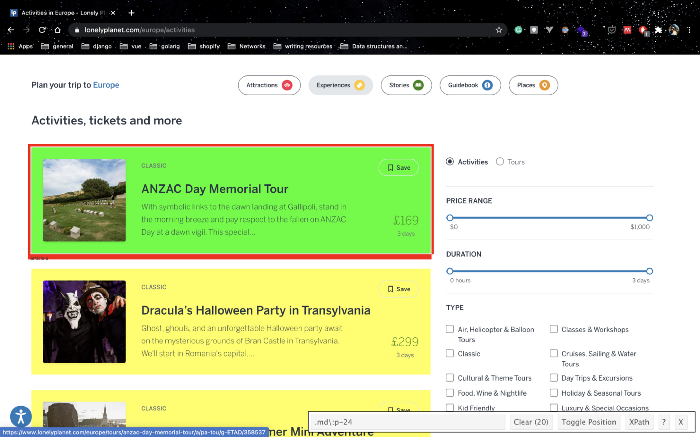
Page We Are Going To Scrape From Indeed
I am assuming that you have already installed Python on your machine. So, let’s move forward with the rest of the installation.
We would need two libraries that will help us extract data. We will install them with the help of pip.
Requests — Using this library we are going to make a GET request to the target URL.
BeautifulSoup — Using this library we are going to parse HTML and extract all the crucial data that we need from the page. It is also known as BS4.
Installation
pip install requests
pip install beautifulsoup4
You can create a dedicated folder for Indeed on your machine and then create a Python file where we will write the code.
Let’s decide what we are going to scrape from Indeed.com
Whenever you start a scraping project, it is always better to decide in advance what exactly we need to extract from the target page.
Things we are going to scrape
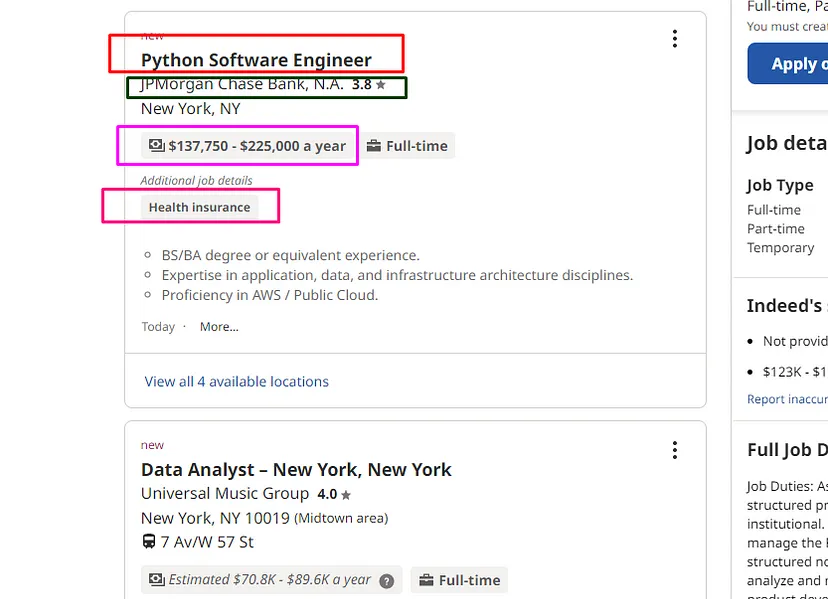
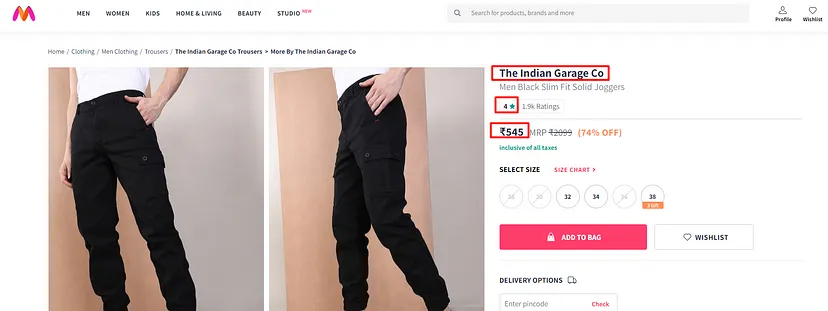
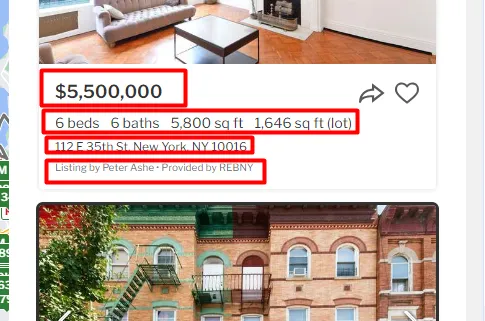
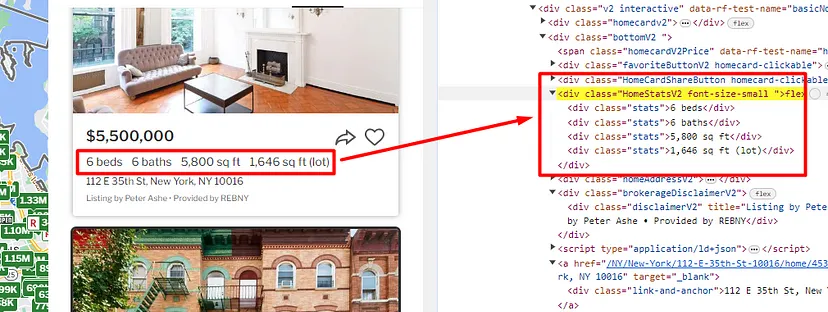
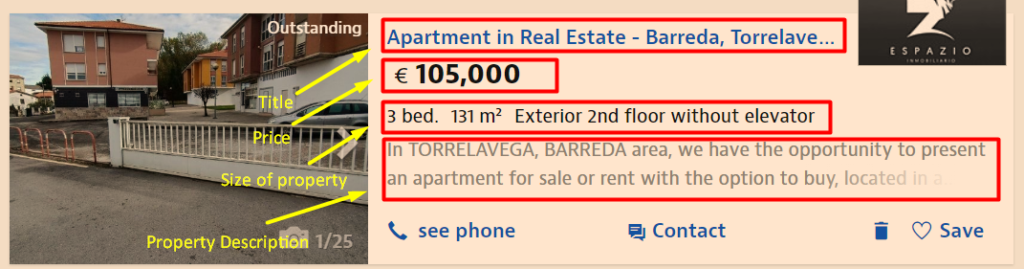
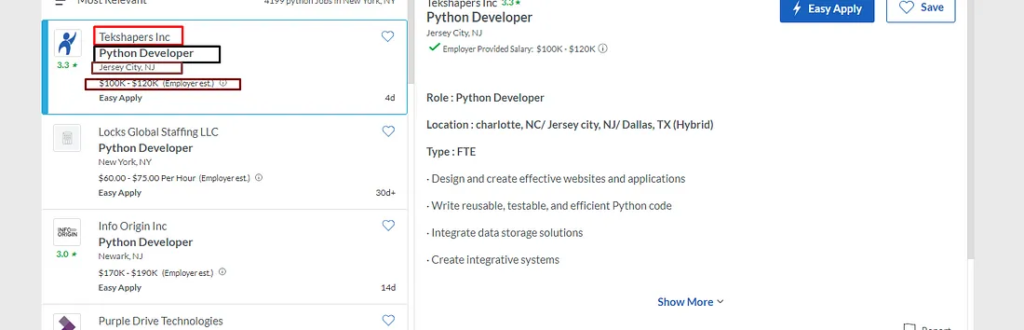
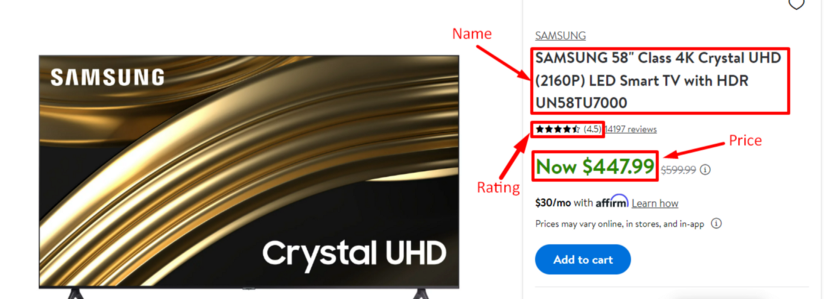
We are going to scrape all the highlighted parts in the above image.
Name of the job
Name of the company
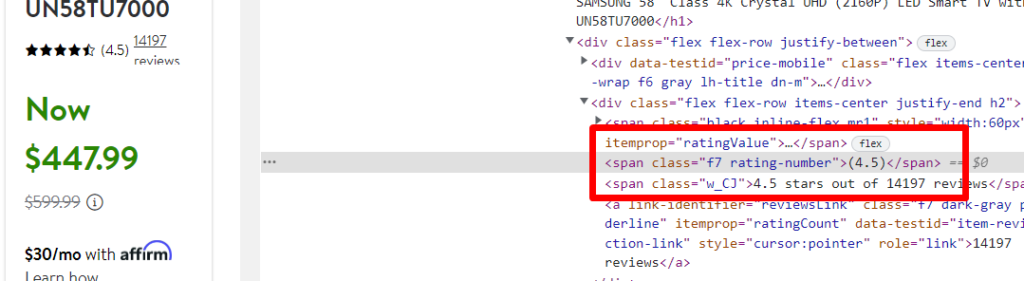
Their ratings
The salary they are offering
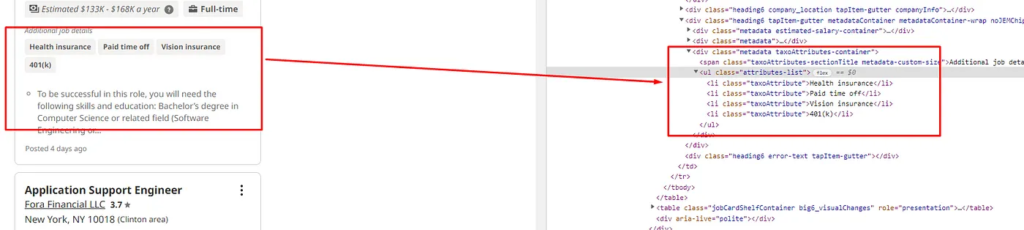
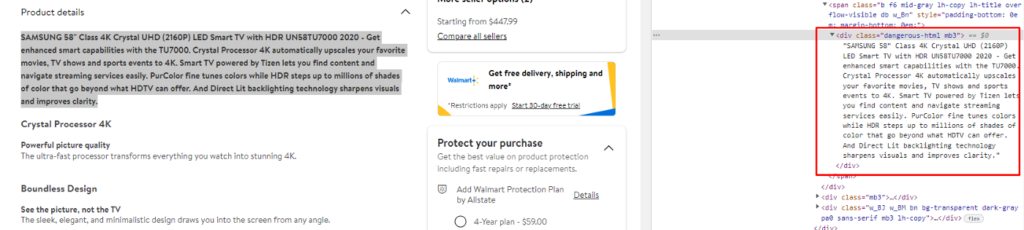
Job details
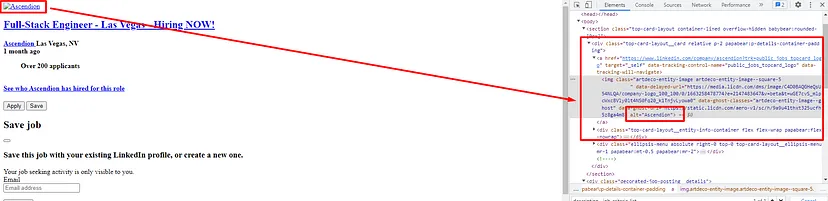
Let’s Start Indeed Job Scraping
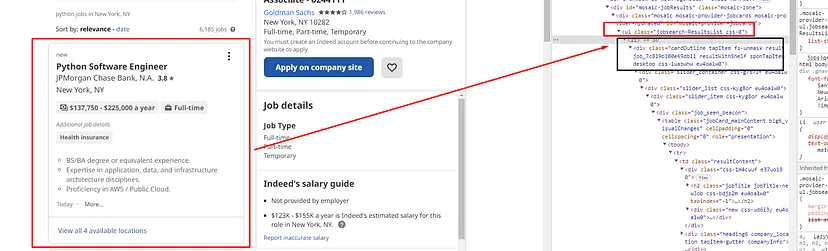
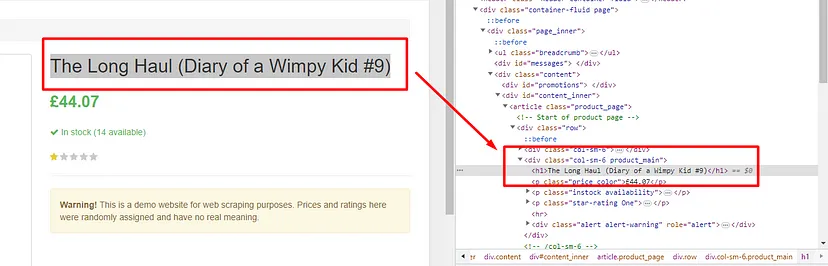
Before even writing the first line of code, let’s find the exact element location in the DOM.
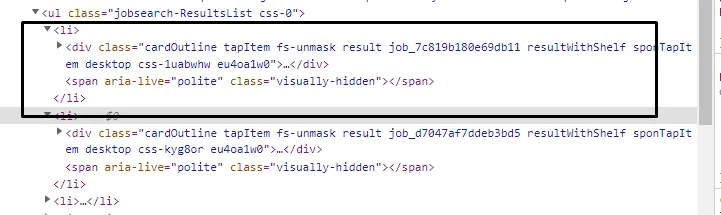
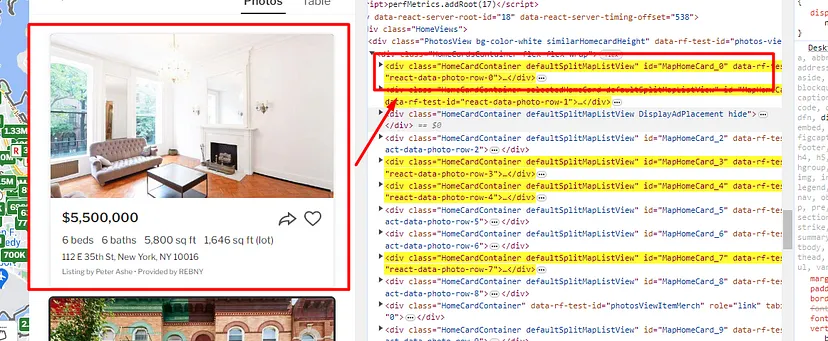
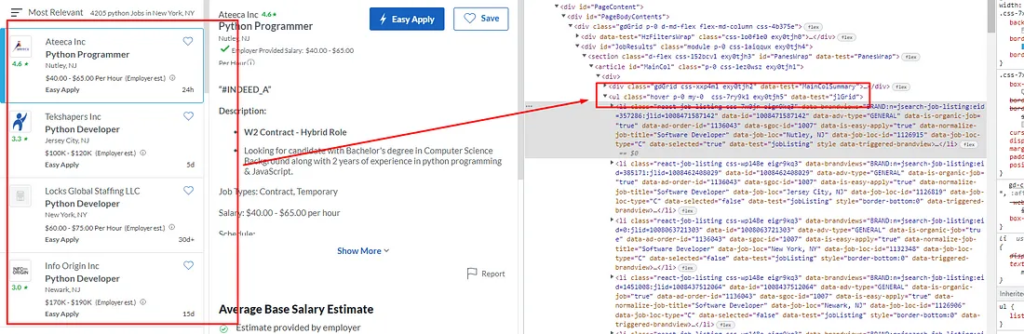
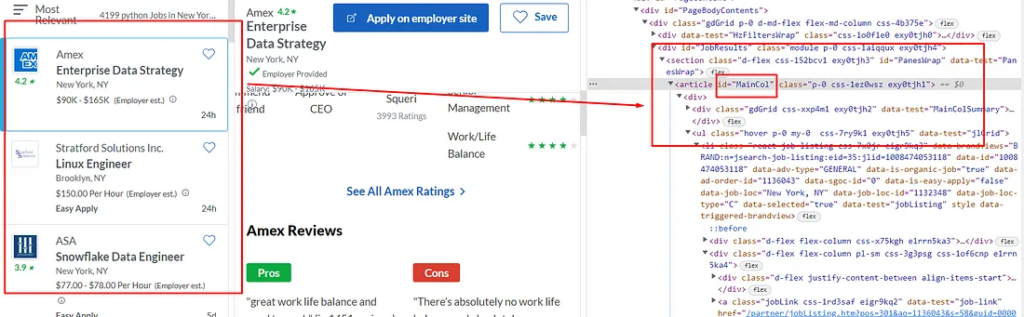
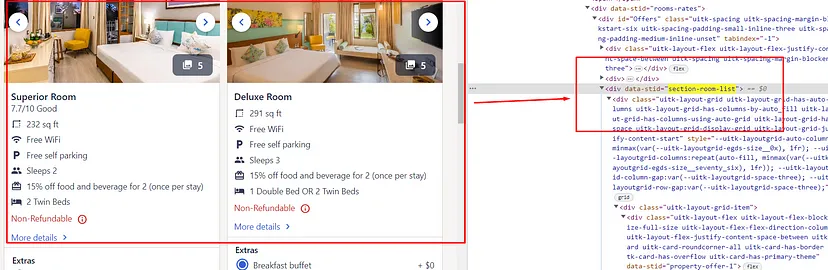
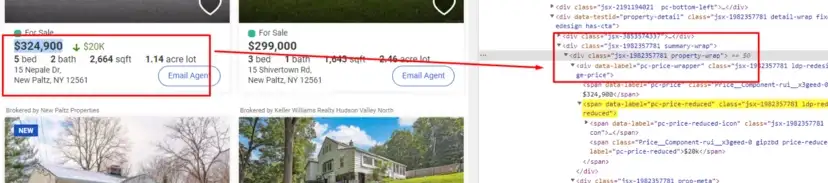
Inspecting Job Box in Source Code
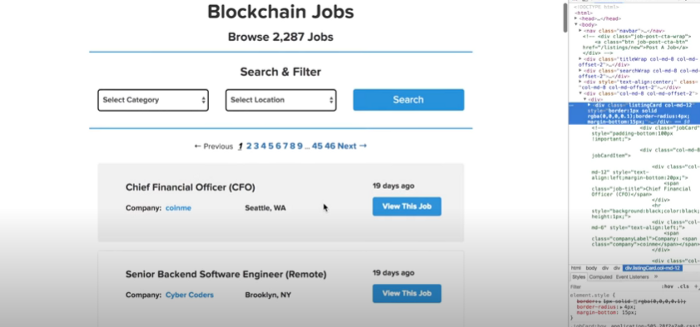
Every job box is a list tag. You can see this in the above image. And there are 18 of them on each page and all of them fall under the div tag with class jobsearch-ResultsList. So, our first job would be to find this div tag.
Let’s first import all the libraries in the file.
import requests
from bs4 import BeautifulSoup
Now, let’s declare the target URL and make an HTTP connection to that website.
Now, we will run a for loop on this list alllitags.
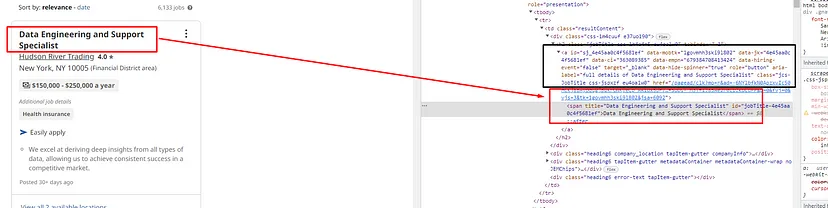
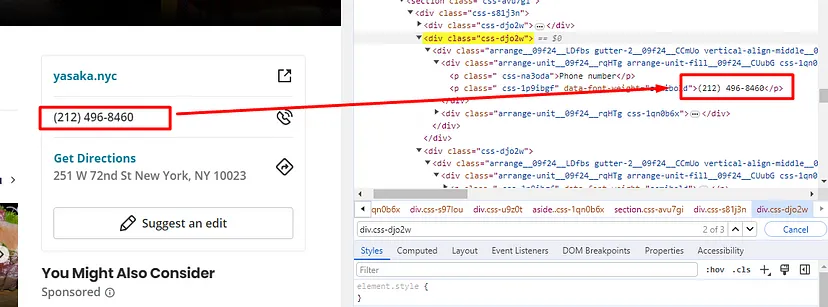
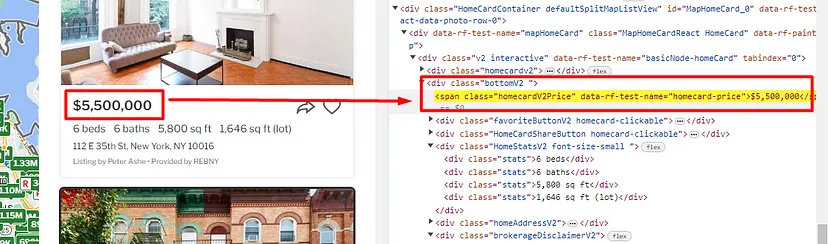
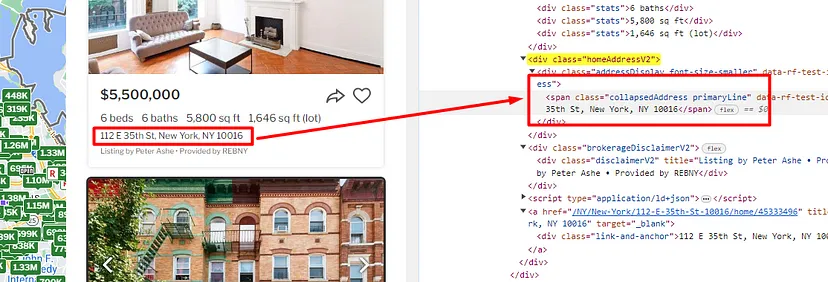
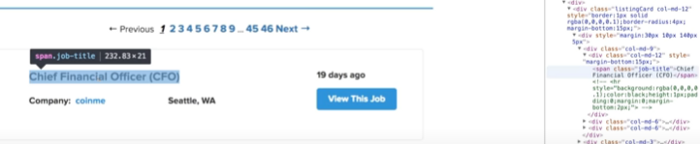
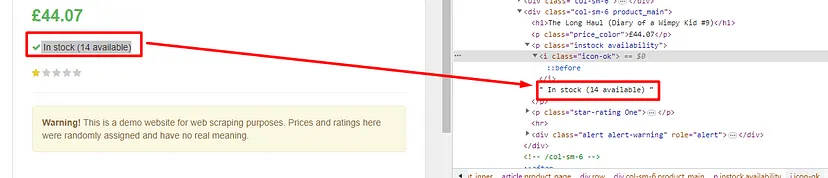
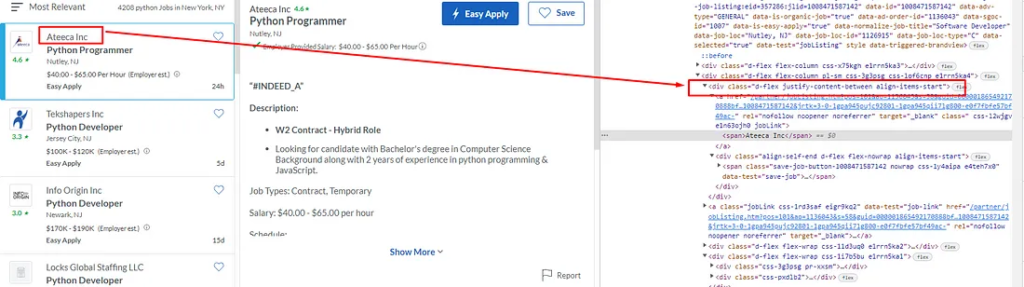
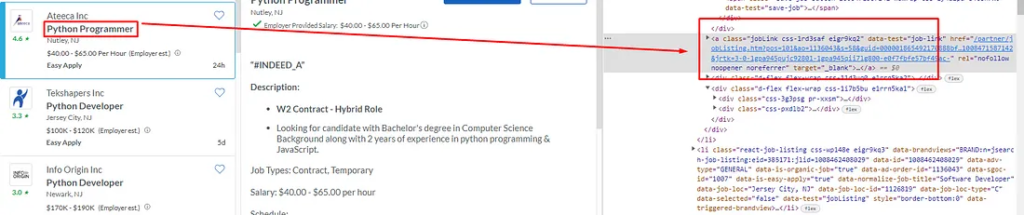
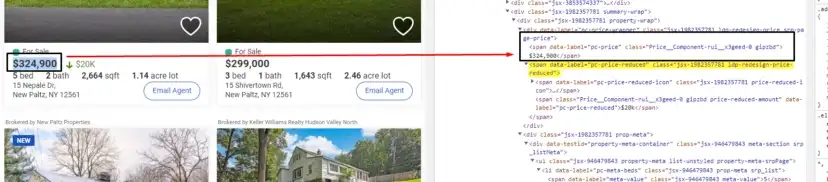
Inspecting Name of the Job
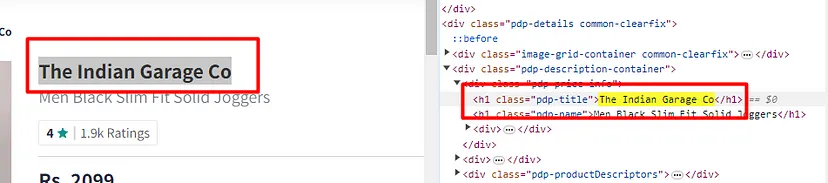
As you can see in the image above that the name of the job is under the a tag. So, we will find this a tag and then extract the text out of it using .text() method of BS4.
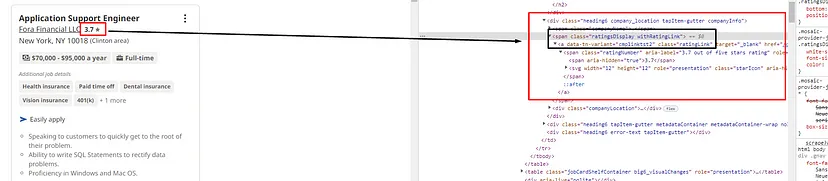
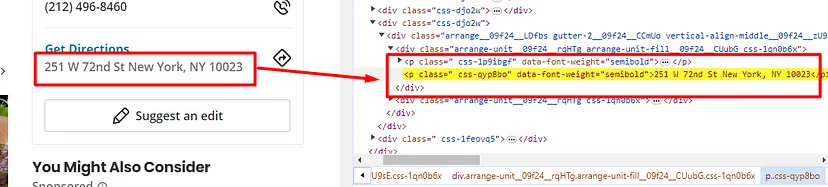
The name of the company can be found under the div tag with class heading6 company_location tapItem-gutter companyInfo. Let’s extract this too.
Here we have first found the div tag and then we have used the .find() method to find the span tag inside it. You can check the image above for more clarity.
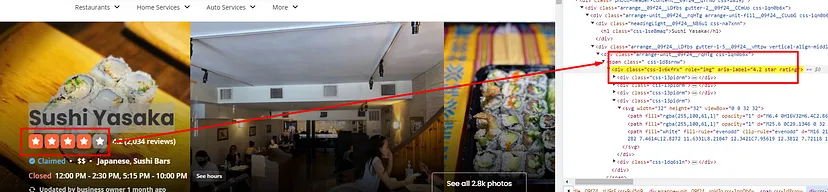
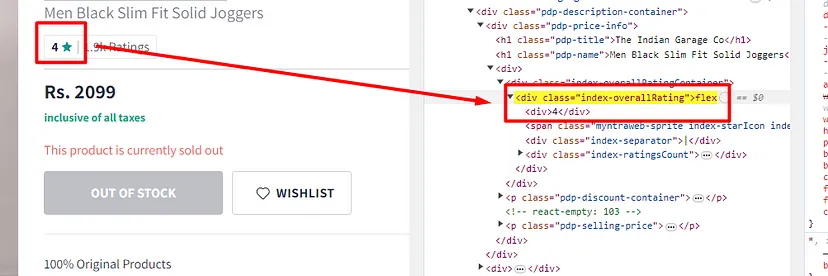
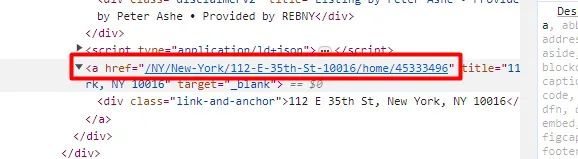
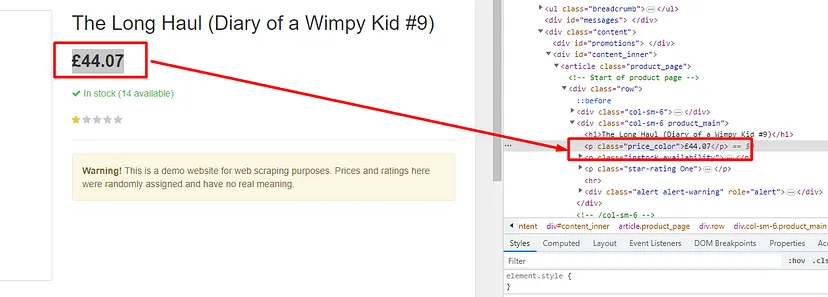
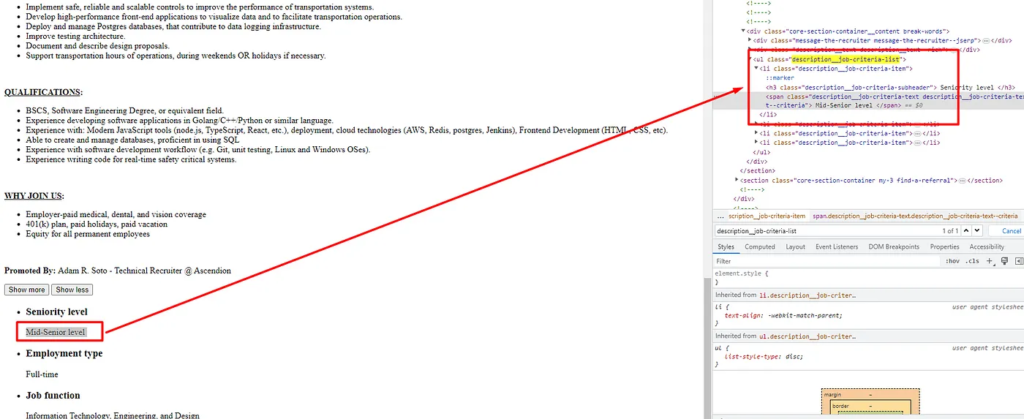
Let’s extract the rating now.
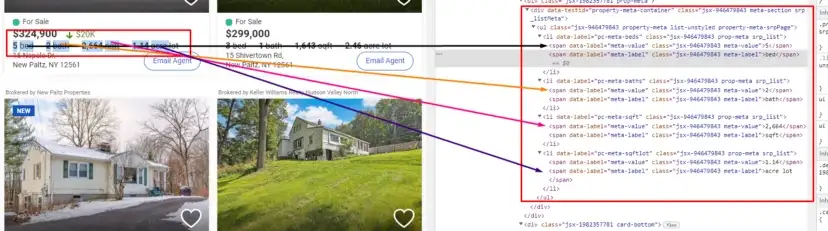
Inspecting the Rating of job post in source code
The rating can be found under the same div tag as the name of the company. Just the class of the span tag will change. The new class will be ratingsDisplay
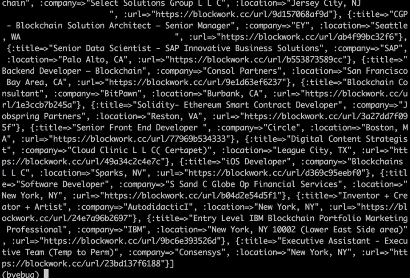
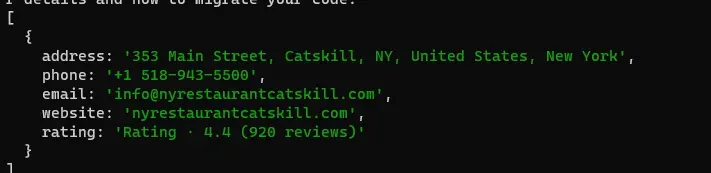
In the end, we have pushed our object o inside the list l and made the object o empty so that when the loop runs again it will be able to store data of the new job.
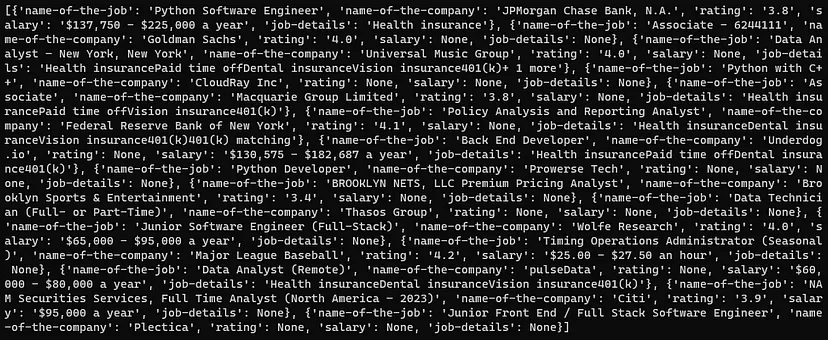
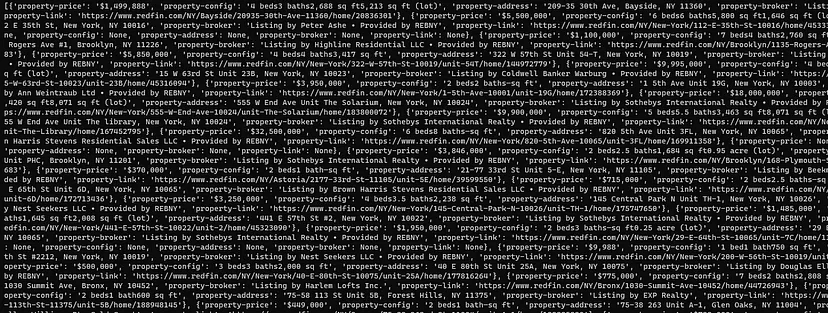
Let’s print it and see what are the results.
print(l)
Complete Code
You can make further changes to extract other details as well. You can even change the URL of the page to scrape jobs from the next pages.
But for now, the complete code will look like this.
Scrapingdog provides a dedicated Indeed Scraping API with which you can scrape Indeed at scale. You won’t even have to parse the data because you will already get data in JSON form.
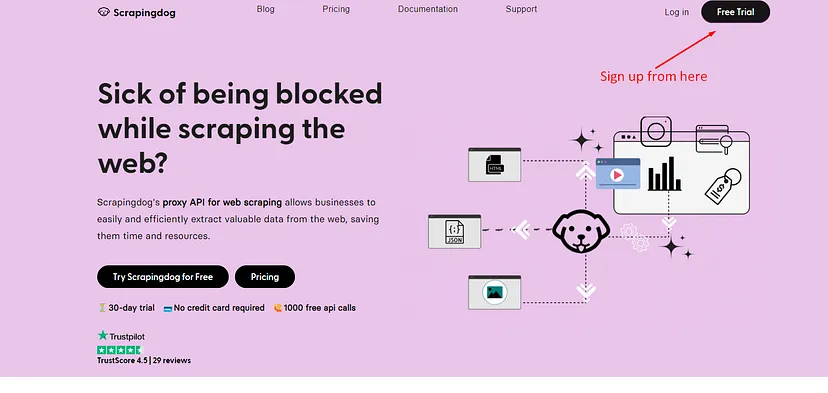
Scrapingdog provides a generous free pack with 1000 credits. You just have to sign up for that.
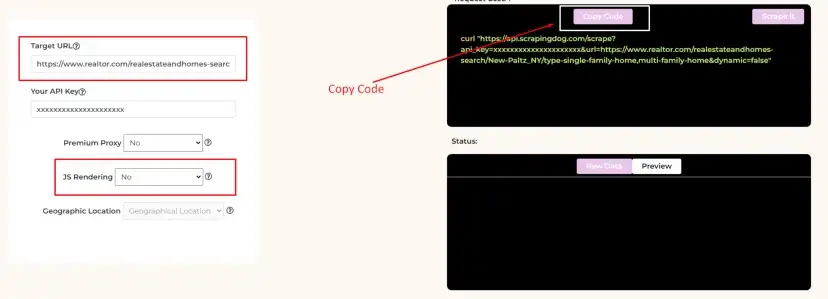
Scrapingdog Homepage
Once you sign up, you will find an API key on your dashboard. You have to paste that API key in the provided code below.
import requests
import json

url = "https://api.scrapingdog.com/indeed"
api_key = "Paste-your-own-API-key"
job_search_url = "https://www.indeed.com/jobs?q=python&l=New York, NY&vjk=8bf2e735050604df"

# Set up the parameters
params = {"api_key": api_key, "url": job_search_url}
print(params)
# Make the HTTP GET request
response = requests.get(url, params=params)

# Check if the request was successful (status code 200)
if response.status_code == 200:
    # Parse the JSON content
    json_response = response.json()
    print(json_response)
else:
    print(f"Error: {response.status_code}")
    print(response.text)
With this script, you will be able to scrape Indeed with a lightning-fast speed that too without getting blocked.
Forget about getting blocked while scraping Indeed
Try out Scrapingdog Indeed Scraper API with thousands of proxy servers and an entire headless Chrome cluster
Conclusion
In this tutorial, we were able to scrape Indeed job postings with Requests and BS4. Of course, you can modify the code a little to extract other details as well.
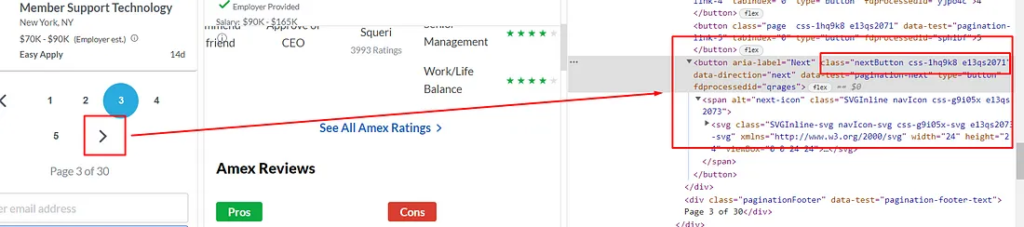
You can change the page URL to scrape jobs from the next page. You have to find the change that happens to the URL once you change the page by clicking the number from the bottom of the page. For scraping millions of such postings you can always use Scrapingdog.
I hope you like this little tutorial and if you do then please do not forget to share it with your friends and on your social media.
Yes, it is allowed to scrape Indeed Jobs. Since this data is publicly available collecting this data doesn’t violate any policy. However, if this collected data is not used ethically, this can be considered illegal.
Yes, Indeed.com does provide an API to get access to its job data. However, it isn’t economical and may hit the pocket hard. Using 3rd party APIs would get you the same job done with less pricing.
Additional Resources
Here are a few additional resources that you may find helpful during your web scraping journey:
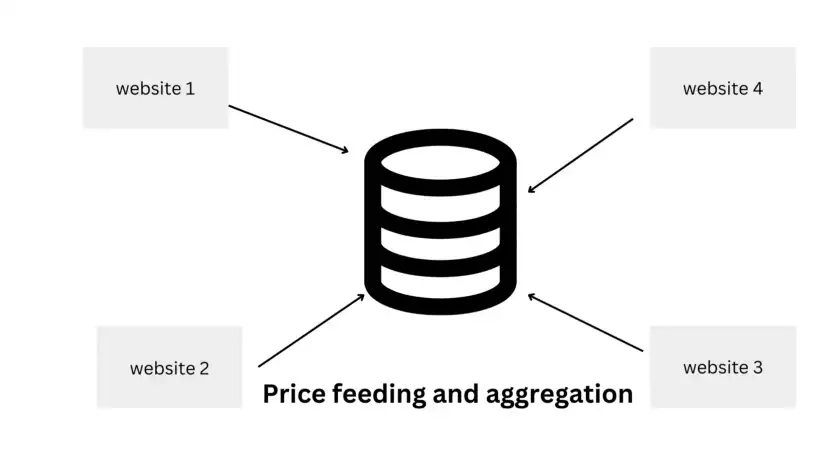
Web scraping is a process of collecting data from the Internet for price aggregation, market research, lead generation, etc. But web scraping is mainly done by major programming languages like Python, Nodejs, or PHP due to this many non-coders found it very difficult to collect data from the internet. They have to hire a developer to complete small data extraction tasks.
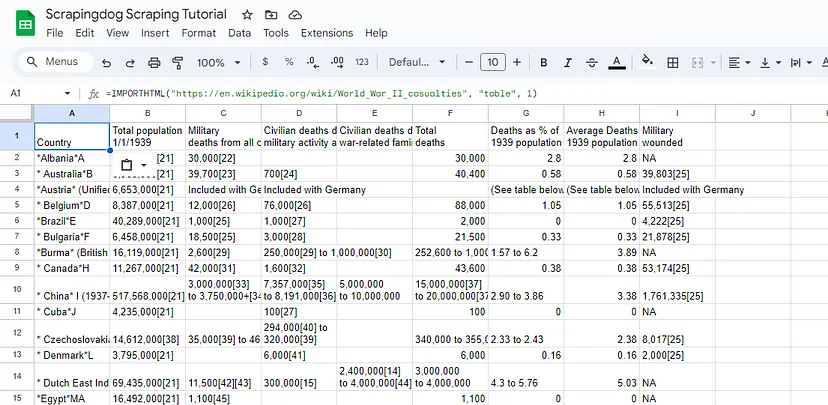
How To Scrape Websites using Google Sheets
In this article, we will learn how we can scrape a website using Google Sheets without using a single line of code. Google Sheets provides built-in functions like IMPORTHTML, IMPORTXML, and IMPORTDATA that allows you to import data from external sources directly into your spreadsheet. It is a great tool for web scraping. Let’s first understand these built-in functions one by one.
Google Sheets Functions
It is better to discuss the capabilities of Google Sheets before scraping a live website. It offers three functions as explained above. Let’s discuss those functions in a little detail.
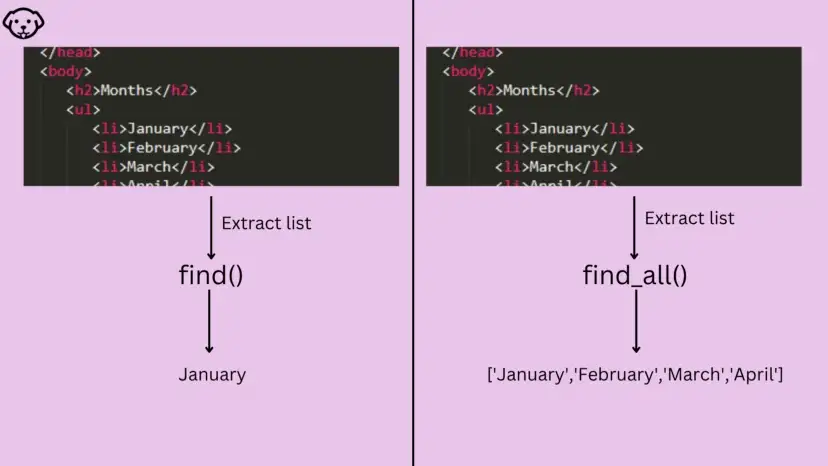
IMPORTHTML– This function provides you with the capability to import a structured list or a table from a website directly into the sheet. Isn’t that great?
=IMPORTHTML("url", "query", index)
“url” is the URL of the webpage containing the table or list you want to import data from.
“query” specifies whether to import a table (“table”) or a list (“list”).
index the index of the table or list on the webpage. For example, if there are multiple tables on the page, you can specify which one to import by providing its index (e.g., 1 for the first table).
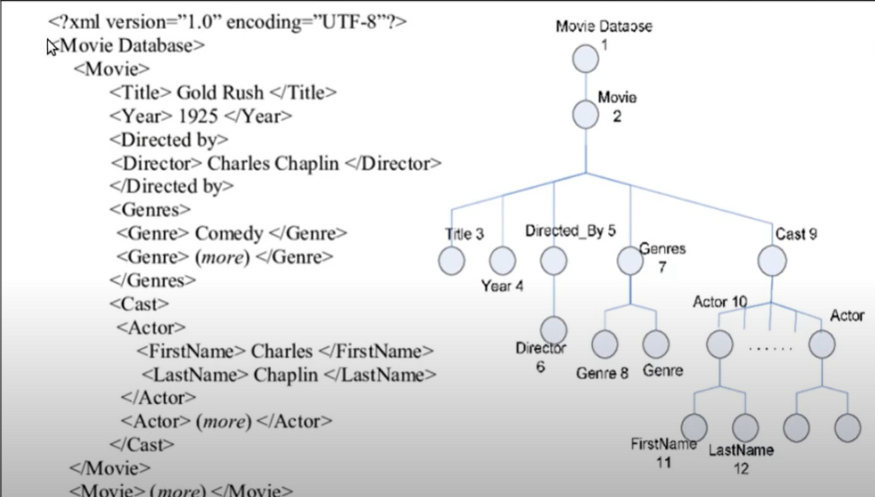
IMPORTXML– This function can help you extract text/values or specific data elements from structured HTML or XML.
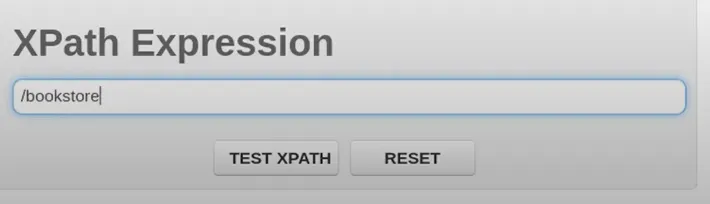
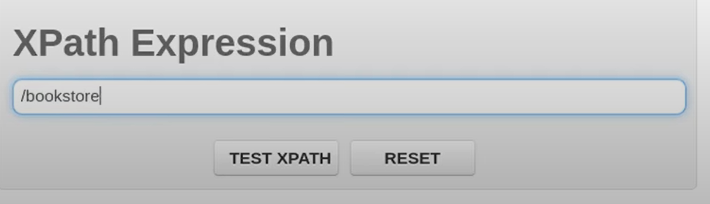
=IMPORTXML(url, xpath_query)
url is the URL of the webpage or XML file containing the data you want to import.
xpath_query is the query used to specify the data element or value you want to extract from the XML or HTML source.
IMPORTDATA– This function can help you import data from any external CSV or a TSV file directly into your Google sheet. It will not be discussed in this article later because the application of this function in web scraping is too small.
Scraping with Google Sheets
This section will be divided into two parts. In the first part, we will use IMPORTXML for scraping, and in the next section, we will use IMPORTHTML for the same.
Scraping Using IMPORTXML
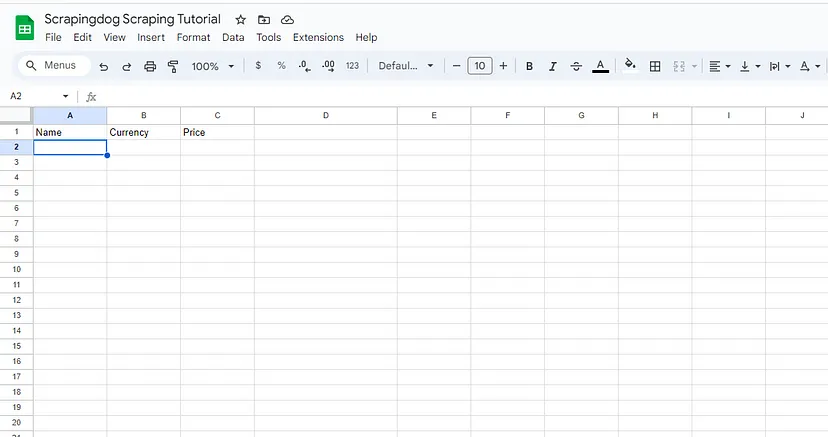
The first step would be to set up an empty or blank Google Sheet. You can do it by visiting https://sheets.google.com/.
Selecting a Blank Google Sheet
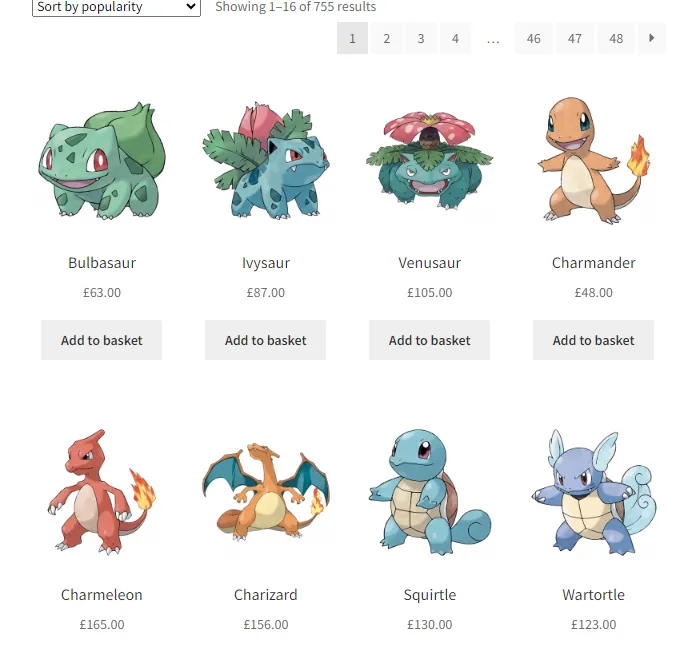
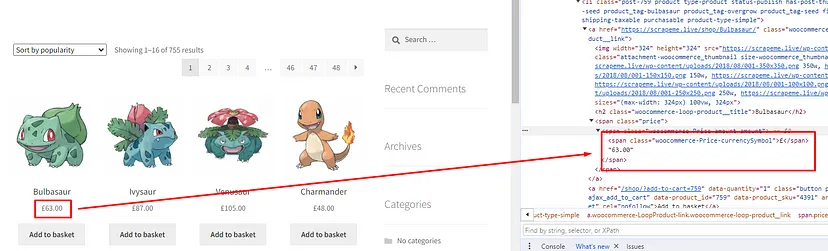
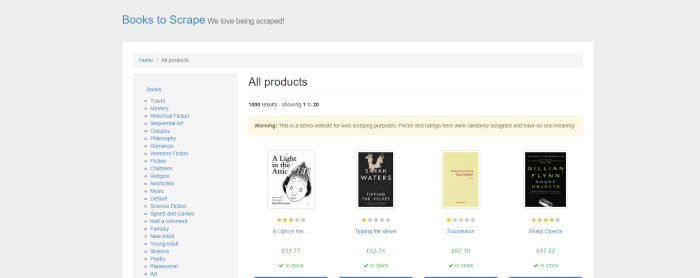
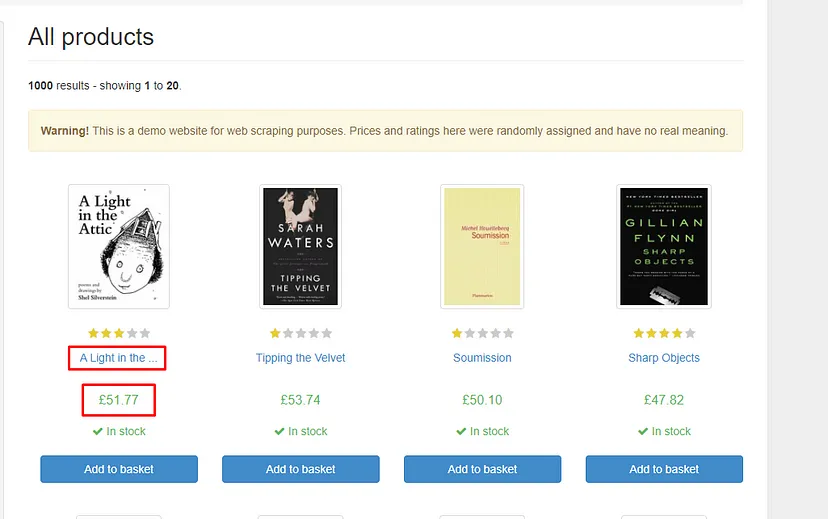
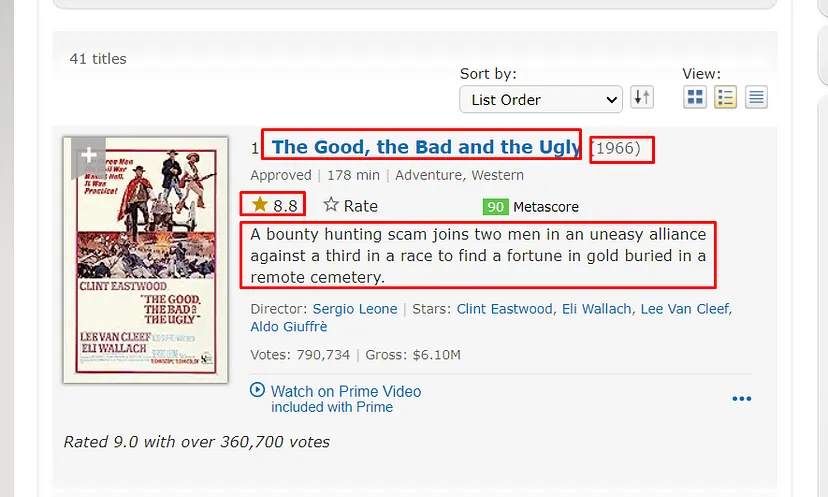
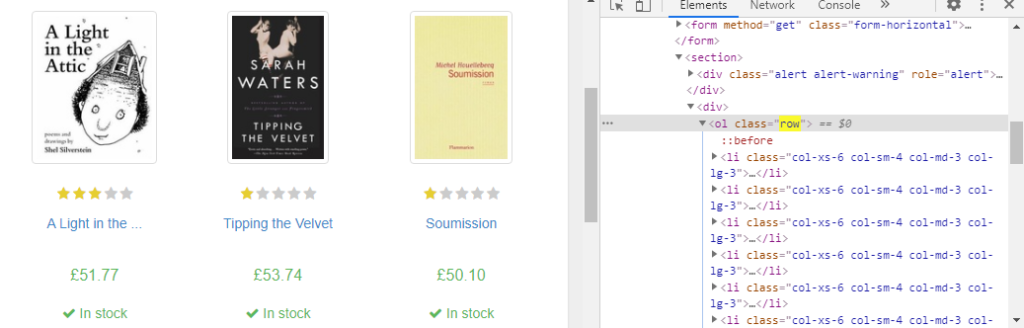
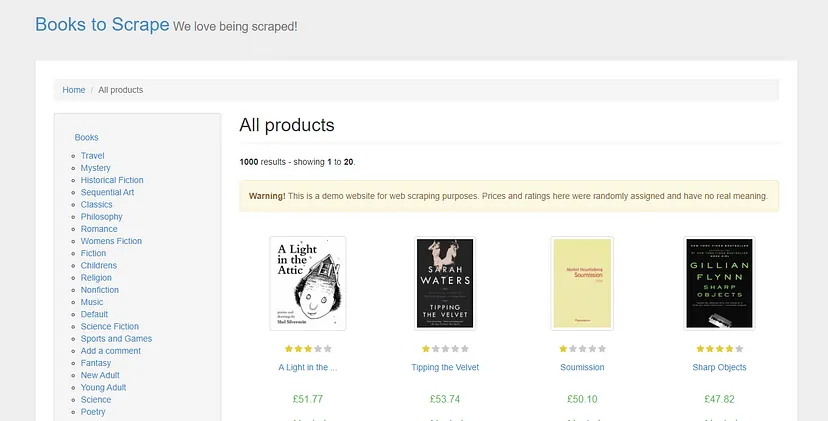
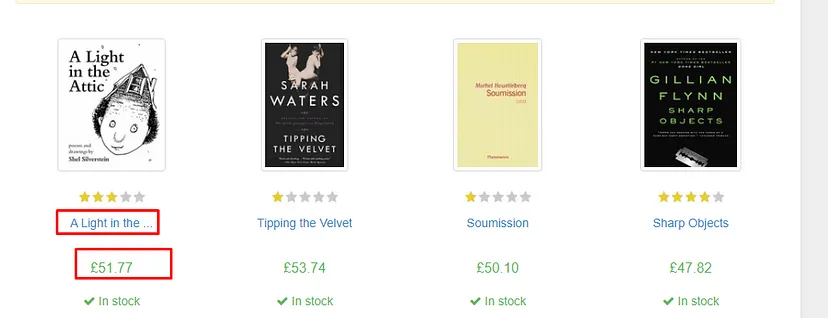
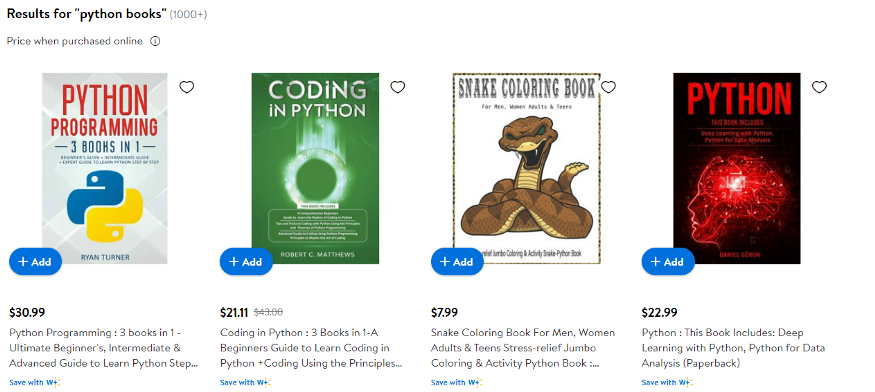
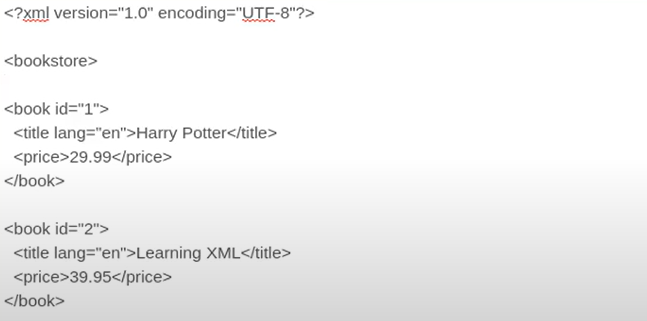
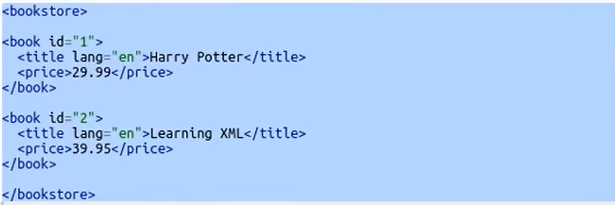
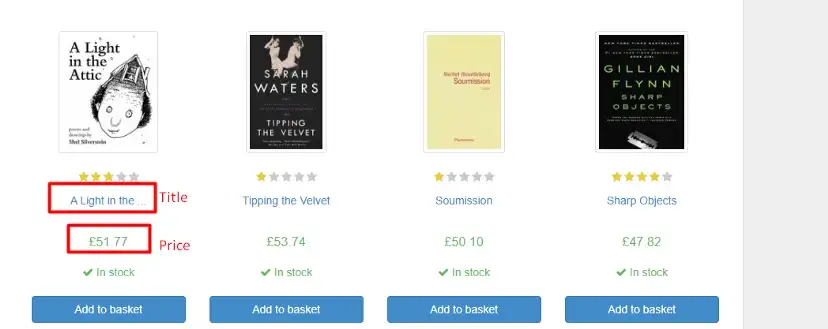
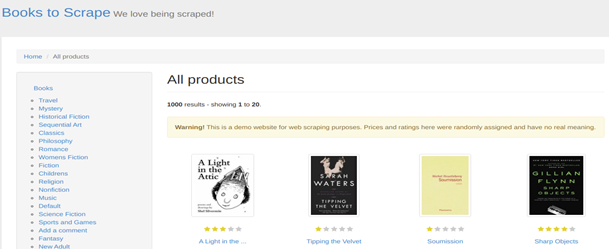
You can click on Blank Spreadsheet to create a blank sheet. Once this is done we have to analyze the structure of the target website. For this tutorial, we are going to scrape this website https://scrapeme.live/shop/.
We are going to scrape the name of the Pokemon and its listed price. First, we will learn how we can scrape data for a single Pokemon and then later we will learn how it can be done for all the Pokemons on the page.
Scraping Data for a Single Pokemon
First, we will create three columns Name, Currency, and Price in our Google Sheet.
As you know IMPORTXML function takes two inputs as arguments.
Second is the xpath_query which specifies the XPath expression used to extract specific data from the XML or HTML source.
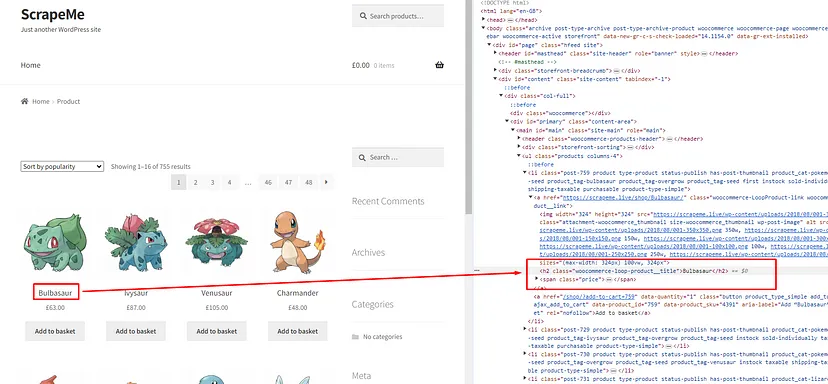
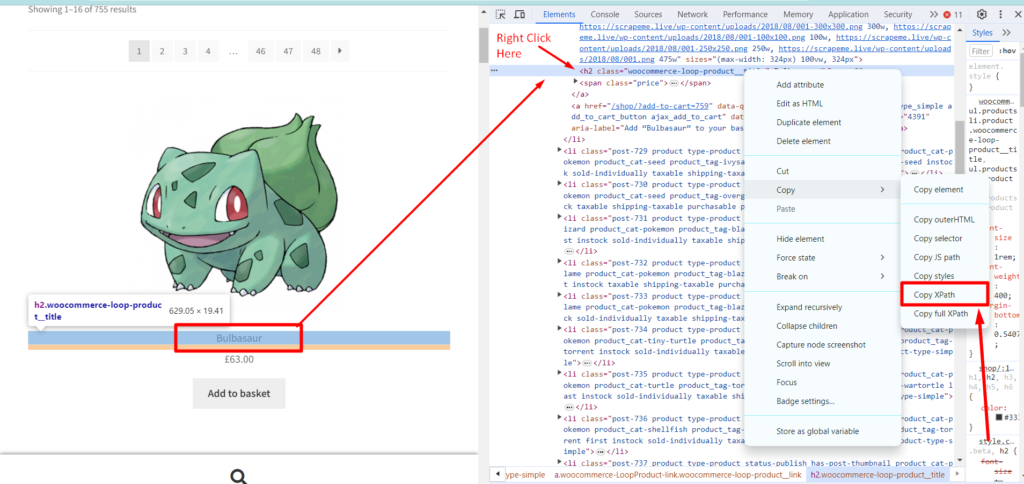
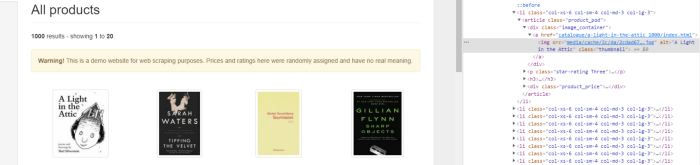
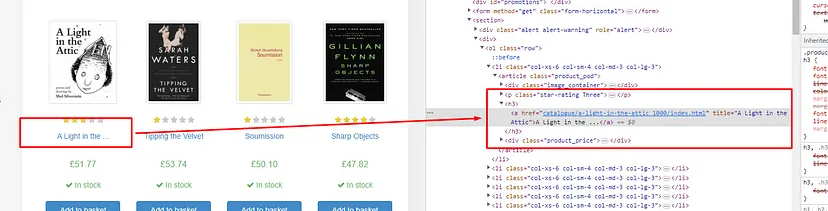
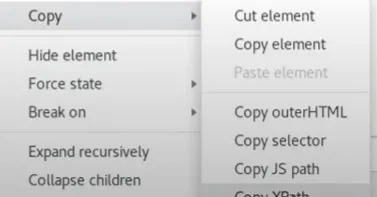
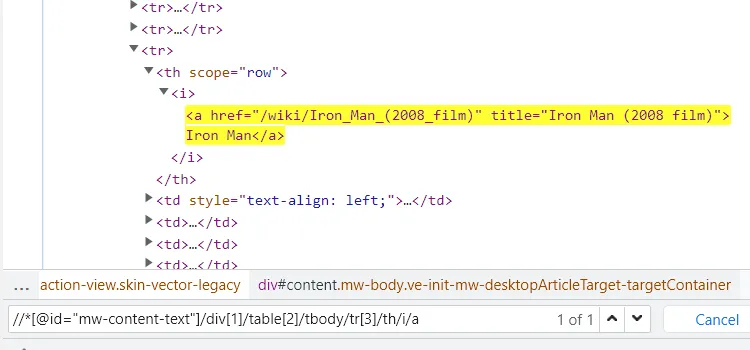
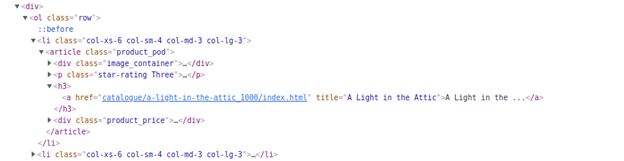
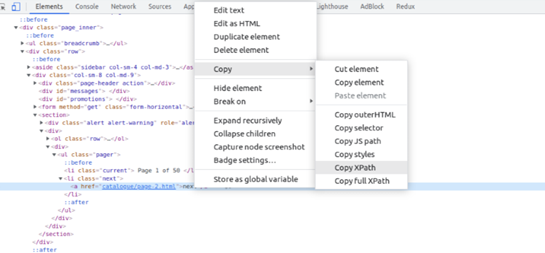
I know you must be wondering how you will get this xpath_query, well that is super simple. We will take advantage of Chrome developer tools in this case. Right-click on the name of the first Pokemon and then click on Inspect to open Chrome Dev Tools.
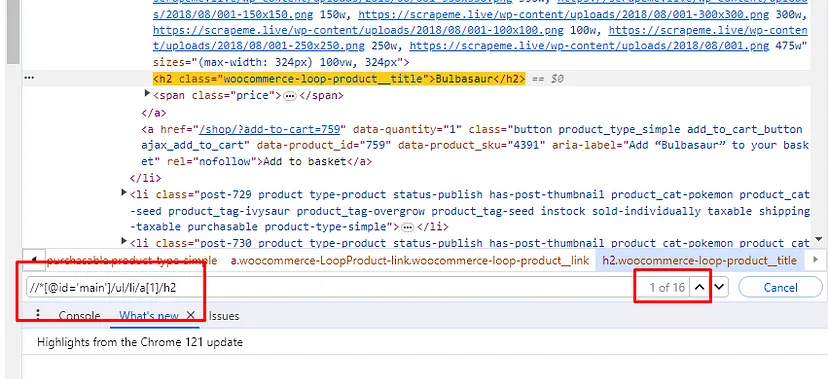
Now, we need an XPath query for this element. Well this can be done by a right click on that h2 tag and then click on the Copy button and finally click on the Copy XPath button.
This is what you will get once you copy the XPath.
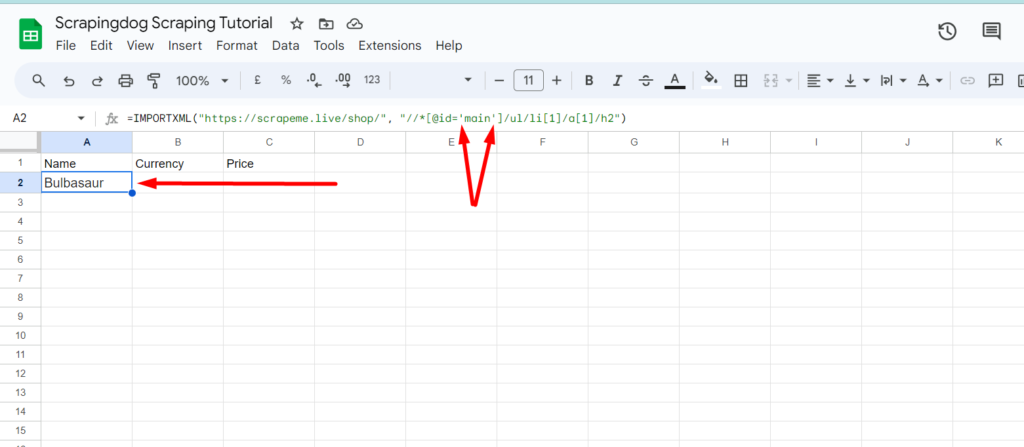
//*[@id="main"]/ul/li[1]/a[1]/h2
We can use this XPath query to get the name of the first Pokemon.
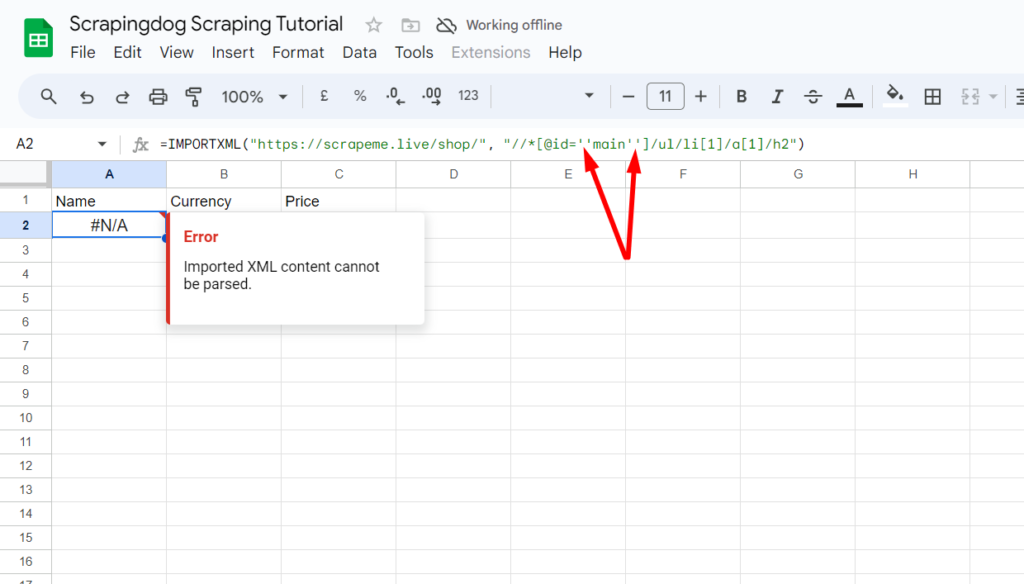
Remember to replace any double quotes in the xpath_query with single quotes otherwise, you will get this error in Google Sheets like the one in the image below.
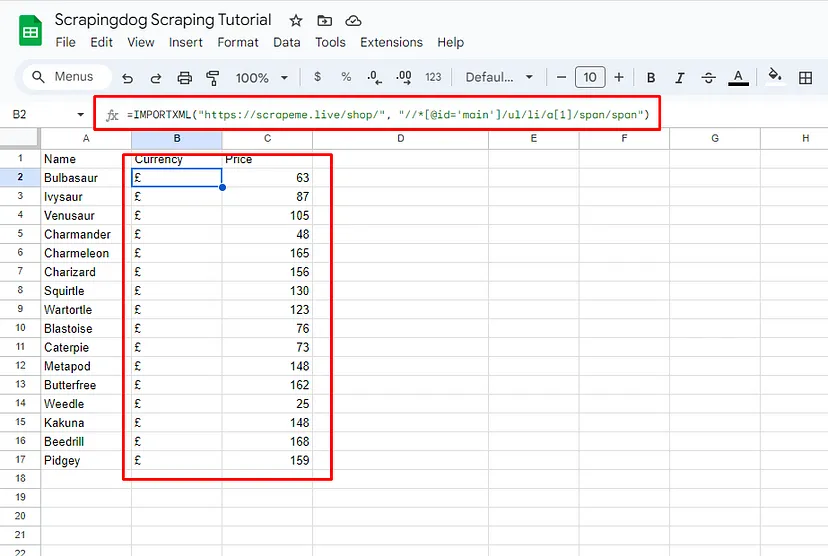
Formula parse error can be resolved by passing single quotes in xpath_query. So, once you type the right function, Google Sheets will pull the name of the first Pokemon.
We can see Bulbasaur being pulled from the target web page in the A2 cell of the sheet. Well, this was fast and efficient too!
Now, the question is how to pull all the names. Do we have to apply a different xpath_query for each Pokemon present on the target page?
Well, the answer is NO. We just have to figure out an XPath query that selects all the names of the Pokemon at once.
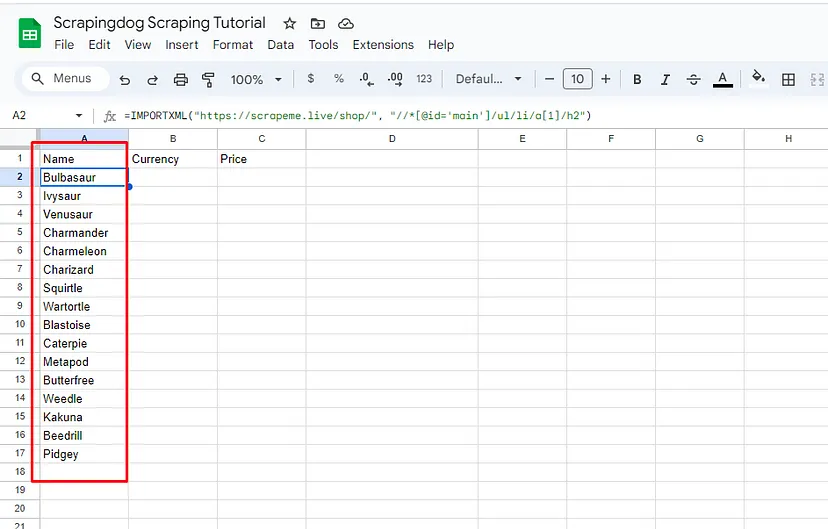
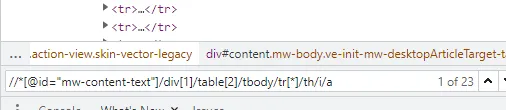
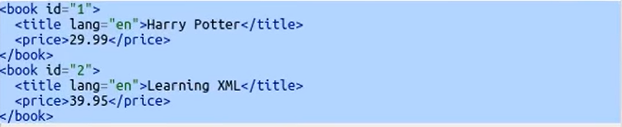
If you notice our current xpath_query you will notice that it is pulling data from the li element with an index 1. If you remove that index you will notice that it selects all the name tags.
Great! Now, our new xpath_query will look like this.
//*[@id='main']/ul/li/a[1]/h2
Let’s change our xpath_query in the IMPORTXML function.
In just a few seconds Google Sheet was able to pull all the data from the target page and populate it in the sheet itself. This was super COOL! Similarly, you can pull the currency and price.
xpath_query for all the price tags will be //*[@id=’main’]/ul/li/a[1]/span/span.
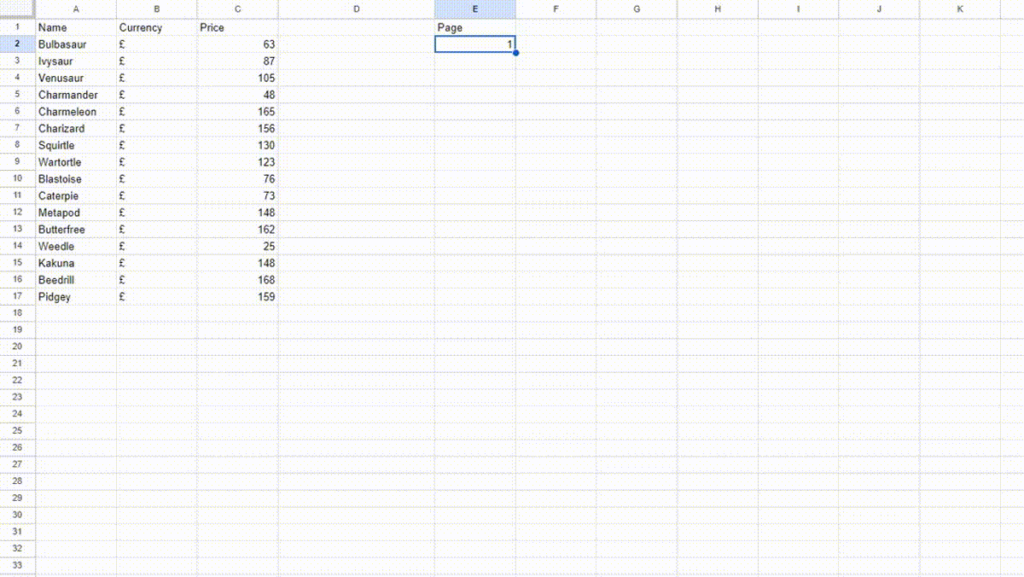
Let’s see whether we can scale this process by scraping more than one page. When you click on the II page by scrolling down you will notice that the website URL changes to https://scrapeme.live/shop/page/2/ and when you click on the III page the URL changes to https://scrapeme.live/shop/page/3/. We can see the pattern that the number after page/ increases by 1 on every click. This much information is enough for us to scale our current scraping process.
Create another column Page in your spreadsheet.
We have to make our target URL dynamic so that it can pick the page value from the E2 cell. This can be done by changing our target URL to this.
"https://scrapeme.live/shop/page/"&E2
Remember you have to change the target URL to the above URL for both the Name and Price columns. Now, the target URL changes based on the value you provide to the E2 cell.
This is how you can scale the web scraping process by concatenating the static part of the URL with the cell reference containing the dynamic part.
Scraping with IMPORTHTML
Create another sheet within your current spreadsheet by clicking the plus button at the bottom.
This function helps you quickly import the data from a table.
Overall, IMPORTHTML is a versatile function that can save you time and effort by automating the process of importing data from HTML tables or lists on web pages directly into your Google Sheets. It’s especially useful for tasks that involve data scraping, reporting, analysis, and monitoring of external data sources.
However, IMPORTHTML may not always format imported data as expected. This can result in inconsistent formatting or unexpected changes to the data once it’s imported into Google Sheets. Users may need to manually adjust formatting or use additional formulas to clean up the imported data.
Limitations of using IMPORTXML and IMPORTHTML
IMPORTXML and IMPORTHTML are designed for simple data extraction tasks and may not support advanced scraping requirements such as interacting with JavaScript-generated content, handling dynamic web pages, or navigating complex website structures.
Google Sheets imposes rate limits on the frequency and volume of requests made by IMPORTXML and IMPORTHTML functions. Exceeding these limits can result in errors, delays, or temporary suspensions of the functions. This makes it challenging to scrape large volumes of data or scrape data from multiple websites rapidly.
Imported data may require additional formatting, cleaning, or transformation to make it usable for analysis or integration with other systems. This can introduce complexity and overhead, particularly when dealing with inconsistent data formats or messy HTML markup.
An alternative to scraping with Google Sheets – Scrapingdog
As discussed above scraping with Google Sheets at scale has many limitations and Scrapingdog can help you bypass all of those limitations. With a pool of more than 13 million proxies and headless Chrome, you can scrape any website at scale without getting blocked.
Scrapingdog provides a web scraping API that can help you bypass CAPTCHAs and IP limits very easily. Its API can handle JS rendering and proxies for you so that you can focus on data collection rather than on these inefficient processes.
You can try the free pack by signing up here. You will get 1000 FREE credits which are enough for testing the API on any website.
Scale Your Web Scraping Process
Try out Scrapingdog Web Scraping API with thousands of proxy servers and an entire headless Chrome cluster
Conclusion
We’ve explored the capabilities of IMPORTXML and IMPORTHTML functions in Google Sheets for web scraping. These powerful tools provide a convenient and accessible way to extract data from websites directly into your spreadsheets, eliminating the need for complex coding or specialized software.
However, it’s important to be mindful of the limitations of IMPORTXML and IMPORTHTML, such as rate limits, HTML structure dependencies, and data formatting challenges.
To eliminate such challenges you are advised to use a web scraping API which can take the web scraping process to autopilot mode for you.
Having data by your side is the biggest asset one can have.
Every decision today is backed up by data, & therefore the value of data cannot be understated. Unless you are informed in advance, you can’t make a decision.
Search Engine Scraping
Search engines index a lot of data, and gaining access to that data can be your upper hand in competing against others in your industry. And this is where the power data from search engine scraping can become a game-changer.
That’s an enormous amount of data! Let’s jump in and understand what search engine scraping is and how it can help you.
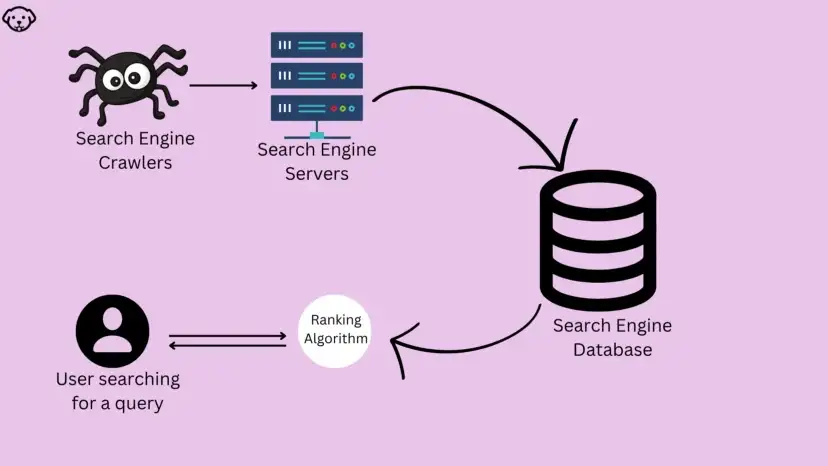
What is Search Engine Scraping?
Web Scraping as a whole is the process of extracting data from a particular source, however when we scrape or extract data from search engines (i.e. Google, Yahoo, Yandex, etc.) then the process is referred to as search engine scraping.
This data extracted can be analyzed and used for various purposes. Search engine scrapers are typically the tools that are designed to extract data from them.
By now, you might be questioning whether scraping should be an option or whether you can do it the old-fashioned manual way.
Well, you can do it manually and there are other ways to do it. I have discussed them in the later section of this blog.
What Type of Data Can You Scrape From Search Engines?
Search engines, each with their unique algorithms and features, offer a wealth of information in various formats. Generally, these platforms provide access to a diverse array of data types, including web pages, news articles, images, videos, and more. Essentially, anything that appears on a search engine result page (SERP) is potentially scrapable.
By analyzing the data from SERPs, one can understand how different websites rank for specific keywords, track changes in search engine algorithms, and gather data on consumer engagement with various types of content.
Furthermore, scraping news sections can provide up-to-date information on current events, industry developments, and market shifts. This can be valuable for businesses looking to stay ahead in a rapidly changing environment.
Images and video content scraped from search engines can also be used for various purposes, from digital marketing to machine learning applications. By analyzing visual content, companies can gain insights into consumer preferences, and emerging trends, and even perform competitive analysis.
In addition to these, search engines also index forums, academic papers, patents, and other specialized databases, offering a wide knowledge and information that can be extracted and utilized for research, development, and strategic planning.
Use cases of Search Engine Scraping
SEO and Digital Marketing
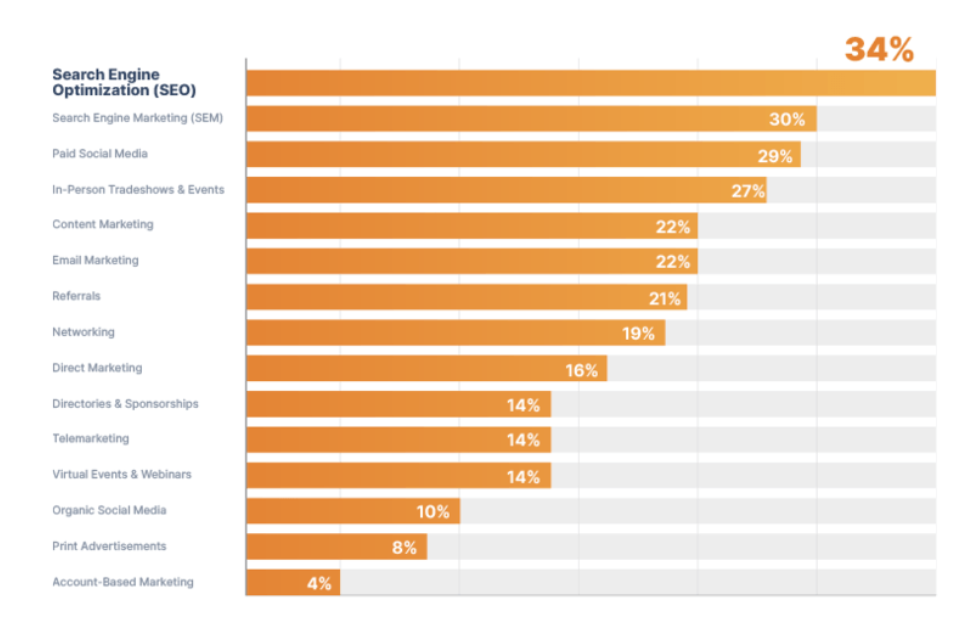
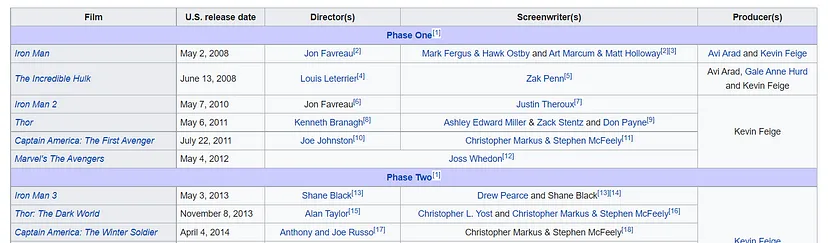
SEO is one of the mainstream channels for most of the businesses. According to a study conducted, it generates 34% of the qualified leads for B2B businesses.
By extracting data from SERPs (search engine result pages), professionals can analyze which competitor websites rank higher for keywords and understand the factors contributing to their success. This information is crucial for developing effective SEO strategies, including keyword optimization, content creation/optimization, and link building. Engaging with a white-label SEO company can provide businesses with the expertise and services needed to implement these strategies effectively, under their brand name.
Additionally, digital marketers can use this data to craft more targeted and effective advertising campaigns, understanding what content resonates with audiences and how to position their brand effectively in the domain.
Lead Generation and Sales Intelligence
Search engines can play a significant role in generating leads. Scraping Google Maps of your target potential customers can give you the phone numbers. Similarly, there are other Google products you can web scrape to generate leads.
Building a brand from the ground up is a considerable achievement, and naturally, protecting its reputation is of utter importance. Today threats to your brand’s image require serious attention and proactive measures.
Many companies utilize search engine scraping to detect instances of brand misuse or imitation. This technique is particularly effective in identifying unauthorized use of proprietary business elements, such as images or videos, by competitors or other entities.
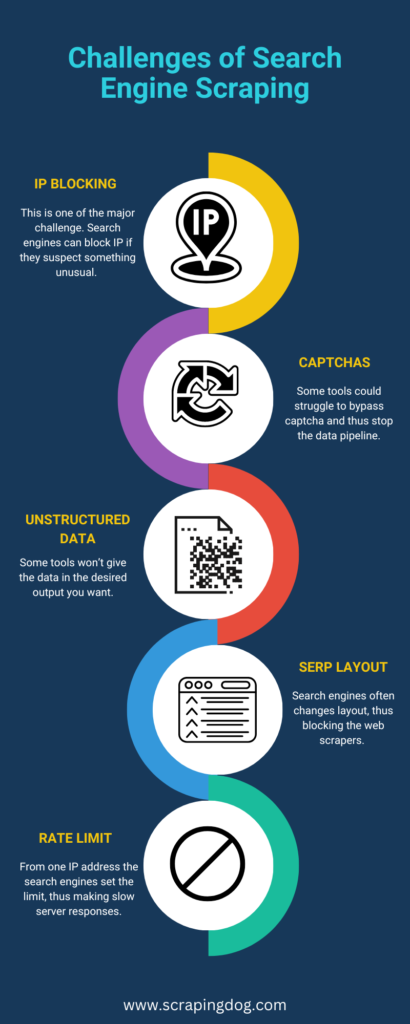
Challenges of Search Engine Scraping
Scraping data from Search Engine Results Pages (SERPs) offers significant value to businesses across various industries. However, this data extraction process has challenges, often complicating the scraping process.
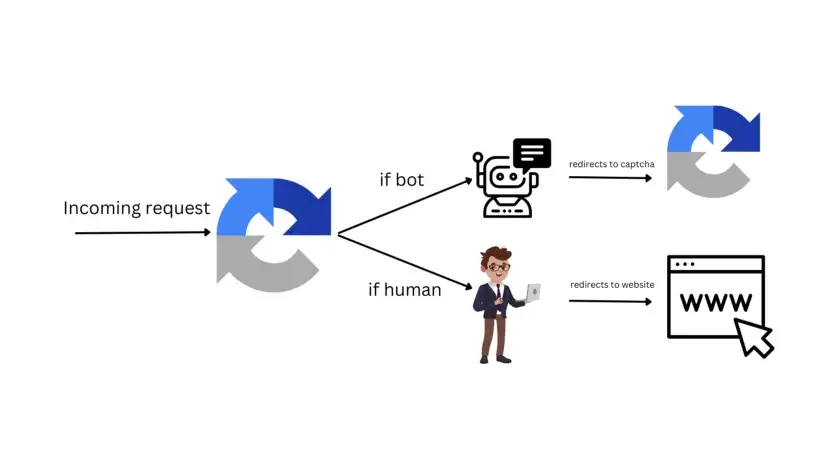
A key issue lies in search engines’ difficulty differentiating between beneficial and harmful bots. As a result, legitimate web scraping activities are frequently misidentified as malicious, leading to unavoidable obstructions.
Challenges in Search Engine Scraping
IP Blocks: A Common Hurdle
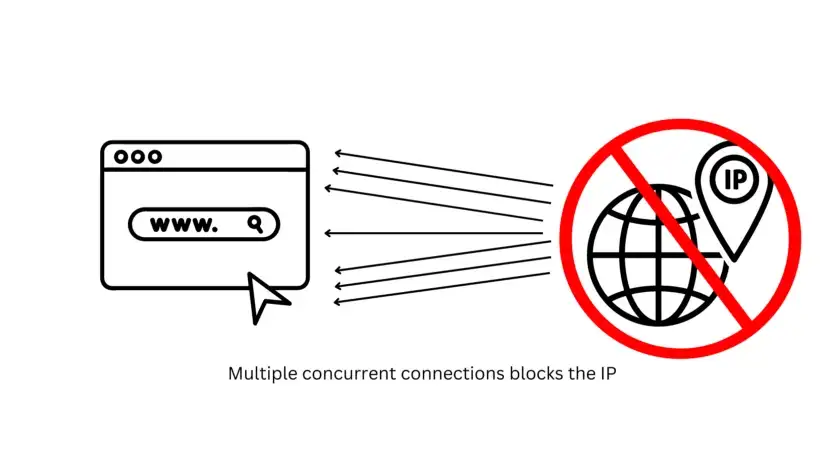
One major obstacle is the risk of IP blocking. Search engines can easily detect a user’s IP address. During web scraping, a large number of requests are sent to servers to retrieve needed information.
If these requests consistently originate from the same IP address, search engines may block it, perceiving it as non-human traffic. This necessitates careful planning to avoid IP-related issues.
CAPTCHAs
CAPTCHAs represent another prevalent security measure. Search engines throw CAPTCHAs when their system detects unusual or bot activity. Standard tools struggle to bypass CAPTCHAs, often leading to IP blocks. Only the most sophisticated scraping technologies can effectively bypass CAPTCHA challenges.
Dealing with Unstructured Data
Successfully extracting data from search engines is just the right start. However, the real challenge lies in handling the fetched data, especially if it is unstructured and difficult to interpret. Therefore, it’s crucial to consider the desired data format before choosing the right web scraping tool. The utility of the scraped data hinges on its readability and structure, making this an important factor in your scraping strategy.
Frequent Changes in SERP Layouts and Algorithms
Search engines frequently update their algorithms and change the layout of their result pages. These updates can significantly impact scraping efforts, as existing scripts or tools become unusable overnight.
Keeping up with these changes requires constant monitoring and quick adaptation of scraping tools and techniques. Businesses must invest in agile and adaptable scraping solutions capable of quickly responding to these changes to maintain uninterrupted data collection.
Rate Limiting and Throttling
Another challenge in scraping is rate limiting and throttling implemented by search engines. These mechanisms limit the number of requests an IP address can make within a certain timeframe. Exceeding these limits can result in temporary blocks or slowed responses from the server.
Effective scraping requires a strategy that either rotates IP addresses or schedules requests in a manner that respects these rate limits, thereby avoiding throttling and ensuring continuous data access.
Tools to Scrape Search Engines
There are a couple of ways to extract search results. The very basic way would be to do it manually, however, this method is time-consuming, is prone to make mistakes, and is not scalable.
Further, there are no-code readily available tools, these tools can be used by someone who has zero experience in scraping. These tools have some limitations, that can be overcome by using a Web scraping API.
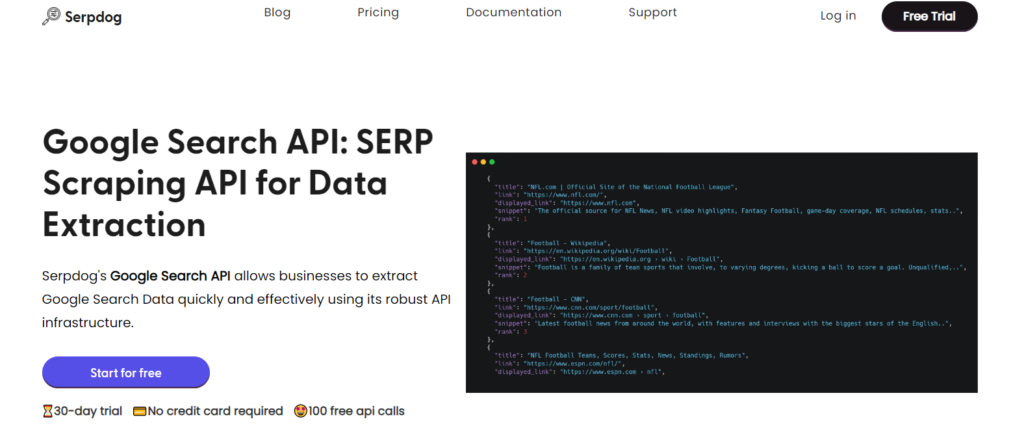
Although some programming background needs to be there to run these APIs, they are a great way to scale the process of scraping search results. Recently, I have made a dedicated Google Scraping API, the output it gives is in JSON format.
Conclusion
Search engines are indeed a great source of information. The value they can provide is immense. Built-in tools can help you to help you in this process. I at Scrapindog have an experience of over 8 years of scraping & have been constantly evolving in the web scraping space.
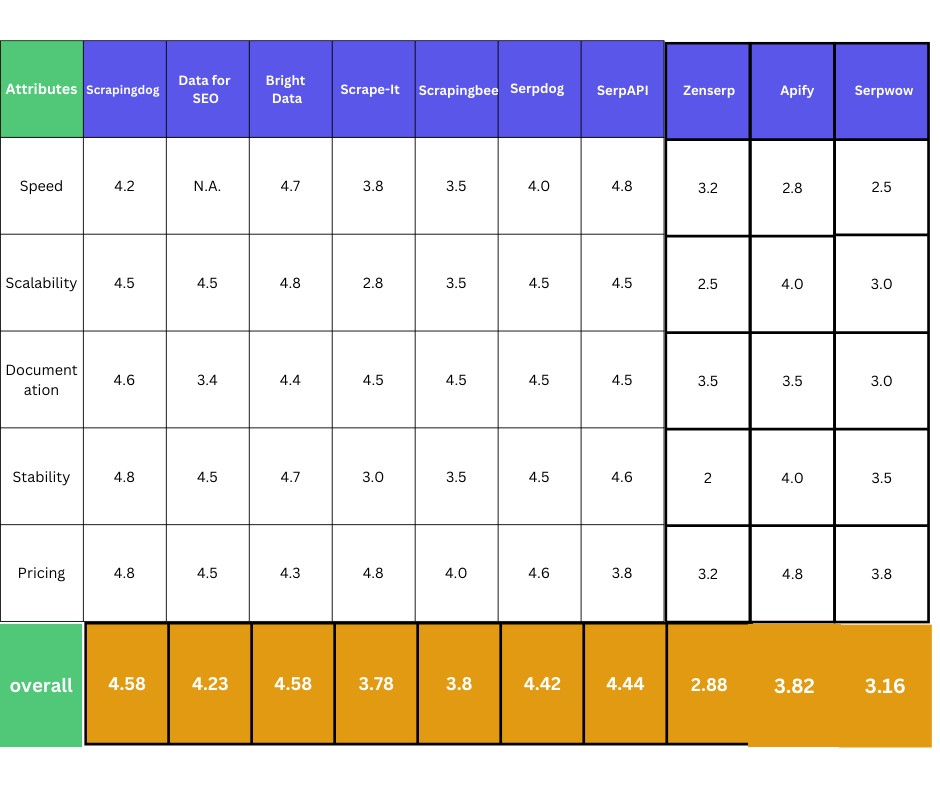
Over time we have built more stable APIs for different sources. Also, you can check out my article published on the best Google SERP APIs to see which API would suit you. I have compared different aspects and listed them in a table.
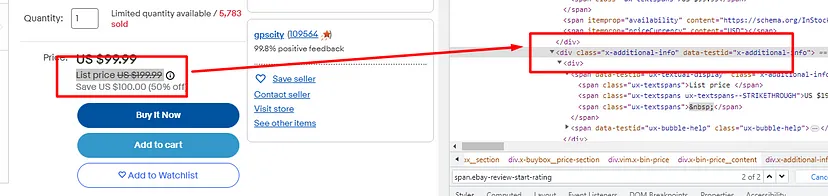
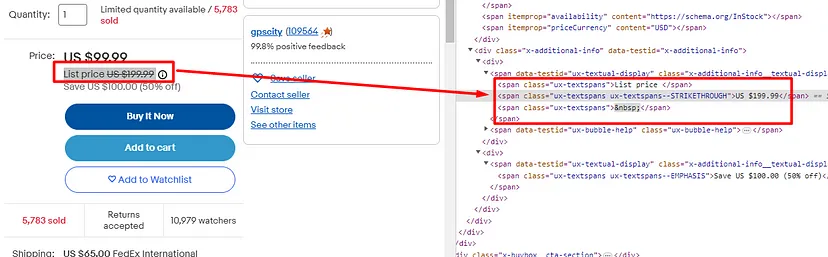
Wanna Buy some items on Amazon? But afraid that the current pricing of the product doesn’t match your budget?
Well, you can wait for the price to drop. But when will it drop?
Amazon Price Tracker using Python
In this tutorial, we are going to build an Amazon Price Tracker using our old favorite programming language ‘Python’. We will first scrape prices from any Amazon product and then will set an alert when the price drops a certain number.
Requirements
I hope you have already installed Python 3.x on your machine. If not then you can download it from here. After this, we will create a folder in which we will keep this project. I am naming the folder as scraping.
mkdir scraping
cd scraping
Now, we will install all the libraries that we need in this tutorial.
requests– This will be used to make a GET request to the API which provides Amazon pricing.
smtplib– This will be used to email when the price drops.
time– To create a delay between two consecutive function calls. We will talk about this later.
We just need to install requests as the other two libraries are pre-installed.
pip install requests
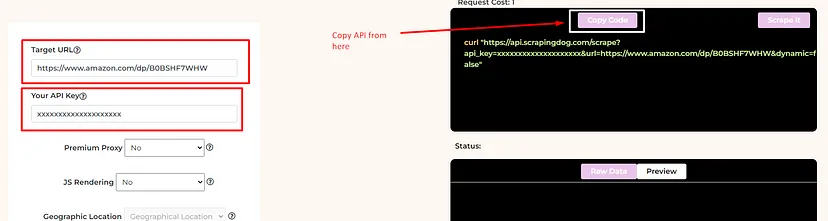
We also have to sign up for a free Amazon Scraping API which will help us pull pricing of any product in real time. The trial package comes with a generous 1000 free credits. So, it is enough for testing.
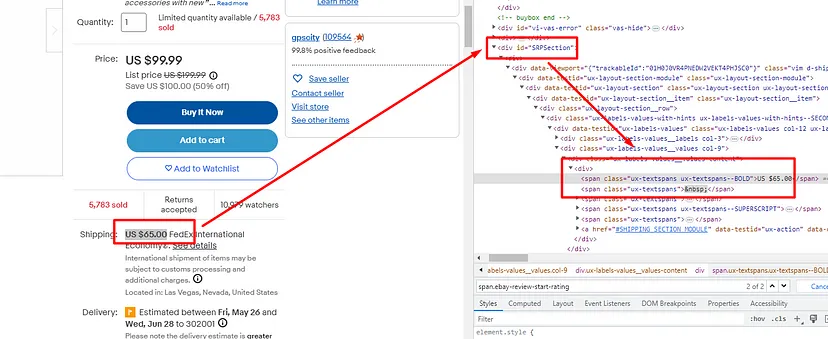
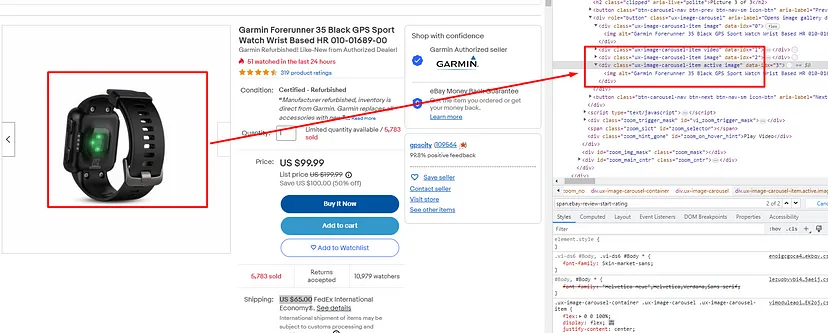
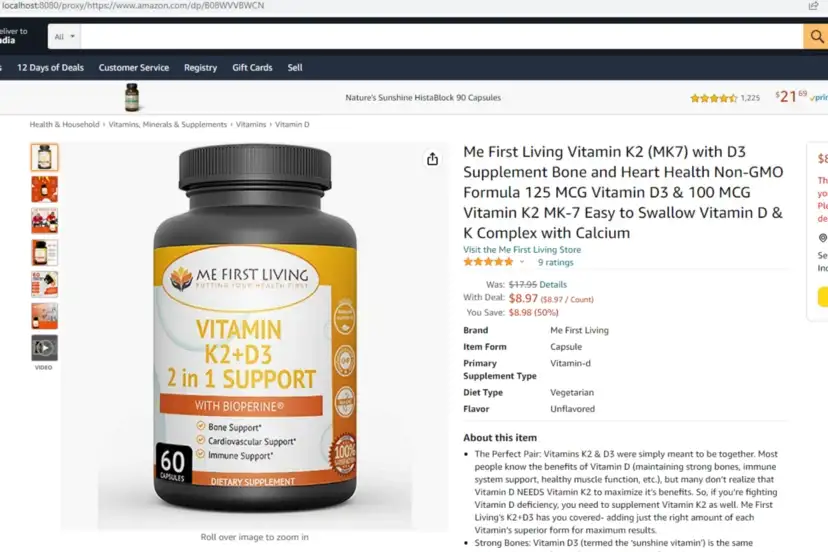
Scraping Amazon Product Pricing
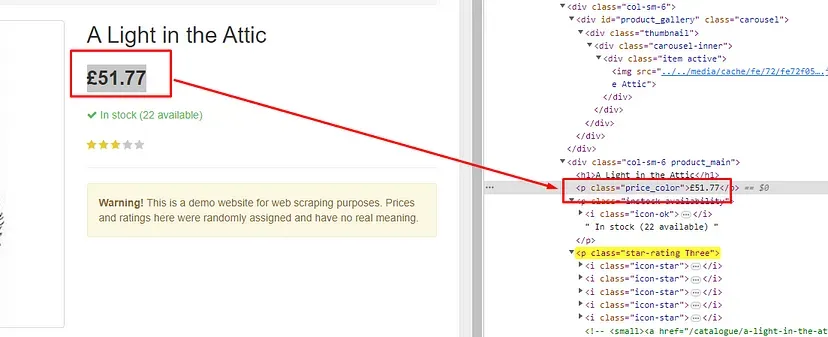
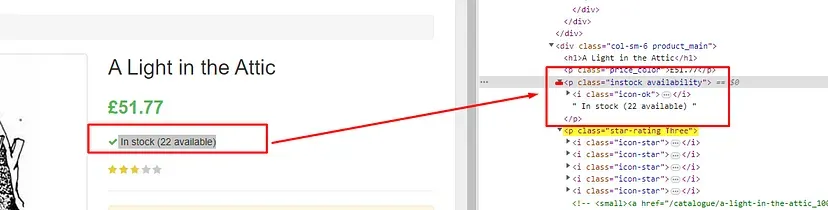
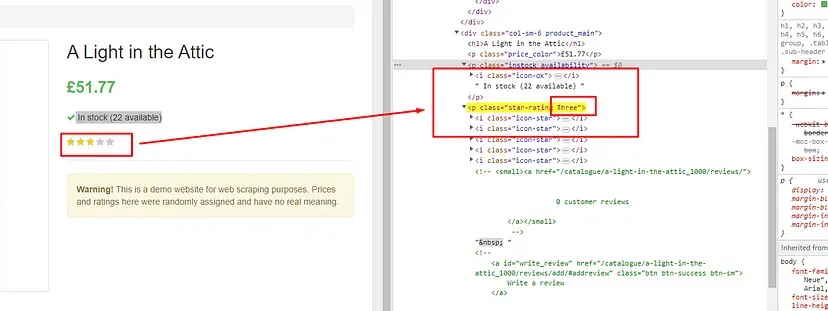
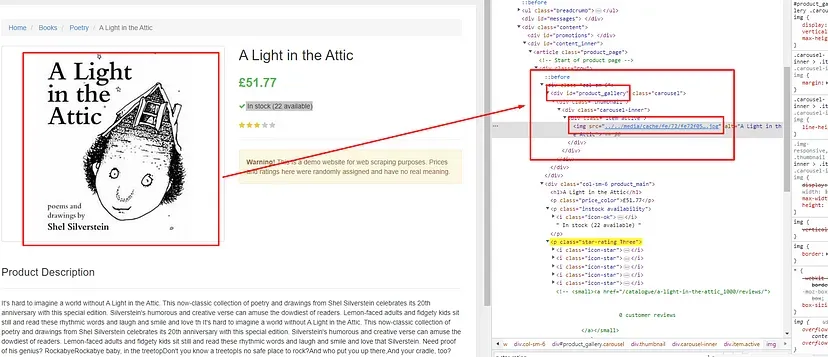
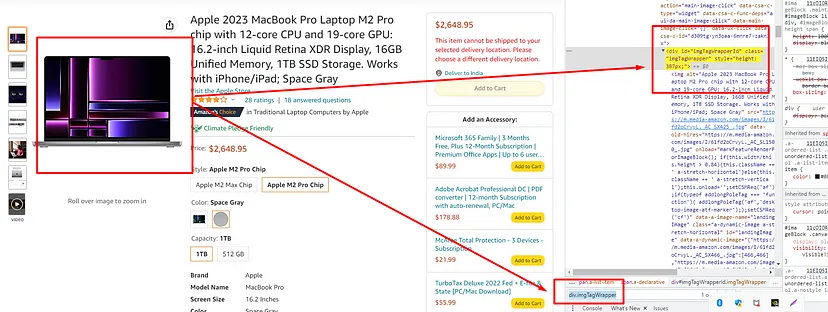
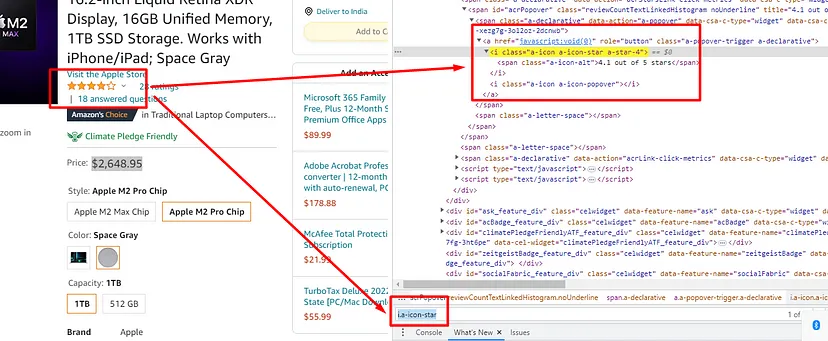
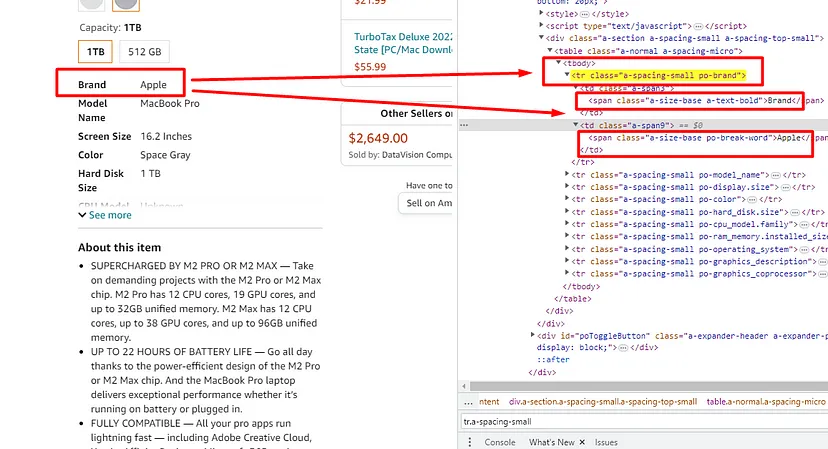
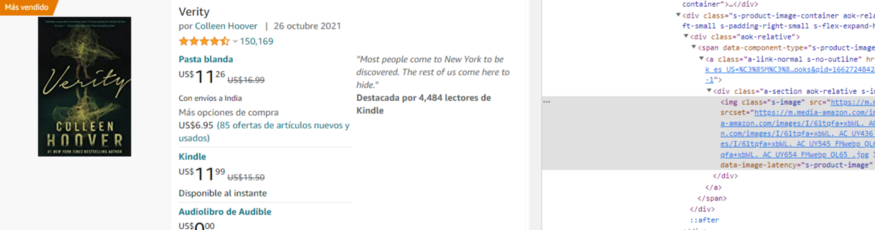
We will be scraping the price of this product page. In this section, we are going to scrape Amazon prices using the API.
import requests
import time
import smtplib
from email.mime.text import MIMEText
def check_price():
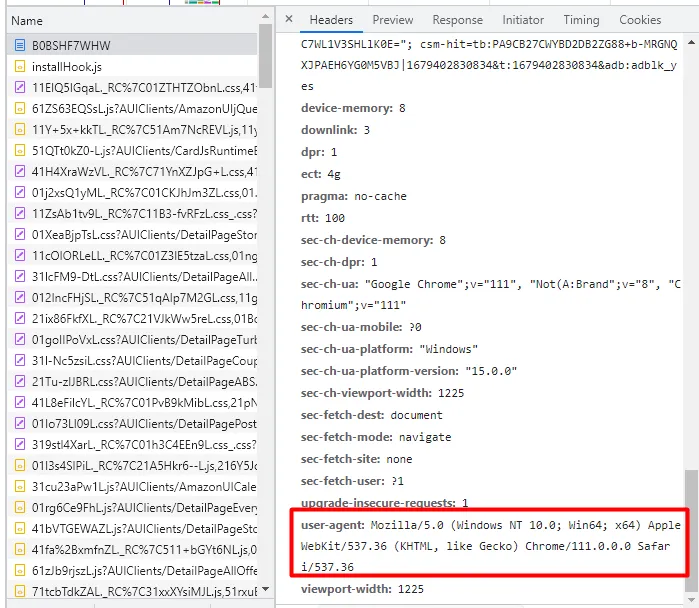
api_url = 'http://api.scrapingdog.com/amazon/product?api_key=YOUR-API-KEY&domain=com&asin=B0BSHF7WHW'
try:
response = requests.get(api_url)
price = int(float(response.json()['price'].replace("$","").replace(',', '')))
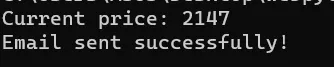
print(f"Current price: {price}")
if int(price) < 2147:
print(price)
except requests.RequestException as e:
print(f"Error fetching price: {e}")
check_price()
Imports:
requests– A Python library used for making HTTP requests.
time– A Python library providing various time-related functions (though it’s not used in this function).
smtplib and email.mime.text.MIMEText-Libraries for sending emails, but these are not used in the provided function.
2. The check_price Function
api_url– This is a URL string that points to an API endpoint. It appears to be for an Amazon product’s price, fetched using the Scrapingdog API service.
The function makes an HTTP GET request to the API using requests.get(api_url).
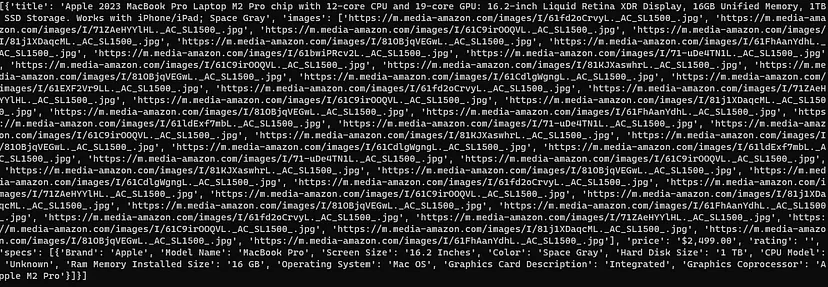
It then parses the JSON response to extract the product’s price.
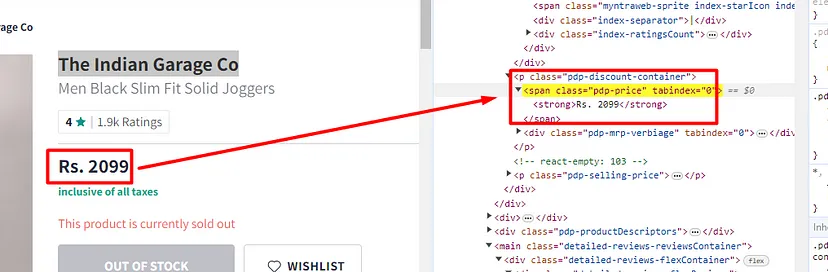
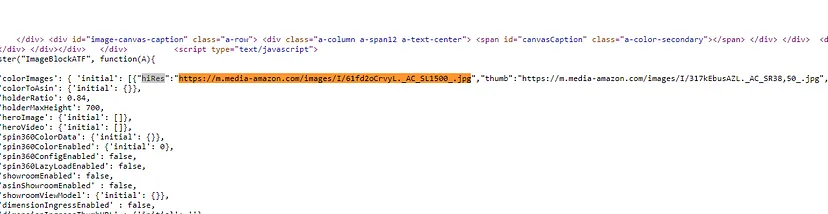
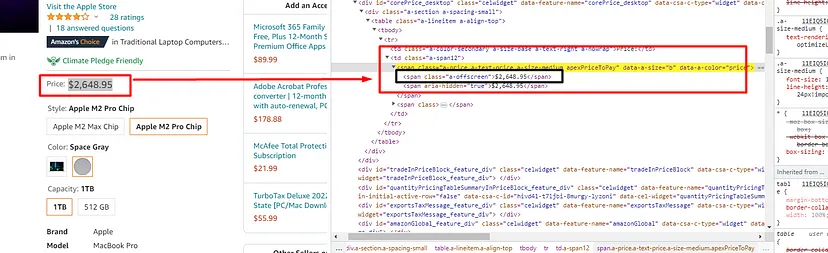
response.json()[‘price’] gets the price from the JSON response.
.replace(“$”,””).replace(‘,’, ”) removes the dollar sign and commas from the price string. This is necessary to convert the price from a formatted string (like $2,147.42) to a number.
int(float(…)) first converts the cleaned string to a float (to handle decimal points) and then to an integer. This effectively truncates any decimal part.
Our budget is anything below $2147. So, we have set a condition that if the price is less than 2147 we will send ourselves an email. We will write the email function in the next section.
The try-except block catches exceptions related to the network request (like connectivity issues, or errors returned by the API).
3. Calling check_price
Finally, the function check_price() is called to execute the code.
Remember you have to use your API key in the above code.
In this section, we will write an email function that will help us send an email if the price of the product is under our budget.
def send_email(price):
sender_email = "[email protected]"
receiver_email = "[email protected]"
password = "your-password"
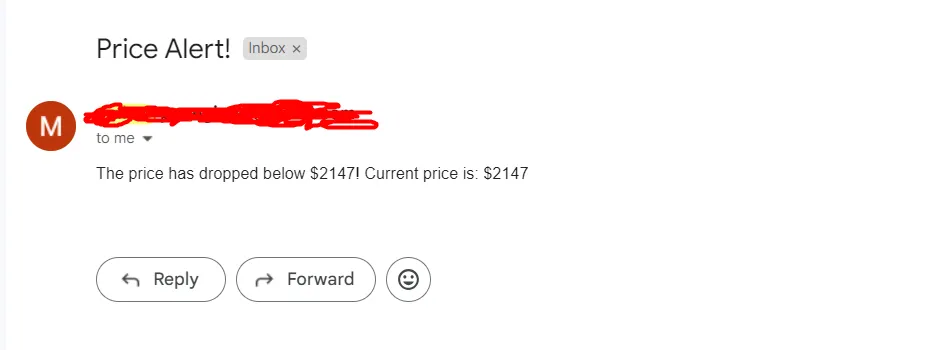
message = MIMEText(f"The price has dropped below $2147! Current price is: ${price}")
message['Subject'] = "Price Alert!"
message['From'] = sender_email
message['To'] = receiver_email
try:
with smtplib.SMTP('smtp.gmail.com', 587) as server:
server.starttls()
server.login(sender_email, password)
server.sendmail(sender_email, receiver_email, message.as_string())
print("Email sent successfully!")
except Exception as e:
print(f"Error sending email: {e}")
Let me explain the above code step by step.
def send_email(price)– This line defines a function named send_email that takes one argument, price.
sender_email– The email address that will send the notification.
receiver_email– The email address that will receive the notification.
password– The password for the sender’s email account. For security reasons, hardcoding passwords like this is not recommended in a production environment.
MIMEText– This is a class from the email.mime.text module used to create an email body. The email body in this case includes a message about the price drop and the current price.
The Subject, From, and To headers of the email are set to appropriate values.
The function uses smtplib.SMTP to connect to Gmail’s SMTP server at smtp.gmail.com on port 587 (the standard port for SMTP with TLS).
server.starttls()– This command starts TLS encryption for the connection, ensuring that the email contents and login credentials are securely transmitted.
server.login(sender_email, password)– Logs into the SMTP server using the provided credentials.
server.sendmail(sender_email, receiver_email, message.as_string())– Sends the email.
If the email is sent successfully, “Email sent successfully!” is printed. If there’s an error during this process, it’s caught in the except block and printed.
Setting a Time Interval
Only one thing is left which is to set a time interval between two consecutive calls. For this, we will use the time library.
while True:
    check_price()
    time.sleep(3600)
This code will run the check_price() function every hour. Our motive is to constantly monitor the pricing of the product and as soon as the price comes under our budget we will send an email to ourselves.
Complete Code
import requests
import time
import smtplib
from email.mime.text import MIMEText

def send_email(price):
    sender_email = "[email protected]"
    receiver_email = "[email protected]"
    password = "your-password"

    message = MIMEText(f"The price has dropped below $2147! Current price is: ${price}")
    message['Subject'] = "Price Alert!"
    message['From'] = sender_email
    message['To'] = receiver_email

    try:
        with smtplib.SMTP('smtp.gmail.com', 587) as server:
            server.starttls()
            server.login(sender_email, password)
            server.sendmail(sender_email, receiver_email, message.as_string())
            print("Email sent successfully!")
    except Exception as e:
        print(f"Error sending email: {e}")

def check_price():
    api_url = 'http://api.scrapingdog.com/amazon/product?api_key=YOUR-API-KEY&domain=com&asin=B0BSHF7WHW'

    try:
        response = requests.get(api_url)

        price = int(float(response.json()['price'].replace("$","").replace(',', '')))

        print(f"Current price: {price}")

        if int(price) < 2147:
            send_email(price)
    except requests.RequestException as e:
        print(f"Error fetching price: {e}")

while True:
    check_price()
    time.sleep(3600)
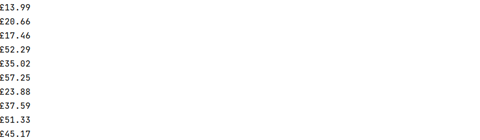
Test Email
For testing purposes, we can set the price budget above or equal to $2147 and see if the code works or not.
So, once you run the code you should see this on your console.
And you should receive an email.
With this our Amazon Price Tracker is ready. Now, you can track the pricing of any product and send yourself an email.
You can even create an app using this Amazon Scraping API which helps other people track the pricing of their favourite products.
Conclusion
In this blog, we understood how you can keep track of products on Amazon when they drop a certain level. Just like Amazon, you can use Python to track prices from other marketplaces as well, such as walmart & eBay.
Today, we will be exploring how to scrape Twitter and extract valuable information by web scraping Twitter using the versatile and powerful Python programming language. In the era of information overload, it’s crucial to harness the power of data to gain insights, make informed decisions, and fuel innovation.
Social media, particularly Twitter, has become an indispensable source of information, opinions, and trends. Learning to extract data from Twitter can provide us with a treasure trove of real-time information, enabling us to analyze public sentiment, track market movements, and uncover emerging trends.
Web Scraping Twitter.com
This comprehensive guide will walk you through the process of web scraping Twitter, step by step, so that even if you are a beginner, you’ll quickly gain the confidence and know-how to get valuable insights from the sea of tweets.
We will be using Python & Selenium to Scrape Twitter.com!
Also, if you don’t want to read the blog till the very end and want to extract data from Twitter right away, you can check our Twitter Scraper API which provides you the output in parsed JSON data.
Setting up the prerequisites for scraping Twitter
In this tutorial, we are going to use Python 3.x. I hope you have already installed Python on your machine. If not then you can download it from here.
Also, create a folder in which you will keep the Python script. Then create a Python file where you will write the code.
mkdir twitter
Then create a Python file inside this folder. I am naming it twitter.py. You can use any name you like.
Along with this, we have to download III party libraries likeBeautifulSoup(BS4), Selenium, and achromium driver. This setup is essential for tasks like scraping Twitter with Selenium.
Installation
For installing BeautifulSoup use the below-given command.
pip install beautifulsoup4
For installing Selenium use the below-given command.
pip install selenium
Selenium is a popular web scraping tool for automating web browsers. It is often used to interact with dynamic websites, where the content of the website changes based on user interactions or other events.
Whereas BS4 will help us parse the data from the raw HTML we are going to download using Selenium
Remember that you will need the exact version of the Chromium driver as your Chrome browser. Otherwise, it will not run.
Testing the setup
Just to make sure everything works fine, we are going to set up our Python script and test it by downloading data from this page.
from bs4 import BeautifulSoup
from selenium import webdriver
import time


PATH = 'C:\Program Files (x86)\chromedriver.exe'


target_url = "https://twitter.com/scrapingdog"


driver=webdriver.Chrome(PATH)

driver.get(target_url)
time.sleep(5)


resp = driver.page_source
driver.close()

print(resp)
Let me explain step by step what each line means.
The first three lines import the necessary libraries: BeautifulSoup for parsing HTML and XML, Selenium for automating web browsers, and time for setting a delay.
The fourth line sets the path to the chromedriver executable. This is the location where your Chrome driver is installed.
Then the fifth line sets the target URL to the Scrapingdog Twitter page that we want to scrape.
The sixth line creates a new instance of the ChromeDriver using the path specified in the PATH variable.
Then using .get() method of the Selenium browser will navigate to the target page.
The next line sets a delay of 5 seconds to allow the page to fully load before continuing with the script.
Using .page_source function we get the HTML content of the current page and store it in the resp variable.
Then using .close() method we are closing down the browser window. This step will save your server from crashing if you are going to make multiple requests at a time.
The last line prints the HTML content of the page to the console.
Once you run this code you will get raw HTML on the console. This test ensures our setup is ready for scraping Twitter with Beautiful Soup and Selenium.
What exactly are we going to extract from a Twitter page?
Extracting Details From Scrapingdog’s Twitter Handle
It is always better to decide in advance what exactly you want to extract from the page. For this tutorial, we are going to scrape these data points.
Profile Name
Profile Handle
Profile Description
Profile Category
Website URL
Joining date
Number of Followers
Following Count
I have highlighted these data points in the above image. Please refer to that if you have any confusion.
Let’s start scraping Twitter
Continuing with the above code, we will first find the locations of each element and then extract them with the help of BS4. We will use .find() and .find_all() methods provided by the BS4. If you want to learn more about BS4 then you should refer BeautifulSoup Tutorial.
First, let’s start by finding the position of the profile name.
Extracting Profile name
As usual, we have to take support of our Chrome developer tools over here. We have to inspect the element and then find the exact location.
Inspecting Profile Name in Source Code
Here you will find that there are four elements with a div tag and class r-1vr29t4 but the name of the profile is the first one on the list. As you know .find() function of BS4 is a method used to search for and retrieve the first occurrence of a specific HTML element within a parsed document.
With the help of this, we can extract the name of the profile very easily.
Here we have declared one empty list l and one empty object o.
Then we created a BeautifulSoup object. The resulting soup the object is an instance of the BeautifulSoup class, which provides a number of methods for searching and manipulating the parsed HTML document
Then using .find() method we are extracting the text.
Nothing complicated as of now. Pretty straightforward.
Extracting profile handle
For extracting the profile handle we are going to use the same technique we just used above while extracting the name.
Inspecting Profile Handle in Source Code
In this case, the handle is located inside a div tag with class r-1wvb978. But again there are almost 10 elements with the same tag and class.
Once you will search for this class in the Chrome developer tool you will find that the element where the handle is stored is first in the list of those 10 elements. So, using .find() method we can extract the first occurrence of the HTML element.
Extracting Profile Category, website link, and joining date
Inspecting Profile Category, Website Link & Joining Date
As you can see all the there data elements are stored inside this div tag with attribute data-testid and value UserProfileHeader_Items. So, our first job would be to find this.
The following and followers elements can be found under a tag with class r-rjixqe. You will find seven such elements. I have even highlighted that in the above image. But following count and followers count are the first two elements. So, all we have to do is use .find_all() method of BS4. Remember .find_all() will always return a list of elements matching the given criteria.
I have used 0 for the following count because it is the first one on the list and 1 for followers because it is the second one on the list.
With this, our process of scraping Twitter and extracting multiple data points is over.
Complete Code
You can of course extract more data like tweets, profile pictures, etc. But the complete code for all the information we have scraped in this tutorial will look like this.
The advantages of using Scrapingdog Web Scraping API are:
You won’t have to manage headers anymore.
Every request will go through a new IP. This keeps your IP anonymous.
Our API will automatically retry on its own if the first hit fails.
Scrapingdog uses residential proxies to scrape Twitter. This increases the success rate of scraping Twitter or any other such website.
You have to sign up for the free account to start using it. It will take just 10 seconds to get you started with Scrapingdog.
Once you sign up, you will be redirected to your dashboard. The dashboard will look somewhat like this.
You have to use your API key.
Now, you can paste your Twitter page link to the left and then select JS Rendering as Yes. After this click on Copy Code from the right. Now use this API in your script to scrape Twitter.
With Scrapingdog API for web scraping, you won’t have to worry about any Chrome drivers. It will be handled automatically for you. You just have to make a normal GET request to the API.
Note: – If you want the get data from Twitter in JSON format, you can use our dedicated Twitter Scraper API.
Forget about getting blocked while scraping Twitter
Try out Scrapingdog General Web Scraping API Or Check Out Our Dedicated Twitter Scraper API
Conclusion
In this article, we managed to scrape certain Twitter profile data. With the same scraping technique, you can scrape publically available tweets and profile information from Twitter.
You can take advantage of some Twitter Python libraries with which you can scrape any tweet in normal text. You won’t even have to parse the data.
I hope you like this little tutorial and if you do then please do not forget to share it with your friends and on your social media.
Additional Resources
Here are a few additional resources that you may find helpful during your web scraping journey:
In today’s highly competitive e-commerce landscape, staying ahead of the curve is crucial for businesses striving for success. One indispensable strategy involves the practice of price scraping.
This technique allows companies to extract and analyze pricing data from various online sources, enabling them to make informed decisions and optimize their pricing strategies.
In this article, we will delve into the fundamentals of price scraping, discuss its practical applications, and provide insights on how businesses can harness their full potential to gain a competitive edge in the ever-evolving digital marketplace.
Price Scraping: Definition & Best Tools
Let’s say you want to buy a laptop, you will search for it on Amazon, eBay, Walmart, etc. You will look for the cheapest price available for that laptop on these platforms and then buy it. This is what we do, right?
Now, you will think what is the role of web scraping when it comes to checking prices? Well, if you want to save some bucks then scraping prices from the different platforms can help you with analyzing the cheapest possible price and it will also tell which platform is selling it so that you don’t have to open every single website & monitor it.
It can be done in three simple steps:
Scrape that target product URL.
Parse the data.
Email yourself with the name of the cheapest provider and the price.
You can even analyze the data for a week by scraping and storing it in a CSV file. Then you can decide based on dates on which prices are lower or got dropped.
Why price scraping is done?
With the competition rising in online businesses, many suffer due to a lack of proper pricing strategy.
To gain an advantage in the market you need to do competitor price scraping. Monitoring 24*7 becomes mandatory when you want an edge over the others in your domain.
Using web scraping tools you will be able to scrape any website in no time. Various eCommerce, Travel, Finance, etc companies collect a tremendous amount of data from the web because they know to beat their competitors they have to access their competitors’ data.
The advantage of using web scraping tools is to provide you with a seamless data pipeline that will be able to handle all the blocks between you and the data.
How do travel companies get benefits from price scraping?
Travel companies use hotel rate shopping toolsto get the prices of their competitors. Let us understand how this process works.
Let’s take the example of The Lenox Hotel in Boston, USA, and consider the check-in date as 16 October 2023 and check-out as 17 October 2023. For booking this hotel there are many booking websites like Expedia, Hotels.com, HRS, Booking.com, etc.
Now, the guest will book it from the cheapest provider and that could be say Expedia. But because of big travel agencies, small agencies suffer due to a lack of bookings.
To counter this, agencies use price comparison APIs to keep track of pricing offered by their competitors. In this competitive world, it becomes necessary to keep track of your niche market.
With pricing intelligence, you can set your prices and can even generate discounts to ultimately gain more bookings.
How do e-commerce companies get benefits from price scraping?
Many individual eCommerce platforms deal with a particular range of products. It could be clothes, supplements, sportswear, cosmetics, etc.
Now, there is a lot of competition in the market when it comes to any of these product lines. To beat niche websites you will need market and pricing intelligence. Market intelligence will tell you about product insights and pricing intelligence will tell you what price you need to set to increase your revenue.
Why E-commerce Platforms Scrape Prices
If your product is great but is not priced in line with the market then your product will not sell. It should always be about minimum features & maximum delivery.
Pricing will play a great role when it comes to the eCommerce industry.
How do finance companies get benefits from price scraping?
Financial companies use price scraping in stock analysis, market sentiment analysis, credit ratings, etc. Companies crawl stock prices to set an alert for buying or selling. They use web scraping tools to scrape news, search Google search results, and social media websites like Twitter, etc to make market sentiments.
Big companies like Goldman Sachs, Fitch Ratings, etc use web scraping services to crawl over the internet to create reports on multiple financial decisions that governments around the world might have to take in the coming few years. They also crawl data for analyzing market moods.
Challenges in Price Scraping
Real-Time Updates
Prices on e-commerce websites can change extremely frequently due to factors like stock levels, competitors’ prices, and changes in demand. This dynamic pricing environment necessitates almost real-time or at least frequent scraping, which can be resource-intensive and technically challenging. The frequency of price changes means data collected even a few hours ago might already be outdated.
Dynamic Pricing
Many online sellers use dynamic pricing, where the price changes in real-time based on variables like the user’s browsing history, demand fluctuations, location, and the time of day. This introduces additional variability into the pricing data and can make it challenging to get consistent and comparable data. A scraper needs to account for these potential fluctuations and still make sense of the pricing structure.
Complex Page Structures
Product pages on e-commerce sites are often intricate, displaying a wealth of information beyond just the price. They may include product specifications, customer reviews, related products, and more. These complexities require a more advanced scraper that can correctly identify and extract the specific information you need (i.e., the price) from a sea of other data.
Hidden Prices
Some e-commerce platforms do not display prices until a certain action is performed, such as adding an item to the cart or beginning the checkout process. This level of interaction goes beyond what a basic scraper can handle and requires more advanced techniques to simulate these user actions and extract hidden prices.
Variations and Bundles
Products often come in different variations (such as size, color, or package quantity), each with its own price. Additionally, products may be offered as part of bundles or special deals, which have different pricing structures. Capturing and correctly interpreting these various prices can complicate the scraping process and make it more challenging to perform accurate and fair price comparisons.
Location-Based Pricing
Depending on the buyer’s geographical location, prices may vary due to differing tax rates, shipping costs, or regional pricing strategies. To accurately scrape prices, the scraper may need to simulate being in various locations, often requiring proxy servers or VPNs. This adds another layer of complexity and a potential point of failure to the scraping process.
Anti-Scraping Technologies
E-commerce sites often employ advanced anti-scraping technologies to protect their pricing data from competitors. These might include CAPTCHAs, requiring user logins, IP blocking, or more advanced behavioral analysis to identify and block scrapers. Overcoming these defenses can be technically challenging and may require continuous updating of scraping strategies as anti-scraping technologies evolve.
Well, the correct answer is yes but up to a certain extent. You can legally scrape publically available pages. Legal scraping can be:
If the page is not behind an authentication wall.
Does not include any private information of a user.
Follow the rules of the robots.txt file.
Do not overload the host server with unnecessary calls.
Recently Linkedin filed a caseagainst a Singapore-based company Mantheos. This company was illegally selling LinkedIn member data to other companies.
They were also using the data for sentiment analysis. This is the perfect example of illegal scraping. You cannot go on scraping somebody’s private information and then sell it.
Price Scraping: Legal Vs Illegal
There have been many cases like this in the past where the defendant also won. Like eBay vs Bidder’s Edge case, BE Inc was a price comparison website where they were crawling product prices from eBay (an online auction company) regularly.
Later BE filed an appeal that if all the websites stopped scraping then the internet will cease to exist. This was an interesting case for the scraping industry.
Best Price Scraping Tools
Depending on your needs and specifications, many tools can help you scrape prices from your target source. We have concluded a list of possible methods/tools you can use to scrape prices.
Building a Web Scraper of Your Own – Creating a web scraper to scrape fixed targets is a great way to start. However, there are some limitations to it. Some websites may change their structure, and in that case, a regular maintenance team is needed. Another limitation is to have a good grasp on the programming language the price scraper is made and that would need an extra resource and time.
Using A Built-in Tool for this purpose – The time and resources you would spend on the extra team while building the scraper of your own, can be done by buying a tool that can be half the cost. Scrapingdog is a web scraping API that can be used to scrape prices from different e-commerce sites including Amazon. Although, as I said an Amazon scraper using Python or any other programming language can be made, they are difficult to maintain and require heavy resources. We also have a dedicated Amazon Scraping API that you can use to get the output result in JSON format.
Using an Open Source Tool– To price scrape you can also use free tools like Scrapy. It is one of the cost-effective & customizable ways to scrape prices. Scrapy can be however used for small projects, large scale data extraction or price scraping wouldn’t be viable using this tool.
Conclusion
To price scrape or not depends on your business needs. Doing it legitimately is the way to go! However, if you are new to scraping try to get a basic understanding of how it is done, and know which data will be beneficial for you in the long run of your business.
In this article, we will talk about how a proxy can be used with Puppeteer. First, we will learn some basic steps to set up a proxy with Puppeteer, and then we will try it with Scrapingdog private proxies.
We will also learn how you can scrape the data after pressing the button using Puppeteer and proxies.
Proxy in Puppeteer
Requirements
Before we begin we need to make sure that we have installed everything we may need in this tutorial ahead.
Puppeteer is a great tool for web scraping and that is due to its API support. I would suggest you go and read the Puppeteer documentation. We will begin with some basic steps to start with.
Steps
Launch the puppeteer using launch function.
Then open a new page using newPage function.
The third step is completely conditional. It involves passing proxy credentials in case the proxy is private. You have to use authenticate function to pass the credentials.
The next step is to extract the raw HTML from that page using the content function.
The last step is to close the browser using the close function.
As stated earlier this is used to pass credentials to private proxies. Puppeteer does not provide command-line options to pass the proxy credentials. There is no straightforward method to force Chromium to use a specific username and password. But the puppeteer provides a authenticate function that can be used to solve this problem.
When you open a website URL using the goto function there might be some cases where some of the websites won’t load completely. If the website is not completely loaded then you will receive incomplete data after scraping. In many cases, you will not receive the data(dynamic data) you need. So, you have to keep rendering the website until it loads completely. Puppeteer has a function called waitUntil where you can pass in several options. These options change the behavior of how and when it will complete the rendering of your page, and return the results.
Options offered by waitUntil are:
load — When this event is fired navigation will be completed.
domcontentloaded — When this event is fired, navigation will be completed.
networkidle0 — consider navigation to be finished when there are no more than 0 network connections for at least 500 ms.
networkidle2 — consider navigation to be finished when there are no more than 2 network connections for at least 500 ms.
We have created an async function puppy where we have used a public proxy. You can select any free proxy. We have also used try and catch in case our proxy fails to scrape our target website.
Then we used the content method to extract the data from that page which is followed by closing the browser.
Finally, we are printing the data.
The response will look like this
Scraping After Pressing a Button
For this, we might need some quality proxies. You can signup for Scrapingdog free trial for that. You will get free 1000 calls.
Forget about getting blocked while scraping the Web
Try out Scrapingdog Web Scraping API with thousands of proxy servers and an entire headless Chrome cluster
After signup, you will find a proxy URL on your dashboard. We are going to use that for web scraping. Now, if you want to use datacenter proxies then just remove this part — “-country=random”. country=random will provide you with Residential proxies from random countries.
We will understand this with two examples.
plan of attack for I example
Open a page.
Click an element.
Redirect to a new page.
Scrape that page.
plan of attack for II example
Open a page.
Type some queries and press enter.
After pressing Enter a new page will open.
Scrape that page.
Example I
In this example, we will scrape this website. As explained earlier we will open the website and then click on the first book “A Light in the Attic”.
Now, we have to tell the puppeteer where it has to click so that it can redirect us to our target URL. For that, we need to pass the onPage HTML elements. We will inspect the page for that.
We will use the img tag to click that particular book.
await page.click(‘img[alt=”A Light in the Attic”]’)
await page.waitFor(2000);
var data = await page.content();
await browser.close()
console.log(data)
We have used waitFor function in order to wait for the page to redirect completely. After loading the page we will use the content function to extract all the data.
Response
Example II
For this example, we will scrape Google. We will type a query on the input field and then press enter. After that whatever results appear on our screen we will scrape it.
Now, we need to find the input field by inspecting the page.
We will click/select the second child of the div parent and then type a query “scrapingdog”. After that, we will press enter.
await page.waitForSelector(‘div form div:nth-child(2) input’);

await page.click(‘div form div:nth-child(2) input’)
await page.keyboard.type(‘scrapingdog’);
await page.keyboard.press(‘Enter’);
await page.waitFor(3000);
var data = await page.content();

await browser.close();
console.log(data)
Here we have used waitForSelector function to wait for the particular element to appear on the screen. When it appears we are going to click it and type scrapingdog and then press enter.
We are waiting for the page to load completely. After that, we will scrape the page data using the content function and then close the browser using close function.
This screen will appear after pressing enter
Similarly, you can scrape any website using this technique with the support of quality proxies. Do remember all proxies are not the same, you might have to make small changes according to the proxy provider.
Troubleshooting Puppeteer with Proxy
We all know the frustration of trying to web scrape behind a proxy. It’s like being in a maze – every time you think you’ve found the exit, you hit another wall.
Luckily, there are some tools and tricks that can help you get around this hurdle. In this article, we’ll show you how to use Puppeteer with a proxy.
First, let’s take a look at some of the common issues you might encounter when using Puppeteer with a proxy. Then, we’ll share some tips on how to overcome them.
Common Issues: –
One of the most common issues is having Puppeteer return an error when trying to connect to the proxy. This can happen for a number of reasons, but the most likely cause is that your proxy requires authentication.
If this is the case, you’ll need to set the username and password for the proxy in the Puppeteeroptions object. For example:
Another issue you might encounter is that Puppeteer is able to connect to the proxy, but then gets stuck when trying to load the page. This can be caused by a number of factors, but one common cause is a slow connection.
To troubleshoot this, you can try increasing the timeout in the Puppeteeroptions object. For example:
const options = {

timeout: 30000,

}
If you’re still having issues, the next step is to check the proxy itself. Make sure the proxy is online and accessible from your network. You can do this by trying to connect to the proxy from a web browser.
If the proxy is up and running, but you’re still having issues, contact the proxy provider for help.
Tips and Tricks
Now that we’ve gone over some of the common issues you might encounter when using Puppeteer with a proxy, let’s share some tips and tricks that can help you get around them.
One useful tip is to use a rotating proxy. This will help to avoid any potential issues that could arise from using a single proxy for an extended period of time.
There are a number of rotating proxy providers that you can use, or you can even set up your own.
Another useful tip is to use a VPN in addition to a proxy. This will help to further mask your identity and make it more difficult for sites to block your IP address. There are a number of VPN providers that you can use, or you can even set up your own. Hopefully, these tips and tricks will help you get the most out of using Puppeteer with a proxy.
Conclusion
In this tutorial, we discussed how Puppeteer can be used in several different ways for web scraping using proxies. You will now be able to scrape other websites that need a login or a click on a dialog box. But these websites can only be scraped using paid proxies. Free proxies have limited usage but with paid proxies, there are no limits. You can also check the test results for the best datacenter proxies. We have compared many paid proxy providers.
If you have any questions for us then please drop us an email. You can also follow us on Twitter.
Additional Resources
Here are a few additional resources that you may find helpful during your web scraping journey:
Yelp is a platform that gathers customer opinions about businesses. It started in 2004 and helps people see what real customers think about local businesses. It ranks as the 44th most visited website & has over 184 million reviews. (source)
As of now, there are more than 5 million businesses listed on Yelp, making it a valuable resource for finding information about these businesses. To extract details from any listing from Yelp there are different ways.
For the sake of this tutorial, we’ll use Python to extract business listing details from Yelp.
Requirements For Scraping Yelp Data
Generally, web scraping is divided into two parts:
Fetching data by making an HTTP request
Extracting important data by parsing the HTML DOM
Libraries & Tools
Beautiful Soupis a Python library for pulling data out of HTML and XML files.
Requests allow you to send HTTP requests very easily.
Our setup is pretty simple. Just create a folder and install BeautifulSoup & requests. For creating a folder and installing libraries, type the below-given commands. I assume that you have already installed Python 3. x (The latest version is 3.9 as of April 2022).
We will extract the following information from our target page.
Name of the Restaurant
Address of the Restaurant
Rating
Phone number
A Yelp Listing from Which We Are Going To Extract Data
Let’s Start Scraping
Now, since we have all the ingredients to prepare the scraper, we should make a GET request to the target URL to get the raw HTML data.
We will scrape Yelp data using the requests library below.
from bs4 import BeautifulSoup
import requests
l={}
u=[]
r = requests.get('https://www.yelp.com/biz/sushi-yasaka-new-york').text
This will provide you with an HTML code of that target URL.
Parsing the raw HTML
Now we will use BS4 to extract the information we need. But before this, we have to find the DOM location of each data element. We will take advantage of Chrome developer tools to find the location.
Let’s start with the name first.
Finding The Tag That Has Name
So, the name is located inside the h1 tag with the class css-1se8maq.
Identifying the Tag That has the Location
Similarly, the address can be found inside the p tag with the class css-qyp8bo from the image above.
Identifying the HTML Tag that Holds the Value of Star Rating
The star rating can be found in the div tag with the class css-1v6kfrx. Inside this class, there is an attribute aria-label inside which this star rating is hidden.
Locating the location of Phone Number in HTML Tag
The phone number is located inside the second div tag with the class css-djo2w.
Now, we have the location of each data point we want to extract from the target page. Let’s now use BS4 to parse this information.
Once you run the above code you will get this output on your console.
{'data': [{'name': 'Sushi Yasaka', 'address': '251 W 72nd St New York, NY 10023', 'stars': '4.2 star rating', 'phone': '(212) 496-8460'}]}
There you go!
We have the Yelp data ready to manipulate and maybe store somewhere like in MongoDB. But that is out of the scope of this tutorial.
Complete Code
You can scrape other information like reviews, website addresses, etc from the raw HTML we downloaded in the first step. But for now, the code will look like this.
Scrapingdog’s API for web scraping can help you extract data from Yelp at scale without getting blocked. You just have to pass the target url and Scrapingdog will create an unbroken data pipeline for you, that too without any blockage.
Scrapingdog Homepage
Once you sign up you will get an API key on your dashboard.
You have to use this API key in the below provided code.
As you can see the code is the same except the target url. With the help of Scrapingdog, you can scrape endless data from Yelp.
Conclusion
In this step-by-step guide, you’ve gained a comprehensive understanding of how to create a Python scraper capable of retrieving Yelp data efficiently. As demonstrated throughout this tutorial, the process is surprisingly straightforward.
Additionally, you’ve explored an alternative approach using the Web Scraper API, which can help bypass anti-bot protection mechanisms and extract Yelp data with ease. The techniques outlined in this article not only apply to Yelp but can also be employed to scrape data from similarly complex websites without the risk of being blocked.
Web Scraping as the name suggests is the process of extracting data from a source on the internet. With so many tools, use cases, and a large market demand, there are a couple of web scraping tools to cater to this market size with different capabilities and functionality.
I have been web scraping for the past 8 years and have vast experience in this domain. In these years, I have tried and tested many web scraping tools (& finally, have made a tool myself too).
In this blog, I have handpicked some of the best web scraping tools, tested them separately, and ranked them.
4 Types of Web Scraping Tools
With different levels of experience users may have the web scraping tools can be divided into different categories.
1. Web Scraping APIs: This category is ideal for users with some programming knowledge and who prefer a more hands-on approach but still want some convenience.
These APIs allow users to integrate web scraping functionalities directly into their applications or scripts. They often provide a high level of customization and can handle complex scraping tasks relatively easily.
2. No-Code Web Scraping Tools: This category is perfect for users without programming skills or prefer a more straightforward, user-friendly approach. These tools typically offer a graphical user interface (GUI) where users can easily select data they want to scrape through point-and-click methods.
They are very accessible and are great for simpler scraping tasks or for users who need to scrape data quickly without delving into code.
3. Web Scraping Tools for SEO: These are the tools specifically designed for digital marketing and SEO professionals. Focused on extracting and analyzing data from individual websites to assess SEO-related aspects. Key functionalities include a thorough inspection of website content for duplication issues, especially when similar content appears on multiple pages, which can affect search engine rankings.
These tools typically concentrate on analyzing a single website at a time, providing targeted insights into its SEO performance and identifying areas for optimization. This focused approach allows for a detailed understanding of a specific site’s SEO health.
4. Building Scraping Tools using Programming Languages – This category suits users with programming expertise who need highly tailored solutions. Languages like Python, JavaScript, and Ruby, with libraries such as BeautifulSoup, Scrapy, Puppeteer, and Cheerio, offer a high degree of customization.
Category
Target Users
Key Features
Use Cases
Web Scraping APIs
Users with some programming knowledge
High level of customization, integration into applications/scripts, handles complex tasks
Complex data extraction, automation in scraping
No-Code Web Scraping Tools
Users without programming skills
User-friendly GUI, point-and-click data selection, accessible
Simple scraping tasks, quick data extraction
Web Scraping Tools for SEO
Digital marketing and SEO professionals
Focuses on individual websites, analyses SEO aspects like content duplication
SEO performance analysis, optimising website SEO
Tools built using the programming language
Users with programming expertise
High degree of customization, use of specific programming languages and libraries like BeautifulSoup, Scrapy, etc.
Highly tailored scraping solutions, extensive data manipulation
Web Scraping Tools categorization
5 Best Web Scraping APIs
Scrapingdog
Scrapingdog Homepage
The number one on this list is Scrapingdog’s web scraping API. It lets you scrape the web at scale without any blockage. With 40M+ IPs that periodically rotate on a request, the API is quite stable and can be used to scale any web scraping task.
Along with the general web scraping API, Scrapingdog has dedicated APIs built for different platforms. These are: –
You can further read reviews of Scrapingdog on Trustpilot to see how the users who are already engaged or used Scrapingdog feel about this service. At the time of writing this blog, it has 341 reviews and an average rating of 4.8/5.
Smartproxy Web Scraping API
Smartproxy Web Scraping API
Smartproxy, known for its leading proxy-providing service, has expanded its offerings and has now an API for web scraping. This development positions them as a versatile tool for those looking to build effective scrapers. With one of the largest pools of data centers and residential proxies, their service ensures broad compatibility across various websites.
While primarily acclaimed for its expansive proxy network, Smartproxy has now also come into dedicated scraping APIs, especially for prominent sites like Amazon and Google, which is a significant enhancement to their services. It’s important to note, though, that while their proxies generally perform well, there can be variability in success rates when scraping certain domains like Indeed and Amazon.
Brightdata
Brightdata
Brightdata, previously known as Luminati, is a prominent player in the proxy market, offering an array of web scraping APIs and specialized scraping tools for various domains. Their features include a vast pool of data centers, and mobile, and residential proxies, catering to a wide range of scraping needs. Brightdata is particularly noted for its high-end proxies and is regarded as a premium web scraping software.
The platform offers dedicated scrapers for specific websites, including Google, Yelp, and Zillow, which contributes to its high success rate in scraping across various websites.
However, Brightdata’s services are priced at the higher end of the spectrum, making it more suitable for companies with larger budgets. Additionally, some users have reported challenges with customer support and user experience, particularly regarding the dashboard’s complexity and potential lag between the front and backend, suggesting issues with API and frontend synchronization.
Crawlbase Scraper API offers a robust web scraping solution, ideal for both businesses and developers. Its key feature is the ability to extract data from any website through a single API call, streamlining the web scraping process. The API is further enhanced by the inclusion of rotating data centers and residential proxies, which are critical for scaling, scraping activities, and overcoming website blockages.
This tool is particularly suitable for those who are either building their scrapers or need large-scale scraping operations without triggering website access restrictions. Crawlbase API’s efficiency in data extraction makes it a practical choice. They offer a free trial with 1000 requests, enabling users to evaluate its features before committing to a paid plan.
Key benefits include comprehensive documentation for various programming languages and exceptional support for any queries or issues. Additionally, its affordability makes it a competitive option in the market. However, it’s worth noting that a basic understanding of coding is beneficial to fully utilize the API’s capabilities.
Scraper API
ScraperAPI
ScraperAPI is an efficient online tool for web scraping, offering the capability to scrape any site with just a single GET request. This service includes both data center and residential proxies, which are particularly useful for those with their scraping tools, helping to prevent blocks during large-scale scraping operations. ScraperAPI gives free credits whenever you sign up for the first time. Its documentation is comprehensive, ensuring ease of use. Additionally, ScraperAPI is known for its responsive and helpful support.
However, users should be aware of some limitations. The service has been noted for inconsistent uptime, with occasional server crashes. Additionally, scraping complex websites such as Amazon and Indeed can be more costly, consuming more scraping credits per page. There are also certain websites, like Indeed and Google, where the tool might face difficulties in scraping effectively.
Parsehub, designed to cater to non-developers, is a web scraping tool available as a desktop application. It offers a free version with basic features, making it an attractive option for beginners in web scraping or those who are not ready to commit fully. For enterprise-level clients requiring more advanced functionalities, Parsehub provides subscription plans that unlock a wider range of features.
The advantages of Parsehub include the ability to schedule web scraping tasks, which is particularly useful for regular data extraction needs. Additionally, they offer free web scraping courses and guides, aiding users in quickly getting up to speed with the tool’s capabilities.
On the flip side, Parsehub does have a somewhat steep learning curve, despite its no-code approach, which might require some time for users to fully grasp. Also, the availability of support is tiered, which means that the level of assistance you receive may depend on your subscription plan.
Octoparse
Octoparse No-Code Web Scraper
Octoparse is another user-friendly no-code web scraping tool that shares similarities with Parsehub. It features a straightforward point-and-click interface, eliminating the need for any coding expertise. Octoparse sets itself apart with its AI-powered auto-detect functionality, which simplifies the data extraction process by not relying on traditional methods like HTML selectors.
Key advantages of Octoparse include the ability to effectively extract data from complex web elements, such as dropdown menus. Additionally, it offers flexibility in how scraping tasks are run, giving users the choice to execute them either on the cloud or locally on their device.
However, like Parsehub, Octoparse also presents a steep learning curve that might require a significant investment of time to overcome. Additionally, the level of customer support provided is somewhat limited, which might be a consideration for users who may require extensive assistance.
Scrape Storm
Scrape Storm
ScrapeStorm offers an AI-powered, user-friendly web scraping experience that also doesn’t require coding. It excels in extracting data from almost any website with its intelligent content and pagination identification. This tool simplifies the scraping process: users only need to input URLs, and ScrapeStorm does the rest, eliminating the need for complex configurations.
Available as a desktop application for Windows, Mac, and Linux, ScrapeStorm supports a variety of data export formats such as Excel, HTML, Txt, and CSV, and allows for data export to databases and websites. A notable limitation is the absence of cloud services, which might be a drawback for users looking for cloud-based scraping solutions.
While no-code web scraping tools are user-friendly and accessible for those without programming skills, they do have limitations compared to web scraping APIs, which are important to consider:
Feature
No-Code Web Scraping Tools
Web Scraping APIs
Customization and Flexibility
Limited; often rely on predefined templates and workflows.
High; allows tailored data extraction and manipulation.
Handling Dynamic/JavaScript-Heavy Sites
Might struggle with dynamic content and heavy JavaScript.
Generally more capable, especially those that render JavaScript.
Scalability
Not as scalable; limited by GUI-based processing.
Highly scalable; can handle large volumes of data and simultaneous requests.
Speed and Efficiency
Slower due to more manual configuration.
Faster and more efficient; can be integrated directly into scripts or applications.
Error Handling and Robustness
Limited advanced error handling capabilities.
More robust; better equipped to handle network errors, server failures, etc.
Dependency on Tool’s UI/Updates
High; dependent on the interface and tool updates.
Lower; can be quickly adjusted in code for website changes.
Features: Web Scraping API vs No-Code Scraping Tools
For users with no coding experience, but want to scale their data extraction process, integrating web scraping APIs with platforms like Airtable offers a practical approach. This method bridges the gap between the power of APIs and the simplicity of no-code tools.
I wrote a guide that demonstrates this approach, specifically focused on scraping LinkedIn job data without the need for coding. The guide walks through the process step-by-step, making it accessible even for those without a technical background. This way you can scrape almost any website just like we did for LinkedIn here.
Web Scraping Tools for SEO
Screamingfrog
Screamingfrog Web Crawling Spider
Screamingfrog is a renowned tool in the SEO community, known for its comprehensive web scraping capabilities, specifically for SEO purposes. This desktop application, available for Windows, Mac, and Linux, stands out for its ability to perform in-depth website crawls. It’s particularly adept at analyzing large sites, and efficiently extracting data such as URLs, page titles, meta descriptions, and headings.
Key features of ScreamingFrog include the ability to identify broken links (404s) and server errors, find temporary and permanent redirects, analyze page titles and metadata, discover duplicate content, and generate XML sitemaps. It’s also useful for visualizing site architecture and reviewing robots.txt files.
Screamingfrog Use Cases
Screamingfrog can also integrate with Google Analytics, Google Search Console, and other SEO tools, enhancing its data analysis capabilities. This integration allows for a more comprehensive SEO audit, covering aspects like internal linking and response time.
Sitebulb
Sitebulb SEO Tool
Sitebulb is a desktop-based web crawling and auditing tool and is also highly regarded in the SEO community for its comprehensive and user-friendly features. Available for both Windows and Mac users, Sitebulb provides an intuitive interface that simplifies the process of conducting in-depth SEO audits.
The tool excels in offering a wide range of insightful SEO data. It thoroughly analyses various aspects of a website, including site structure, internal linking, HTML validation, and page speed issues. Sitebulb’s capability to identify areas such as broken links, redirects, and duplicate content makes it an invaluable asset for SEO professionals.
One of the standout features of Sitebulb is its detailed reporting and visualizations, which offer deep insights into the data it collects. This helps in understanding complex site architecture and SEO issues more clearly. The reports generated are not only comprehensive but also easy to interpret, making them useful for both SEO experts and those new to the field.
While tools like ScreamingFrog and Sitebulb are excellent for crawling and scraping content from individual web sources, it’s important to note their limitations. These tools are not designed for data extraction at large scales. They are best suited for specific use cases in SEO, such as auditing a single website’s SEO performance or analyzing its content structure.
Their functionality is primarily focused on SEO tasks and may not be as effective for broader data scraping needs that require handling multiple sources or large datasets simultaneously.
Building a Scraping Tool from Scratch Using Programming Language
For those who seek the utmost flexibility and control in web scraping, building custom tools using programming languages is the best way. This approach is especially suited for tech-savvy individuals or teams with specific scraping needs that go beyond what pre-built tools offer.
It involves selecting a programming language that aligns with your project requirements and using its respective libraries and frameworks for scraping tasks. While this path offers greater customization, it also comes with its share of challenges and learning curves.
The most popular languages for web scraping include:
1. Python: Known for its simplicity and readability, Python is a favorite for web scraping due to its powerful libraries like BeautifulSoup, Scrapy, and Selenium. These libraries offer various functionalities for parsing HTML, handling JavaScript, and automating browser tasks.
2. JavaScript: With Node.js and frameworks like Puppeteer and Cheerio, JavaScript is ideal for scraping dynamic websites. It’s particularly useful for sites that heavily rely on JavaScript for content rendering.
3. Ruby: Ruby, with its Nokogiri library, is another good choice for web scraping, offering straightforward syntax and efficient data extraction capabilities.
4. PHP: While not as popular as Python or JavaScript for scraping, PHP can be used effectively for web scraping with libraries like Goutte and Guzzle.
Each language has its strengths and is suitable for different types of scraping tasks. However, as said earlier there are some limitations associated with building these scrapers and therefore I have listed them below in the table.
Feature/Aspect
Limitations and Challenges
Learning Curve
Requires programming knowledge; time investment to learn and master.
Maintenance and Scalability
Relying on external libraries/frameworks may have their own limitations.
Handling Dynamic Content
Challenges in scraping JavaScript-heavy sites without the right libraries or frameworks.
Anti-Scraping Measures
Need to implement strategies to bypass anti-scraping technologies like CAPTCHAs and IP bans.
Legal and Ethical Considerations
Must be aware of legal implications and ethical issues around web scraping.
Data Extraction Complexity
Handling complex data structures and parsing HTML/XML can be intricate.
Dependency on External Libraries
Relying on external libraries/frameworks may have their limitations.
Limitation of Building A Scraping Tool From Programming Language
Conclusion
Web Scraping offers a diverse range of tools and methodologies, each catering to different needs and skill levels. From no-code solutions ideal for beginners and non-developers to the more advanced web scraping APIs for those with programming expertise, there’s a tool for every scenario.
While no-code tools provide an accessible entry point into web scraping, they have their limitations in terms of scalability and flexibility compared to more robust web scraping APIs and custom-built tools using programming languages.
For SEO purposes, specialized tools like ScreamingFrog and Sitebulb offer targeted functionalities but are not designed for large-scale data extraction. They limit themselves to SEO only.
Remember, the choice of a web scraping tool should align with your technical skills, the scale of data extraction needed, and the specific tasks at hand. Whether you’re a marketer, developer, or researcher, the web scraping landscape offers a tool that can fit your unique data-gathering needs.
Today many websites cannot be scraped with a normal XHR request because they render data through Javascript execution. Traditional web scraping libraries like requests and Scrapy are excellent for extracting data from websites where the content is directly embedded in the HTML of the page. However, a growing number of modern websites use JavaScript to dynamically load and render content. When you make a simple HTTP request (like an XHR request) using requests or similar libraries, you get the initial HTML, but it might lack the dynamically loaded content.
Headless browsers or browser automation tools can help. These tools simulate a browser environment and can execute JavaScript on a page.
Web Scraping Myntra using Selenium & Python
In this tutorial, we will learn how to scrape dynamic websites using Selenium and Python. For this tutorial, we are going to scrape myntra.com.
Requirements
I assume you already have Python 3.x installed on your machine. If not then you can install it from here. Let’s start with creating a folder in which we are going to keep our Python script.
mkdir seleniumtut
Then after creating the folder, we have to install two libraries that will be needed in the course of this tutorial.
Selenium– It is used to automate web browser interaction from Python.
Beautiful Soupis a Python library for parsing data from the raw HTML downloaded using Selenium.
Chromium– It is a web browser that will be controlled through selenium. You can download it from here.
pip install bs4
pip install selenium
Remember that you will need the exact version of the Chromium driver as your Chrome browser. Otherwise, it will not run and throw an error.
Now, create a Python file where we can write our code. I am naming the file as tutorial.py.
What are we going to scrape?
For this tutorial, we are going to scrape this page.
We are going to scrape three data points from this page.
Name of the product
Price of the product
Rating of the product
First, we will download the raw HTML from this page using selenium, and then using BS4 we are going to parse the required data.
Downloading the data with Selenium
First step would be import all the required libries inside our file tutorial.py.
from bs4 import BeautifulSoup
from selenium import webdriver
from selenium.webdriver.chrome.service import Service
Here we first imported the BeautifuSoup, webddriver module from selenium and the Service class from selenium.
PATH = 'C:\Program Files (x86)\chromedriver.exe'
Here I have declared the path where I have installed my chromium driver. Your location might be different.
service = Service(executable_path=PATH)
options = webdriver.ChromeOptions()
driver = webdriver.Chrome(service=service, options=options)
The executable_path parameter is used to provide the path to the ChromeDriver executable on your system. This is necessary for Selenium to locate and use the ChromeDriver executable.
webdriver.ChromeOptions is a class in Selenium that provides a way to customize and configure the behavior of the Chrome browser.
webdriver.Chrome is a class in Selenium that represents the Chrome browser. The service parameter is used to specify the ChromeDriver service, which includes the path to the ChromeDriver executable. The options parameter allows you to provide the ChromeOptions instance created earlier, customizing the behavior of the Chrome browser according to your needs.
driver.get("https://www.myntra.com/trousers/the+indian+garage+co/the-indian-garage-co-men-black-slim-fit-solid-joggers/9922235/buy")

html_content = driver.page_source
print(html_content)


# Close the browser
driver.quit()
The get method is used to navigate the browser to a specific URL, in this case, the URL of a Myntra product page for trousers.
driver.page_source is a property of the WebDriver that returns the HTML source code of the current page. After this step we are printing the result on the console.
driver.quit() closes the browser, ending the WebDriver session.
Once you run this code you will get this on your console.
This means that we have successfully managed to download the raw HTML from the target website. Now, we can use BS4 for parsing the data.
Since we have already decided what we are going to extract from this raw data let’s find out the DOM location of each of these data points.
Location of Title Tag in the page
The title of the product is located inside the h1 tag with class pdp-title.
Finding the location of star rating
The rating is located inside the first div tag of the parent div with the class index-overallRating.
Locating the pricing text in source code
Similarly, you can see that the pricing text is located inside the span tag with class pdp-price.
We can now implement this into our code using BS4.
from bs4 import BeautifulSoup
from selenium import webdriver
from selenium.webdriver.chrome.service import Service
import time

l=[]
o={}

PATH = 'C:\Program Files (x86)\chromedriver.exe'

# Set up the Selenium WebDriver
service = Service(executable_path=PATH)
options = webdriver.ChromeOptions()
# options.add_argument("--headless")
driver = webdriver.Chrome(service=service, options=options)

# Navigate to the home page
driver.get("https://www.myntra.com/trousers/the+indian+garage+co/the-indian-garage-co-men-black-slim-fit-solid-joggers/9922235/buy")

html_content = driver.page_source

soup=BeautifulSoup(html_content,'html.parser')


try:
    o["title"]=soup.find('h1',{'class':'pdp-title'}).text.lstrip().rstrip()
except:
    o["title"]=None

try:
    o["rating"]=soup.find('div',{'class':'index-overallRating'}).find('div').text.lstrip().rstrip()
except:
    o["rating"]=None

try:
    o["price"]=soup.find('span',{'class':'pdp-price'}).text.lstrip().rstrip()
except:
    o["price"]=None


l.append(o)


print(l)


# Close the browser
driver.quit()
soup = BeautifulSoup(html_content, ‘html.parser’) initializes a BeautifulSoup object (soup) by parsing the HTML content (html_content) using the HTML parser.
o[“title”] = soup.find(‘h1’, {‘class’: ‘pdp-title’}).text.lstrip().rstrip() finds an <h1> element with the class ‘pdp-title’ and extracts its text content after stripping leading and trailing whitespace. If not found, sets ‘title’ to None.
o[“rating”] = soup.find(‘div’, {‘class’: ‘index-overallRating’}).find(‘div’).text.lstrip().rstrip() finds a <div> element with the class ‘index-overallRating’, then finds another <div> inside it and extracts its text content. If not found, sets ‘rating’ to None.
o[“price”] = soup.find(‘span’, {‘class’: ‘pdp-price’}).text.lstrip().rstrip() finds a <span> element with the class ‘pdp-price’ and extracts its text content after stripping leading and trailing whitespace. If not found, sets ‘price’ to None.
At the end, we pushed the complete object o to the list l using .append() method.
Once you run the code you will get this output.
At the end, we pushed the complete object o to the list l using .append() method.
Once you run the code you will get this output.
[{'title': 'The Indian Garage Co', 'rating': '4', 'price': '₹545'}]
Complete Code
You can of course extract many other data points from this page by finding the location of those elements. But for now, the code will look like this.
from bs4 import BeautifulSoup
from selenium import webdriver
from selenium.webdriver.chrome.service import Service
import time

l=[]
o={}

PATH = 'C:\Program Files (x86)\chromedriver.exe'

# Set up the Selenium WebDriver
service = Service(executable_path=PATH)
options = webdriver.ChromeOptions()
# options.add_argument("--headless")
driver = webdriver.Chrome(service=service, options=options)

# Navigate to the home page
driver.get("https://www.myntra.com/trousers/the+indian+garage+co/the-indian-garage-co-men-black-slim-fit-solid-joggers/9922235/buy")

html_content = driver.page_source

soup=BeautifulSoup(html_content,'html.parser')


try:
    o["title"]=soup.find('h1',{'class':'pdp-title'}).text.lstrip().rstrip()
except:
    o["title"]=None

try:
    o["rating"]=soup.find('div',{'class':'index-overallRating'}).find('div').text.lstrip().rstrip()
except:
    o["rating"]=None

try:
    o["price"]=soup.find('span',{'class':'pdp-price'}).text.lstrip().rstrip()
except:
    o["price"]=None


l.append(o)


print(l)


# Close the browser
driver.quit()
Conclusion
In this article, we learn how we can easily scrape JS-enabled websites using Selenium.
Selenium is highlighted for its capability to automate browser interactions seamlessly.
The focus was to parse HTML with elegance using Selenium to extract valuable insights.
The scope of insights includes a wide range, from product details to user ratings.
Overall, the article demonstrates how Selenium can be a powerful tool for web scraping tasks involving dynamic content and JavaScript execution.
Some websites may force you to use a web scraping API for heavy scraping. Web Scraping APIs will take your headless browser and proxy management part on an autopilot mode and you will just have to focus on data collection.
I hope you like this little tutorial and if you do then please do not forget to share it with your friends and on social media.
Web scraping is a useful tool when you want to gather information from the internet. For those in the hotel industry, knowing the prices of other hotels can be very helpful. This is because, with more hotels & OTAs coming into the market, the competition is rising at a faster pace now!
So, how do you keep track of all these prices?
The answer is by scraping hotel prices. In this blog, we’ll show you how to scrape hotel prices from booking.com using Python.
How To Scrape Hotel Data from Booking.com
You’ll learn how to get prices from any hotel on booking.com by just entering the check-in/out dates and the hotel’s ID. Also, if you’re a hotel owner and want a ready-made solution to monitor prices, check out the Makcorps Hotel API.
Let’s get started!
Why use Python to Scrape booking.com
Python is the most versatile language and is used extensively with web scraping. Moreover, it has dedicated libraries for scraping the web.
Requirements for scraping hotel data from booking.com
We need Python 3.x for this tutorial and I am assuming that you have already installed that on your computer. Along with that, you need to install two more libraries which will be used further in this tutorial for web scraping.
Requests will help us to make an HTTP connection with Booking.com.
BeautifulSoup will help us to create an HTML tree for smooth data extraction.
Setup
First, create a folder and then install the libraries mentioned above.
Inside this folder create a Python file where will write the code. These are the following data points that we are going to scrape from the target website.
Address
Name
Pricing
Rating
Room Type
Facilities
Let’s Scrape Booking.com
Since everything is set let’s make a GET request to the target website and see if it works.
import requests
from bs4 import BeautifulSoup

l=list()
o={}

headers={"User-Agent":"Mozilla/5.0 (Windows NT 10.0; Win64; x64) AppleWebKit/537.36 (KHTML, like Gecko) Chrome/107.0.0.0 Safari/537.36"}

target_url = "https://www.booking.com/hotel/us/the-lenox.html?checkin=2022-12-28&checkout=2022-12-29&group_adults=2&group_children=0&no_rooms=1&selected_currency=USD"

resp = requests.get(target_url, headers=headers)

print(resp.status_code)
The code is pretty straightforward and needs no explanation but let me explain you a little. First, we imported two libraries that we downloaded earlier in this tutorial then we declared headers and target URLs.
Finally, we made a GET request to the target URL. Once you print you should see a 200 code otherwise your code is not right.
How to scrape the data points
Since we have already decided which data points we are going to scrape let’s find their HTML location by inspecting chrome.
For this tutorial, we will be using the find() and find_all() methods of BeautifulSoup to find target elements. DOM structure will decide which method will be better for each element.
Extracting hotel name and address
Let’s inspect Chrome and find the DOM location of the name as well as the address.
As you can see the hotel name can be found under the h2 tag with class pp-header__title. For the sake of simplicity let’s first create a soup variable with the BeautifulSoup constructor and from that, we will extract all the data points.
soup = BeautifulSoup(resp.text, 'html.parser')
Here BS4 will use an HTML parser to convert a complex HTML document into a complex tree of python objects. Now, let’s use the soup variable to extract the name and address.
Once again we will inspect and find the DOM location of the rating and facilities element.
Rating is stored under the div tag with class d10a6220b4. We will use the same soup variable to extract this element. The following code will extract the rating data.
Extracting facilities is a bit tricky. We will create a list in which we will store all the facilities HTML elements. After that, we will run a for loop to iterate over all the elements and store individual text in the main array.
fac variable will hold all the facilities elements. Now, let’s extract them one by one.
for i in range(0,len(fac)):
    fac_arr.append(fac[i].text.strip("\n"))
fac_arr array will store all the text values of the elements. We have successfully managed to extract the main facilities.
Extract Price and Room Types
This part is the most tricky part of the complete tutorial. The DOM structure of booking.com is a bit complex and needs thorough study before extracting price and room type information.
Here tbody tag contains all the data. Just below tbody you will find tr tag, this tag holds all the information from the first column.
Then going one step down you will find multiple td tags where information like Room Type, price, etc can be found.
One thing that you will notice is that every tr tag has data-block-id attribute. Let’s collect all those ids in a list.
for y in range(0,len(tr)):
try:
id = tr[y].get('data-block-id')
except:
id = None
if( id is not None):
ids.append(id)
Now, once you have all the ids rest of the job becomes slightly easy. We will iterate over every data-block-id to extract room pricing and room types from their individual tr blocks.
for i in range(0,len(ids)):
try:
allData = soup.find("tr",{"data-block-id":ids[i]})
except:
k["room"]=None
k["price"]=None
allData variable will store all the HTML data for a particular data-block-id .
Now, we can move to td tags that can be found inside this tr tag. Let’s extract rooms first.
Here comes the fun part, when you have more than one option for a particular room type you have to use the same room for the next set of pricing in the loop. Let me explain to you with the picture.
Here we have three pricing for one room type. So, when for loop iterates value of the rooms variable will be None. You can see it by printing it. So, we will use the old value of rooms until we receive a new value. I hope you got my point.
if(rooms is not None):
last_room = rooms.text.replace("\n","")
try:
k["room"]=rooms.text.replace("\n","")
except:
k["room"]=last_room
Here last_room will store the last value of rooms until we receive a new value.
Let’s extract the price now.
Price is stored under the div tag with class “bui-price-display__value prco-text-nowrap-helper prco-inline-block-maker-helper prco-f-font-heading”. Let’s use allData variable to find it and extract the text.
We have finally managed to scrape all the data elements that we were interested in.
Complete Code
You can extract other pieces of information like amenities, reviews, etc. You just have to make a few more changes and you will be able to extract them too. Along with this, you can extract other hotel details by just changing the unique name of the hotel in the URL.
The code will look like this.
import requests
from bs4 import BeautifulSoup
l=list()
g=list()
o={}
k={}
fac=[]
fac_arr=[]
headers={"User-Agent":"Mozilla/5.0 (Windows NT 10.0; Win64; x64) AppleWebKit/537.36 (KHTML, like Gecko) Chrome/107.0.0.0 Safari/537.36"}
target_url = "https://www.booking.com/hotel/us/the-lenox.html?checkin=2022-12-28&checkout=2022-12-29&group_adults=2&group_children=0&no_rooms=1&selected_currency=USD"
resp = requests.get(target_url, headers=headers)
soup = BeautifulSoup(resp.text, 'html.parser')
o["name"]=soup.find("h2",{"class":"pp-header__title"}).text
o["address"]=soup.find("span",{"class":"hp_address_subtitle"}).text.strip("\n")
o["rating"]=soup.find("div",{"class":"d10a6220b4"}).text
fac=soup.find_all("div",{"class":"important_facility"})
for i in range(0,len(fac)):
fac_arr.append(fac[i].text.strip("\n"))
ids= list()

targetId=list()
try:
    tr = soup.find_all("tr")
except:
    tr = None
for y in range(0,len(tr)):
    try:
        id = tr[y].get('data-block-id')

    except:
        id = None

    if( id is not None):
        ids.append(id)
print("ids are ",len(ids))
for i in range(0,len(ids)):
try:
allData = soup.find("tr",{"data-block-id":ids[i]})
try:
     rooms = allData.find("span",{"class":"hprt-roomtype-icon-link"})
except:
     rooms=None
if(rooms is not None):
   last_room = rooms.text.replace("\n","")
try:
   k["room"]=rooms.text.replace("\n","")
except:
   k["room"]=last_room
price = allData.find("div",{"class":"bui-price-display__value prco-text-nowrap-helper prco-inline-block-maker-helper prco-f-font-heading"})

k["price"]=price.text.replace("\n","")
g.append(k)
k={}
except:
k["room"]=None
k["price"]=None
l.append(g)
l.append(o)
l.append(fac_arr)
print(l)
The output of this script should look like this.
Advantages of Scraping Booking.com
Lots of travel agencies collect a tremendous amount of data from their competitor’s websites. They know if they want to gain an edge in the market they must have access to competitors’ pricing strategies.
Advantages of Scraping Booking.com
To secure an advantage over the niche competitor one has to scrape multiple websites and then aggregate the data. Then finally adjust your prices after comparing with them. Generate discounts or show on the platform how cheap are your prices alongside your competitor’s prices.
Since there are more than 200 OTAs in the market it becomes a lot more difficult to scrape and compare. I would advise you to use services like hotel search API to get all the prices of all the hotels in any city around the globe.
Scrapingdog’s API offers efficient, scalable, and reliable hotel price scraping, adept at handling dynamic sites and bypassing CAPTCHAs. Its easy integration, customization, affordable pricing, and comprehensive support make it a superior choice. Check out our pricing plan here.
Not sure how many requests will be used by Scrapingdog’s API? Talk to our expert from here & get a customized plan as per your business needs!!
Conclusion
Hotel data scraping goes beyond this and this was just an example of how Python can be used for scraping Booking.com for price comparison purposes. You can use Python for scraping other websites like Expedia, Hotels.com, etc.
But scraping at scale would not be possible with this process. After some time booking.com will block your IP and your data pipeline will be blocked permanently. Ultimately, you will need to track and monitor prices for hotels when you will be scraping the hotel data.
Additional Resources
Here are a few additional resources that you may find helpful during your web scraping journey:
In the vast ecosystem of the World Wide Web, no single entity dominates the search engine space quite like Google. Serving as the internet’s principal gatekeeper, Google processes an astounding 8.5 billion searches per day, firmly maintaining over 90% of the global search engine market share. Its groundbreaking algorithms and unprecedented ability to process and present information make Google not just a search engine, but a fundamental pillar of the digital age.
However, as comprehensive as the Google search engine may be, extracting specific, manageable data from this colossal repository poses a significant challenge.
In this article, we will explore the 10 best SERP APIs. These APIs provide the ability to provide enhanced efficiency, flexibility, and scalability in a wide array of applications and services.
Indeed, crafting your own Google web scraper using your preferred programming language is an intriguing possibility for extracting search results. This bespoke approach can yield significant results, especially for smaller-scale operations or niche applications.
That being said, to scale Google scraping you would need a search engine API. Google scraping can have many use cases, one of them we use commonly is keyword position tracking in SEO strategy.
Using your Google web scraper can be a risky proposition, especially considering Google’s protective measures. Rapid, large-scale data extraction can lead to an immediate IP ban, effectively halting your data pipeline. Moreover, ensuring your scraper’s longevity requires altering headers with each request – a labor-intensive process.
Seeking a Google scraping service may be driven by the difficulty of scraping Google and the need for quick access to data. Unless you have an abundance of time, it is generally not advisable to develop a Google scraper.
Additionally, data parsing becomes your responsibility. It is no easy task. Furthermore, Google is continuously evolving, rendering scrapers ineffective over time. Maintaining a Google scraper indefinitely is an unappealing prospect.
You can use the official API from Google but it is way too expensive. Then the alternative is to use the 3rd party scraping APIs. With these, you can get Google search results anonymously. They provide great flexibility and are faster in response.
Advantages of using SERP API for Google
There are various advantages of using these APIs to scrape Google search results:
You will always stay anonymous. On each request, a new IP will be used to scrape a page. Your IP will always be hidden.
The price is too low compared to the official API.
You can get parsed JSON as well as raw HTML data from these APIs.
You can even ask the vendors for API customization.
24X7 support.
10 Best APIs for Scraping Google in 2024
We will be judging these APIs based on 5 attributes.
Factors on Which We Have Ranked Google SERP APIs
Scalability means how many pages you can scrape in a day.
Pricing of the API. What is the cost of one API call?
Speed means how fast an API can respond with results.
Developer-friendly refers to the ease with which a software engineer can use the service.
Stability refers to how much load a service can handle or for how long the service is in the market.
Scrapingdog’s Google SERP API
Scrapingdog’s Google SERP API provides raw and parsed data from Google search results with a breeze. Along with a general web scraper API, you get dedicated scrapers for websites like Google, LinkedIn, Zillow, etc.
Scrapingdog Google SERP API
Details
With this API you get more than a billion API requests every month which makes this API a healthy choice.
Per API call cost for scraping Google starts from $0.003 and goes below $0.00125 for higher volumes.
For testing the speed of the API we are going to test the API on POSTMAN.
Scrapingdog’s Google SERP API Response Time
It took around 2.98 seconds to complete the request.
Scrapingdog has very clean documentation in multiple languages. From curl to Java, you will find a code snippet in almost every language.
Scrapingdog has been in the market for more than 3 years and rated 4.8 on Trustpilot. This Google SERP API is stable.
You can even test the API for free.
Data For SEO
Data for SEO provides the data required for creating any SEO tool. They have APIs for backlinks, keywords, search results, etc.
DataForSEO SERP API
Details
Documentation is too noisy which makes integration of the API too time-consuming.
The pricing is not clear. Their pricing changes based on the speed you want. But the high-speed pack will cost $0.002 per search. The minimum investment is $2k per month.
Since they have been into scraping for a very long time then I can say that this API is both scalable and stable.
Cannot comment on the speed as we were unable to test the API because of very confusing documentation.
Bright Data
Bright Data as we all know is a huge company focused on data collection. They provide proxies, data scrapers, etc.
Bright Data SERP API
Details
Their documentation is quite clear and testing is super simple.
We tested their API and the average response time was close to 1.9 seconds.
Per API call cost starts from $0.005.
The success rate is pretty great which makes this API scalable and stable. They have been in the market for a very long time. You can consider them experts in data extraction.
Scrape-It Cloud
Scrape-it Cloud is another great option if you are looking for search engine API. Their dashboard makes your onboarding pretty simple.
Scrape-It Cloud Google SERP API
Details
Documentation is pretty simple and easy to understand.
Per API call response time is around 4.7 seconds.
If you hit the same API multiple times they show a lag. So, I think the API is not scalable at the moment.
Per API call price starts from $0.003 and goes around $0.0004 with higher volumes.
They are pretty new to the market and lack regular updates to the API.
Scrapingbee’s Google Search API
Scrapingbee is also a web scraping API that offers a dedicated scraper for Google.
Scrapingbee’s Google Search API
Details
The documentation is pretty clear and contains code snippets in almost every language.
The average time taken by the API to respond was close to 5 seconds. API delays response if multiple requests are made at the same time.
Scrapingbee Google Search API Response Time
They have been in the market for more than 4 years now and this makes them reliable and stable.
The average time might go up if you need high concurrency.
Pricing starts from $0.0081 per search and goes down to $0.001875 per search for the Business pack.
Serpdog was initially launched as a free search engine API but now it is a fully-fledged freemium API. They offer multiple dedicated APIs around Google and its other services like Maps, Images, News, etc.
Serpdog Google SERP API
Details
Documentation is very clear and has code snippets for all major languages like Java, NodeJS, etc. This makes testing this API super easy.
The average response time was around 3.2 seconds. And it continues to be the same even for high concurrency.
Serpdog Google SERP API Response Time
Pricing starts from $0.00375 per search and goes below $0.00166 for bigger packs.
API is reliable and can be used for bigger projects.
SerpAPI
SerpAPI is the fastest Google search scraper API with the highest variety of Google-related APIs.
SerpAPI Home Page
Details
The documentation is very clear and concise. You can quickly start scraping and Google service within minutes.
The average response time was around 3.8 seconds. API is fast and reliable. This API can be used for any commercial purpose which requires a high volume of scraping.
Pricing starts at $0.01 per request and it goes down to $0.0083! Now, you might be thinking, ‘Wow, that’s expensive!’ But fear not, because here’s the SerpAPI alternative that’s not only fast but also easy on your wallet.
SerpAPI has been in this industry since 2016 and they have immense experience in this market. If you have a high-volume project then you can consider them.
Zenserp
Zenserp is a search engine API that offers multiple dedicated scrapers for Google, Bing, etc.
Zenserp
The documentation is not that great clear. You have to spend a little time to get an idea. Only curl code snippets are available.
The average response time was around 5.2 seconds. Time might go up with high concurrency.
Zenserp Response Time
Pricing starts from $0.058 and goes below $0.03325. Seems very expensive.
No support and zero updates to the API make it non-reliable.
Apify
Apify is a web scraping and automation platform that provides tools and infrastructure to simplify data extraction, web automation, and data processing tasks. It allows developers to easily build and run web scrapers, crawlers, and other automation workflows without having to worry about infrastructure management.
APIFY Google Search Result Scraper
Details
The documentation is pretty clear and makes integration simple.
The average response time was around 8.2 seconds.
Apify’s Google Search Result Scraper API Response Time
Pricing starts from $0.003 per search and goes below $0.0019 per search in their Business packs.
They have been in this industry for a very very long time which indicates they are reliable and scalable.
Serpwow
Serpwow is an API service that provides access to search engine result page (SERP) data from various search engines. It allows developers to retrieve organic search results, paid search results, and other relevant data related to search engine rankings.
SerpWow
Details
Documentation is neat and API integration is simple.
The average response time for this API was around 10 seconds. Which is quite high.
SerpWow Search Scraper API Response Time
Pricing starts from $0.012 per search and goes below $0.0048 per search for bigger packs.
API seems unreliable as the time taken by the API kept increasing with the load.
Final Verdict
Overall Result
Based on multiple factors we have prepared a list of the best SERP APIs, many of which offer free trials to test. This is the report based on my thorough analysis of each API. They all will look a little similar on the surface but once you dig deeper while testing you will find very few APIs(two or three) are stable and can be used for production purposes.
At this point, it is crucial to evaluate the options based on your specific requirements and select the most suitable one from the provided list.
Scraping social media websites has become quite imperative for multiple companies. You can track people’s sentiments through their comments, posts, likes, etc. Companies can track feedback from their customers or they can track activities of their competitors.
Today influencer marketing is at its peak and by scraping the number of followers and their content reach one can decide to promote their products with them.
Best Twitter Scraper API
PR agencies can scrape social media to analyze hot topics and then they can ask their clients to create content on the same. On the other hand, political parties can identify which topic should be on the agenda for the election campaign.
Among all social media websites, Twitter is the most dynamic one. It has around 450M active users which makes it a great data dump. From movie celebrities to top political figures all are pretty active over here and hence there will be a lot of user-generated data over here due to reactions from common people.
But scraping Twitter at scale is a challenge in itself because your IP will be blocked in no time and your data pipeline will be blocked. So, it is always advisable to use a Twitter Scraping API.
In this blog, we will discuss the top 4 Twitter Scrapers which can help you to get the data you need.
Scrape any tweet with its tweet ID or scrape any public page to extract details like followers count, the following count, website link, etc.
Pricing: The per-page cost of scraping Twitter is $0.00075 per page which is the best available considering the top APIs.
It can return results in both HTML and parsed JSON.
A free trial is available with 1000 free credits.
Brightdata
Brightdata Twitter Scraper
Brightdata is another API in the list with great scraping infrastructure. It specializes in providing proxies but also provides ready-made scrapers to provide data from selected websites.
Features
They also provide particular tweet scraper, Twitter page scraper, and scraping tweets for any keyword.
Results will appear in JSON format only.
Pricing: per page, the cost is around $0.01. This makes it pretty expensive.
We have curated a list of all the Twitter scrapers available in the market. Of course, there are a few more but they were not as good as these four. We will keep updating this list as we find better Twitter scraping solutions.
For businesses, investors, and even curious individuals, real-time insights into the housing market can be invaluable. Redfin, a prominent player in the real estate sector, offers a mine of such data, spanning across more than 100 markets in both the United States and Canada. With a commendable 0.80% market share in the U.S. (Wikipedia), as gauged by the number of units sold, and boasting a network of approximately 2,000 dedicated lead agents, Redfin stands as a significant source of real estate intelligence.
In this blog, we will see how we can scrape data from Redfin using Python, further, I will show you how you can scale this process.
Let’s start!!
Collecting all the Ingredients for Scraping Redfin
Assuming that you have already installed Python 3.x on your machine and if not then please install it from here. Once this is done create a folder in which we will keep our Python scripts.
mkdir redfin
cd redfin
Once you are inside your folder install these public Python libraries.
Requests– This will be used for making the HTTP connection with redfin.com. Using this library we will install the raw HTML of the target page.
BeautifulSoup– Using this we will parse the important data from the raw HTML downloaded using the requests library.
pip install requests
pip install beautifulsoup4
Now create a python file inside this folder where you can write the script. I am naming the file as redfin.py.
With this our project setup is complete and now we can proceed with the scraping.
What are we going to scrape?
In this tutorial, we are going to scrape two types of pages from redfin.com.
Redfin Search Page
Redfin Property Page
Scraping Redfin Search Page
It is always a great practice to decide in advance what data you want from the page. For this tutorial, we are going to scrape this page.
Download Raw HTML from the Page
Our first task would be to download the raw HTML from the target web page. For this, we are going to use the requests library.
import requests
from bs4 import BeautifulSoup


l=[]
o={}


head={"User-Agent":"Mozilla/5.0 (Windows NT 10.0; Win64; x64) AppleWebKit/537.36 (KHTML, like Gecko) Chrome/120.0.0.0 Safari/537.36"}
target_url="https://www.redfin.com/city/30749/NY/New-York/filter/status=active"


resp = requests.get(target_url,headers=head,verify=False)
print(resp.status_code)
First, we imported all the libraries that we installed earlier. Then I declared one empty list and one empty object.
The head variable is a dictionary containing the User-Agent header. The target_url variable contains the URL of the webpage to be scraped.
The requests.get function is used to send an HTTP GET request to the specified URL (target_url). The headers parameter is set to include the User-Agent header from the head dictionary. The verify=False parameter disables SSL certificate verification. The response object (resp) contains the server’s response to the request.
Once you run this code and see a 200 on the logs then that means you have successfully scraped the target web page.
Now, we can parse the data using BS4.
Parsing the Raw HTML
BeautifulSoup will now help us extract all the data points from the raw HTML downloaded in the previous section. But before we start coding we have to identify the DOM location of each element.
We will use the Chrome developer tool to find the DOM location. If you inspect and analyze the design of the page then you will find that all the property box is inside the div tag with the class HomeCardContainer. So, first, we should find all these elements using find_all() method of BS4.
The BeautifulSoup constructor is used to create a BeautifulSoup object (soup). The find_all method of the BeautifulSoup object is used to find all HTML elements that match the class HomeCardContainer.
allBoxes is a list that contains all the property data elements. Using for loop we are going to reach every property container and extract the details. But before we write our for loop let’s find the DOM location of each data point.
Let’s start with the property price.
Once you right-click on the price you will see that the price is stored inside the span tag with the class homecardV2Price.
Similarly, the configuration of the property can be found inside the div tag with class HomeStatsV2.
Agent/Broker name can be found inside the div tag with the class brokerageDisclaimerV2.
Individual property links can be found inside the a tag. This a tag is the only a tag inside each property container.
For each home card container, it extracts specific pieces of information, such as property price, configuration, address, broker details, and a link to the property.
for loop iterates through each element (box) in the list of home card containers. For each piece of information (property price, configuration, address, broker, link), a try block attempts to find the corresponding HTML element within the current home card container (box). If successful, it extracts the text content, strips leading and trailing whitespaces, and assigns it to the corresponding key in the dictionary (o). If the extraction fails (due to an attribute not being present or other issues), the except block sets the value to None.
After extracting information from the current home card container, the dictionary o is appended to the list l. Then, the dictionary o is reset to an empty dictionary for the next iteration.
Once you run this code you will get this response.
Saving the data to a CSV file
For better visibility of this data, we are going to save this data to a CSV file. For this task, we are going to use the pandas library.
The code uses the pandas library to create a DataFrame (df) from the list of dictionaries (l) that contains the scraped data. After creating the DataFrame, it is then exporting the DataFrame to a CSV file named 'properties.csv'.
After running the code you will find a CSV file inside your working folder by the name properties.csv.
Saving the data from a list to a CSV file was super simple with Pandas.
Complete Code
You can scrape many more details from the page but for now, the code will look like this.
From the property page, we are going to gather this information.
Property Price
Property Address
Is it still available(True/False)
About section of the property
Download Raw HTML from the Page
import requests
from bs4 import BeautifulSoup


l=[]
o={}
available=False


head={"User-Agent":"Mozilla/5.0 (Windows NT 10.0; Win64; x64) AppleWebKit/537.36 (KHTML, like Gecko) Chrome/120.0.0.0 Safari/537.36"}
target_url="https://www.redfin.com/NY/New-York/112-E-35th-St-10016/home/45333496"


resp = requests.get(target_url,headers=head,verify=False)
print(resp.status_code)
This Python code performs web scraping on a Redfin property page using the requests library to make an HTTP GET request and the BeautifulSoup library to parse the HTML content. The script initializes empty data structures (l and o) to store scraped information and sets a User-Agent header to simulate a Chrome browser request. The target URL is specified, and an HTTP GET request is sent with SSL certificate verification disabled.
After running the code if you get 200 on your console then that means your code was able to scrape the raw HTML from the target web page.
Let’s use BS4 to parse the data.
Parsing the Raw HTML
As usual, we have to first find the location of each element inside the DOM.
Price is stored inside the div tag with class statsValue.
The address is stored inside the h1 tag with the class full-address.
Property sale status is located inside the div tag with the class ListingStatusBannerSection.
About section of the property can be found inside the div tag with id marketing-remarks-scroll.
By default available is set to False and it is set to True if the string ACTIVE is present inside the check string. We have used strip() function to remove the unwanted spaces from the text value.
Once you run the code you should get this.
Finally, we were able to extract all the desired information from the target page.
Complete Code
The complete code for this property page will look like this.
While scrolling down on the product page you will find information regarding agents, down payment, calculator, etc. This information loads through an AJAX injection.
This cannot be scraped through a normal XHR request. At this point, many of you will think that this information can be scraped easily through a headless browser but the problem is that these headless browsers consume too much CPU resources. Well, let me share the alternate for this.
Redfin renders this data from the API calls it makes from the second last script tag of any property page. Let me explain to you what I mean over here.
The raw HTML you get after making the GET request will have a script tag in which all this data will be stored.
The script tag you see above is the second last script tag of the raw HTML downloaded from the target property page. Here is how using regular expression you can access the data from this tag.
Using regular expression we are finding a string that matches the pattern reactServerState\.InitialContext\s*=\s*({.*?});
Once you run this code you will find all the information inside this string.
How to scrape Redfin at scale?
The above approach is fine until you are scraping a few hundred pages but this approach will fall flat when your scraping demands reach millions. Redfin will start throwing captcha pages like this.
To avoid this situation you have to use a web scraping API like Scrapingdog. This API will handle proxy rotations for you. Proxy rotation will help you maintain the data pipeline.
You can sign up for the free account from here. The free account comes with a generous 1000 credits which is enough for testing the API.
Once you are on the dashboard you will find an API key that will be used in the below code.
For this example, I am again using the Redfin search page.
Did you notice something? The code is almost the same as above we just replaced the target URL with the Scrapingdog API URL. Of course, you have to use your personal API key above to run this program successfully.
It is a very economical solution for large-scale scraping. You just have to focus on data collection and the rest will be managed by Scrapingdog.
Conclusion
In this blog, I have scraped two distinct types of pages on Redfin: the search page and the property page. Moreover, I have included a bonus section that sheds light on extracting information that’s dynamically loaded through AJAX injections.
Just like Redfin, I have extracted data from other real estate giants. (find their links below)
If this article resonates with you and you appreciate the effort put into this research, please share it with someone who might be on the lookout for scalable real estate data extraction solutions from property sites.
In the future, I will be making more such articles. If you found this article helpful, please share it. Thanks for reading!
Manthan Koolwal
My name is Manthan Koolwal and I am the founder of scrapingdog.com. I love creating scraper and seamless data pipelines.
Nodejs offers multiple HTTP client options and Axios is one of them. Axios has by far the best community support compared to other libraries like Fetch, Unirest, etc. It provides a stable API through which you can make XMLHttpRequests. Using a middleware-like function you can customize the pattern of request. It supports GET, POST, DELETE, PUT, etc methods. Axios is built on top of Promises, making it easy to work with asynchronous code and response handling.
Axios is a very powerful tool when it comes to web scraping. In this article, we will understand how we can scrape a website with the combination of proxy and Axios.
Requirements
For this tutorial, I hope you have already installed the latest version of Nodejs on your machine. If not then you can download it from here.
Now, let’s set up our coding playground. First, we will create a folder to keep our Nodejs script.
mkdir axiostut
cd axiostut
npm init
Then we have to install Axios inside this folder.
npm i axios
Once this is done we can create a JS file in which we will learn how Axios works with proxy. I am naming the file as axiostut.js.
How Axios works?
In this section, I will explain step by step how Axios works.
How to make a Basic GET Request
Let’s first start with the basic HTTP GET request. For this entire tutorial, we are going to use this website for scraping.
const axios = require('axios');

async function scraping() {
    try {
        // Make a GET request to https://httpbin.org/ip
        const response = await axios.get('https://httpbin.org/ip');

        // Check if the request was successful (status code 200)
        if (response.status === 200) {
            // Parse JSON response
            const ipAddress = response.data.origin;

            // Log or use the IP address
            console.log('Your IP address is:', ipAddress);
        } else {
            console.error(`Error: ${response.status} - ${response.statusText}`);
        }
    } catch (error) {
        // Handle errors
        console.error('Error:', error.message);
    }
}

// Call the function to get the IP address
scraping();
The response is checked for a successful status code 200.
If the request is successful, the IP address is extracted from the JSON response and logged.
If there’s an error during the request, it is caught and logged.
How to use a proxy with Axios?
For this example, we can use any public proxy. Take any free proxy, from this list.
const axios = require('axios');

let config= {
    method: 'get',
    url: 'https://httpbin.org/ip',
    proxy: {
      host: '20.157.194.61',
      port: 80
    }
  };

async function getIpAddress() {
    try {
        // Make a GET request to https://httpbin.org/ip
        const response = await axios(config);

        // Check if the request was successful (status code 200)
        if (response.status === 200) {
            // Parse JSON response
            const ipAddress = response.data.origin;

            // Log or use the IP address
            console.log('Your IP address is:', ipAddress);
        } else {
            console.error(`Error: ${response.status} - ${response.statusText}`);
        }
    } catch (error) {
        // Handle errors
        console.error('Error:', error.message);
    }
}

// Call the function to get the IP address
getIpAddress();
In the above code, config is an object that contains configuration options for making an HTTP request using the Axios library. Here’s a breakdown of the properties in the config object.
method: 'get' -Specifies the HTTP method for the request. In this case, it is set to ‘get,’ indicating an HTTP GET request.
url: 'https://httpbin.org/ip' -Specifies the target URL for the HTTP request. The request will be made to the ‘https://httpbin.org/ip‘ endpoint, which returns information about the requester’s IP address.
proxy: { host: '20.157.194.61', port: 80 } -Specifies a proxy configuration for the request. The proxy property is an object that includes the host (IP address) and port of the proxy server. This configuration is optional and is used here to demonstrate how to request a proxy.
How to use a password-protected proxy with Axios?
To use the proxy which is protected by a password you can simply pass the username and the password to the config object.
const axios = require('axios');

let config= {
    method: 'get',
    url: 'https://httpbin.org/ip',
    proxy: {
      host: '94.103.159.29',
      port: 8080,
      auth: {
        username: 'Your-Username',
        password: 'Your-Password',
    }
    }
  };

async function getIpAddress() {
    try {
        // Make a GET request to https://httpbin.org/ip
        const response = await axios(config);

        // Check if the request was successful (status code 200)
        if (response.status === 200) {
            // Parse JSON response
            const ipAddress = response.data.origin;

            // Log or use the IP address
            console.log('Your IP address is:', ipAddress);
        } else {
            console.error(`Error: ${response.status} - ${response.statusText}`);
        }
    } catch (error) {
        // Handle errors
        console.error('Error:', error.message);
    }
}

// Call the function to get the IP address
getIpAddress();
We have just passed an auth object with the properties username and password. Once you run this code you will get this output.
Your IP address is: 94.103.159.29
How to rotate proxies with Axios?
Many crawler-sensitive websites like Amazon, Walmart, LinkedIn, etc will block you if you keep scraping these websites with just a single IP. Headers are important too but changing the IPs on every request is as critically important.
const axios = require('axios');

let proxy_arr=[
{host: '69.51.19.191',
port: 8080,
auth: {
  username: 'Your-Username',
  password: 'Your-Password',
}},
{host: '69.51.19.193',
port: 8080,
auth: {
  username: 'Your-Username',
  password: 'Your-Password',
}},
{host: '69.51.19.195',
port: 8080,
auth: {
  username: 'Your-Username',
  password: 'Your-Password',
}},
{host: '69.51.19.207',
port: 8080,
auth: {
  username: 'Your-Username',
  password: 'Your-Password',
}},
{host: '69.51.19.220',
port: 8080,
auth: {
  username: 'Your-Username',
  password: 'Your-Password',
}}]

let config= {
    method: 'get',
    url: 'https://httpbin.org/ip',
    proxy:proxy_arr[Math.floor(Math.random() * 5)]
  };


async function getIpAddress() {
    try {
        // Make a GET request to https://httpbin.org/ip
        const response = await axios(config);

        // Check if the request was successful (status code 200)
        if (response.status === 200) {
            // Parse JSON response
            const ipAddress = response.data.origin;

            // Log or use the IP address
            console.log('Your IP address is:', ipAddress);
        } else {
            console.error(`Error: ${response.status} - ${response.statusText}`);
        }
    } catch (error) {
        // Handle errors
        console.error('Error:', error.message);
    }
}

// Call the function to get the IP address
getIpAddress();
In the above code, I have created a proxy array that contains five proxy objects. Using Math.random function we are passing these proxies on a random basis to the config object.
Now, every request will go through a different proxy and the chances of getting your scraper getting blocked will be very low.
How to use Scrapingdog Proxy with Axios?
For small-scale scraping above methods are fine and will do the job. But if you want to scrape millions of pages then you have to go with some premium web scraping API that can take this proxy management on an autopilot mode. You simply have to send a GET request and the API will handle all these headaches for you.
In this section, I will show you how Scrapingdog proxy can be used for scraping purposes. First of all, you have to sign up for the free pack from here.
The free pack will provide you with a generous 1000 credits and that is enough for you to test the service before proceeding with the paid plan. Once you sign up you will get an API key on your dashboard.
You have to pass this API key in the below code as your proxy password. You can read more about the proxies from the documentation.
const axios = require('axios');


let config= {
    method: 'get',
    url: 'http://httpbin.org/ip',
    proxy:{
    host: 'proxy.scrapingdog.com',
    port: 8081,
    auth: {
      username: 'scrapingdog',
      password: 'Your-API-key'
    }
  }
}


async function getIpAddress() {
    try {
        // Make a GET request to https://httpbin.org/ip
        const response = await axios(config);

        // Check if the request was successful (status code 200)
        if (response.status === 200) {
            // Parse JSON response
            const ipAddress = response.data.origin;

            // Log or use the IP address
            console.log('Your IP address is:', ipAddress);
        } else {
            console.error(`Error: ${response.status} - ${response.statusText}`);
        }
    } catch (error) {
        // Handle errors
        console.error('Error:', error.message);
    }
}

// Call the function to get the IP address
getIpAddress();
Scrapingdog has a proxy pool of more than 10M proxies which makes large-scale scraping seamless. Once you run this code after placing your API key, every run will print a new IP on the console.
It is a very economical solution for large-scale scraping. You just have to focus on data collection and the rest will be managed by Scrapingdog.
Conclusion
Axios is a very popular choice when it comes to web scraping and in this article, we saw how Axios can be used with proxies in different scenarios. We also understood the importance of proxy rotation and how APIs like Scrapingdog can take all the hassle of proxy rotation on autopilot mode.
I hope you like this little tutorial and if you do then please do not forget to share it with your friends and on social media.
Additional Resources
And there’s the list! At this point, you should feel comfortable writing your first web scraper to gather data from any website. Here are a few additional resources that you may find helpful during your web scraping journey:
We often discuss proxies in the context of web scraping. We understand the significance of proxy rotation when scraping millions of pages. However, in addition to proxies, headers also play an equally important role in web scraping.
How User Agent in Web Scraping Works
With the help of other headers, User-Agents can help you scrape a tremendous amount of data from the internet. In this article, we will discuss what a user agent is, how it is used for normal/small web scraping projects, and how it can help you with advanced scraping.
What is a User Agent?
If I talk in the context of web scraping then User-Agent is a header that mimics a real browser. This makes a request look more legitimate and influences how the host server responds to the request. It provides information about the client making the request, such as the browser type, version, and sometimes the operating system.
But why are User Agents important?
Well, the User Agent in most cases is the deciding factor for the host server to respond with status code 200(OK) and allow access to the requested resource. A server can send a 4xx error if it identifies the User Agent as suspicious.
What does User Agent look like?
A User Agent looks like this- Mozilla/5.0 (X11; U; Linux x86_64) AppleWebKit/537.36 (KHTML, like Gecko) Chrome/108.0.5399.183 Safari/537.36.
What user agent look like?
Let me break the above string and explain to you what every part means in detail.
Mozilla/5.0 – This is a legacy token that most web browsers include in their User-Agent strings for historical reasons. It’s a reference to the original Mosaic web browser and is used to ensure compatibility with websites.
(X11; U; Linux x86_64)-This part typically represents the operating system and platform information. In this case, it indicates that the browser is running on a Linux (X11) system using a 64-bit x86 architecture.
AppleWebKit/537.36-The AppleWebKit part denotes the layout engine used by the browser. This engine is used to render web pages. Apple’s Safari browser also uses the WebKit engine. The “537.36” number is the version of the WebKit engine.
(KHTML, like Gecko)– This is an additional detail to ensure compatibility with some websites. “KHTML” refers to the open-source layout engine used by the Konqueror web browser. “Gecko” is the layout engine used by Mozilla Firefox. This part helps the browser appear compatible with a wider range of web content.
Chrome/108.0.5399.183– This part indicates that the browser is Chrome, and “108.0.5399.183” is the version of Google Chrome. This detail allows websites to detect the browser and version, which may be used to optimize content or detect compatibility issues.
Safari/537.36– The final part specifies that the browser is compatible with Safari. The “537.36” version number is a reference to WebKit, indicating the version of the engine. Including “Safari” in the User-Agent helps with rendering content designed for Safari browsers.
If you want to break down and test more user agent strings then use this website.
How to use User Agents with Python
Web scraping with Python is the most common way for many new coders to learn web scraping. During this journey, you will come across certain websites that are quite sensitive to scrapers and you might have to pass headers like User Agents. Let’s understand how you can pass a User-Agent with a simple example.
import requests

target_url='https://httpbin.org/headers'
headers={'User-Agent':'Mozilla/5.0 (Macintosh; Intel Mac OS X 10_15_7) AppleWebKit/537.36 (KHTML, like Gecko) Chrome/108.0.0.0 Safari/537.361675787112'}
resp = requests.get(target_url,headers=headers)

print(resp.text)
Here I am passing a custom User-Agent to the target URL https://httpbin.org/headers. Once you run this code you will get this as output.
{
  "headers": {
    "Accept": "*/*",
    "Accept-Encoding": "gzip, deflate",
    "Host": "httpbin.org",
    "User-Agent": "Mozilla/5.0 (Macintosh; Intel Mac OS X 10_15_7) AppleWebKit/537.36 (KHTML, like Gecko) Chrome/108.0.0.0 Safari/537.361675787112",
    "X-Amzn-Trace-Id": "Root=1-6548b6c9-4381f1cb1cb6dc915aa1268f"
  }
}
So, this way you can pass a user agent to websites that are sensitive to scraping with Python.
How to avoid getting your scraper banned?
You might be thinking that you can simply avoid this situation by using a rotating proxy and that will certainly solve the problem. But this is not the case with many websites like Google, amazon, etc.
Along with proxy rotation, you have to also focus on header rotation (especially User-Agent). In some cases, you might have to use the latest User-Agents to spoof the request. Let’s see how we can rotate user agents in Python.
User Agent rotation with Python
For this example, I am going to consider these five User Agents.
'Mozilla/5.0 (Macintosh; Intel Mac OS X 10_15_7) AppleWebKit/537.36 (KHTML, like Gecko) Chrome/108.0.0.0 Safari/537.361675787110',
'Mozilla/5.0 (Macintosh; Intel Mac OS X 11_3) AppleWebKit/537.36 (KHTML, like Gecko) Chrome/109.0.5412.99 Safari/537.36',
'Mozilla/5.0 (Macintosh; Intel Mac OS X 10_10) AppleWebKit/537.36 (KHTML, like Gecko) Chrome/108.0.5361.172 Safari/537.36',
'Mozilla/5.0 (X11; Linux i686) AppleWebKit/537.36 (KHTML, like Gecko) Chrome/109.0.5388.177 Safari/537.36',
'Mozilla/5.0 (Macintosh; Intel Mac OS X 11_14) AppleWebKit/537.36 (KHTML, like Gecko) Chrome/109.0.5397.215 Safari/537.36',
We are going to use the random library of Python. This is a legacy library and you don’t have to install it separately. Also, if you need more latest User Agents then visit this link.
import requests
import random


userAgents=['Mozilla/5.0 (Macintosh; Intel Mac OS X 10_15_7) AppleWebKit/537.36 (KHTML, like Gecko) Chrome/108.0.0.0 Safari/537.361675787110',
'Mozilla/5.0 (Macintosh; Intel Mac OS X 11_3) AppleWebKit/537.36 (KHTML, like Gecko) Chrome/109.0.5412.99 Safari/537.36',
'Mozilla/5.0 (Macintosh; Intel Mac OS X 10_10) AppleWebKit/537.36 (KHTML, like Gecko) Chrome/108.0.5361.172 Safari/537.36',
'Mozilla/5.0 (X11; Linux i686) AppleWebKit/537.36 (KHTML, like Gecko) Chrome/109.0.5388.177 Safari/537.36',
'Mozilla/5.0 (Macintosh; Intel Mac OS X 11_14) AppleWebKit/537.36 (KHTML, like Gecko) Chrome/109.0.5397.215 Safari/537.36']


target_url='https://httpbin.org/headers'
headers={'User-Agent':random.choice(userAgents)}

resp = requests.get(target_url,headers=headers)

print(resp.text)
In this code, every request will go through a separate User Agent. Now, you can use this code with a rotating proxy to give more strength to the scraper. Techniques like this will help you scrape Amazon, scrape Google, etc. effectively.
List of Best User-Agents for Web Scraping
This file contains bidirectional Unicode text that may be interpreted or compiled differently than what appears below. To review, open the file in an editor that reveals hidden Unicode characters. Learn more about bidirectional Unicode characters
Many websites have started using a protective layer that prevents scraping. Therefore passing proper headers has become necessary and in this tutorial, I showed you how with the help of User Agents you can bypass that layer and extract the data.
But of course, for mass scraping this will not be enough and you have to consider using a Web Scraping API. This API will handle all the headers, proxy rotation, and headless chrome for you.
I hope you like this little tutorial and if you do then please do not forget to share it with your friends and on social media. You can also follow us on Twitter.
Scraping Idealista can give you massive datasets that you need to drive business growth. Real Estate has become a crucial sector for any country around the globe and every decision is backed by some solid data analysis.
Now if we are talking about data, how should we collect so much data faster? Well, here web scraping can help you collect data.
Scraping Idealista.com Property Data
In this tutorial, we are going to scrape the biggest real estate portal in Portugal Idealista. We are going to use Python for this tutorial & will create our own Idealista scraper.
Collecting all the Ingredients for Scraping Idealista
I am assuming that you have already installed Python on your machine. I will be using Python 3.x. With that being installed we will require two more libraries for data extraction.
Selenium — It will be used for rendering the Idealista website.
BeautifulSoup — It will be used to create an HTML tree for data parsing.
Chromium — This is a webdriver that is used by Selenium for controlling Chrome. You can download it from here.
First, we need to create the folder where we will keep our script.
mkdir coding
Inside this folder, you can create a file by any name you like. I am going to use idealista.py in this case. Finally, we are going to install the above-mentioned libraries using pip.
pip install selenium
pip install beautifulsoup4
Selenium is a browser automating tool, it will be used to load our target URL in a real chrome browser. BeautifulSoup aka BS4 will be used for clean data extraction from raw HTML returned by selenium.
We can also use the requests library here but Idealistia loves sending captchas and a normal HTTP GET request might block your request and will cause serious breakage to your data pipeline. In order to give Idealista a real browser vibe we are going ahead with selenium.
What we are going to scrape from Idealista?
I will divide this part into two sections. In the first section, we are going to scrape the first page from our target site, and then in the second section, we will create a script that can support pagination. Let’s start with the first section.
What data we are going to extract?
It is better to decide this in advance rather than deciding it when doing it live.
I have decided to scrape the following data points:
Title of the property
Price of the property
Area Size
Property Description
Dedicated web link of the property.
We will first scrape the complete page using selenium and store the page source to some variable. Then we will create an HTML tree using BS4. Finally, we will use the find() and find_all() methods to extract relevant data.
Let’s scrape the page source first
We will be using selenium for this part. We will be using page_source driver method that will help us to get the source of the current page or the target page.
from bs4 import BeautifulSoup
from selenium import webdriver
import time
import schedule

PATH = 'C:\Program Files (x86)\chromedriver.exe'


l=list()
o={}

target_url = "https://www.idealista.com/venta-viviendas/torrelavega/inmobiliaria-barreda/"


driver=webdriver.Chrome(PATH)

driver.get(target_url)


time.sleep(5)
resp = driver.page_source
driver.close()
I first imported all the required libraries and then defined the location of our Chromium browser. Do remember to keep the version of chromium the same as your Chrome browser otherwise it will not run.
After this, I created a Chrome instance with the path where the driver is downloaded. With this command, we can perform multiple tests on the browser until you close the connection with .close() method.
Then I used .get() method to load the website. It not only loads the website but also waits until the website rendering is completed.
Finally, we extracted the data using the page_source method and closed the session using .close() method. .close() will disconnect the link from the browser. Now, we have the complete page data. Now, we can use BS4 to create a soup through which we can extract desired data using the .find() and .find_all() methods of BS4.
Scraping Title from Idealista Property Listing
Let’s first inspect and find the DOM element.
Inspecting Title in Source Code of Idealista Property Listing
The title of the property is stored under a tag with a class item-link. This tag is nested inside a div tag with class item-info-container.
After closing the web driver session we created a page tree through which we will extract the text. For the sake of simplicity, we have stored all the properties as a list inside allProperties variable. Now, extracting titles and other data points will become quite easier for us.
Since there are multiple properties inside our allProperties variable we have to run a for loop in order to reach each and every property and extract all the necessary information from it.
for i in range(0,len(allProperties)):
o["title"]=allProperties[i].find("a",{"class":"item-link"}).text.strip("\n")
Object o will hold all the titles of all the properties once the for loop ends. Let’s scrape the remaining data points.
Scraping Property Price
Let’s inspect and find the location of this element inside the DOM.
Inspecting Property Price in Source Code
Price is stored inside span tag of the class item-price. We will use the same technique that we used for scraping the title. Inside for loop, we will use the below-given code.
The property description can be found inside the div tag with the class “item-description”.
Dedicated Property Url
With the same technique, you can scrape dedicated links as well. Let’s find its location.
Inspecting the Link of the Property in Source Code
Link is stored inside a tag with href attribute. This is not a complete URL so we will add a pretext. Here we will use the .get() method of BS4 to get the value of an attribute.
Here we have added https://www.idealista.com as a pretext because we will not find the complete URL inside the href tag.
We have managed to scrape all the data we were interested in.
Complete Code
You can make a few more changes to extract a little more information like the number of properties, map, etc. But the current code will look like this.
from bs4 import BeautifulSoup
from selenium import webdriver
import time
PATH = 'C:\Program Files (x86)\chromedriver.exe'
l=list()
o={}
target_url = "https://www.idealista.com/venta-viviendas/torrelavega/inmobiliaria-barreda/"
driver=webdriver.Chrome(PATH)
driver.get(target_url)
time.sleep(7)
resp = driver.page_source
driver.close()
soup = BeautifulSoup(resp, 'html.parser')

allProperties = soup.find_all("div",{"class":"item-info-container"})
for i in range(0,len(allProperties)):
    o["title"]=allProperties[i].find("a",{"class":"item-link"}).text.strip("\n")
o["price"]=allProperties[i].find("span",{"class":"item-price"}).text.strip("\n")
o["area-size"]=allProperties[i].find("div",{"class":"item-detail-char"}).text.strip("\n")
o["description"]=allProperties[i].find("div",{"class":"item-description"}).text.strip("\n")
o["property-link"]="https://www.idealista.com"+allProperties[i].find("a",{"class":"item-link"}).get('href')
l.append(o)
o={}
print(l)
Once you print the response will look like this.
Let’s move on to the second section of this tutorial where we will create pagination support as well. With this, we will be able to crawl over all the pages available for a particular location.
Scraping all the Pages
You must have noticed one thing each page has 30 properties. With this information, you can get the total number of pages each location has. Of course, you will first have to scrape the total number of properties any location has.
The current target page has 146 properties. We have to scrape this number and then divide it by 30. That number will be the total number of pages. So, let’s scrape this number first.
As you can see this number is inside a string. We have to scrape this string and then use .split() function of Python to break the string into a list. Then the first element of the list will be our desired element because 146 is the first character inside the sentence.
This string is stored inside a div tag with the class “listing-title”. Let’s extract it.
by using the int() method I have converted the string to an integer. Then we divided it by 30 to get the total number of pages. Now, let’s check how the URL pattern changes when the page number changes.
So, it adds a string “pagina-2.htm” when you click on page two. Similarly, when you click on page three you get “pagina-3.htm”. We just need to change the target URL by just adding this string according to the page number we are on. We will use for loop for this.
from bs4 import BeautifulSoup
from selenium import webdriver
import time
PATH = 'C:\Program Files (x86)\chromedriver.exe'
l=list()
o={}
target_url = "https://www.idealista.com/venta-viviendas/torrelavega/inmobiliaria-barreda/"
driver=webdriver.Chrome(PATH)
driver.get(target_url)
time.sleep(7)
resp = driver.page_source
driver.close()
soup = BeautifulSoup(resp, 'html.parser')
totalProperties = int(soup.find("div",{"class":"listing-title"}).text.split(" ")[0])
totalPages = round(totalProperties/30)
allProperties = soup.find_all("div",{"class":"item-info-container"})
for i in range(0,len(allProperties)):
o["title"]=allProperties[i].find("a",{"class":"item-link"}).text.strip("\n")
o["price"]=allProperties[i].find("span",{"class":"item-price"}).text.strip("\n")
o["area-size"]=allProperties[i].find("div",{"class":"item-detail-char"}).text.strip("\n")
o["description"]=allProperties[i].find("div",{"class":"item-description"}).text.strip("\n")
o["property-link"]="https://www.idealista.com"+allProperties[i].find("a",{"class":"item-link"}).get('href')
l.append(o)
o={}
for x in range(2,totalPages+1):
target_url = "https://www.idealista.com/venta-viviendas/torrelavega/inmobiliaria-barreda/pagina-{}.htm".format(x)
driver=webdriver.Chrome(PATH)
driver.get(target_url)
time.sleep(7)
resp = driver.page_source
driver.close()
soup = BeautifulSoup(resp, 'html.parser')
allProperties = soup.find_all("div",{"class":"item-info-container"})
for i in range(0,len(allProperties)):
o["title"]=allProperties[i].find("a",{"class":"item-link"}).text.strip("\n")
o["price"]=allProperties[i].find("span",{"class":"item-price"}).text.strip("\n")
o["area-size"]=allProperties[i].find("div",{"class":"item-detail-char"}).text.strip("\n")
o["description"]=allProperties[i].find("div",{"class":"item-description"}).text.strip("\n")
o["property-link"]="https://www.idealista.com"+allProperties[i].find("a",{"class":"item-link"}).get('href')
l.append(o)
o={}
print(l)
After extracting data from the first page, we are running a for loop to get the new target URL and extract the data from it in the same fashion. Once you print the list l you will get complete data.
Finally, we have managed to scrape all the pages. This data can be used for making important decisions like buying or renting a property.
Using Scrapingdog for web scraping Idealista
So, we have seen how you can scrape Idealista using Python. But to be very honest, idealista.com is a well-protected site and you cannot extract data at scale using only Python. In fact, after 10 or 20 odd requests Idealista will detect scraping and ultimately will block your scrapers.
After that, you will continue to get 403 errors on every web request you make. How to avoid this? Well for this I would suggest you go with an API for web scraping. Scrapingdog uses its large pool of proxies to overcome any challenges you might face while extracting data at scale.
Scrapingdog provides free 1000 API calls for all new users and in that pack, you can use all the premium features. First, you need to signup to get your own private API key.
Scrapingdog HomePage
You can find your API key at the top of the dashboard. You just have to make a few changes to the above code and Scrapingdog will be able to handle the rest of the things. You don’t need Selenium or any other web driver to scrape it. You just have to use the requests library to make a GET request to the Scrapingdog API.
from bs4 import BeautifulSoup
import requests


l=list()
o={}

target_url = "https://www.idealista.com/venta-viviendas/torrelavega/inmobiliaria-barreda/"


resp = requests.get("https://api.scrapingdog.com/scrape?api_key=Your-API-KEY&url={}&dynamic=false".format(target_url))
soup = BeautifulSoup(resp.text, 'html.parser')
totalProperties = int(soup.find("div",{"class":"listing-title"}).text.split(" ")[0])
totalPages = round(totalProperties/30)
allProperties = soup.find_all("div",{"class":"item-info-container"})

for i in range(0,len(allProperties)):
    o["title"]=allProperties[i].find("a",{"class":"item-link"}).text.strip("\n")
    o["price"]=allProperties[i].find("span",{"class":"item-price"}).text.strip("\n")
    o["area-size"]=allProperties[i].find("div",{"class":"item-detail-char"}).text.strip("\n")
    o["description"]=allProperties[i].find("div",{"class":"item-description"}).text.strip("\n")
    o["property-link"]="https://www.idealista.com"+allProperties[i].find("a",{"class":"item-link"}).get('href')
    l.append(o)
    o={}
print(totalPages)
for x in range(2,totalPages+1):
    target_url = "https://www.idealista.com/venta-viviendas/torrelavega/inmobiliaria-barreda/pagina-{}.htm".format(x)

    resp = requests.get("https://api.scrapingdog.com/scrape?api_key=Your-API-KEY&url={}&dynamic=false".format(target_url))
    soup = BeautifulSoup(resp.text, 'html.parser')
    allProperties = soup.find_all("div",{"class":"item-info-container"})
    for i in range(0,len(allProperties)):
        o["title"]=allProperties[i].find("a",{"class":"item-link"}).text.strip("\n")
        o["price"]=allProperties[i].find("span",{"class":"item-price"}).text.strip("\n")
        o["area-size"]=allProperties[i].find("div",{"class":"item-detail-char"}).text.strip("\n")
        o["description"]=allProperties[i].find("div",{"class":"item-description"}).text.strip("\n")
        o["property-link"]="https://www.idealista.com"+allProperties[i].find("a",{"class":"item-link"}).get('href')
        l.append(o)
        o={}

print(l)
We have removed Selenium because we no longer need that. Do not forget to replace “Your-API-KEY” section with your own API key. You can find your key on your dashboard. This code will provide you with an unbreakable data stream. Apart from this the rest of the code will remain the same.
Just like this Scrapingdog can be used for scraping any website without getting BLOCKED.
Forget about getting blocked while scraping the Web
Try out Scrapingdog Web Scraping API & Scrape Idealista without Any Blockage
Conclusion
In this blog, we understood how you can use Python to scraper Idealista, which is data rich real-estate website that needs no introduction. Further, we saw how Idealista can block your scrapers and to overcome you can use Scrapingdog’s web scraping API.
Note: – We have recently updated our API to scrape Idealista more efficiently, resulting in reduced response times. The faster data extraction not only allows for the collection of more data but also decreases the load on server threads.
I hope you like this little tutorial and if you do then please do not forget to share it with your friends and on social media.
Additional Resources
Here are a few additional resources you may find resourceful. We have scraped other real estate websites that are below: –
In this quick guide, we will learn how you can scrape pages using this programming language.
Web Scraping with Ruby
Here is the URL for that web page which we will be going to scrape with the help of Ruby in this tutorial.
Block Work Website
Ruby Web Scraping
Ruby Web Scraping can be used to extract information such as product details, prices, contact information, and more.
Scraping data from websites can be a tedious and time-consuming task, especially if the website is not well structured. This is where Ruby comes in handy. Ruby is a powerful programming language that makes it easy to process and extract data from websites.
With Ruby, you can use the Nokogiri and Open-URI gems to easily extract data from websites. Nokogiri is a Ruby gem that makes it easy to parse and search HTML documents. Open-URI is a Ruby gem that allows you to open and read files from the web.
In this article, we will learn how to scrape websites using the Ruby programming language. We will use the Nokogiri and Open-URI gems to make our life easier. We will also look at how to scrape paginated data.
Ruby Scraper Library
Ruby has a few different libraries that can be used for web scraping, but one of the most popular is Nokogiri. Nokogiri is a Ruby gem that can be used to parse HTML and XML documents. It’s fast and easy to use, and it has a ton of features that make it perfect for web scraping.
One of the best things about Nokogiri is that it can be used with a variety of different Ruby gems, so you can always find a way to get the data you need. For example, if you need to scrape a website that uses JavaScript, you can use Nokogiri with the therubyracer gem to parse the JavaScript and get the data you need.
Nokogiri is also very well-documented, so you can always find what you need if you get stuck. There’s a great community of Nokogiri users who are always willing to help, so you’ll never feel lost when you’re using this gem.
Let’s Get started.
Setup
Our setup is pretty simple. Just type the below commands in cmd.
mkdir scraper
cd scraper
touch GemFile
touch scraper.rb
Now, you can open this scraper folder in any of your favorite code editors. I will use Atom. Inside our scraper folder, we have our GemFile and a scraper file.
For our scaper, we are going to use a couple of gems. So, the first thing I want to do is jump into the gem file we just created and I am going to add a couple of things. We are going to add three gems one is an HTTP party, another one is Nokogiri and the last one is Byebug.
Now, go back to your cmd and install all the gems using
bundle install
After this everything is set and a file name gemfile.lock has been created in our working folder. Or setup is complete.
Preparing the Food
Now we are going to start writing our scraper in scraper.rb file. Before we start writing our scraper I am going to require the dependencies that we just added into our gem file. So, we’ll add nokogiri, byebug, and httparty.
We have declared a variable inside the function by the name URL and then to make an HTTP GET request to this URL we are going to use httparty.
After HTTP call, we’ll get raw HTML source code from that web page. So, what we can do next is we can bring Nokogiri and we can parse that page.
So let’s create another variable called parse_page. Nokogiri will provide us with a format from which we can start to extract data out of the raw HTML. Then we used Byebug. It will set up a debugger that lets us interact with some of these variables. Once we have added that we can jump back to our cmd.
ruby scraper.rb
parse_page #on hitting byebug
On writing “parsed_page” after hitting byebug we’ll get…
Here, we can use nokogiri to interact with this data. So, this is where things get pretty cool. Using Nokogiri we can target various items on the page like classes, IDs, etc. We’ll inspect the job page and we’ll find the class associated with each job block.
On inspection, we see that every job has a class “listingCard”.
In cmd type
jobCards = parsed_page.css(‘div.listingCard’)
Now, if you will type jobCards.first in the terminal it will show the result for the first job block. To extract the position, Location, Company, and the URL to apply we can dig a little bit deeper into this using CSS.
#Coming back to scraper.rb

def scraper
   url = "https://blockwork.cc/"
   unparsed_page = Httparty.get(url)
   parse_page = Nokogiri::HTML(unparsed_page)
   jobs = Array.new
   job_listings = parsed_page.css("div.lisingCard")
   job_listings.each do [job_listing]
      job = {
             title:job_listing.css('span.job-title'),
             company: job_listing.css('span.company'),
             location:job_listing.css('span.location'),
             url:"https://blockwork.cc" + job_listing.css('a')[0].attributes['href'].value
       }
       jobs == job
   end
   byebug

end

scraper
We have created a variable job_listings which contains all the top 50 job postings on the page. And then we want to pass that data into an array. We have created a job object which will hold all the individual company details.
Now, we can iterate over 50 jobs on a page and we should be able to extract the data that we are trying to target out of each of those jobs. A jobs array has been declared to store all 50 job listings one by one. Now, we can run our script on cmd to check all 50 listings.
ruby scraper.rb
jobs #After hitting the byebug
We have managed to scrape the first page but what if we want to scrape all the pages?
Scraping Every Page
We have to make our scraper a little more intelligent. We are going to make a few tweaks to our web scraper. Here we will take pagination into account and we’ll scrape all the listings on this site instead of just 50 per page.
There are a couple of things we want to know to make this work. The first is just how many listings are getting served on each page. So, we already know that it’s 50 listings per page. The other thing we want to figure out is the total number of listings on the site. We already know that we have 2287 listings on the site.
#Coming back to scraper.rb

def scraper
   url = "https://blockwork.cc/"
   unparsed_page = Httparty.get(url)
   parse_page = Nokogiri::HTML(unparsed_page)
   jobs = Array.new
   job_listings = parsed_page.css("div.lisingCard")

   page = 1

   per_page = job_listings.count #50
   total = parsed_page.css('div.job-count').text.split(' ')[1].gsub(',','').to_i  #2287
   last_page = (total.to_f / per_page.to_f).round

while page <= last_page
     pagination_url = "https://blockwork.cc/listings?page=#{page}"

     pagination_unparsed_page = Httparty.get(pagination_url)
     pagination_parse_page = Nokogiri::HTML(pagination_unparsed_page)
     pagination_job_listings = pagination_parsed_page.css("div.lisingCard")

     pagination_job_listings.each do [job_listing]
       job = {
             title:job_listing.css('span.job-title'),
             company: job_listing.css('span.company'),
             location:job_listing.css('span.location'),
             url:"https://blockwork.cc" + job_listing.css('a')[0].attributes['href'].value
        }
        jobs << job
     end
     page += 1
   end
   byebug

end

scraper
per_page will calculate the job listings on a page and the total will calculate the total number of job postings. We should avoid making it hardcoded. last_page will determine the last page number. We have declared a while loop which will stop when the page will become equal to the last_page. pagination_url will provide a new URL for every page value. Then the same logic will be followed as what we used while scraping the first page. Array jobs will contain all the jobs present on the website.
So, just like that, we can build a simple and powerful web scraper using Ruby and Nokogiri.
Conclusion
In this article, we understood how we can scrape data using Ruby and Nokogiri. Once you start playing with it you can do a lot with Ruby. Ruby on Rails makes it easy to modify the existing code or add new features. Ruby is a concise language when combined with 3rd party libraries, which allows you to develop features incredibly fast. It is one of the most productive programming languages around.
Feel free to comment and ask me anything. You can follow me on Twitter and Medium. Thanks for reading and please hit the like button!
No, Ruby is not a dying language. While its popularity has decreased compared to some newer languages, it remains a viable choice due to its mature ecosystem, readability, and the ongoing development of the Ruby on Rails framework.
It’s not accurate to say one language is definitively better than the other, as Ruby and Python both have their strengths and use cases. However, if you want to learn web scraping Python, we have a dedicated blog made here.
Additional Resources
And there’s the list! At this point, you should feel comfortable writing your first web scraper with Ruby to gather data from any website. Here are a few additional resources that you may find helpful during your web scraping journey:
Well, it might sound challenging at first, but with the right guidance, parsing HTML with regex can become easy.
Whether you’re a developer aiming to extract specific content from web pages or a data enthusiast looking for efficient methods to sift through massive amounts of web data, understanding the basics of parsing HTML with regex is essential.
This blog goes deep into this technique, offering insights, examples, and best practices for those keen on mastering the art of HTML parsing using regular expressions.
Parse HTML with Regex
What you will learn from this article?
How regular expressions can be used in Python?
How to create patterns.
I am assuming that you have already installed Python 3.x on your computer. If not then please install it from here.
Come, let us explore the art of HTML parsing using Python and Regex!
What is Regular Expression?
Regular expression or regex is like a sequence of characters that forms a search pattern that can be used for matching strings. It is a very powerful tool that can be used for text processing, data extraction, etc. It is supported by almost every language including Python, JavaScript, Java, etc. It has great community support which makes searching and matching using Regex super easy.
There are five types of Regular Expressions:
Types of regular expressions
Here is how regex can be used for data extraction
A sequence of characters is declared to match a pattern in the string.
In the above sequence of characters, metacharacters like dot . or asterisk * are also often used. Here the dot (.) metacharacter matches any single character, and the asterisk (*) metacharacter represents zero or more occurrences of the preceding character or pattern.
Quantifiers are also used while making the pattern. For example, the plus (+) quantifier indicates one or more occurrences of the preceding character or pattern, while the question mark (?) quantifier indicates zero or one occurrence.
Character classes are used in the pattern to match the exact position of the character in the text. For example, the square brackets ([]) can be used to define a character class, such as [a-z] which matches any lowercase letter.
Once this pattern is ready you can apply it to the HTML code you have downloaded from a website while scraping it.
After applying the pattern you will get a list of matching strings in Python.
Example
Let’s say we have this text.
text = "I have a cat and a catcher. The cat is cute."
Our task is to search for all occurrences of the word “cat” in the above-given text string.
We are going to execute this task using the re library of Python.
In this case, the pattern will be r’\bcat\b’. Let me explain the step-by-step breakdown of this pattern.
\b: This is a word boundary metacharacter, which matches the position between a word character (e.g., a letter or a digit) and a non-word character (e.g., a space or a punctuation mark). It ensures that we match the whole word “cat” and not part of a larger word that contains “cat”.
cat: This is the literal string “cat” that we want to match in the text.
\b: Another word boundary metacharacter, which ensures that we match the complete word “cat”. If you want to learn more about word boundaries then read this article.
Python Code
import re

text = "I have a cat and a catcher. The cat is cute."
pattern = r'\bcat\b'

matches = re.findall(pattern, text)

print(type(matches))
In this example, we used the re.findall() function from the re module in Python to find all matches of the regular expression pattern \bcat\b in the text string. The function returned a list with the matched word “cat” as the result.
The output will look like this.
['cat', 'cat']
This is just a simple example for beginners. Of course, regular expression becomes a little complex with complex HTML code. Now, let’s test our skill in parsing HTML using regex with a more complex example.
Parsing HTML with Regex
We are going to scrape a website in this section. We are going to download HTML code from the target website and then parse data out of it completely using Regex.
For this example, I am going to use this website. We will use two third-party libraries of Python to execute this task.
requests– Using this library we will make an HTTP connection with the target page. It will help us to download HTML code from the page.
re– Using this library we can apply regular expression patterns to the string.
What are we going to scrape?
It is always better to decide in advance what exactly we want to scrape from the website.
Scraping bookstoscrape
We are going to scrape two things from this page.
Title of the book
Price of the book
Let’s Download the data
I will make a GET request to the target website in order to download all the HTML data from the website. For that, I will be using the requests library.
import requests
import re

l=[]
o={}

# Send a GET request to the website
target_url = 'http://books.toscrape.com/'
response = requests.get(target_url)

# Extract the HTML content from the response
html_content = response.text
Here is what we have done in the above code.
We first downloaded both the libraries requests and re.
Then empty list l and object o were declared.
Then the target URL was declared.
HTTP GET request was made using the requests library.
All the HTML data is stored inside the html_content variable.
Let’s parse the data with Regex
Now, we have to design a pattern through which we can extract the title and the price of the book from the HTML content. First, let’s focus on the title of the book.
Inspecting the title in the source code
The title is stored inside the h3 tag. Then inside there is a a tag which holds the title. So, the title pattern should look like this.
title_pattern = r'<h3><a.*?>(.*?)<\/a><\/h3>'
I know you might be wondering how I created this pattern, right? Let me explain to you this pattern by breaking it down.
<h3>: This is a literal string that matches the opening <h3> tag in the HTML content.
<a.*?>: This part of the pattern matches the <a> tag with any additional attributes that might be present in between the opening <a> tag and the closing >. The .*? is a non-greedy quantifier that matches zero or more characters in a non-greedy (minimal) way, meaning it will match as few characters as possible.
(.*?): This part of the pattern uses parentheses to capture the text within the <a> tags. The .*? inside the parentheses is a non-greedy quantifier that captures any characters (except for newline) in a non-greedy (minimal) way.
<\/a>: This is a literal string that matches the closing </a> tag in the HTML content.
<\/h3>: This is a literal string that matches the closing </h3> tag in the HTML content.
So, the title_pattern is designed to match the entire HTML element for the book title, including the opening and closing <h3> tags, the <a> tag with any attributes, and the text within the <a> tags, which represent the book title. The captured text within the parentheses (.*?) is then used to extract the actual title of the book using the re.findall() function in Python.
Now, let’s shift our focus to the price of the book.
Inspecting the Price of the page in the source code
The price is stored inside the p tag with class price_color. So, we have to create a pattern that starts with <p class=”price_color”> and ends with </p>.
This one is pretty straightforward compared to the other one. But let me again break it down for you.
<p class="price_color">: This is a literal string that matches the opening <p> tag with the attribute class="price_color", which represents the HTML element that contains the book price.
(.*?): This part of the pattern uses parentheses to capture the text within the <p> tags. The .*? inside the parentheses is a non-greedy quantifier that captures any characters (except for newline) in a non-greedy (minimal) way.
<\/p>: This is a literal string that matches the closing </p> tag in the HTML content.
So, the price_pattern is designed to match the entire HTML element for the book price, including the opening <p> tag with the class="price_color" attribute, the text within the <p> tags, which represent the book price, and the closing </p> tag. The captured text within the parentheses (.*?) is then used to extract the actual price of the book using the re.findall() function in Python.
import requests
import re

l=[]
o={}

# Send a GET request to the website
target_url = 'http://books.toscrape.com/'
response = requests.get(target_url)

# Extract the HTML content from the response
html_content = response.text

# Define regular expression patterns for title and price
title_pattern = r'<h3><a.*?>(.*?)<\/a><\/h3>'
price_pattern = r'<p class="price_color">(.*?)<\/p>'

# Find all matches of title and price patterns in the HTML content
titles = re.findall(title_pattern, html_content)
prices = re.findall(price_pattern, html_content)
Since titles and price variables are lists, we have to run a for loop to extract the corresponding titles and prices and store them inside a list l.
for i in range(len(titles)):
    o["Title"]=titles[i]
    o["Price"]=prices[i]
    l.append(o)
    o={}


print(l)
This way we will get all the prices and titles of all the books present on the page.
Complete Code
You can scrape many more things like ratings, product URLs, etc using regex. But for the current scenario, the code will look like this.
import requests
import re

l=[]
o={}

# Send a GET request to the website
target_url = 'http://books.toscrape.com/'
response = requests.get(target_url)

# Extract the HTML content from the response
html_content = response.text

# Define regular expression patterns for title and price
title_pattern = r'<h3><a.*?>(.*?)<\/a><\/h3>'
price_pattern = r'<p class="price_color">(.*?)<\/p>'

# Find all matches of title and price patterns in the HTML content
titles = re.findall(title_pattern, html_content)
prices = re.findall(price_pattern, html_content)


for i in range(len(titles)):
    o["Title"]=titles[i]
    o["Price"]=prices[i]
    l.append(o)
    o={}


print(l)
Conclusion
In this guide, we’ve demystified the process of utilizing regex patterns to efficiently parse intricate HTML content, bypassing the need for dedicated libraries like Beautiful Soup or lxml. For newcomers, regular expressions may initially seem daunting, but with consistent practice, their power and flexibility become unmistakable.
Regular expressions stand as a potent tool, especially when dealing with multifaceted data structures. Our previous article on web scraping Amazon using Python showcased the use of regex in extracting product images, offering further insights into the versatility of this method. For a deeper dive and more real-world examples, I recommend giving it a read.
I hope you like this little tutorial and if you do then please do not forget to share it with your friends and on your social media.
Every business be it a small organization, a medium-sized team, or an enterprise. Revenue is generated when businesses have customers paying them.
To reach those customers businesses reach out to potential people who can be interested in the problem you are solving.
In this blog, we will know how web scraping can be one of the ways to generate leads, what are its advantages, and how different industries can use it.
Web Scraping For Lead Generation
What is Lead Scraping?
Lead Scraping is the process of collecting information such as emails, names, contact numbers, etc. using web scraping. The process involves using third-party software to do this very part of web scraping.
This way businesses can enjoy the freedom to focus on other tasks, while with scraping at the backend they can generate leads at a generous amount each day. The whole process has the advantage that it can be done at scale and the output can be sent to the CRM a company is using.
Challenges in Lead Scraping
Scraping leads can be a valuable strategy for businesses looking to expand their client base. However, it comes with its own set of challenges. Here are some common challenges faced in lead scraping and how to overcome them.
IP blocking
Lead Scraping is not a simple and straightforward task. You have to crawl websites that are quite sensitive to bots. These websites can easily block your scraper by blocking your IP which can stop your data pipeline.
Complex Website Structure
Websites like LinkedIn are not easy to scrape. They require a completely different infrastructure in order to crawl public profiles. LinkedIn is a lead warehouse and you can find tons of leads for your product over here. A dedicated LinkedIn Scraper can help you bypass the hurdle of maintaining a scraper.
Website Design
Sometimes websites change their design due to which HTML tags also change. Due to this, your scraper can break because the tags you are picking and parsing are now gone.
Methods to scrape Leads
Scraping leads, or extracting contact information from various sources, is a common practice for sales and marketing teams looking to generate leads and grow their customer base. Here are some methods to scrape leads:
No-code Web Scraping
Let’s say I want to scrape emails from yellowpages.com then I can simply use the combination of Airtable, Web Scraping API, and data fetcher to pull fresh data and save it in a CSV file. Here Data Fetcher is an extension that can be downloaded when you sign up for an account on Airtable. Using this extension you can pull data through Web Scraping APIs and then save it to a sheet inside Airtable.
You can even schedule your tasks in Airtable. So, even when you are sleeping your scraper will keep running and it will keep scraping the leads. Isn’t that amazing?
Creating your own Scrapers
If you are a developer then you can build a scraper using Python or Nodejs. Websites like Yelp and Yellowpages can be scraped using these languages. You can crawl and parse the data to extract details like phone number, email, etc.
However, there is a limitation to this method because this method is not scalable. Normal scrapers get blocked easily due to IP blocking. We have discussed this above too in the Challenges section.
We can overcome this problem by using Web Scraping APIs.
Web Scraping API
Web Scraping API will handle all the hassles like the rotation of proxies, passing custom headers, or even headless browsers. This will help you create a constant flow of data through the data pipeline. You just have to send a GET request and you will get the data without worrying about getting blocked. Even websites like LinkedIn can be scraped at a speed of 1 million profiles per day using these services.
Websites where you can find your target prospects
Yelp
Scraping leads from Yelp involves the extraction of business names, addresses, phone numbers, and websites, from Yelp listings. These leads can be potential clients or prospects. You can kickstart your journey by reading web scraping with Yelp.
Google
When you make a search on Google it shows the Title, link, and description. Inside this description, you will sometimes find emails or phone numbers. This data can help you generate leads. You can extract the data from the box of Google Business. You can learn how to scrape Google search results with Python to start scraping leads.
Google Maps
Google Maps can also provide you with email, phone numbers, addresses, etc. Although scraping Google Maps is not an easy task, you should always use scraping APIs to scrape it. You can read this guide on scraping Google Maps with Python.
LinkedIn
Personally, I prefer LinkedIn for generating leads. LinkedIn is like an ocean of leads and you can find your target customers over here. It is used by more than 900M users which means you can extract thousands of leads every day from Linkedin. If you want to scrape LinkedIn person and company profiles then read Scraping LinkedIn Profiles with Python.
Advantages of collecting leads via web scraping
When you collect leads by scraping websites, the process becomes relatively faster than collecting leads manually.
You reach out fast and the lead pipeline never goes empty.
Ultimately customers and revenue go up.
How companies can take advantage of lead generation via web scraping?
Large enterprise companies have a set goal for customer acquisition. Here marketing and sales teams can lower their burden by web scraping websites from where they think their market-fit audience can be found.
Otherwise, they have to manually visit forums, social media, and other websites to collect leads. This becomes a tedious and manually dependent task and can leave the lead pipeline dry for a period of time.
Companies can even save bucks by not using a paid tool likeLinkedIn Sales Navigator, Snov, etc. IT team can create a dedicated web scraper or can use a third-party tool like Scrapingdog that can be used by the sales team.
After this sales team can refine leads by cold calling or by either emailing them. If somebody is interested then it can be passed on to the upper management for closing the prospect.
Conclusion
Web scraping can sometimes be a little rough and therefore you should avoid scraping those particular websites. For example, LinkedIn does not allow the crawling of public profiles. Do remember that the quality of the audience is far better than the quantity.
Our main focus should be on finding leads that can become our customers in the future otherwise there is no point in collecting emails like a robot just for the sake of keeping the lead pipeline open.
Web scraping has become very crucial when it comes to data collection. No matter what kind of data you need you must have the skills to collect data from any target website. There are endless use cases of web scraping which makes it a “must-have” skill. You can use it to collect travel data or maybe product pricing from e-commerce websites like Amazon, etc.
Web Scraping with Nodejs
We have written many articles on web scraping and have scraped various websites with Python but in this article, we will show you how it can be done with Nodejs.
This tutorial will be divided into two sections. In the first section we will scrape a website with a normal XHR request and then in the next section we will scrape another website that only loads data after Javascript execution.
But before we proceed with our setup for the scraper let’s first understand why you should prefer nodejs for building large scrapers.
Why Nodejs for Web Scraping?
The event loop in JavaScript is a critical component that enables Node.js to efficiently handle large-scale web scraping tasks. Javascript at any time can only do one thing as opposed to other languages like C or C++ that can have multiple threads to do multiple things at the same time.
An important distinction in Javascript where it can’t run things in parallel but it can run things concurrently. I know you are confused now. Things run at the same time but it process results at different times. Javascript cannot process all the functions at the same time.
Node.JS Application
JavaScript, and consequently Node.js, is designed to be non-blocking and asynchronous. In a web scraping context, this means that Node.js can initiate tasks (such as making HTTP requests) and continue executing other code without waiting for those tasks to complete. This non-blocking nature allows Node.js to efficiently manage multiple operations concurrently.
Node.js uses an event-driven architecture. When an asynchronous operation, such as a network request or file read, is completed, it triggers an event. The event loop listens for these events and dispatches callback functions to handle them. This event-driven model ensures that Node.js can manage multiple tasks simultaneously without getting blocked.
With its event-driven and non-blocking architecture, Node.js can easily handle concurrency in web scraping. It can initiate multiple HTTP requests to different websites concurrently, manage the responses as they arrive, and process them as needed. This concurrency is essential for scraping large volumes of data efficiently.
How does Event Loop work?
The event loop continuously checks if the call stack is empty.
If the call stack is empty, the event loop checks the event queue for pending events.
If there are events in the queue, the event loop dequeues an event and executes its associated callback function.
The callback function may perform asynchronous tasks, such as reading a file or making a network request.
When the asynchronous task is completed, its callback function is placed in the event queue.
The event loop continues to process events from the queue as long as there are events waiting to be executed.
Setting up the prerequisites
I am assuming that you have already installed nodejs on your machine. If not then you can do so from here.
For this tutorial, we will mainly need three nodejs libraries.
Unirest– For making XHR requests to the website we are going to scrape.
Cheerio– To parse the data we got by making the request through unirest.
Puppeteer– It is a nodejs library that will be used to control and automate headless Chrome or Chromium browsers. We will learn more about this later.
Before we install these libraries we will have to create a dedicated folder for our project.
mkdir nodejs_tutorial
npm init
npm init will initialize a new Node.js Project. This command will create a package.json() file. Now, let’s install all of these libraries.
npm i unirest cheerio puppeteer
This step will install all the libraries in your project. Create a .js file inside this folder by any name you like. I am using first_section.js.
Now we are all set to create a web scraper. So, for the first section, we are going to scrape this page from books.toscrape.com.
Downloading raw data from books.toscrape.com
Our first job would be to make a GET request to our host website using unirest. Let’s test our setup first by making a GET request. If we get a response code of 200 then we can proceed ahead with parsing the data.
//first_section.js
const unirest = require('unirest');
const cheerio = require('cheerio');
async function scraper(){
  let target_url = 'https://books.toscrape.com/catalogue/a-light-in-the-attic_1000/index.html'
  let data = await unirest.get(target_url)
  return {status:data.status}
}
scraper().then((data) => {
  console.log(data)
}).catch((err) => {
  console.log(err)
})
Let me first explain this code to you step by step before running it.
Importing required modules:
The unirest module is imported to make HTTP requests and retrieve the HTML content of a web page.
The cheerio module is imported to parse and manipulate the HTML content using jQuery-like syntax.
Defining the scraper async function:
The scraper function is an async function, which means it can use the await keyword to pause execution and wait for promises to resolve.
Inside the function, a target URL (https://books.toscrape.com/catalogue/a-light-in-the-attic_1000/index.html) is assigned to the target_url variable.
Making an HTTP GET request and loading the HTML content:
The unirest.get() method is used to make an HTTP GET request to the target_url.
The await keyword is used to wait for the request to complete and retrieve the response object.
The HTML content of the response is accessed through data.body.
Returning the result:
The scraper function returns an object with the status code of the HTTP response (data.status).
Invoking the scraper function:
The scraper function is called asynchronously using scraper().then() syntax.
The resolved data from the function is logged into the console.
Any errors that occur during execution are caught and logged into the console.
I hope you have got an idea of how this code is actually working. Now, let’s run this and see what status we get. You can run the code using the below command.
node first_section.js
When I run I get a 200 code.
{ status: 200 }
It means my code is ready and I can proceed ahead with the parsing process.
What are we going to scrape?
It is always great to decide this thing in advance what exact information you want to extract from the target page. This way we can analyze in advance which element is placed where inside the DOM.
We are going to scrape five data elements from this page:
Product Title
Product Price
In stock with quantity
Product rating
Product image.
We will start by making a GET request to this website with our HTTP agent unirest and once the data has been downloaded from the website we can use Cheerio to parse the required data.
With the help of .find() function of Cheerio, we are going to find each data and extract its text value.
Before making the request we are going to analyze the page and find the location of each element inside the DOM. One should always do this exercise to identify the location of each element.
We are going to do this by simply using the developer tool. This can be accessed by simply right-clicking on the target element and then clicking on the inspect. This is the most common method, you might already know this.
Identifying the location of each element
Let’s start by searching for the product title.
The title is stored inside h1 tag. So, this can be easily extracted using Cheerio.
The cheerio.load() function is called, passing in data.body as the HTML content to be loaded.
This creates a Cheerio instance, conventionally assigned to the variable $, which represents the loaded HTML and allows us to query and manipulate it using familiar jQuery-like syntax.
HTML structure has an <h1> element, the code uses $('h1') to select all <h1> elements in the loaded HTML. But in our case, there is only one.
.text() is then called on the selected elements to extract the text content of the first <h1> element found.
The extracted title is assigned to the obj["title"] property.
Find the price of the product.
This price data can be found inside the p tag with class name price_color.
Stock data can be found inside p tag with the class name instock.
obj[“stock_data”]=$(‘p.instock’).text().trim()
Finding the star rating
Here star rating is the name of the class. So, we will first find this class by the name star-rating and then we will find the value of this class attribute using .attr() function provided by the cheerio.
By adding “https://books.toscrape.com” as a pretext we are completing the URL.
With this, we have managed to find every data we were planning to extract.
Complete Code
You can extract many other things from the page but my main motive was to show you how the combination of any HTTP agent(Unirest, Axios, etc) and Cheerio can make web scraping super simple.
The code will look like this.
const unirest = require('unirest');
const cheerio = require('cheerio');
async function scraper(){
let obj={}
let arr=[]
let target_url = 'https://books.toscrape.com/catalogue/a-light-in-the-attic_1000/index.html'
let data = await unirest.get(target_url)
const $ = cheerio.load(data.body);
obj["title"]=$('h1').text()
obj["price_of_product"]=$('p.price_color').text().trim()
obj["stock_data"]=$('p.instock').text().trim()
obj["rating"]=$('p.star-rating').attr('class').split(" ")[1]
obj["image"]="https://books.toscrape.com"+$('div#product_gallery').find('img').attr('src').replace("../..","")
arr.push(obj)
return {status:data.status,data:arr}
}
scraper().then((data) => {
console.log(data.data)
}).catch((err) => {
console.log(err)
})
Scraping Websites with Headless Browsers in JavaScript
Why do we need a headless browser for scraping a website?
Rendering JavaScript– Many modern websites rely heavily on JavaScript to load and display content dynamically. Traditional web scrapers may not execute JavaScript, resulting in incomplete or inaccurate data extraction. Headless browsers can fully render and execute JavaScript, ensuring that the scraped data reflects what a human user would see when visiting the site.
Handling User Interactions– Some websites require user interactions, such as clicking buttons, filling out forms, or scrolling, to access the data of interest. Headless browsers can automate these interactions, enabling you to programmatically navigate and interact with web pages as needed.
Captchas and Bot Detection– Many websites employ CAPTCHAs and anti-bot mechanisms to prevent automated scraping. Headless browsers can be used to solve CAPTCHAs and mimic human-like behavior, helping you bypass bot detection measures.
Screenshots and PDF Generation– Headless browsers can capture screenshots or generate PDFs of web pages, which can be valuable for archiving or documenting web content.
Scraping website with Puppeteer
What is Puppeteer?
Puppeteer is a Node.js library developed by Google that provides a high-level API to control headless versions of the Chrome or Chromium web browsers. It is widely used for automating and interacting with web pages, making it a popular choice for web scraping, automated testing, browser automation, and other web-related tasks.
How does it work?
1. Installation:
Start by installing Puppeteer in your Node.js project using npm or yarn.
You can do this with the following command:
npm install puppeteer
2. Import Puppeteer:
In your Node.js script, import the Puppeteer library by requiring it at the beginning of your script.
const puppeteer = require('puppeteer');
3. Launching a Headless Browser:
Use Puppeteer’s puppeteer.launch() method to start a headless Chrome or Chromium browser instance.
Headless means that the browser runs without a graphical user interface (GUI), making it more suitable for automated tasks.
You can customize browser options during the launch, such as specifying the executable path or starting with a clean user profile.
4. Creating a New Page:
After launching the browser, you can create a new page using the browser.newPage() method.
This page object represents the tab or window in the browser where actions will be performed.
5. Navigating to a Web Page:
Use the page.goto() method to navigate to a specific URL.
Puppeteer will load the web page and wait for it to be fully loaded before proceeding.
6. Interacting with the Page:
Puppeteer allows you to interact with the loaded web page, including:
Clicking on elements.
Typing text into input fields.
Extracting data from the page’s DOM (Document Object Model).
Taking screenshots.
Generating PDFs.
Evaluating JavaScript code on the page.
These interactions can be scripted to perform a wide range of actions.
7. Handling Events:
You can listen for various events on the page, such as network requests, responses, console messages, and more.
This allows you to capture and handle events as needed during your automation.
8. Closing the Browser:
When your tasks are complete, you should close the browser using browser.close() to free up system resources.
Alternatively, you can keep the browser open for multiple operations if needed.
9. Error Handling:
It’s important to implement error handling in your Puppeteer scripts to gracefully handle any unexpected issues.
This includes handling exceptions, network errors, and timeouts.
I think this much information is enough for now on Puppeteer and I know you are eager to build a web scraper using Puppeteer. Let’s build a scraper.
Scraping Facebook with Nodejs and Puppeteer
We have selected Facebook because it loads its data through javascript execution. We are going to scrape this page using Puppeteer. The page looks like this.
As usual, we should test our setup before starting with the scraping and parsing process.
Downloading the raw data from Facebook
We will write a code that will open the browser and then open the Facebook page that we want to scrape. Then it will close the browser once the page is loaded completely.
const puppeteer = require('puppeteer');
const cheerio = require('cheerio');

async function scraper(){
  let obj={}
  let arr=[]
  let target_url = 'https://www.facebook.com/nyrestaurantcatskill/'
  const browser = await puppeteer.launch({headless:false});
  const page = await browser.newPage();
  await page.setViewport({ width: 1280, height: 800 });
  let crop = await page.goto(target_url, {waitUntil: 'domcontentloaded'});
  let data = await page.content();
  await page.waitFor(2000)
  await browser.close();
  return {status:crop.status(),data:data}
}

scraper().then((data) => {
console.log(data.data)
}).catch((err) => {
console.log(err)
})
This code snippet demonstrates an asynchronous function named scraper that uses Puppeteer for automating web browsers, to scrape data from a specific Facebook page.
Let’s break down the code step by step:
The function scraper is declared as an asynchronous function. It means that it can use the await keyword to wait for asynchronous operations to complete.
Two variables, obj and arr, are initialized as empty objects and arrays, respectively. These variables are not used in the provided code snippet.
The target_url variable holds the URL of the Facebook page you want to scrape. In this case, it is set to 'https://www.facebook.com/nyrestaurantcatskill/'.
puppeteer.launch({headless:false}) launches a Puppeteer browser instance with the headless option set to false. This means that the browser will have a visible UI when it opens. If you set headless to true, the browser will run in the background without a visible interface.
browser.newPage() creates a new browser tab (page) and assigns it to the page variable.
page.setViewport({ width: 1280, height: 800 }) sets the viewport size of the page to 1280 pixels width and 800 pixels height. This simulates the screen size for the scraping operation.
page.goto(target_url, {waitUntil: 'domcontentloaded'}) navigates the page to the specified target_url. The {waitUntil: 'domcontentloaded'} option makes the function wait until the DOM content of the page is fully loaded before proceeding.
The crop variable stores the result of the page.goto operation, which is a response object containing information about the page load status.
page.content() retrieves the HTML content of the page as a string and assigns it to the data variable.
page.waitFor(2000) pauses the execution of the script for 2000 milliseconds (2 seconds) before proceeding. This can be useful to wait for dynamic content or animations to load on the page.
browser.close() closes the Puppeteer browser instance.
The function returns an object with two properties: status and data. The status property contains the status code of the crop response object, indicating whether the page load was successful or not. The data property holds the HTML content of the page.
Once you run this code you should see this.
If you see this then your setup is ready and we can proceed with data parsing using Cheerio.
What are we going to scrape?
We are going to scrape these five data elements from the page.
Address
Phone number
Email address
Website
Rating
Now as usual we are going to first analyze their location inside the DOM. We will take support of Chrome dev tools for this. Then using Cheerio we are going to parse each of them.
Identifying the location of each element
Let’s start with the address first and find out its location.
Once you inspect you will find that all the information we want to scrape is stored inside this div tag with the class name xieb3on. And then inside this div tag, we have two more div tags out of which we are interested in the second one because the information is inside that.
We have set a condition that only if i is 1 then only it will go inside the condition. With this, we have cleared our intention that we are only interested in the second div block. Now, the question is how to extract an address from this. Well, it become very easy now.
The address can be found inside the first div tag with the class x1heor9g. This div tag is inside the ul tag.
Well, finally we managed to scrape a dynamic website using JS rendering.
Scraping without getting blocked with Scrapingdog
Scrapingdog is a web scraping API that uses new proxy/IP on every new request. Once you start scraping Facebook at scale you will face two challenges.
Puppeteer will consume too much CPU. Your machine will get super slow.
Your IP will be banned in no time.
With Scrapingdog you can resolve both the issues very easily. It uses headless Chrome browsers to render websites and every request goes through a new IP.
As you can see you just have to make a simple GET request and your job is done. Scrapingdog will handle everything from headless chrome to retries for you.
If interested you can start with free 1000 credits to try how Scrapingdog can help you collect a tremendous amount of data.
Conclusion
Nodejs is a very powerful language for web scraping and this tutorial is evidence. Of course, you have to deep dive a little to better some basics but it is fast and robust.
In this tutorial, we learned how you can scrape both dynamic and non-dynamic websites with NodeJS. In the case of dynamic websites, you can also use playwright in place of the puppeteer.
I just wanted to give you an idea of how nodejs can be used for web scraping and I hope with this tutorial you will get a little clarity.
Additional Resources
And there’s the list! At this point, you should feel comfortable writing your first web scraper to gather data from any website. Here are a few additional resources that you may find helpful during your web scraping journey:
If you’re looking to gather data from the web, you may be wondering how to go about it. Just as there are many ways to gather data, there are also many ways to scrape data from the web. In this blog post, we’ll be scraping data from websites using r.
R is a programming language that is well-suited for web scraping due to its many libraries and tools. We’ll go over some of the basics of web scraping with R so that you can get started on your own projects.
This tutorial is divided into three sections.
In the first section, we are going to scrape a single page from IMDB. In the second section, we are going to open links to each movie and then scrape the data from there as well.
In the last and final section, we are going to scrape data from all the pages. We will see how URL patterns change when page numbers are changed.
Requirements
We can start writing some code. So, we will first install and import two libraries that we’ll be using. One is rvest and the other one dplyr.
rvest — It is for the web scraping part. Inspired by bs4.
and then we will import the libraries within our script.
library(rvest)
library(dplyr)
What data will we scrape from IMDB?
It is always best to decide this thing in advance before writing the code. We will scrape the name, the year, the rating, and the synopsis.
Scraping IMDB using R
Web Scraping with R is super easy and useful, and in this tutorial, I scrape movies from IMDb into a data frame in R using thervest library and then export the data frame as a CSV, all in a few lines of code. This method works across many sites — typically those that show static content — such as Yelp, Amazon, Wikipedia, Google, and more.
We will create a new variable for our target link. Along with that, we will declare another variable page. This variable will get HTML code from our target URL. We will learn more about this in detail in a bit.
library(rvest)
library(dplyr)
link = "https://www.imdb.com/list/ls058457633/"
page = read_html(link)
We will first start with creating the name column. So, we will declare a variable called name. We will extract the name from the HTML code that we just fetched.
library(rvest)
library(dplyr)
link = "https://www.imdb.com/list/ls058457633/"
page = read_html(link)
name = page %>% html_nodes(".lister-item-header a") %>% html_text()
We have used the HTML nodes function in order to extract that particular HTML tag. After inspecting the title we found out that all the titles are stored under the class names lister-item-header with a tag. After this, we piped that one result into HTML text.
Let us understand what we have done so far. What each and every command do and also what this pipe operator is, in case you have never seen it before.
read_html — We are using it to read HTML and essentially what it does is, it is provided with a URL and it gives you back an HTML document or the source code of the target URL.
html_nodes — Given the HTML source code, it pulls out the actual elements that we want to grab.
html_text — It will parse the text out of those tags.
Pipe Operator(%>%) — It’s part of the deep wire library and essentially it makes coding really easy. I highly recommend this library. It is equivalent to taking the mean i.e. a %>% mean = mean(a). Everything that’s to the left of the pipe is computed and it takes the result and passes it in as the first argument to the function that’s after the pipe. So, pretty easy and super useful.
So, now we have written the code for the name column, we can go ahead and run the code. This is what we get as the output.
It looks pretty good and it has all of our movie titles. Now, we will try to grab the year’s text. If we inspect the year, we will find that all the years are stored under the class text-muted unbold.
library(rvest)
library(dplyr)
link = "https://www.imdb.com/list/ls058457633/"
page = read_html(link)
name = page %>% html_nodes(".lister-item-header a") %>% html_text()
year = page %>% html_nodes(".text-muted unbold") %>% html_text()
If we run that line we will get the below output.
Now, we will grab the ratings. After the inspection, we can find that all the ratings are stored under the class ipl-rating-star__rating.
Just to confirm we are getting the right data we are going to print it.
So, the rating looks good. Let us check the synopsis.
The synopsis also looks good. Now, we have our four variables and we are going to treat these as columns for our data frame, in order to make this data frame we are going to call data.frame command.
We have passed another argument stringAsFactors as false. Essentially what it does is when it is true it makes all of your columns into factors instead of characters or numeric or whatever else they should be. So, just watch out for that.
We can run this code and view our movie’s data frame and you can see just in a few lines we got the whole text from the IMDB page into a data frame.
View(movies)
And the last thing I want to show you is how you can store the data in a CSV file.
After running it you will get the movies.csv file inside your folder.
Scraping Individual Movie Pages
In this section, we are going to open every movie link from the same IMDb page in order to scrape more data on every individual movie. Essentially I want to add one more data column to the above movies’ data frame of all the primary cast members of each of these movies. I want to scrape all the primary cast of the movie, and that is only possible by going inside every individual page.
So, the first thing is to grab all those URLs for each of these movies. We have already written the code for it or at least most of the code for it. So, it is not so hard, we just need to add a new variable called movie links.
if you will run the below code
name = page %>% html_nodes(“.lister-item-header a”)
you will get this.
So, we just need to extract the href attribute from this code to complete the URL.
the paste will concatenate the imdb.com with the href tag value. And piping will take everything to the left of the pipe. It computes that and it passes whatever that result is like the first argument to the function after the pipe. Whatever is being passed in is passed as a second argument by putting that period there. The paste will add an empty space in between so to avoid that we have used sep as empty quotes. So, we can go ahead and run this code.
This is exactly what we want. That looks good. Now, that we have all the movie links, we need to figure out a way to go into each of the pages and scrape the cast members. If you come from a programming background or have done any coding at all you might be tempted to use the for loop here but I think r is actually more efficient when it is used by applying function rather than for loops.
I am going to create a function that essentially takes in one of these movie links and scrapes these cast members and then just returns whatever that string is. You can find the HTML element by inspecting it.
So, now I have all the movie links and I have this function get_cast that scrapes all the cast names and returns a single string with them. So, to put it all together, I will create a cast column using the sapply function.
cast = sapply(movie_links, FUN = get_cast)
Essentially the way sapply works is, given the first variable which is a vector of movie links it will go into each one grab this and run it through the function. movie_links is passed as parameters and then whatever the result is it will just put that back into a vector for us.
The last thing you can do is to add cast to the movies dataframe as our fifth column.
movies = data.frame(name, year, rating, cast, synopsis, stringAsFactors=FALSE)
Now, if you run this, we will get all the cast within our movie data frame.
If you want to do the text cleaning you can do that, but I liked it this way.
In this section, we are going to scrape multiple pages with r. The first step is to figure out how the URL of the website is changing.
So, to scrape multiple pages, you can see if we go down to the very bottom you will find the next button. And when you click it you will find &start=51 in your URL and again if you will click it you will find &start=101 in your URL.
The page number is increasing by 50 for every new page. Similarly, if you add &start=1 to the URL you will be redirected to the first page, and hence we have figured out how the URL changes.
We will create a for loop that will go through each of the pages that we want to scrape then just do everything that we did before. So, not super hard but there are a few components to it.
We will create a big for loop outside everything and I know in the last section I said that the sapply function is preferable to for loops but for this situation, it just kind of makes sense for me to use a for loop but you can do it the way that you feel most comfortable.
I am using the paste function again to make our URL dynamic and I have used sep to remove all the spaces between the strings that you are trying to concatenate.
I have kept get_cast out of the for loop as it does not change each time. As we are going to call it from inside the for loop. If we put the movie’s data frame inside the for loop it will keep changing the value on every run.
So, in the end, it will have the values of the last 50 results. In our case, it would be the second page and that’s not what we want. For that, we are going to use rbindfunction which means row bind and it will take the first argument as movies and the second argument will stay this data frame.
So, now each time this for loops runs, it will take whatever the old movies variable was and then just put on the new rows of movies that it got from this page that it’s running on.
In the end, we are going to use the print statement to track our progress.
This is what our movie’s data frame looks like.
We have managed to scrape the first 100 pages of IMDb. Now, if you want to scrape all the pages then you can make the changes in your for loop according to your requirements.
Conclusion
In this tutorial, we discussed the various R open-source libraries you may use to scrape a website. If you followed along with the tutorial, you were able to create a basic scraper to crawl any page. While this was an introductory article, we covered most methods you can use with the libraries. You may choose to build on this knowledge and create complex web scrapers that can crawl thousands of pages.
If you don’t want to code your own scraper then you can always use our web scraping API.
Feel free to message us to inquire about anything you need clarification on.
Additional Resources
Here are a few additional resources that you may find helpful during your web scraping journey:
Web Scraping has become very common nowadays days as the demand for data extraction has gone up in recent years. Pick any industry and you will find one thing in common and that is web scraping.
But web scraping at scale can be a little frustrating as many websites around the world use on-screen data protection software like Cloudflare.
Web Scraping Challenges
In this post, we will discuss the most common challenges in web scraping that you might face in your data extraction journey. Let’s understand them one by one.
CAPTCHAs
CAPTCHA is a Completely Automated Public Turing Test to Tell Computers and Humans Apart. Captchas are the most common kind of protection used by many websites around the world.
If an on-screen protection software thinks the incoming request is unusual then it will throw a captcha to test whether the incoming request is from a human or a robot. Once confirmed it will redirect the user to the main website.
CAPTCHAs
Captcha helps to distinguish humans from computers & is one of the major challenges of web scraping when extracting data from the web. This is a kind of test that a computer should not be able to pass but it should be able to grade. It is kind of a paradoxical idea.
There are multiple captcha-solving software in the market that can be used for solving captchas while scraping but they will slow down the scraping process and the cost of scraping per page will also go up drastically.
The only solution to this problem is to use proper headers along with high-quality residential proxies. This combination might help you bypass any kind of on-site protection. Residential proxies are high-authority IPs that come from a real device. The header object should contain proper User-Agent, referer, etc.
IP blocking or IP bans are very common measures taken by website security software to prevent web scraping. Usually, this technique is used to prevent any kind of cyber attack or other illegal activities.
But along with this, IP bans can also block your bot which is collecting data through web scraping. There are mainly two kinds of IP bans.
Sometimes website owners do not like bots collecting data from their websites without permission. They will block you after a certain number of requests.
There are geo-restricted websites that only allow traffic from selected countries to visit their website.
IP blocking Process
IP bans can also happen if you keep making connections to the website without any delay. This can overwhelm the host servers. Due to this, the website owner might limit your access to the website.
Another reason could be cookies. Yes! this might sound strange but if your request headers do not contain cookies then you will get banned from the website. Websites like Instagram, Facebook, Twitter, etc. ban the IP if cookies are absent in the headers.
Dynamic Websites
Many websites use AJAX to load content on their website. These websites cannot be scraped with a normal GET request & are one of the important challenges to address when scraping. In AJAX architecture multiple API calls are made to load multiple components available on the website.
To scrape such websites you need a Chrome instance where you can load these websites and then scrape once they have loaded every component. You can use Selenium and Puppeteer to load websites on the cloud and then scrape it.
The difficult part is to scale the scraper. Let’s say you want to scrape websites like Myntra then you will require multiple instances to scrape multiple pages at a time. This process is quite expensive and requires a lot of time to set up. Along with this, you need rotating proxies to prevent IP bans.
Change in Website Layout
In a year or so many popular websites change their website layout to make it more engaging. Once that is changed many tags and attributes also change and if you have created a data pipeline through that website then your pipeline will be blocked until you make appropriate changes at your end which further adds to challenges in web scraping.
Let’s say you are scraping mobile phone prices from Amazon and one day they just changed the name of the element that holds that price tag then eventually your scraper will also stop responding with correct information.
To avoid such a mishap, you can create a cron job that can run every 24 hours just to check if the layout is the same or different. If something changes you can shoot an alert email to yourself and after that, you can make the changes you need to keep the pipeline intact.
Even a minor change in the website layout will block your scraper from returning appropriate information.
Honeypot Traps
A honeypot is a kind of system that is set up as a decoy, designed to appear as a high-value asset like a server. Its purpose is to detect and deflect unauthorized access to website content.
Honeypot Traps
There are mainly two kinds of honeypot traps:
Research Honeypot Traps: close analysis of bot activity.
Production Honeypot Traps: It deflects intruders away from the real network.
Honeypot traps can be found in the form of a link that is only visible to bots but not humans. Once a bot falls into the trap, it starts gathering valuable information (IP address, Mac address, etc.). This information is then used to block any kind of hack or scraping.
Sometimes honeypot traps use the deflection principle by diverting the attacker’s attention to less valuable information.
The placement of these traps varies depending on their sophistication. It can be placed inside the network’s DMZ or outside the external firewall to detect attempts to enter the internal network. No matter the placement it will always have some degree of isolation from the production environment.
Data Cleaning
Web scraping will provide you with raw data. You have to parse out the data you need from the raw HTML. Libraries like BeautifulSoup in Python, and Cheerio in Nodejs can help you clean the data and extract the data you are looking for.
One of the primary tasks in data cleaning is addressing missing data. Missing values can be problematic as they lead to gaps in the dataset, potentially introducing bias and errors in analytical results.
Data cleaning techniques often involve strategies like imputation, where missing values are replaced with estimated or derived values, or the removal of records with significant data gaps.
Duplicate records are another common issue that data cleaning tackles. Duplicate entries skew statistical analyses and can misrepresent the underlying patterns in the data.
Data cleaning identifies and removes these duplicates, ensuring that each record is unique and contributes meaningfully to the analysis.
Additionally, data cleaning may involve identifying and handling outliers — data points that significantly deviate from the majority of the dataset. Outliers can distort statistical summaries and may require correction or removal to maintain the data’s integrity.
Authentication
Handling authentication in web scraping involves the process of providing credentials or cookies to access protected or restricted web resources.
Authentication is crucial when scraping websites that require users to log in or when accessing APIs that require API keys or tokens for authorization. There are several methods to handle authentication in web scraping.
One common approach is to include authentication details in your HTTP requests. For instance, if you’re scraping a website that uses basic authentication, you can include your username and password in the request’s headers.
Similarly, when accessing an API that requires an API key or token, you should include that key or token in the request headers. This way, the web server or API provider can verify your identity and grant you access to the requested data.
It’s essential to handle authentication securely, store credentials in a safe manner, and be cautious when sharing sensitive information in code or scripts.
How Scrapingdog Helps To Overcome These Web Scraping Challenges
This article covered the most common challenges in web scraping that you might face in your web scraping journey. There are many more such challenges in the real world.
We can overcome all these challenges by changing the scraping pattern. But if you want to scrape a large volume of pages then going with a Scraping API like Scrapingdog would be great.
Scrapingdog offers 1000 free request credits!!
We will keep updating this article in the future with more web scraping challenges. So, bookmark this article and also share it on your social media pages.
Web Scraping is a great way to collect large amounts of data in less time. Worldwide data is increasing, and web scraping has become more important for businesses than ever before.
In this article, we are going to list & use JavaScript scraping libraries and frameworks to extract data from web pages. We are going to scrape “Book to Scrape” for demo purposes.
It is an HTTP client through which you can easily make HTTP calls. It also supports HTTPS & follows redirects by default. Now, let’s see an example of request-promise-native and how it works.
const request = require(‘request-promise-native’);

let scrape = async() => {
 var respo = await request(‘http://books.toscrape.com/')
 return respo;
}

scrape().then((value) => {
 console.log(value); // HTML code of the website
});
What are the advantages of using request-promise-native:
It provides proxy support
Custom headers
HTTP Authentication
Support TLS/SSL Protocol
Unirest
Unirest is a lightweight HTTP client library from Mashape. Along with JS, it’s also available for Java, .Net, Python, Ruby, etc.
GET request
var unirest = require('unirest');

let scrape = async() => {
 var respo = await unirest.get(‘http://books.toscrape.com/')
 return respo.body;
}

scrape().then((value) => {
 console.log(value); // Success!
});
2. POST request
var unirest = require(‘unirest’);

let scrape = async() => {
 var respo = await unirest.post(‘http://httpbin.org/anything').headers({'X-header': ‘123’})
 return respo.body;
}

scrape().then((value) => {
 console.log(value); // Success!
});
In the response to POST and PUT requests, you can see I have added a custom header. We add custom headers to customize the result of the response.
Advantages of using Unirest
support all HTTP Methods (GET, POST, DELETE, etc.)
support forms uploads
supports both streaming and callback interfaces
HTTP Authentication
Proxy Support
Support TLS/SSL Protocol
Cheerio
In the Cheerio module, you can use jQuery’s syntax while working with downloaded web data. Cheerio allows developers to provide their attention to the downloaded data rather than parsing it. Now, we’ll calculate the number of books available on the first page of the target website.
We are finding all the li tags inside the ol tag with class row.
Finding all the li tags inside the ol tag
Advantages of using Cheerio
Familiar syntax: Cheerio implements a subset of core jQuery. It removes all the DOM inconsistencies and browser cruft from the jQuery library, revealing its genuinely gorgeous API.
Lightening Quick: Cheerio works with a straightforward, consistent DOM model. As a result, parsing, manipulating, and rendering are incredibly efficient. Preliminary end-to-end benchmarks suggest that cheerio is about 8x faster than JSDOM.
Stunningly flexible: Cheerio can parse nearly any HTML or XML document.
Puppeteer
Puppeteer is a Node.js library that offers a simple but efficient API that enables you to control Google’s Chrome or Chromium browser.
It also enables you to run Chromium in headless mode (useful for running browsers in servers) and send and receive requests without needing a user interface.
It has better control over the Chrome browser as it does not use any external adaptor to control Chrome plus it has Google support too.
The great thing is that it works in the background, performing actions as instructed by the API.
We’ll see an example of a puppeteer scraping the complete HTML code of our target website.
let scrape = async () => {
 const browser = await puppeteer.launch({headless: true});
 const page = await browser.newPage();

await page.goto(‘http://books.toscrape.com/');

await page.waitFor(1000);

var result = await page.content();

browser.close();
 return result;
};

scrape().then((value) => {
 console.log(value); // complete HTML code of the target url!
});
What each step means here:
This will launch a chrome browser.
Second-line will open a new tab.
The third line will open that target URL.
We are waiting for 1 second to let the page load completely.
We are extracting all the HTML content of that website.
We are closing the Chrome browser.
returning the results.
Advantages of using Puppeteer
Click elements such as buttons, links, and images
Automate form submissions
Navigate pages
Take a timeline trace to find out where the issues are on a website
Carry out automated testing for user interfaces and various front-end apps directly in a browser
Take screenshots
Convert web pages to PDF files
I have explained everything about Puppeteer over here; please go through the complete article.
{ heading: ‘List of U.S. states and territories by population’, title: ‘List of U.S. states and territories by population — Wikipedia’ }
Advantages of using Osmosis
Supports CSS 3.0 and XPath 1.0 selector hybrids
Load and search AJAX content
Logs URLs, redirects, and errors
Cookie jar and custom cookies/headers/user agent
Login/form submission, session cookies, and basic auth
Single proxy or multiple proxies and handles proxy failure
Retries and redirect limits
How To Choose the Best JavaScript Library for Web Scraping?
There are a few things to consider before choosing the best javascript library for web scraping:
Easy to use and has good documentation.
Able to handle a large amount of data.
Able to handle different types of data (e.g., text, images, etc.).
The library should be able to handle different types of web pages (e.g., static, dynamic, etc.).
Conclusion
We understood how we could scrape data with Nodejs using Puppeteer, Osmosis, Request-promise-Native & Unirest regardless of the type of website. Web scraping is set to grow as time progresses. As web scraping applications abound, JavaScript libraries will grow in demand. While there are salient JavaScript libraries, it could be puzzling to choose the right one. However, it would eventually boil down to your own respective requirements.
JavaScript and Python have their own advantages and disadvantages when it comes to web scraping. However, some general points to consider include the following:
– JavaScript can be more challenging to learn than Python for some people.
– Python is often faster to write code in than JavaScript.
– Python code is typically more concise and easier to read than JavaScript code.
– JavaScript can be more difficult to debug than Python.
Additional Resources
And there’s the list! At this point, you should feel comfortable writing your first web scraper to gather data from any website. Here are a few additional resources that you may find helpful during your web scraping journey:
You don’t need to know coding to scrape LinkedIn jobs at scale!!
If you’ve found your way to this article, chances are you’re not a developer but eager to learn how to scrape a website and seamlessly store its JSON data into Airtable.
Scraping LinkedIn jobs without coding using Airtable
What is Airtable – It’s a digital platform that acts like a supercharged spreadsheet, making it easy to organize and store data.
Quickly now, I will run through the steps you need to follow along. We will be using Scrapingdog’s LinkedIn Jobs API & will save the data in Airtable without coding anywhere in between!!
Requirements
First, you have to sign up on Scrapingdog, you can do that from here. Then you have to sign up on Airtable.
Process of saving the data
Once you sign up on Airtable you will see this on your screen.
You have to click on the “Start from scratch” button. Then a screen will appear where Airtable will ask you to name the project. You can use any name here. I am using Demo-Project.
After that, you can click “Skip setup” and then on Confirm.
This will directly take you to your project page.
Quickly Install this extension to your Chrome browser. This extension is Data Fetcher and it can help you import data from Scrapingdog’s API directly to Airtable. Isn’t that fantastic?
Just click on Add extension and let it launch.
After clicking on Add extension you will be redirected to your project page on Airtable. Now, click on Add extension again.
Now, you will be asked to create an account on Data Fetcher.
Once you sign up this box will open on your screen
Click on “Create your first request” and proceed ahead.
Then click on Custom under the Application tab. It will open a box that might appear similar to POSTMAN or Insomnia.
Now, we can start scraping. I would request you go through the documentation of LinkedIn Jobs API. This will give you an idea about the API. How it works and what data it needs to return the response. Below I am attaching the image from the documentation, wherein you can see what inputs you need to give and what they are.
Inputs for LinkedIn Jobs API in Scrapingdog
For this tutorial, we are going to focus on this API.
This API will return a list of jobs based on the parameters you pass. Now, let’s say I want to find jobs in Python for geoid 101473624(you can find it on LinkedIn URL) and I need all the data on the first page. Then in this case the API URL will look like this:
Once you have this link, you need to place it in the Data Fetcher Box. (please refer image below)
But before that, in “http://api.scrapingdog.com/linkedinjobs?page=1&geoid=101473624&field=python&api_key=Your-API-Key”, see the last part “Your-API-Key”, here you have to paste your own API key.
You can find your API key on the dashboard of Scrapingdog. (please refer image)
Your API Key in Scrapingdog’s Dashboard
Now, paste the API link inside the Data Fetcher box.
Once done click on Save and Run from the bottom right. After that a tab will appear with the name “Response field Mapping”, you need to click Save & Run again here. (please refer screenshot below)
Data Fetcher will request data from scrapingdog’s API
The JSON result from Scrapingdog API has been saved inside the table. You can find this data inside your Airtable project too.
If you want to download this data in a CSV file then click on “Grid view” on the top left and then click “download CSV”.
This will download all of your results in CSV format.
Conclusion
In this journey, we’ve ventured into the world of web scraping and data automation without the need for coding skills. By harnessing the power of Scrapingdog’s LinkedIn Jobs API, we’ve unlocked a treasure trove of JSON data from LinkedIn, and then seamlessly funneled it into Airtable for organized storage and analysis. What seemed like a complex task has now become accessible to non-coders, empowering them to gather valuable insights, monitor job trends, or curate data for their projects.
Of course, you can use any API to store data inside Airtable using the Data Fetcher extension. Data Fetcher works great by creating a bridge between the data collection process and non-coders.
If you want to learn more about this extension then you should refer to their documentation. For more such tutorials keep visiting our Blog section. We will be releasing more such content so keep your heads up.
In today’s digital age, online reviews have become an integral part of our decision-making process. Whether we’re searching for a cozy restaurant, a reputable doctor, or a five-star hotel, we often turn to platforms like Google Maps to read user reviews and gauge the quality of services.
For businesses, these reviews are not just feedback but a vital aspect of their online presence. So, what if you could harness the power of Python to extract and analyze these valuable insights from Google Maps? In this article, we’ll explore how to scrape Google Maps reviews using Python, opening up a world of possibilities for businesses, researchers, and data enthusiasts alike.
Scraping Google Maps Review using Python
Scraping Google Maps reviews can offer a wealth of information. You can uncover trends, sentiments, and preferences of customers, providing businesses with actionable insights to enhance their services.
Whether you’re looking to gather competitive intelligence, track your own business’s performance, or conduct market research, Python offers a versatile toolkit to automate the extraction of Google Maps reviews efficiently. Join us on this journey as we delve into the fascinating world of web scraping, data extraction, and analysis to unlock the hidden treasures of Google Maps reviews.
Web scraping Google Maps reviews can be achieved by using Playwright and Beautiful Soup Python libraries. The first is an emerging headless browser and the second is a widely recognized web scraping library that offers extensive documentation.
Playwright and Beautiful Soup: Why choose this team?
Playwright is a library developed by Microsoft, initially intended for JavaScript applications. but it has since been extended to support Python, serving as a good alternative to Selenium when it comes to headless browser automation.
Playwright allows you to control browser behavior testing, web scraping, and other automation tasks. To install Playwright in your virtual environment, you’ll need to run the following commands.
pip install pytest-playwright
playwright install
It can easily be paired with web scraping libraries, such as Beautiful Soup. Which is a well-known library that parses data from HTML and XML files. To install it, you can run the following pip command.
pip install beautifulsoup4
How to automate Google?
To scrape reviews from Google Maps, a set of automation tasks need to be taken beforehand, such as clicks, scrolls, and changing pages. Take a look at the required imports.
import time
from playwright.sync_api import sync_playwright
from bs4 import BeautifulSoup
Now let’s specify three variables, one for the category for which we want reviews, another for the location, and finally the Google main URL.
# the category for which we seek reviews
CATEGORY = "vegan restaurants"


# the location
LOCATION = "Lisbon, Portugal"


# google's main URL
URL = "https://www.google.com/"
All set to start our Playwright instance.
with sync_playwright() as pw:
# creates an instance of the Chromium browser and launches it
      browser = pw.chromium.launch(headless=False)


      # creates a new browser page (tab) within the browser instance
      page = browser.new_page()
Playwright supports both synchronous and asynchronous variations, in this case, we are using synchronous for the sake of better understanding each step, since in this mode, each command is executed one after the other.
In addition, Playwright is compatible with all modern rendering engines: Chromium, Webkit and Firefox. In this case, we’ll be using Chromium which is the most used.
A new instance of the latter browser is created with the headless mode set to False, allowing the user to see the automation live on a GUI (Graphic User Interface). Finally, the new browser page is created, this instance will be responsible for most of the actions.
# go to url with Playwright page element
page.goto(URL)


# deal with cookies
page.click('.QS5gu.sy4vM')


# write what you're looking for
page.fill("textarea", f"{CATEGORY} near {LOCATION}")


# press enter
page.keyboard.press('Enter')


# change to english
page.locator("text='Change to English'").click()
time.sleep(4)


# click in the "Maps" HTML element
page.click('.GKS7s')
time.sleep(4)
Above, we can see several automation actions applied with the page instance. The first task (page.goto(URL)), moves the browser’s tab to the Google main URL. Then, in some cases, Google might display a cookies window, depending on your location or proxy.
In that case, you can use the function .click() on the HTML class (‘.QS5gu.sy4vM’) which owns the button to continue.
At this point, we have reached Google’s main page, and we can write what are we looking for. The variables CATEGORY and LOCATION were introduced before, and they can be used in the .fill() function. Writing is not enough, and that’s why just below we see the .keyboard.press()function to press Enter.
If you’re running the script from a non-English country without a proxy, and you want the reviews in English, you might need to click on some HTML element that changes the language. In this case, this was achieved by using the .locator() function to track the text Change to Englishand click on it.
The .sleep()functions are important to add loading time just after the actions. Sometimes they take more time than expected and the following steps do not occur, resulting in error.
Finally, we can head to the Google Maps page, by clicking on the respective HTML class (‘.GKS7s’).
The Google Maps page shows the different vegan restaurants in Lisbon. But only a few are presented. To see more we need to start scrolling, and it is an infinite scroll situation, meaning that not all restaurants are loaded at the same time.
# scrolling
for i in range(4):
      # tackle the body element
      html = page.inner_html('body')


      # create beautiful soup element
      soup = BeautifulSoup(html, 'html.parser')


      # select items
      categories = soup.select('.hfpxzc')
      last_category_in_page = categories[-1].get('aria-label')


      # scroll to the last item
      last_category_location = page.locator(
          f"text={last_category_in_page}")
      last_category_location.scroll_into_view_if_needed()


# get links of all categories after scroll
links = [item.get('href') for item in soup.select('.hfpxzc')]
The code snippet shows a loop to scroll the page 4 times. The higher the number, the more restaurants we have.
This is where we start using Beautiful Soup, not to scrape reviews just yet, but to grab a string that is needed to apply scrolling. The htmlinstance contains the HTML information, and the soup element is created to be able to parse it.
Playwright owns other functions to do scrolling such as .mouse.wheel(), but in this case, we have it on the left and another strategy had to be applied by using the function .scroll_into_view_if_needed(). This takes a locator element and scrolls to it. In this case, the element is the last restaurant title available on the page. This triggers the loading of more restaurants. The step is repeated until the desired number of restaurants is reached.
At the very end of the loop, we can obtain all the restaurant URLs (links), by selecting the same HTML element as before (‘.hfpxzc’) and getting the hrefof each.
See the code below.
for link in links:
# go to subject link
      page.goto(link)
      time.sleep(4)


      # load all reviews
      page.locator("text='Reviews'").first.click()
      time.sleep(4)


      # create new soup
      html = page.inner_html('body')


      # create beautiful soup element
      soup = BeautifulSoup(html, 'html.parser')


      # scrape reviews
      reviews = soup.select('.MyEned')
      reviews = [review.find('span').text for review in reviews]


      # print reviews
      for review in reviews:
      print(review)
            print('\n')
Another loop is needed to extract the reviews from each restaurant. This time we navigate to each link. Then we locate the ‘Reviews’ tab and click on it. We need to make another soup instance, otherwise, we would be reading the HTML information from the previous page.
The first reviews of each restaurant are presented in the ‘.MyEned ‘ class. From here we take the text of all span elements (reviews).
See the output below:
As a tourist I really recommend this place a super nice family business with delicious vegan food and a mix of different
cultures as well. We had the Brazilian dish (Feijoada) and the mushrooms 🍄 calzone with salad as well and the apple 🍏 ...


A perk in Lisboa, where is a bit hard to find vegan food. This restaurant is managed by very lovely people, the owner is so
kind and her wife too. Quality is top of the edge, they do not use much spices neither much salt or sugar, but yet ...

Good solid vegan food. Not inventive just very good.  Very nice out of the way location.
Complete Code
Of course, you can scrape more valuable data from the page but for the current scenario, the code will look like this.
import time
from playwright.sync_api import sync_playwright
from bs4 import BeautifulSoup
from rich import print


# the category for which we seek reviews
CATEGORY = "vegan restaurants"
# the location
LOCATION = "Lisbon, Portugal"
# google's main URL
URL = "https://www.google.com/"


if __name__ == '__main__':
    with sync_playwright() as pw:
        # creates an instance of the Chromium browser and launches it
        browser = pw.chromium.launch(headless=False)
        # creates a new browser page (tab) within the browser instance
        page = browser.new_page()
        # go to url with Playwright page element
        page.goto(URL)
        # deal with cookies page
        page.click('.QS5gu.sy4vM')
        # write what you're looking for
        page.fill("textarea", f"{CATEGORY} near {LOCATION}")
        # press enter
        page.keyboard.press('Enter')
        # change to english
        page.locator("text='Change to English'").click()
        time.sleep(4)
        # click in the "Maps" HTML element
        page.click('.GKS7s')
        time.sleep(4)
        # scrolling
        for i in range(2):
            # tackle the body element
            html = page.inner_html('body')
            # create beautiful soup element
            soup = BeautifulSoup(html, 'html.parser')


            # select items
            categories = soup.select('.hfpxzc')
            last_category_in_page = categories[-1].get('aria-label')
            # scroll to the last item
            last_category_location = page.locator(
                f"text={last_category_in_page}")
            last_category_location.scroll_into_view_if_needed()
            # wait to load contents
            time.sleep(4)


        # get links of all categories after scroll
        links = [item.get('href') for item in soup.select('.hfpxzc')]


        for link in links:
            # go to subject link
            page.goto(link)
            time.sleep(4)
            # load all reviews
            page.locator("text='Reviews'").first.click()
            time.sleep(4)
            # create new soup
            html = page.inner_html('body')
            # create beautiful soup element
            soup = BeautifulSoup(html, 'html.parser')
            # scrape reviews
            reviews = soup.select('.MyEned')
            reviews = [review.find('span').text for review in reviews]
            # print reviews
            for review in reviews:
                print(review)
                print('\n')
Once you run the code it will look like this on your screen.
Conclusion
In the age of information, data is power, and Python equips us with the tools to access that power. With the knowledge you’ve gained from this article, you’re now equipped to scrape Google Maps reviews with ease, transforming raw data into actionable insights. Whether you’re a business owner aiming to monitor your online reputation, a researcher seeking to analyze customer sentiments, or simply a Python enthusiast looking for a practical project, the ability to extract and analyze Google Maps reviews is a valuable skill.
You can also use Selenium but to be honest, I was getting bored with Selenium (of course it’s a great library). Playwright brings flexibility and consumes much fewer resources than selenium does.
I hope you like this tutorial and if you do then please do not forget to share it with your friends and on your social media.
There is a lot of data available on the internet and almost all of that is pretty useful. You can make an analysis based on that data, make better decisions, and even predict changes in the stock market. But there is a gap between this data and your decision-making graphs and that gap can be filled with HTML parsing.
Python HTML Parsing Libraries
If you want to use this data for your personal or business needs then you have to scrape it and clean it. All this data is not human readable therefore you need a mechanism to clean that raw data and make it human readable. This technique is called HTML parsing. Optimal performance, reliability, scalability, security, and ease of management for Python web apps using HTML parsers like Beautiful Soup, lxml, html5lib, and PyQuery hinge on selecting the best Python hosting provider. A reliable host is crucial for the success of your projects, providing the necessary infrastructure and support.
In this blog, we will talk about the best python html parsing libraries available. Many new coders get confused while choosing a suitable parsing library. Python is supported by a very large community and therefore it comes with multiple options for parsing html.
Here are some common criteria and reasons for selecting specific HTML parsing libraries for this blog.
Ease of Use and Readability
Performance and Efficiency
Error Handling and Robustness
Community and Support
Documentation and Learning Resources
Top 4 Python HTML Parsing Libraries
BeautifulSoup
It is the most popular one among all the html parsing libraries. It can help you parse HTML and XML documents with ease. Once you read the documentation you will find it very easy to create parsing trees and extract useful data out of them.
Since it is a third-party package you have to install it using pip in your project environment. You can do it using pip install beautifulsoup4. Let’s understand how we can use it in Python with a small example.
The first step would be to import it into your Python script. Of course, you have to first scrape the data from the target website but for this blog, we are just going to focus on the parsing section. You can refer to web scraping with Python in order to learn more about the web scraping part using the best Python web scraping libraries.
Example
Let’s say we have the following simple HTML document as a string.
<!DOCTYPE html>
<html>
<head>
    <title>Sample HTML Page</title>
</head>
<body>
    <h1>Welcome to BeautifulSoup Example</h1>
    <p>This is a paragraph of text.</p>
    <ul>
        <li>Item 1</li>
        <li>Item 2</li>
        <li>Item 3</li>
    </ul>
</body>
</html>
Here’s a Python code example using BeautifulSoup.
from bs4 import BeautifulSoup

# Sample HTML content
html = """
<!DOCTYPE html>
<html>
<head>
    <title>Sample HTML Page</title>
</head>
<body>
    <h1>Welcome to BeautifulSoup Example</h1>
    <p>This is a paragraph of text.</p>
    <ul>
        <li>Item 1</li>
        <li>Item 2</li>
        <li>Item 3</li>
    </ul>
</body>
</html>
"""

# Create a BeautifulSoup object
soup = BeautifulSoup(html, 'html.parser')

# Accessing Elements
print("Title of the Page:", soup.title.text)  # Access the title element
print("Heading:", soup.h1.text)  # Access the heading element
print("Paragraph Text:", soup.p.text)  # Access the paragraph element's text

# Accessing List Items
ul = soup.ul  # Access the unordered list element
items = ul.find_all('li')  # Find all list items within the ul
print("List Items:")
for item in items:
    print("- " + item.text)
Let me explain the code step by step:
We import the BeautifulSoup class from the bs4 library and create an instance of it by passing our HTML content and the parser to use (in this case, 'html.parser').
We access specific elements in the HTML using the BeautifulSoup object. For example, we access the title, heading (h1), and paragraph (p) elements using the .text attribute to extract their text content.
We access the unordered list (ul) element and then use .find_all('li') to find all list items (li) within it. We iterate through these list items and print their text.
Once you run this code you will get the following output.
Title of the Page: Sample HTML Page
Heading: Welcome to BeautifulSoup Example
Paragraph Text: This is a paragraph of text.
List Items:
- Item 1
- Item 2
- Item 3
You can adapt similar techniques for more complex web scraping and data extraction tasks. If you want to learn more about BeautifulSoup, you should read web scraping with BeautifulSoup.
LXML
LXML is considered to be one of the fastest parsing libraries available. It gets regular updates with the last update released in July of 2023. Using its ElementTree API you can access libxml2 and libxslt toolkits(for parsing HTML & XML) of C language. It has great documentation and community support.
BeautifulSoup also provides support for lxml. You can use it by just mentioning the lxml as your second argument inside your BeautifulSoup constructor.
lxml can parse both HTML and XML documents with high speed and efficiency. It follows standards closely and provides excellent support for XML namespaces, XPath, and CSS selectors.
In my experience, you should always prefer BS4 when dealing with messy HTML and use lxml when you are dealing with XML documents.
Like BeautifulSoup this is a third-party package that needs to be installed before you start using it in your script. You can simply do that by pip install lxml.
Let me explain to you how it can used with a small example.
Example
<bookstore>
  <book>
    <title>Python Programming</title>
    <author>Manthan Koolwal</author>
    <price>36</price>
  </book>
  <book>
    <title>Web Development with Python</title>
    <author>John Smith</author>
    <price>34</price>
  </book>
</bookstore>
Our objective is to extract this text using lxml.
from lxml import etree

# Sample XML content
xml = """
<bookstore>
  <book>
    <title>Python Programming</title>
    <author>Manthan Koolwal</author>
    <price>36</price>
  </book>
  <book>
    <title>Web Development with Python</title>
    <author>John Smith</author>
    <price>34</price>
  </book>
</bookstore>
"""

# Create an ElementTree from the XML
tree = etree.XML(xml)

# Accessing Elements
for book in tree.findall("book"):
    title = book.find("title").text
    author = book.find("author").text
    price = book.find("price").text
    print("Title:", title)
    print("Author:", author)
    print("Price:", price)
    print("---")
Let me explain you above code step by step.
We import the etree module from the lxml library and create an instance of it by passing our XML content.
We access specific elements in the XML using the find() and findall() methods. For example, we find all <book> elements within the <bookstore> using tree.findall("book").
Inside the loop, we access the <title>, <author>, and <price> elements within each <book> element using book.find("element_name").text.
The output will look like this.
Title: Python Programming
Author: Manthan Koolwal
Price: 36
---
Title: Web Development with Python
Author: John Smith
Price: 34
---
HTML5lib is another great contender on this list which works great while parsing the latest HTML5. Of course, you can parse XML as well but mainly it is used for parsing html5.
It can parse documents even when they contain missing or improperly closed tags, making it valuable for web scraping tasks where the quality of HTML varies. html5lib produces a DOM-like tree structure, allowing you to navigate and manipulate the parsed document easily, similar to how you would interact with the Document Object Model (DOM) in a web browser.
Whether you’re working with modern web pages, and HTML5 documents, or need a parsing library capable of handling the latest web standards, html5lib is a reliable choice to consider.
Again this needs to be installed before you start using it. You can simply do it by pip install html5lib. After this step, you can directly import this library inside your Python script.
Example
import html5lib

# Sample HTML5 content
html5 = """
<!DOCTYPE html>
<html>
<head>
    <title>HTML5lib Example</title>
</head>
<body>
    <h1>Welcome to HTML5lib</h1>
    <p>This is a paragraph of text.</p>
    <ul>
        <li>Item 1</li>
        <li>Item 2</li>
        <li>Item 3</li>
    </ul>
</body>
</html>
"""

# Parse the HTML5 document
parser = html5lib.HTMLParser(tree=html5lib.treebuilders.getTreeBuilder("dom"))
tree = parser.parse(html5)

# Accessing Elements
title = tree.find("title").text
heading = tree.find("h1").text
paragraph = tree.find("p").text
list_items = tree.findall("ul/li")

print("Title:", title)
print("Heading:", heading)
print("Paragraph Text:", paragraph)
print("List Items:")
for item in list_items:
    print("- " + item.text)
Explanation of the code:
We import the html5lib library, which provides the HTML5 parsing capabilities we need.
We define the HTML5 content as a string in the html5 variable.
We create an HTML5 parser using html5lib.HTMLParser and specify the tree builder as "dom" to create a Document Object Model (DOM)-like tree structure.
We parse the HTML5 document using the created parser, resulting in a parse tree.
We access specific elements in the parse tree using the find() and findall() methods. For example, we find the <title>, <h1>, <p>, and <ul> elements and their text content.
Once you run this code you will get this.
Title: HTML5lib Example
Heading: Welcome to HTML5lib
Paragraph Text: This is a paragraph of text.
List Items:
- Item 1
- Item 2
- Item 3
You can refer to its documentation if you want to learn more about this library.
Pyquery
With PyQuery you can use jQuery syntax to parse XML documents. So, if you are already familiar with jQuery then pyquery will be a piece of cake for you. Behind the scenes, it is actually using lxml for parsing and manipulation.
Its application is similar to BeautifulSoup and lxml. With PyQuery, you can easily navigate and manipulate documents, select specific elements, extract text or attribute values, and perform various operations on the parsed content.
This library receives regular updates and has growing community support. PyQuery supports CSS selectors, allowing you to select and manipulate elements in a document using familiar CSS selector expressions.
Example
from pyquery import PyQuery as pq

# Sample HTML content
html = """
<html>
  <head>
    <title>PyQuery Example</title>
  </head>
  <body>
    <h1>Welcome to PyQuery</h1>
    <ul>
      <li>Item 1</li>
      <li>Item 2</li>
      <li>Item 3</li>
    </ul>
  </body>
</html>
"""

# Create a PyQuery object
doc = pq(html)

# Accessing Elements
title = doc("title").text()
heading = doc("h1").text()
list_items = doc("ul li")

print("Title:", title)
print("Heading:", heading)
print("List Items:")
for item in list_items:
    print("- " + pq(item).text())
Understand the above code:
We import the PyQuery class from the pyquery library.
We define the HTML content as a string in the html variable.
We create a PyQuery object doc by passing the HTML content.
We use PyQuery’s CSS selector syntax to select specific elements in the document. For example, doc("title") selects the <title> element.
We extract text content from selected elements using the text() method.
Once you run this code you will get this.
Title: PyQuery Example
Heading: Welcome to PyQuery
List Items:
- Item 1
- Item 2
- Item 3
Conclusion
I hope things are pretty clear now. You have multiple options for parsing but if you dig deeper you will realize very few options can be used in production. If you want to mass-scrape some websites then Beautifulsoup should be your go-to choice and if you want to parse XML then lxml should your choice.
Of course, the list does not end here there are other options like requests-html, Scrapy, etc. but the community support received by BeautifulSoup and lxml is next level.
You should also try these libraries on a live website. Scrape some websites and use one of these libraries to parse out the data to make your own conclusion. If you want to crawl a complete website then Scrapy is a great choice. We have also explained web crawling in Python, it’s a great tutorial you should read it.
I hope you like this tutorial and if you do then please do not forget to share it with your friends and on your social media.
Manthan Koolwal
My name is Manthan Koolwal and I am the founder of scrapingdog.com. I love creating scraper and seamless data pipelines.
We often talk about how to make a GET request and fetch crucial data from any website but in this post, we will talk about how we can send a POST request with Python. Web Scraping is not all about a GET request, many times you have to submit some data to the host server in order to retrieve the information.
Send Post Request with Python
But again one thing will remain common in this tutorial too and that is Requests library. As we all know it is a widely used library due to its simplicity and public support on multiple technical fronts. Using this library you can easily interact with any web API, scrape web pages, or send data easily to the host server.
We will start with basic steps and then later we will cover some advanced topics like session management & handling cookies.
How to send a basic POST request?
We can easily make a POST request using .post() method of the requests library. We will be using httpbin.org website for this tutorial.
# import requests package
import requests

# Define the URL
url = "http://httpbin.org/post"


# Send the POST request
response = requests.post(url)
This is the most basic way of sending a POST request.
How to send a POST request with JSON data?
In the last step, we saw how we can make a POST request. But with POST request we have to send some data too. Sending JSON data is common when interacting with APIs that expect data in JSON format. We’ll use the httpbin.org/post URL as our testing endpoint. So, let’s see how we can send data in JSON format.
import requests
import json

# Define the URL
url = "http://httpbin.org/post"

# Define the JSON data you want to send in the POST request
data = {
    "name": "John Doe",
    "email": "[email protected]"
}

# Convert the data dictionary to a JSON string
json_data = json.dumps(data)


# Send the POST request with JSON data
response = requests.post(url, data=json_data)

print(response.text)
We create a dictionary data containing the key-value pairs that we want to send in JSON format.
We use json.dumps(data) to convert the data dictionary into a JSON string. This step is essential because the requests.post() method expects the data to be in the form of a JSON string.
Once you run it you will see this.
How to send headers with POST request?
The above example worked but in real-world scenarios when you will be dealing with commercial APIs this will fail due to the absence of a proper header. You have to tell the host server about the format of the data that you are going to send to their database. This will help them receive the data in the proper manner otherwise many servers will send you a 4xx error.
Here we have used Content-type header whose value is application/json. I have made another change, I think you might have already noticed it. I have used json paramter to pass the JSON-encoded object directly without using the json.dumps() function. This simply the code a little.
Once you run this code you will get the same response as above. You can even read our complete guide on web scraping with Python to get a complete idea of how headers actually function.
How to send FORM data with POST request?
Let’s say you want to scrape something that is behind an auth wall. That auth wall consists of a simple form that expects the correct username and password from you. This can be easily done using POST request. You just need to use the correct content type.
Generally, the value of the content-type header is application/x-www-form-urlencoded while submitting a form.
import requests

# Define the URL of the login endpoint
url = 'https://example.com/login'

# Create a dictionary containing the form data
form_data = {
    'username': 'your_username',
    'password': 'your_password'
}

# Define headers including the "Content-Type" header
headers = {
    'Content-Type': 'application/x-www-form-urlencoded'
}

# Send the POST request with the form data and headers
response = requests.post(url, data=form_data, headers=headers)
In this case, you just have to use the file parameter of the requests. The best part of this you don’t typically set the Content-Type header manually for file uploads. Instead, requests will automatically determine the correct Content-Type based on the file being uploaded.
import requests

# Define the URL where you want to upload the file
url = 'https://example.com/upload'

# Create a dictionary containing the file to upload
files = {
    'file_field_name': ('sample.png', open('path/to/your/file.png', 'rb'))
}

# Send the POST request with the file
response = requests.post(url, files=files)
Session & cookie management with POST request
We have to create a session object that will retain information like cookies and other session-related data. The session object will help with state management.
import requests

# Create a session object
session = requests.Session()

# Define the login URL
login_url = 'https://example.com/login'

# Define the data to be sent in the POST request for login
login_data = {
    'username': 'your_username',
    'password': 'your_password',
}

# Send a POST request to log in
login_response = session.post(login_url, data=login_data)


session.close()
You can even store the cookies in a variable and use it to visit other pages of the website. With that, you can make HTTP GET requests to specific pages to retrieve the data.
After completing the requests, it’s good practice to close the session using session.close() to release any resources associated with it.
Conclusion
By mastering these concepts, you’ve gained the knowledge and skills needed to interact with web services, web APIs, and web applications effectively. Sending POST requests is a fundamental aspect of web development and data retrieval, making this knowledge invaluable in your programming journey.
As you continue to explore Python and web development, you’ll find that sending POST requests opens the door to a wide range of possibilities, from interacting with third-party APIs to building your own web applications. Remember to refer back to this guide whenever you need a refresher or a quick reference on POST requests in Python.
I hope you like this tutorial and if you do then please do not forget to share it with your friends and on your social media.
Manthan Koolwal
My name is Manthan Koolwal and I am the founder of scrapingdog.com. I love creating scraper and seamless data pipelines.
If you are an investor, a trader, an analyst, or just curious about the overall stock market. You’ve probably already stumbled on Google Finance. It provides up-to-date stock quotes from indexes, historical financial data, news, and currency conversion rates.
Web Scraping Google Finance
Knowing how to scrape the Google Finance website, can be advantageous when it comes to:
Data Aggregation: Google Finance hosts data from different sources, minimizing the need to look for data elsewhere.
Sentiment Analysis: The website displays news from several sources. These can be scraped to gather insights about the market’s sentiment.
Market Predictions: It provides historical data and real-time information from several stock market indexes. Resulting in a very effective source for price predictions.
Risk Management: Google Finance minimizes arbitrage, thanks to its accurate and up-to-date data, which is crucial for assessing the risk associated with specific investment strategies.
Web scraping Google Finance can be achieved using Beautiful Soup and Requests Python’s libraries.
Why Beautiful Soup as the scraping tool?
Beautiful Soup is one of the most used web scraping libraries in Python. It comprises extensive documentation, it’s easy to implement and to integrate with other libraries. To use it, you first need to set your Python’s virtual environment, then you can easily install it using the following command.
pip install beautifulsoup4
It is usually used side-by-side with the Requests Python library, which serves as the standard package for making HTTP requests. It generates the HTML instance, from which Beautiful Soup will interact to grab the required information. This library can also be installed via pip.
pip install requests
How to extract information from stocks?
To extract stock information from Google Finance, we first need to understand how to play with the website’s URL to crawl the desired stock. Let’s take for instance the NASDAQ index, which hosts several stocks from where we can grab information. To have access to the symbols of each stock, we can use NASDAQ’s stock screener in this link. Now let’s take META as our target stock. With both the index and stock we can build the first code snippet of our script.
import requests
from bs4 import BeautifulSoup


BASE_URL = "https://www.google.com/finance"
INDEX = "NASDAQ"
SYMBOL = "META"
LANGUAGE = "en"
TARGET_URL = f"{BASE_URL}/quote/{SYMBOL}:{INDEX}?hl={LANGUAGE}"
Now we can use the Requests library to make an HTTP request on the TARGET_URLand create a Beautiful Soup instance to crawl the HTML content.
# make an HTTP request
page = requests.get(TARGET_URL)


# use an HTML parser to grab the content from "page"
soup = BeautifulSoup(page.content, "html.parser")
Before getting into scraping, we first need to tackle the HTML elements by inspecting the web page (TARGET_URL).
The items that describe the stock are represented by the class gyFHrc. Inside each one of these elements, there’s a class that represents the title of the item (Previous close for instance) and the value ($295.89). The first can be grabbed from the mfs7Fc class, and the second from the P6K39crespectively. The complete list of items to be scraped is the following:
Previous Close
Day Range
Year Range
Market Cap
AVG Volume
P/E Ratio
Dividend Yield
Primary Exchange
CEO
Founded
Website
Employees
Let’s now see how we can crawl these items with Python code.
# get the items that describe the stock
items = soup.find_all("div", {"class": "gyFHrc"})


# create a dictionary to store the stock description
stock_description = {}

# iterate over the items and append them to the dictionary
for item in items:
    item_description = item.find("div", {"class": "mfs7Fc"}).text
    item_value = item.find("div", {"class": "P6K39c"}).text
    stock_description[item_description] = item_value


print(stock_description)
The function .find_all() was used to target all the elements containing the class gyFHrc. Unlike .find_all(), the function .find()only retrieves one element. That’s why it is used inside the for loop because in this case, we know that there’s only one mfs7Fcand P6K39cfor each iterable item. The .text()attribute, concatenates all the pieces of text that are inside each element which is the information displayed on the webpage.
The loop in the code snippet above serves to build a dictionary of items that represent the stock. This is a good practice because the dictionary structure can easily be converted to other file formats such as a .json file or a .csv file, depending on the use case.
This is just an example of a simple script, that can be integrated into a trading bot, an application, or a simple dashboard to keep track of your favorite stocks.
Complete Code
You can definitely scrape many more data attributes from the page but for now, the complete code will look somewhat like this.
import requests
from bs4 import BeautifulSoup


BASE_URL = "https://www.google.com/finance"
INDEX = "NASDAQ"
SYMBOL = "META"
LANGUAGE = "en"
TARGET_URL = f"{BASE_URL}/quote/{SYMBOL}:{INDEX}?hl={LANGUAGE}"

# make an HTTP request
page = requests.get(TARGET_URL)


# use an HTML parser to grab the content from "page"
soup = BeautifulSoup(page.content, "html.parser")


# get the items that describe the stock
items = soup.find_all("div", {"class": "gyFHrc"})


# create a dictionary to store the stock description
stock_description = {}


# iterate over the items and append them to the dictionary
for item in items:
    item_description = item.find("div", {"class": "mfs7Fc"}).text
    item_value = item.find("div", {"class": "P6K39c"}).text
    stock_description[item_description] = item_value


print(stock_description)
Limitations while scraping Google Finance
Using the above method you can definitely create a small scraper but this scraper will not continue to supply you with data if you are going to do mass scraping. Google is very sensitive to data crawling and it will ultimately block your IP.
Once your IP is blocked you will not be able to scrape anything and your data pipeline will finally break. Now, how to overcome this issue? Well, there is a very easy solution for this and that is to use a Google Scraping API.
Let’s see how we can use this API to crawl limitless data from Google Finance.
Using Scrapingdog for scraping Google Finance
Once you sign up for this web scraping API you will get your own API key(available on the dashboard). Now, just copy that API key to the below-provided code.
import requests
from bs4 import BeautifulSoup

BASE_URL = "http://api.scrapingdog.com/google/?api_key=YOUR-API-KEY&query=https://www.google.com/finance"
INDEX = "NASDAQ"
SYMBOL = "META"
LANGUAGE = "en"
TARGET_URL = f"{BASE_URL}/quote/{SYMBOL}:{INDEX}?hl={LANGUAGE}"

# make an HTTP request
page = requests.get(TARGET_URL)

# use an HTML parser to grab the content from "page"
soup = BeautifulSoup(page.content, "html.parser")

# get the items that describe the stock
items = soup.find_all("div", {"class": "gyFHrc"})

# create a dictionary to store the stock description
stock_description = {}

# iterate over the items and append them to the dictionary
for item in items:
    item_description = item.find("div", {"class": "mfs7Fc"}).text
    item_value = item.find("div", {"class": "P6K39c"}).text
    stock_description[item_description] = item_value

print(stock_description)
In place of YOUR-API-KEY you have to paste your own API key. One thing you might have noticed is that apart from the BASE_URL nothing has changed in the code. This is the beauty of using the web scraping APIs.
Using this code you can scrape endless Google Finance pages. If you want to crawl this then I would advise you to read web crawling with Python.
Conclusion
With the combination of requests and bs4, we were able to scrape Google Finance. Of course, if the scraper needs to survive then you have to use a proxy scraping APIs.
We have explored the fascinating world of web scraping Google Finance using Python. Throughout this article, we have learned how to harness the power of various Python libraries, such as BeautifulSoup and Requests, to extract valuable financial data from one of the most trusted sources on the internet.
Scraping financial data from Google Finance can be a valuable skill for investors, data analysts, and financial professionals alike. It allows us to access real-time and historical information about stocks, indices, currencies, and more, enabling us to make informed decisions in the world of finance.
I hope you like this tutorial and if you do then please do not forget to share it with your friends and on your social media.
Over the years, the Internet has grown into something tremendous and rather intricate. It’s now a place where an incredible amount of data is being exchanged. People on the Internet create approximately 2.5 quintillion bytes of data per day!
What Are Datacenter Proxies?
With so much data roaming around the Web, it’s become tough to protect and secure sensitive information. Data breaches are expensive, not to mention very costly for businesses and users. The global loss due to cybercrime is predicted to grow to over $10.5 trillion annually by 2025. On this same note, Gartner predicts that 45% of organizations worldwide will be victims of a supply chain attack in the next 2 years.
What can be done?
This is where datacenter proxies enter the picture. This technology is a resource for those who seek more security and safety, as well as businesses that need to secure their digital assets.
And in this post, we’ll tell you all about datacenter proxies and why you should use them for your personal and business security.
What are datacenter proxies
A datacenter proxy is a proxy server that’s hosted in a datacenter. The datacenter proxy will assign IP addresses to datacenter servers unlike tying them to internet service providers and physical locations (like the case with residential proxies).
Simply put, the datacenter proxy server is a computer that routes your internet traffic via a datacenter-based server before it gets the information to the final destination. When you access a website, the other side will see not your IP address, but that of the proxy server.
As a result, your online activity remains untraceable and anonymous and therefore, much safer.
Think of this as sending a letter without your address on the envelope, or asking someone else to send it for you.
Why you should use datacenter proxies
There are plenty of reasons why you should use datacenter proxies. These are:
Compliance
Privacy and security
Speed (increased ability to handle high volumes of traffic)
Cost-effectiveness
Helps in Efficient Web Scraping
Let’s delve into these.
Datacenter proxies and compliance
Today, website owners use proxy servers to keep user data anonymous. These serve as intermediaries between people’s devices and the internet. It allows people to access the pages anonymously, which goes a long way in preserving their privacy.
But, what does this have to do with compliance?
Ever since data privacy laws like the GDPR have become more stringent, there’s been a hysteria among companies that collect data – which makes up the majority of them. GDPR requires that companies have a lawful basis for the collection and processing of data, and they put a special focus on consent.
Under GDPR, companies need to request consent from users for their details to be used for marketing. Content requests can take many forms, some of which you can see in these GDPR opt-in examples. Proxies are great for compliance. They can provide IP anonymization and block third-party cookies, which helps websites collect data and remain compliant at the same time.
Privacy and security
When you use a datacenter proxy server and hide your IP address, as well as some other important information, you are making it a lot harder for third parties to track your activities on the Web. Routing the internet traffic increases both the security and privacy of data.
The next reason why you should be using data center proxies is the strong performance they offer. Keep in mind that these originate in data centers, which makes them very fast and with excellent uptime. You can now find servers with 10Gbps speeds. A data center proxy is one of the fastest types of proxies.
Cost-effectiveness
Datacenter proxies are far less expensive compared to other proxy types. This makes them a mix of reliability, security, and affordability, which is perfect for people and businesses who want to protect the data they use.
Helps in Efficient Web Scraping
Datacenter proxies come in pools, enabling users to rotate IP addresses. This rotation capability means that for every request or series of requests, a different IP address can be used. As a result, web scrapers can access target websites continuously without being restricted or banned, as each request appears to be coming from a different user.
Websites often have rate limits, restricting the number of requests from a single IP within a specific timeframe. With datacenter proxies, you can distribute your requests across multiple IP addresses, ensuring that you don’t hit these limits. This ensures continuous data extraction without any interruptions.
Not only do datacenter proxies offer faster speeds that reduce the time spent scraping, but they can also minimize the risk of getting blocked. Time is money, and by efficiently accessing data without setbacks, the scraping process becomes more economical.
Using datacenter proxies effectively integrates into the web scraping infrastructure, ensuring that businesses and individuals can gather the vast amounts of data they need swiftly and without complications.
IPs in datacenter proxies aren’t in any way connected to ISPs. Based on this, there are 3 main types of datacenter proxies you should know about:
Private Proxies
A private datacenter proxy is a dedicated IP given exclusively to the user by the service provider. In this case, the IPs can only be used on selected domains.
Out of all types of datacenter proxies, these are the most expensive and also the highest-performing proxies. They give you the most privacy and control.
Private proxies are sometimes referred to as dedicated proxies.
Shared proxies
A shared proxy can be used by more than one person at a time. This number cannot exceed 3 users. Shared proxies cost a solid sum, but they perform better than free proxies. They are excellent for simpler web scraping and data extraction tasks. However, these can sometimes be blocked on sites due to their shared nature.
Public Proxies
Public, free, or web proxies are proxies that you can find and use free of charge. They don’t work as well as private and shared proxies but come at no cost. If you plan to use them for data extractions, they have lower success rates. Basically, they are good for basic tasks such as, for instance, changing your location to access a site that’s restricted in your country.
Now, there’s an option that combines these – companies that offer free proxies for a limited time. In this case, you can enjoy the capabilities of the proxies in their paid plan for a limited time, just to give you a peak at what you’d be getting if you paid for the ‘real thing’.
Datacenter proxies vs. other types of proxies
There are different types of proxies that you can use these days, and datacenter is just one of them. Let’s talk a bit about the alternatives.
Residential proxies
One of the most frequently used proxy types is residential proxy. As we mentioned previously, these assign IP addresses to real locations and devices, such as your business or your home. They are more expensive and harder to detect as proxies.
Residential proxies will use all devices that you connect through broadband. They will use personal computers and laptops through residential ISPs.
Another type is a mobile proxy. Mobile proxies assign IP addresses to mobile devices such as your smartphone. They come at a steep price and are usually used to bypass geo-location and similar online restrictions.
Simply put, a mobile proxy is a server that will direct the online traffic through your tablet or smartphone and hide your identity and location. When you try to reach an online service or a website, the phone will send a request to the ISP, and an IP address is assigned. Then, the request is sent to the service or website via the ISP mobile network.
Datacenter proxies are ideal for businesses and individuals who want to boost their online security and privacy. They are:
Dependable
Much more budget-friendly compared to mobile and residential proxies
Have remarkable speed
Can bypass many web-based limitations
Very easy to set up (in comparison, mobile and residential proxies are hard to set up)
Don’t require physical networks or devices
How to choose a datacenter proxy provider
If you’ve decided to invest in a datacenter proxy, know that the reliable ones come at a cost, albeit much lower than other types of proxies. To avoid spending money unnecessarily and making risky mistakes, you should carefully consider your options.
To choose a good datacenter proxy provider, it’s important to know what to look for. Different proxies will support different encryption methods and protocols, so you must consider your needs before you invest.
Here are some factors that we believe will help you make your choice:
Consider the provider’s reputation
Just like with anything else you buy, it’s imperative to know how they perform on the market. Take your time checking feedback from users and ratings on trusted websites.
Search for multiple server locations
A provider can have a trustworthy service, but if they don’t have several server locations, their service will probably be slower. To make sure you get fast data transfers and maximum uptime, search for providers that have more than one – or two server locations.
Check the speed and latency
Ideally, the provider you choose should offer low latency and fast speed. Look for details in terms of response times and bandwidth. This is especially important if you want to use them for high-performance tasks like web scraping.
Proxy pool size
The proxy pool’s size can impact everything, including the speed and reliability of the service. Search for providers with large proxy pools, ones that will offer you many IP addresses at all times.
Ready to choose your datacenter proxy?
In the end, it will all come down to your needs, preferences, and of course, budget. Take your time with this. Even though datacenter proxies can bring you tremendous benefits, remember that this will only work if you choose a reliable provider and the right proxy based on your needs.
Manthan Koolwal
My name is Manthan Koolwal and I am the founder of scrapingdog.com. I love creating scraper and seamless data pipelines.
Web crawling is a technique by which you can automatically navigate through multiple URLs and collect a tremendous amount of data. You can find all the URLs of multiple domains and extract information from them.
This technique is mainly used by search engines like Google, Yahoo, and Bing to rank websites and suggest results to the user based on the query one makes.
In this article, we are going to first understand the main difference between web crawling and web scraping. This will help you create a thin line in your mind between web scraping and web crawling.
Before we dive in and create a full-fledged web crawler I will show you how you can create a small web crawler using requests and BeautifulSoup. This will give you a clear idea of what exactly a web crawler is. Then we will create a production-ready web crawler using Scrapy.
What is web crawling?
Web crawling is an automated bot whose job is to visit multiple URLs on a single website or multiple websites and download content from those pages. Then this data can be used for multiple purposes like price analysis, indexing on search engines, monitoring changes on websites, etc.
It all starts with the seed URL which is the entry point of any web crawler. The web crawler then downloads HTML content from the page by making a GET request. The data downloaded is now parsed using various html parsing libraries to extract the most valuable data from it.
Extracted data might contain links to other pages on the same website. Now, the crawler will make GET requests to these pages as well to repeat the same process that it did with the seed URL. Of course, this process is a recursive process that enables the script to visit every URL on the domain and gather all the information available.
How web crawling is different from web scraping?
Web scraping and web crawling might sound similar but there is a fine line between them which makes them very different.
Web scraping involves making a GET request to just one single page and extracting the data present on the page. It will not look for other URLs available on the page. Of course, web scraping is comparatively fast because it works on a single page only.
In my experience, the combination of requests and BS4 is the best when it comes to downloading and parsing the raw HTML. If you want to learn more about the best libraries for web scraping with Python then check out this guide best Python scraping libraries.
In this section, we will create a small crawler for this website. So, according to the flowchart shown above the crawler will look for links right from the seed URL. The crawler will then go to each link and extract data.
Let’s first download these two libraries in the coding environment.
pip install requests
pip install bs4
We will be using another library urllib.parse but since it is a part of the Python standard library, there is no need for installation.
A basic Python crawler for our target website will look like this.
import requests
from bs4 import BeautifulSoup
from urllib.parse import urljoin

# URL of the website to crawl
base_url = "https://books.toscrape.com/"

# Set to store visited URLs
visited_urls = set()

# List to store URLs to visit next
urls_to_visit = [base_url]

# Function to crawl a page and extract links
def crawl_page(url):
    try:
        response = requests.get(url)
        response.raise_for_status()  # Raise an exception for HTTP errors

        soup = BeautifulSoup(response.content, "html.parser")

        # Extract links and enqueue new URLs
        links = []
        for link in soup.find_all("a", href=True):
            next_url = urljoin(url, link["href"])
            links.append(next_url)

        return links

    except requests.exceptions.RequestException as e:
        print(f"Error crawling {url}: {e}")
        return []

# Crawl the website
while urls_to_visit:
    current_url = urls_to_visit.pop(0)  # Dequeue the first URL

    if current_url in visited_urls:
        continue

    print(f"Crawling: {current_url}")

    new_links = crawl_page(current_url)
    visited_urls.add(current_url)
    urls_to_visit.extend(new_links)

print("Crawling finished.")
It is a very simple code but let me break it down and explain it to you.
We import the required libraries: requests, BeautifulSoup, and urljoin from urllib.parse.
We define the base_url of the website and initialize a set visited_urls to store visited URLs.
We define a urls_to_visit list to store URLs that need to be crawled. We start with the base URL.
We define the crawl_page() function to fetch a web page, parse its HTML content, and extract links from it.
Inside the function, we use requests.get() to fetch the page and BeautifulSoup to parse its content.
We iterate through each <a> tag to extract links, and convert them to absolute URLs using urljoin(), and add them to the links list.
The while loop continues as long as there are URLs in the urls_to_visit list. For each URL, we:
Dequeue the URL and check if it has been visited before.
Call the crawl_page() function to fetch the page and extract links.
Add the current URL to the visited_urls set and enqueue the new links to urls_to_visit.
8. Once the crawling process is complete, we print a message indicating that the process has finished.
To run this code you can type this command on bash. I have named my file crawl.py.
python crawl.py
Once your crawler starts, this will appear on your screen.
This code might give you an idea of how web crawling actually works. However, there are certain limitations and potential disadvantages to this code.
No Parallelism: The code does not utilize parallel processing, meaning that only one request is processed at a time. Parallelizing the crawling process can significantly improve the speed of crawling.
Lack of Error Handling: The code lacks detailed error handling for various scenarios, such as handling specific HTTP errors, connection timeouts, and more. Proper error handling is crucial for robust crawling.
Depth-First Crawling: The code uses a breadth-first approach, but in certain cases, depth-first crawling might be more efficient. This depends on the structure of the website and the goals of the crawling operation. If you want to learn more about BFS and DFS then read this guide. Basically, BFS looks for the shortest path to reach the destination.
In the next section, we are going to create a web crawler using Scrapy which will help us eliminate these limitations.
Web Crawler using Scrapy
Again we are going to use the same site for crawling with Scrapy.
This page has a lot of information like warnings, titles, categories, etc. Our task would be to find links that match a certain pattern. For example, when we click on any of the categories we can see a certain pattern in the URL.
Every URL will have /catalogue, /category and /books. But when we click on a book we only see /catalogue and nothing else.
So, one task would be to instruct our web crawler to find all the links that have this pattern. The web crawler would then follow to find all the available links with /catalogue/category patterns in them. That would be the mission of our web crawler.
In this case, it would be quite trivial because we have a sidebar where all the categories are listed but in a real-world project, you will oftentimes have something like maybe the top 10 categories that you can click and then there are a hundred more categories that you have to find by for example going into a book and then you have another 10 sub-categories of the book present on that book page.
So, you can instruct the crawler to go into all the different book pages to find all the secondary categories and then collect all the pages that are category pages.
This could be the web crawling task and the web scraping task could be to collect titles and prices of the books from each dedicated book page. I hope you got the idea now. Let’s proceed with the coding part!
We will start with downloading Scrapy. It is a web scraping or web crawling framework. It is not just a simple library but an actual framework. Once you download this it will create multiple python files in your folder. You can type the following command in your cmd to install it.
pip install scrapy
Once you install it you can go back to your working directory and run this command.
scrapy startproject learncrawling
You can of course use whatever name you like. I have used learncrawling. Once the project is created you can see that in your chosen directory you have a new directory with the project name inside it.
You will see a bunch of other Python files as well. We will cover some of these files later in this blog. But the most important directory here is the spider’s directory. These are actually the constructs that we use for the web crawling process.
We can create our own custom spiders to define our own crawling process. We are going to create a new Python file inside this.
In this file, we are going to write some code.
from scrapy.spiders import CrawlSpider, Rule
from scrapy.linkextractors import LinkExtractor
from scrapy.spider import CrawlSpider: This line imports the CrawlSpider class from the scrapy.spider module. CrawlSpider is a subclass of the base Spider class provided by Scrapy. It is used to create spider classes specifically designed for crawling websites by following links. Rule is used to define rules for link extraction and following.
from scrapy.linkextractors import LinkExtractor: This line imports the LinkExtractor class from the scrapy.linkextractors module. LinkExtractor is a utility class provided by Scrapy to extract links from web pages based on specified rules and patterns.
Then we want to create a new class which is going to be our custom spider class. I’m going to call this class CrawlingSpider and this is going to inherit from the CrawlSpider class.
from scrapy.spiders import CrawlSpider, Rule
from scrapy.linkextractors import LinkExtractor


class CrawlingSpider(CrawlSpider):
    name = "mycrawler"
    allowed_domains = ["toscrape.com"]
    start_urls = ["https://books.toscrape.com/"]


    rules = (
        Rule(LinkExtractor(allow="catalogue/category")),
    )
name = "mycrawler": This attribute specifies the name of the spider. The name is used to uniquely identify the spider when running Scrapy commands.
allowed_domains = ["toscrape.com"]: This attribute defines a list of domain names that the spider is allowed to crawl. In this case, it specifies that the spider should only crawl within the domain “toscrape.com”.
start_urls = ["https://books.toscrape.com/"]: This attribute provides a list of starting URLs for the spider. The spider will begin crawling from these URLs.
Rule(LinkExtractor(allow="catalogue/category")),: This line defines a rule using the Rule class. It utilizes a LinkExtractor to extract links based on the provided rule. The allow parameter specifies a regular expression pattern that is used to match URLs. In this case, it’s looking for URLs containing the text “catalogue/category”.
Let’s run this crawler and see what happens.
You can run the crawler like this.
scrapy crawl mycrawler
Once it starts running you will see something like this on your bash.
Our crawler is finding all these urls. But what if we want to find links to individual book pages as well and we want to scrape certain information from that?
Now, we will look for certain things in our spiders and we will extract some data from each individual book page. For finding book pages I will define a new rule.
This will find all the URLs with catalogue in it but it will deny the pages with category in them. Then we use a callback function to pass all of our crawled urls. This function will then handle the web scraping part.
What will we scrape?
We are going to scrape:
Title of the book
Price of the book
Availability
Let’s find out their DOM locations one by one.
The title can be seen under the class product_main with h1 tags.
Pricing can be seen under the p tag with class price_color.
Availability can be seen under the p tag with class availability.
Let’s put all this under the code under parse_item() function.
yield { ... }: This line starts a dictionary comprehension enclosed within curly braces. This dictionary will be yielded as the output of the method, effectively passing the extracted data to Scrapy’s output pipeline.
"title": response.css(".product_main h1::text").get(): This line extracts the text content of the <h1> element within the .product_main class using a CSS selector. The ::text pseudo-element is used to select the text content. The .get() method retrieves the extracted text.
"price": response.css(".price_color::text").get(): This line extracts the text content of the element with the .price_color class, similar to the previous line.
"availability": response.css(".availability::text")[1].get().strip(): This line extracts the text content of the third element with the .availability class on the page. [2] indicates that we’re selecting the third matching element (remember that indexing is zero-based). The .get() method retrieves the text content. The strip() function is used to remove the white spaces.
Our spider is now ready and we can run it from our terminal. Once again we are going to use the same command.
scrapy crawl mycrawler
Let’s run it and see the results. I am pretty excited.
Our spider scrapes all the books and goes through all the instances that it can find. It will probably take some time but at the end, you will see all the extracted data. You can even notice the dictionary that is being printed, it contains all the data we wanted to scrape.
What if I want to save this data?
Saving the data in a JSON file
You can save this data into a JSON file very easily. You can do it directly from the bash, no need to make any changes in the code.
scrapy crawl mycrawler -o results.json
This will then take all the scraped information and save it in a JSON file.
We have got the title, price, and availability. You can of course play with it a little and extract the integer from the availability string using regex. But my purpose in this was to explain to you how it can be done fast and smoothly.
Web Crawling with Proxy
One problem you might face in your web crawling journey is you might get blocked from accessing the website. This happens because you might be sending too many requests to the website due to which it might ban your IP. This will put a breakage to your data pipeline.
In order to prevent this you can use proxy services that can handle IP rotations, and retries, and even pass appropriate headers to the website to act like a legit person rather than a data-hungry bot(of course we are).
You can sign up for the free datacenter proxy. You will get 1,000 free credits to run a small crawler. Let’s see how you can integrate this proxy into your Scrapy environment. There are mainly 3 steps involved while integrating your proxy in this.
Define a constant PROXY_SERVER in your crawler_spider.py file.
3. Then the final step would be to make changes in our middlewares.py file. In this file, you will find a class by the name LearncrawlingDownloaderMiddleware. From here we can manipulate the process of request-sending by adding the proxy server.
Here you will find a function process_request() under which you have to add the below line.
Now, every request will go through a proxy and your data pipeline will not get blocked.
Of course, changing just the IP will not help you bypass the anti-scraping wall of any website therefore this proxy also passes custom headers to help you penetrate that wall.
Now, Scrapy has certain limits when it comes to crawling. Let’s say if you are crawling websites like Amazon using using Scrapy then you can scrape around 350 pages per minute(according to my own experiment). That means 50400 pages per day. This speed is not enough if you want to scrape millions of pages in just a few days. I came across this article where the author scraped more than 250 million pages within 40 hours. I would recommend reading this article.
In some cases, you might have to wait to make another request like zoominfo.com. For that, you can use DOWNLOAD_DELAY to give your crawler a little rest. You can read more about it here. This is how you can add this to your code.
class MySpider(scrapy.Spider):
name = 'my_spider'
start_urls = ['https://example.com']
download_delay = 1 # Set the delay to 1 second
Then you can use CONCURRENT_REQUESTS to control the number of requests you want to send at a time. You can read more about it here.
You can also use ROBOTSTXT_OBEY to obey the rules set by the domain owners about data collection. Of course, as a data collector, you should respect their boundaries. You can read more about it here.
Complete Code
There are multiple data points available on this website which can also be scraped. But for now, the complete code for this tutorial will look like this.
//crawling_spider.py
from scrapy.spiders import CrawlSpider, Rule
from scrapy.linkextractors import LinkExtractor
class CrawlingSpider(CrawlSpider):
name = "mycrawler"
allowed_domains = ["toscrape.com"]
start_urls = ["http://books.toscrape.com/"]
rules = (
Rule(LinkExtractor(allow="catalogue/category")),
Rule(LinkExtractor(allow="catalogue", deny="category"), callback="parse_item")
)
def parse_item(self,response):

        yield {
            "title":response.css(".product_main h1::text").get(),
            "price":response.css(".price_color::text").get(),
            "availability":response.css(".availability::text")[1].get().strip()
        }
Conclusion
In this blog, we created a crawler using requests and Scrapy. Both are capable of achieving the target but with Scrapy you can complete the task fast. Scrapy provides you flexibility through which you can crawl endless websites with efficiency. Beginners might find Scrapy a little intimidating but once you get it you will be able to crawl websites very easily.
I hope now you clearly understand the difference between web scraping and web crawling. The parse_item() function is doing web scraping once the URLs are crawled.
I think you are now capable of crawling websites whose data matters. You can start with crawling Amazon and see how it goes. You can start by reading this guide on web scraping Amazon with Python.
I hope you like this tutorial and if you do then please do not forget to share it with your friends and on your social media.
C# Web scraping could be a go-to choice since the language offers a wide range of tools. In this tutorial, we will use this programming language with Selenium. We will be designing a simple web scraper in part 1 and in part 2 we will scrape a dynamic website.
Web Scraping With C#
Web Scraping with Selenium C# (Part-I)
I am going to explain everything with a very simple step-by-step approach. So, first of all, I am going to create a new project.
I have created a demo project by the name of web scraping then we will install the Selenium library. We can do this by clicking the Tools tab and then the NuGet package manager.
Then you can search for selenium and then I will pick the solution and install it.
Now, we also need to download the web driver which you can download from here.
Now, I am going to put it inside the bin folder so that I don’t have to specify a path within the code. I am going to open the folder in File Explorer
bin > debug
And then you can just drag the chromedriver file to the debug folder. We are done with the installation. Now, we will start coding the scraper.
using System;
using System.Collections.Generic;
using System.Linq;
using System.Text;
using System.Threading.Tasks;namespace webscraping
  {
     class Program
     {
        static void Main(string[] args)
        {
           IWebDriver driver = new ChromeDriver();
        }
     }
  }
Basically, when you want to make a controllable browser you just have to create an instance of this webdriver and since I am using the chrome web driver I am going to make a chrome fiber and I am just going to import all the packages.
If I run this code it will basically open a new browser. For this post, we are going to make a Google search scraper.
using System;
using System.Collections.Generic;
using System.Linq;
using System.Text;
using System.Threading.Tasks;namespace webscraping
  {
     class Program
     {
        static void Main(string[] args)
        {
           IWebDriver driver = new ChromeDriver();
           driver.Navigate().GoToUrl("https://www.google.com")
        }
     }
  }
Now, here we are navigating our page to the Google home page.
Our scraper will scrape all those titles, descriptions, links, etc. So, in order to do that, we have to make it a search.
There are many ways by which you can detect this input field like class name, id, or even XPath. Here we are going to use the XPath.
using System;
using System.Collections.Generic;
using System.Linq;
using System.Text;
using System.Threading.Tasks;namespace webscraping
  {
     class Program
     {
        static void Main(string[] args)
        {
           IWebDriver driver = new ChromeDriver();
           driver.Navigate().GoToUrl("https://www.google.com")
           var element = driver.findElement(By.XPath("/html/body/div[1]/div[3]/form/div[1]/div[1]/div[1]/div/div[2]/input"));
        }
     }
  }
Then we have to type a keyword in that input field in order to make some Google searches. We are going to use the SendKeys function for that. Then we are going to submit the query using Submit function.
using System;
using System.Collections.Generic;
using System.Linq;
using System.Text;
using System.Threading.Tasks;namespace webscraping
 {
     class Program
     {
        static void Main(string[] args)
        {
           IWebDriver driver = new ChromeDriver();
           driver.Navigate().GoToUrl("https://www.google.com")
           var element = driver.findElement(By.XPath("/html/body/div[1]/div[3]/form/div[1]/div[1]/div[1]/div/div[2]/input"));
           element.SendKeys("webshop")
           element.Submit();
        }
     }
 }
So, our c# web scraper will be able to search for keyword webshop. Now, we will expand this scraper so that it will be able to scrape titles and other data from Google searches.
When we visit the above page we can do the same thing which we did with the input field, find some random element, and copy the XPath. Now, the problem in doing this is when you do it using XPath it will be for a very specific element and it might not apply to other elements.
Now, if you will notice the XPath of two random titles, then you will find out that they are in a sequence and we can use a for loop to scrape those titles.
So, now we can do something like this to find the elements using those XPaths.
using System;
using System.Collections.Generic;
using System.Linq;
using System.Text;
using System.Threading.Tasks;namespace webscraping
 {
     class Program
     {
        static void Main(string[] args)
        {
           IWebDriver driver = new ChromeDriver();
           driver.Navigate().GoToUrl("https://www.google.com")
           var element = driver.findElement(By.XPath("/html/body/div[1]/div[3]/form/div[1]/div[1]/div[1]/div/div[2]/input"));
           element.SendKeys("webshop")
           element.Submit();
           var titles = driver.FindElements(By.XPath("//*[@id=”rso”]/div[1]/div/div[1]/div[1]/a/h3"))
        }
     }
 }
Now, we can loop through these elements and each one of these will be contained within this collection of elements.
using System;
using System.Collections.Generic;
using System.Linq;
using System.Text;
using System.Threading.Tasks;namespace webscraping
 {
     class Program
     {
        static void Main(string[] args)
        {
           IWebDriver driver = new ChromeDriver();
           driver.Navigate().GoToUrl("https://www.google.com")
           var element = driver.findElement(By.XPath("/html/body/div[1]/div[3]/form/div[1]/div[1]/div[1]/div/div[2]/input"));
           element.SendKeys("webshop")
           element.Submit();
           var titles = driver.FindElements(By.XPath("//*[@id=”rso”]/div[1]/div/div[1]/div[1]/a/h3"))
           foreach(var title in titles)
             {
               Console.WriteLine(title.Text)
             }

        }
     }
 }
When we run this we get this.
As you can notice we have managed to scrape all the titles and it has ignored the ads. This is one way you can do it. I did it using XPath but you can also do it using class names. Let’s try it with the class name as well.
When you inspect any element you will find the class name.
Our target class name is LC20lb, you can notice that in the above image. We will use Javascript to scrape it.
using System;
using System.Collections.Generic;
using System.Linq;
using System.Text;
using System.Threading.Tasks;namespace webscraping
{
class Program
{
static void Main(string[] args)
{
IWebDriver driver = new ChromeDriver();
driver.Navigate().GoToUrl("https://www.google.com")
var element = driver.findElement(By.XPath("/html/body/div[1]/div[3]/form/div[1]/div[1]/div[1]/div/div[2]/input"));
element.SendKeys("webshop")
element.Submit();
var titles = driver.FindElements(By.ClassName("LC20lb"))
foreach(var title in titles)
{
Console.WriteLine(title.Text)
}
}
}
}
When we run this code, we get the same results.
Web Scraping with Selenium C# (Part-II)
In this section, we are going to learn to create a very simple c# web scraper that can scrape content that gets loaded dynamically. We are going to scrape this page.
This purple area is actually dynamic content and that basically means that if I click on one of these menu items, the purple area will be changed to some other element but the navbar will remain the same.
So, we are going to scrape these collections. So, let’s get started.
First, we will scrape content names. Content name is stored under class card__contents.
There are 19 elements with class card__contents. The first step is to grab all those elements using the FindElements function and create a list.
using System;
using System.Collections.Generic;
using System.Linq;
using System.Text;
using System.Threading.Tasks;namespace webscraping
{
class Program
{
static void Main(string[] args)
{
driver = new ChromeDriver();
driver.Navigate().GoToUrl("https://www.reverbnation.com")
var collections = driver.FindElements(By.ClassName("card__contents"));
}
}
}
Now, we will loop through that list to get the text out of those elements.
using System;
using System.Collections.Generic;
using System.Linq;
using System.Text;
using System.Threading.Tasks;namespace webscraping
{
class Program
{
static void Main(string[] args)
{
driver = new ChromeDriver();
driver.Navigate().GoToUrl("https://www.reverbnation.com")
var collections = driver.FindElements(By.ClassName("card__contents"));
foreach(var collection in collections)
Console.WriteLine(collection.Text)
}
}
}
We are going to open the home page and then we will click on the discover button on the top of the page before finding any card contents.
using System;
using System.Collections.Generic;
using System.Linq;
using System.Text;
using System.Threading.Tasks;namespace webscraping
{
class Program
{
static void Main(string[] args)
{
driver = new ChromeDriver();
driver.Navigate().GoToUrl("https://www.reverbnation.com") var discoverButton = driver.FindElement(By.Id("menu-item-discover"));
discoverButton.Click(); var collections = driver.FindElements(By.ClassName("card__contents"));
foreach(var collection in collections)
Console.WriteLine(collection.Text)
}
}
}
Now, actually, we have a C# web scraper right here but since it’s dynamic content we will not really get any elements or collection names. So, I am going to just run it and show you.
You can see nothing gets printed out.
Now, we will make a new method. Obviously, if you were making a real web scraper you would probably want to have another class, and then instead of a static class or static method like I did, you would have a method on the web scraper class.
using System;
using System.Collections.Generic;
using System.Linq;
using System.Text;
using System.Threading.Tasks;namespace webscraping
{
class Program
{
static void Main(string[] args)
{
driver = new ChromeDriver();
driver.Navigate().GoToUrl("https://www.reverbnation.com")var discoverButton = driver.FindElement(By.Id("menu-item-discover"));
discoverButton.Click();var collections = driver.FindElements(By.ClassName("card__contents"));
foreach(var collection in collections)
Console.WriteLine(collection.Text)
}
static IReadOnlyCollection<IWebElement> FindElements(By by)
{
return driver.FindElements(by);
}
}
}
Now, if I run this function, it will work the same as the above code (collections variable).
What I wanted to do is basically to run a loop and then for each iteration, it will try and find the elements by using this and if the collections contain elements then it will return them otherwise it will try again and again.
using System;
using System.Collections.Generic;
using System.Linq;
using System.Text;
using System.Threading.Tasks;namespace webscraping
{
class Program
{
static void Main(string[] args)
{
driver = new ChromeDriver();
driver.Navigate().GoToUrl("https://www.reverbnation.com")var discoverButton = driver.FindElement(By.Id("menu-item-discover"));
discoverButton.Click();var collections = FindElements(By.ClassName("card__contents"));
foreach(var collection in collections)
Console.WriteLine(collection.Text)
}
static IReadOnlyCollection<IWebElement> FindElements(By by)
{
while(true)
{
var elements = driver.FindElements(by);
if(elements.Count > 0)
return elements;
Thread.Sleep(10);
}
}
}
}
You can see we are only returning when it contains elements otherwise it will not return anything. We have also created a thread that goes to sleep after 10 milliseconds.
Now, we can test our script once again.
So, it works and it also prints out other stuff but that doesn’t really matter. Now, the problem is we have a while true and while that might be okay in some cases in other cases it might not be.
Take for example you have a proxy, it runs, and all of a sudden it doesn’t work anymore. So, it’s just going to look in this while loop forever, or maybe the document doesn’t even contain these elements.
We have to put a limit on this to avoid problems. Hence, I am just going to use a stopwatch.
using System;
using System.Collections.Generic;
using System.Linq;
using System.Text;
using System.Threading.Tasks;namespace webscraping
{
class Program
{
static void Main(string[] args)
{
driver = new ChromeDriver();
driver.Navigate().GoToUrl("https://www.reverbnation.com")var discoverButton = driver.FindElement(By.Id("menu-item-discover"));
discoverButton.Click();var collections = FindElements(By.ClassName("card__contents"));
foreach(var collection in collections)
Console.WriteLine(collection.Text)
}
static IReadOnlyCollection<IWebElement> FindElements(By by)
{
Stopwatch w = Stopwatch.StartNew();
while(w.ElapsedMilliseconds < 10 * 1000)
{
var elements = driver.FindElements(by);
if(elements.Count > 0)
return elements;
Thread.Sleep(10);
}
return null;
}
}
}
So, if the elapsed time is more significant than 10 seconds our scraper will return null. Let’s test it.
Now, what if we have a very slow internet connection? For that, we will use ChomeNetworkConditions.
Slow Internet Connection
using System;
using System.Collections.Generic;
using System.Linq;
using System.Text;
using System.Threading.Tasks;namespace webscraping
{
class Program
{
static void Main(string[] args)
{
ChromeNetworkConditions conditions = new ChromeNetworkConditions();
conditions.DownloadThroughput = 25 * 1000;
conditions.UploadThroughput = 10 * 1000;
conditions.Latency = TimeSpan.From.Milliseconds(1); driver = new ChromeDriver();
driver.Navigate().GoToUrl("https://www.reverbnation.com")var discoverButton = driver.FindElement(By.Id("menu-item-discover"));
discoverButton.Click();var collections = FindElements(By.ClassName("card__contents"));
foreach(var collection in collections)
Console.WriteLine(collection.Text)
}
static IReadOnlyCollection<IWebElement> FindElements(By by)
{
Stopwatch w = Stopwatch.StartNew();
while(w.ElapsedMilliseconds < 10 * 1000)
{
var elements = driver.FindElements(by);
if(elements.Count > 0)
return elements;
Thread.Sleep(10);
}
return null;
}
}
}
Since we have saved the chrome driver as a web driver so I’m just going to make the driver as ChromeDriver.
using System;
using System.Collections.Generic;
using System.Linq;
using System.Text;
using System.Threading.Tasks;namespace webscraping
{
class Program
{
static void Main(string[] args)
{
ChromeNetworkConditions conditions = new ChromeNetworkConditions();
conditions.DownloadThroughput = 25 * 1000;
conditions.UploadThroughput = 10 * 1000;
conditions.Latency = TimeSpan.From.Milliseconds(1);driver = new ChromeDriver();
(driver as ChromeDriver).NetworkConditions = conditions; driver.Navigate().GoToUrl("https://www.reverbnation.com")var discoverButton =
driver.FindElement(By.Id("menu-item-discover"));
discoverButton.Click();var collections = FindElements(By.ClassName("card__contents"));
foreach(var collection in collections)
Console.WriteLine(collection.Text)
Console.WriteLine("done");
}
static IReadOnlyCollection<IWebElement> FindElements(By by)
{
Stopwatch w = Stopwatch.StartNew();
while(w.ElapsedMilliseconds < 10 * 1000)
{
var elements = driver.FindElements(by);
if(elements.Count > 0)
return elements;
Thread.Sleep(10);
}
return new ReadOnlyCollection<IWebElement>(new List<IWebElement>);
}
}
}
So, now it should actually simulate a slow connection. This is a very important part of creating a web scraper where we learned about handling slow connections as well.
Since you often want to have many proxies running and maybe some of the proxies could be slow.
Conclusion
In this tutorial, we created a very simple web scraper using selenium and C#. First, we created a scraper where we make a Google search and then scrape those results. In the second section, we focused on dynamic web scraping and slow connection proxies. Now, you are trained to create commercial scrapers for your new business,
Although C# web scraper can get most of your work done, some websites that have anti-scraping measures could block your IP after some time when you deploy your scrapers.
To scale the process of web scraping, and managing proxy/IP rotation I would recommend you use an API for web scraping API.
Feel free to message us to inquire about anything you need clarification on web scraping with C#.
Additional Resources
Here are a few additional resources that you may find helpful during your web scraping journey:
Yes, C# and Python are good for web scrapping. You need to select the right programming language as per your expertise level. You can also learn web scraping with python easily.
Scraping Zillow is one of the easiest ways to analyze the market of properties in your desired area. According to similarweb Zillow has an estimated user visits of 348.4 Million per month.
Over time this number is definitely going to increase and more and more people will be registering their properties over it. Hence, scraping Zillow can get you some valuable insights.
Well, then how to scrape Zillow? There are various other methods you can use for Zillow scraping. However, for the sake of this blog, we will be using Python.
Let’s Get Started!!
How to Scrape Zillow
Why Scrape Zillow Data using Python?
Python has many libraries for web scraping that are easy to use and well-documented. That doesn’t mean that other programming languages have bad documentation or anything else, but Python gives you more flexibility.
With all this, you get great community support and tons of forums to solve any issue you might face in your Python journey.
When you are extracting data from the web then starting with Python will help you collect data in no time and it will also boost your confidence especially if you are a beginner.
Some of the best Python forums that I suggest are:
Here we have created a folder and then installed all the required libraries.
import requests
from bs4 import BeautifulSoup
target_url = "https://www.zillow.com/homes/for_sale/Brooklyn,-New-York,-NY_rb/"
headers={"User-Agent":"Mozilla/5.0 (Windows NT 10.0; Win64; x64) AppleWebKit/537.36 (KHTML, like Gecko) Chrome/105.0.0.0 Safari/537.36"}
resp = requests.get(target_url, headers=headers)
print(resp.status_code)
All of these properties are part of a list that has a class name StyledPropertyCardDataWrapper-c11n-8–69–2__sc-1omp4c3–0 KzAaq property-card-data. You can find that by inspecting the element.
There are almost 40 listed properties from Zillow here on this page. We will use BS4 to extract our target data. Let’s check where our target elements are stored.
Checking Target Elements in Zillow.com
As you can see the price tag is stored in the class StyledPropertyCardDataArea-c11n-8–69–2__sc-yipmu-0 kJFQQX. Similarly, you will find that size is stored in StyledPropertyCardDataArea-c11n-8–69–2__sc-yipmu-0 bKFUMJ and address is stored in StyledPropertyCardDataArea-c11n-8–69–2__sc-yipmu-0 dZxoFm property-card-link.
Now we have all the ingredients to make our scraper ready.
import requests
from bs4 import BeautifulSoup
l=list()
obj={}
target_url = “https://www.zillow.com/homes/for_sale/Brooklyn,-New-York,-NY_rb/"
headers={“User-Agent”:”Mozilla/5.0 (Windows NT 10.0; Win64; x64) AppleWebKit/537.36 (KHTML, like Gecko) Chrome/105.0.0.0 Safari/537.36",”Accept-Language”:”en-US,en;q=0.9",”Accept”:”text/html,application/xhtml+xml,application/xml;q=0.9,image/avif,image/webp,image/apng,*/*;q=0.8,application/signed-exchange;v=b3;q=0.9",”Accept-Encoding”:”gzip, deflate, br”,”upgrade-insecure-requests”:”1"}
resp = requests.get(target_url, headers=headers).text
soup = BeautifulSoup(resp,’html.parser’)
properties = soup.find_all(“div”,{“class”:”StyledPropertyCardDataWrapper-c11n-8–69–2__sc-1omp4c3–0 KzAaq property-card-data”})
for x in range(0,len(properties)):
try:
obj[“pricing”]=properties[x].find(“div”,{“class”:”StyledPropertyCardDataArea-c11n-8–69–2__sc-yipmu-0 kJFQQX”}).text
except:
obj[“pricing”]=None
try:
obj[“size”]=properties[x].find(“div”,{“class”:”StyledPropertyCardDataArea-c11n-8–69–2__sc-yipmu-0 bKFUMJ”}).text
except:
obj[“size”]=None
try:
obj[“address”]=properties[x].find(“a”,{“class”:”StyledPropertyCardDataArea-c11n-8–69–2__sc-yipmu-0 dZxoFm property-card-link”}).text
except:
obj[“address”]=None
l.append(obj)
obj={}
print(l)
We have also declared headers like User-Agent, Accept-Encoding, Accept, Accept-Language, and upgrade-insecure-requests to act like a normal browser while hitting Zillow. And this would be the case with any good real estate website.
As I said before they will ultimately identify some suspicious activity and will block you in no time.
To web scrape Zillow at the scale I would suggest you use Scrapingdog’s Web Scraper API which will help scrape property information from Zillow at scale without wasting time on captchas and other data blocks.
We ran a for loop to reach every property stored in our Zillow properties list. Then we use the find function of BS4 to find our target elements.
After finding it we store it in an object and finally push it to a list.
Once you print it you will get this result.
You will notice that you only got 9 results out of 40. Why so?
The answer is that Zillow web scraping can only be done with JS rendering. We will get to that in a while but before that, we will scrape Zillow by changing page numbers.
As you can see there are 5610 listings and on each page, you have 40 properties so according to that we can say there are 140 pages in total. But for learning purposes, we are just going to run our loop for ten pages.
import requests
from bs4 import BeautifulSoup
l=list()
obj={}
headers={"User-Agent":"Mozilla/5.0 (Windows NT 10.0; Win64; x64) AppleWebKit/537.36 (KHTML, like Gecko) Chrome/105.0.0.0 Safari/537.36","Accept-Language":"en-US,en;q=0.9","Accept":"text/html,application/xhtml+xml,application/xml;q=0.9,image/avif,image/webp,image/apng,*/*;q=0.8,application/signed-exchange;v=b3;q=0.9","Accept-Encoding":"gzip, deflate, br","upgrade-insecure-requests":"1"}
for page in range(1,11):
resp = requests.get("https://www.zillow.com/homes/for_sale/Brooklyn,-New-York,-NY_rb/{}_p/".format(page), headers=headers).text
soup = BeautifulSoup(resp,'html.parser')
properties = soup.find_all("div",{"class":"StyledPropertyCardDataWrapper-c11n-8-69-2__sc-1omp4c3-0 KzAaq property-card-data"})
for x in range(0,len(properties)):
try:
obj["pricing"]=properties[x].find("div",{"class":"StyledPropertyCardDataArea-c11n-8-69-2__sc-yipmu-0 kJFQQX"}).text
except:
obj["pricing"]=None
try:
obj["size"]=properties[x].find("div",{"class":"StyledPropertyCardDataArea-c11n-8-69-2__sc-yipmu-0 bKFUMJ"}).text
except:
obj["size"]=None
try:
obj["address"]=properties[x].find("a",{"class":"StyledPropertyCardDataArea-c11n-8-69-2__sc-yipmu-0 dZxoFm property-card-link"}).text
except:
obj["address"]=None
l.append(obj)
obj={}
print(l)
We created a for loop to change our URL every time our scraper is done with the last page. This helps us to iterate over all the pages smoothly.
JS rendering
In this section, we are going to scrape Zillow data with JS rendering. We are going to load the website in a browser and then extract the data we need.
We are doing this because Zillow takes multiple API calls to load the website. We will use the Selenium web driver to implement this task. Let us install it first.
>> pip install selenium
Now, import all the libraries inside your file and code with me step by step.
from bs4 import BeautifulSoup
from selenium import webdriver
import time
Now, to use selenium you need a chrome driver. You can install that from here. Install the same version as your Chrome browser. I am using 105 so I have installed 105.
Now, we will declare the path where our chrome driver is located.
Here, webdriver is asked to use a chrome driver which is located at path PATH. Then .get() function is used to open the target URL in the chrome browser.
Property Page on Zillow
Since we have to scroll down to load the website completely we are going to find HTML elements on this page.
html = driver.find_element_by_tag_name('html')
html.send_keys(Keys.END)
Here we have used .send_keys() to simulate a PAGE_DOWN key press. It is normally used to scroll down the page.
Then we are going to wait for about 5 seconds to load the website completely. After that extract the page source code using .page_source method of the selenium driver.
Then finally close the driver. If you don’t close it then it will consume more CPU resources.
soup=BeautifulSoup(resp,'html.parser')
properties = soup.find_all("div",{"class":"StyledPropertyCardDataWrapper-c11n-8-69-2__sc-1omp4c3-0 KzAaq property-card-data"})
for x in range(0,len(properties)):
try:
obj["pricing"]=properties[x].find("div",{"class":"StyledPropertyCardDataArea-c11n-8-69-2__sc-yipmu-0 kJFQQX"}).text
except:
obj["pricing"]=None
try:
obj["size"]=properties[x].find("div",{"class":"StyledPropertyCardDataArea-c11n-8-69-2__sc-yipmu-0 bKFUMJ"}).text
except:
obj["size"]=None
try:
obj["address"]=properties[x].find("a",{"class":"StyledPropertyCardDataArea-c11n-8-69-2__sc-yipmu-0 dZxoFm property-card-link"}).text
except:
obj["address"]=None
l.append(obj)
obj={}
print(l)
Then we used the same BS4 code from our last section to extract the data we need.
You will get all the property data listed on our target page. As you can see the difference between a normal HTTP request and JS rendering. JS rendering helps us in loading the complete website.
Advantages of JS rendering
Loads the complete website before scraping.
Fewer chances of getting caught by any bot-detection technology available on the website.
Disadvantages of JS rendering
It is a time-consuming process. Some websites might even take a minute to load.
Consumes a lot of CPU resources. It would be best if you had a large infrastructure to scrape websites at scale with JS rendering.
Complete Code
from bs4 import BeautifulSoup
from selenium import webdriver
import time
PATH = 'C:\Program Files (x86)\chromedriver.exe'
l=list()
obj={}
target_url = "https://www.zillow.com/homes/for_sale/Brooklyn,-New-York,-NY_rb/"
driver=webdriver.Chrome(PATH)
driver.get(target_url)
html = driver.find_element_by_tag_name('html')
html.send_keys(Keys.END)
time.sleep(5)
resp = driver.page_source
driver.close()
soup=BeautifulSoup(resp,'html.parser')
properties = soup.find_all("div",{"class":"StyledPropertyCardDataWrapper-c11n-8-69-2__sc-1omp4c3-0 KzAaq property-card-data"})
for x in range(0,len(properties)):
try:
obj["pricing"]=properties[x].find("div",{"class":"StyledPropertyCardDataArea-c11n-8-69-2__sc-yipmu-0 kJFQQX"}).text
except:
obj["pricing"]=None
try:
obj["size"]=properties[x].find("div",{"class":"StyledPropertyCardDataArea-c11n-8-69-2__sc-yipmu-0 bKFUMJ"}).text
except:
obj["size"]=None
try:
obj["address"]=properties[x].find("a",{"class":"StyledPropertyCardDataArea-c11n-8-69-2__sc-yipmu-0 dZxoFm property-card-link"}).text
except:
obj["address"]=None
l.append(obj)
obj={}
print(l)
How to use Scrapingdog for scraping Zillow?
As discussed above, Zillow loves to throw captchas like anything while extracting data from it.
In order to avoid this situation need a Zillow data Scraper that can handle proxies and headless browsers all at once. Here we are using Scrapingdog as the external web scraper to extract data from Zillow without getting blocked.
We will signup for a free pack. The free pack will have 1000 API credits which are enough for testing.
Scrapingdog HomePage
Once you signup you will be redirected to your dashboard where you can find your API Key at the top. API key helps to identify the user. You need this while making the GET request to Scrapingdog.
Advantages of Using Scrapingdog:
You don’t need to install selenium or any external web driver to load the website.
No proxy management.
No other external server.
Everything will be managed by Scrapingdog all you need to do is a simple GET request to the API. For making the GET request we will use the requests library of Python. Let’s see what it looks like.
from bs4 import BeautifulSoup
import requests
# from selenium import webdriver
# import time
# PATH = 'C:\Program Files (x86)\chromedriver.exe'
l=list()
obj={}
target_url = "https://api.scrapingdog.com/scrape?api_key=Your-API-Key&url=https://www.zillow.com/homes/for_sale/Brooklyn,-New-York,-NY_rb/&dynamic=false"
resp=requests.get(target_url)
soup=BeautifulSoup(resp.text,'html.parser')
properties = soup.find_all("div",{"class":"StyledPropertyCardDataWrapper-c11n-8-69-2__sc-1omp4c3-0 KzAaq property-card-data"})
for x in range(0,len(properties)):
try:
obj["pricing"]=properties[x].find("div",{"class":"StyledPropertyCardDataArea-c11n-8-69-2__sc-yipmu-0 kJFQQX"}).text
except:
obj["pricing"]=None
try:
obj["size"]=properties[x].find("div",{"class":"StyledPropertyCardDataArea-c11n-8-69-2__sc-yipmu-0 bKFUMJ"}).text
except:
obj["size"]=None
try:
obj["address"]=properties[x].find("a",{"class":"StyledPropertyCardDataArea-c11n-8-69-2__sc-yipmu-0 dZxoFm property-card-link"}).text
except:
obj["address"]=None
l.append(obj)
obj={}
print(l)
We have removed Selenium because we no longer need that. Do not forget to replace “Your-API-KEY” section with your own API key.
You can find your key on your dashboard as shown below.
API key in Scrapingdog Dashboard
This code will provide you with an unbreakable data stream. Apart from this the rest of the code will remain the same.
Just like this Scrapingdog can be used for scraping any website without getting BLOCKED.
Note: – Also, recently we have made a dedicated Zillow Scraper API, that lets you extract parsed Zillow data.
Forget about getting blocked while scraping Zillow
Try out Scrapingdog’s Zillow Scraper API & Scrape Unlimited Zillow Listings
Conclusion
In this post, we built a Zillow scraper using Python & learned how to extract real estate data. Also, we saw how Scrapingdog can help scale this process.
We learned the main difference between normal HTTP requests and JS rendering while web scraping Zillow with Python.
I have also created a list below of famous real-estate websites to help you identify which website needs JS rendering and which does not.
Need for JS rendering for real estate websites
I hope you liked this post. If you liked it please share it on social media platforms.
If you think I have left some topics then please do let me know.
Scrapingdog has a dedicated Zillow Scraper API for extracting data from Zillow at scale and has a faster response rate compared to other APIs available. Check it out & give it a spin to see if it meets your business needs.
You get 1000 GET requests/month in the free plan. However, in the $30 Lite Plan, we offer 4000 Zillow Credits. So, try the free plan first and upgrade it if it suits your need. Check out the dedicated Zillow Scraper API here!
In this article, we are going to look out at different JavaScript HTML Parsing Libraries to parse important data from HTML. Usually, this step is carried out when you write a web scraper for any website, and in the next step, you parse the data.
JavaScript Parsing Libraries
We are going to test the 4 best HTML parsers in JavaScript. First, we are going to download a page using any HTTP client and then use these libraries to parse the data. At the end of this tutorial, you will be able to make a clear choice for your next web scraping project as to which JavaScript parsing library you can use.
Scraping a Page
The first step would be to download the HTML code of any website. For this tutorial, we are going to use this page.
We are going to use unirest library for downloading data from the target page. First, let’s download this library in our coding environment.
npm i unirest
Once this is done now we can write the code to download the HTML data. The code is pretty simple and straightforward.
const unirest = require('unirest');
async function scraper(scraping_url){
let res;
try{
res = await unirest.get(scraping_url)
return {body:res.body,status:200}
}catch(err){
return {body:'Something went wrong',status:400}
}
}
scraper('https://books.toscrape.com/').then((res) => {
console.log(res.body)
}).catch((err) => {
console.log(err)
})
Let me explain this code to you in step by step method.
const unirest = require('unirest');: This line imports the unirest library, which is a simplified HTTP client for making requests to web servers.
async function scraper(scraping_url) { ... }: This is an async function named scraper that takes a single parameter, scraping_url, which represents the URL to be scraped.
let res;: This initializes a variable res that will be used to store the response from the HTTP request.
try { ... } catch (err) { ... }: This is a try-catch block that wraps the code responsible for making the HTTP request. res = await unirest.get(scraping_url): This line makes an asynchronous HTTP GET request to the specified scraping_url using the unirest library. The await keyword is used to wait for the response before proceeding. The response is stored in the res variable.
return {body: res.body, status: 200}: If the HTTP request is successful (no errors are thrown), this line returns an object containing the response body (res.body) and an HTTP status code (status) of 200 (indicating success).
return {body: 'Something went wrong', status: 400}: If an error is caught during the HTTP request (inside the catch block), this line returns an object with a generic error message ('Something went wrong') and an HTTP status code of 400 (indicating a client error).
scraper('https://books.toscrape.com/')...: This line calls the scraper function with the URL 'https://books.toscrape.com/' and then uses the .then() and .catch() methods to handle the result or any errors. .then((res) => { console.log(res.body) }):
If the promise returned by the scraper function is fulfilled (resolved successfully), this callback function will be executed. It logs the response body to the console. .catch((err) => { console.log(err) }): If the promise is rejected (an error occurs), this callback function will be executed. It logs the error message to the console.
This is the point where parsing techniques will be used to extract important data from the downloaded data.
JavaScript HTML Parsers
Let’s first decide what exactly we are going to extract and then we are going to use and test different JavaScript parsing libraries for the same.
We are going to scrape:
Name of the book
Price of the book
What JavaScript HTML Parsing Libraries We are Going to Cover?
Cheerio
Parse5
htmlparser2
DOMParser
Cheerio
Cheerio is by far the most popular library when it comes to HTML parsing in JavaScript. If you are familiar with jquery then it becomes extremely simple to use this library.
Since it is a III party library you have to install it before you start using it.
npm install cheerio
Let’s now parse book titles and their prices using Cheerio.
This code uses Unirest to make an HTTP GET request to the given URL and fetches the HTML content of the page. Then, Cheerio is used to parse the HTML and extract the book titles and prices using appropriate CSS selectors. The extracted data is stored in an array of objects, each representing a book with its title and price. Finally, the code prints out the extracted book data.
You can read web scraping with nodejs to understand how Cheerio can be used for scraping valuable data from the internet.
Advantages
Since this JavaScript parsing library runs at the backend it becomes comparatively faster than the solutions that are built for browser use.
It supports CSS selectors.
Error handling is quite easy in Cheerio.
Disadvantages
Developers who are not familiar with jQuery might experience a steep learning curve.
I just found this one single disadvantage of using Cheerio which I also had to go through because I was not familiar with jQuery. Once you learn how it works you will never look for another alternate for parsing.
HTMLparser2
HTMLparser2 is another popular choice by javaScript developers for parsing HTML and XML documents. Also, do not get confused by its name, it’s a totally separate project from htmlparser.
This is how you can install it.
npm i htmlparser2
Let’s use this JavaScript library to parse the data.
const unirest = require('unirest');
const htmlparser = require('htmlparser2');
const url = 'https://books.toscrape.com/';
unirest.get(url).end(response => {
if (response.error) {
console.error('Error:', response.error);
return;
}
const books = [];
let currentBook = {}; // To store the current book being processed
const parser = new htmlparser.Parser({
onopentag(name, attributes) {
if (name === 'h3' && attributes.class === 'product-title') {
currentBook = {};
}
if (name === 'p' && attributes.class === 'price_color') {
parser._tag = 'price'; // Set a flag for price parsing
}
},
ontext(text) {
if (parser._tag === 'h3') {
currentBook.title = text.trim();
}
if (parser._tag === 'price') {
currentBook.price = text.trim();
}
},
onclosetag(name) {
if (name === 'h3') {
books.push(currentBook);
currentBook = {}; // Reset currentBook for the next book
}
if (name === 'p') {
parser._tag = ''; // Reset the price flag
}
}
}, { decodeEntities: true });
parser.write(response.body);
parser.end();
console.log('Books:');
books.forEach((book, index) => {
console.log(`${index + 1}. Title: ${book.title}, Price: ${book.price}`);
});
});
This library might be new for many readers so let me explain the code.
Unirest and htmlparser2 were imported.
Target URL was set for making the HTTP request.
Created an empty array books to store information about each book. We also initialize an empty object currentBook to temporarily store data about the book currently being processed.
We create a new instance of htmlparser2.Parser, which allows us to define event handlers for different HTML elements encountered during parsing.
When an opening HTML tag is encountered, we check if it’s an <h3> tag with the class “product-title”. If so, we reset currentBook to prepare for storing data about the new book. If it’s a <p> tag with the class “price_color”, we set a flag (parser._tag = 'price') to indicate that we’re currently processing the price.
When text content inside an element is encountered, we check if we’re currently processing an <h3> tag (indicating the book title) or if we’re processing a price. Depending on the context, we store the text content in the appropriate property of currentBook.
When a closing HTML tag is encountered, we check if it’s an <h3> tag. If it is, we push the data in currentBook into the books array, and then reset currentBook to prepare for the next book. If it’s a closing <p> tag, we reset the parser._tag flag to indicate that we’re no longer processing the price.
We use parser.write(response.body) to start the parsing process using the HTML content from the response. After parsing is complete, we call parser.end() to finalize the process.
Finally, we loop through the books array and print out the extracted book titles and prices.
Advantages
This JavaScript library can parse large HTML documents without loading them into the memory chunk by chunk.
It comes with cross-browser compatibility.
This library allows you to define your own event handlers and logic, making it highly customizable for your parsing needs.
Disadvantages
It could be a little challenging for someone who is new to scraping.
No methods for DOM manipulation.
Parse5
Parse5 works on both backend as well as on browsers. It is extremely fast and can parse both HTML and XML documents with ease. Even documents with HTML5 can be parsed accurately with parse5.
You can even use parse5 with cheerio and jsdom for more complex parsing job.
You can convert a parsed HTML document back to an HTML string. This can help you create new HTML content.
It is memory efficient because it does not load the entire HTML document at once for parsing.
It has great community support which makes this library fast and robust.
Disadvantages
The documentation is very confusing. When you open this page you will find the name of the methods. Now, if you are new you will be lost and might end up finding an alternate library.
DOMParser
This is a browser built-in parser for HTML and XML. Almost all browsers support this parser. JavaScript developers love this parser due to its high community support.
Let’s write a code to parse the title of the book and the price using DOMParser.
// Create a new DOMParser instance
const parser = new DOMParser();
const unirest = require('unirest');
async function scraper(scraping_url){
let res;
try{
res = await unirest.get(scraping_url)
return {body:res.body,status:200}
}catch(err){
return {body:'Something went wrong',status:400}
}
}
scraper('https://books.toscrape.com/').then((res) => {
console.log(res.body)
// Sample HTML content (you can fetch this using AJAX or any other method)
const htmlContent = res.body
// Parse the HTML content
const doc = parser.parseFromString(htmlContent, "text/html");
// Extract book titles and prices
const bookElements = doc.querySelectorAll(".product_pod");
const books = [];
bookElements.forEach((bookElement) => {
const title = bookElement.querySelector("h3 > a").getAttribute("title");
const price = bookElement.querySelector(".price_color").textContent;
books.push({ title, price });
});
// Print the extracted book titles and prices
books.forEach((book, index) => {
console.log(`Book ${index + 1}:`);
console.log(`Title: ${book.title}`);
console.log(`Price: ${book.price}`);
console.log("----------------------");
});
}).catch((err) => {
console.log(err)
})
Advantages
This JavaScript library has a built-in feature, no need to download any external package for using this.
You can even create a new DOM using DOMparser. Of course, some major changes would be needed in the code.
It comes with cross-browser compatibility.
Disadvantages
If the HTML document is too large then this will consume a lot of memory. This might slow down your server and API performance.
Error handling is not robust compared to other third-party libraries like Cheerio.
Conclusion
There are many options for you to choose from but to be honest, only a few will work when you dig a little deeper. My personal favorite is Cheerio and I have been using this for like four years now.
In this article, I tried to present all the positives and negatives of the top parsing libraries which I am sure will help you figure out the best one.
Of course, there are more than just four libraries but I think these four are the best ones.
You are advised to use a Web Scraper API while scraping any website. This API can also be integrated with these libraries very easily.
I hope you like this little tutorial and if you do then please do not forget to share it with your friends and on your social media.
Linkedin is a large network of professional people. It connects around 900M people around the globe. This is a place where people post about their work experience, company culture, current market trends, etc. Linkedin can also be used for generating leads for your business. You can find prospects who might be interested in your product.
Scrape LinkedIn Profiles using Python
Scraping Linkedin profiles has multiple applications. In this blog, we are going to learn how we can scrape LinkedIn profiles with Python. Later I will explain how Scrapingdog’s Linkedin Scraper can help you scrape millions of profiles on a daily basis.
Setting up The Prerequisites for Scraping LinkedIn Profiles using Python
I hope you have already installed Python 3.x on your machine. If not then you can download it from here.
Then create a folder in which you will keep the Python script and inside this folder create a Python file.
mkdir linkedin
I am creating a Python file by the name scrapeprofile.py inside this folder.
Before we start writing the code for scraping Linkedin I would advise you to always focus on scraping public Linkedin Profiles rather than scraping the private ones. If you want to learn more about legal issues involved while scraping Linkedin then do read this article.
Well, now we can proceed with scraping Linkedin. Let me first list down the number of methods we have through which we can scrape Linkedin.
Scraping Linkedin profiles with the cookies of a registered user- This is an illegal process since you are using private cookies to get into their system.
Scraping profiles with cookies of a public page- This is completely legal.
We are going to use the II method. Of course, this method has its own limitation and I will later explain to you how you can bypass this limitation.
Let’s first collect cookies by opening a public profile. You can get cookies by opening the Chrome dev tools.
Collecting Cookies by Opening This LinkedIn Profile
This Python code performs a GET request to the URL “https://www.linkedin.com/in/schylerrichards“ with custom headers, including a specific set of cookies. The response status code is printed to the console.
Let’s break down the code step by step:
Import the requests library: This code requires the requests library to make HTTP requests.
Define the URL and Cookie String: The url variable contains the URL of the page to be scraped. The cookie_strings variable contains the cookie we copied earlier from a public Linkedin profile.
Define the Headers: The headers dictionary contains various request headers that are sent along with the GET request. These headers include 'accept', 'Connection', 'accept-encoding', 'Referer', 'accept-language', and 'user-agent'. Additionally, the 'Cookie' header is set to the cookie_strings variable to include the specified cookies in the request.
Make the GET Request: The code uses requests.get(url, headers=headers) to make the GET request to the given URL with the custom headers.
Print the Response Status Code: The status code of the response is printed to the console using response.status_code. This status code indicates the success or failure of the GET request.
Once you run this code you will get a 200 status code.
Let’s try to scrape another profile. Once again if you run the code you will see a 200 status code.
At this stage, I bet your adrenaline is rushing and you are feeling like you have created the best LinkedIn scraper but hey this is just an illusion and this scraper is going to fall flat after just a few profiles have been scraped. From here two things are going to happen.
Your IP will be banned.
Your cookies will expire.
Once this happens, Linkedin will redirect all of your requests to an authentication page.
LinkedIn Sign-Up Window
Linkedin is very protective of user privacy and due to this, your data pipeline will stop. But there is a solution through which you can scrape millions of Linkedin profiles without getting blocked.
Scrapingdog’s Linkedin Profile Scraper API For Blockage-Free Data Extraction
Scrapingdog offers a dedicated scraper for scraping Linkedin profiles. Of course, it is a paid API but it offers generous free 1000 credits for you to test the service before you commit to the paid subscription.
Once you run this code you will get a JSON response.
Right from the prospect’s name to his work experience, everything has been scraped and served to you in a JSON format. Now you can use it anywhere you like. Like this, you can scrape company profiles as well and the result be in the same JSON format.
What exactly do you get from Scrapingdog’s LinkedIn Profile Scraper API?
The following data points will be part of the JSON response.
Name
Profile pictures
Work Experience
Volunteering work
Languages he/she might know
Recommendations made by other Linkedin users
Education
Activities on Linkedin
Number of followers and connections
What he/she likes
And many more data points.
Many users regularly scrape millions of profiles every month using this API. You can ask for more free credits if you are seriously considering scraping millions of LinkedIn profiles. You can read this guide to better understand the functionality of this API or watch the video below.
LinkedIn Individual & Company Profile Scraper
Conclusion
In this article, I explained to you how you can scrape LinkedIn profiles using Python. I also showed you a way to bypass the LinkedIn auth wall (I know it is paid).
LinkedIn Scrapers are quite in demand in 2024. LinkedIn has the largest pool of corporates available today. So obviously, you can find many people on this platform who could have the same interests as yours. But websites like LinkedIn can serve you with data that can be used for selling goods and products.
Best LinkedIn Scrapers (APIs)
LinkedIn has more than 800 million active users where people share their work experience, skills, and achievements daily. If you scrape and use this data wisely then you can generate a lot of leads for your business. Of course, this data can also be used for other purposes like finding the right candidate for the job or maybe enriching your own CRM.
In this article, we will talk about the best LinkedIn scrapers in the market. Using these scrapers you can scrape Linkedin at scale.
Advantages of using LinkedIn Scrapers Instead of Collecting Data Manually
You will always stay anonymous. On each request, a new IP will be used to scrape a page. Your IP will always be hidden.
The pricing will be less as compared to the official API.
You can get parsed JSON as the output.
3rd Party APIs can be customized according to demands.
24*7 support is available.
Challenges of Scraping LinkedIn at Scale
If you have researched enough, you must by now know that there are tools with which you can scrape a few hundred profiles/jobs without any problem. These tools either use your LinkedIn Profile/LinkedIn Sales Navigator which makes them limited in terms of their abilities to extract data.
The main problem arises when you scrape LinkedIn at scale. We have discussed some of the challenges of scraping LinkedIn at Scale.
Legal and Ethical Issues:
User Agreement Violation: LinkedIn’s terms of service prohibit the scraping of their website. Engaging in this activity can result in legal action against the perpetrators.
Privacy Concerns: Extracting user data without consent violates privacy norms and can lead to severe repercussions.
Technical Challenges:
Rate Limits: LinkedIn monitors and restricts frequent and massive data requests. An IP address can be temporarily banned if it makes too many requests in a short period.
Dynamic Content Loading: LinkedIn uses AJAX and infinite scrolling to load content dynamically. Traditional scraping methods often fail to capture this kind of content.
Complex Website Structure: LinkedIn’s DOM structure is intricate, and elements might not have consistent class or ID names. This can make the scraping process unstable.
Captchas: LinkedIn employs captchas to deter automated bots, making scraping even more challenging.
Cookies and Sessions: Managing sessions and cookies is necessary to mimic a real user browsing pattern and avoid detection.
Maintenance Issues:
Frequent Changes: LinkedIn, like other modern web platforms, frequently changes its user interface and underlying code. This means scrapers need constant updating to remain functional.
Data Quality: Ensuring the scraped data’s accuracy, relevancy, and completeness can be challenging, especially at scale.
Infrastructure and Costs:
Large-scale Scraping: Scraping at scale requires a distributed system, proxy networks, and cloud infrastructure, increasing the complexity and costs.
Data Storage: Storing vast amounts of scraped data efficiently and securely is another challenge.
Continuous Monitoring: Even if you successfully scrape data, LinkedIn monitors for suspicious activities and can block accounts or IP addresses.
Advantages of using LinkedIn Scrapers Instead of Collecting Data Manually
You will always stay anonymous. On each request, a new IP will be used to scrape a page. Your IP will always be hidden.
The pricing will be less as compared to the official API.
You can get parsed JSON as the output.
3rd Party APIs can be customized according to demands.
24*7 support is available.
5 Best LinkedIn Scrapers [In 2024]
We will be judging these LinkedIn lead Scraper APIs based on 5 attributes.
Scalability means how many pages you can scrape in a day.
Pricing of the API. What is the cost of one API call?
Developer-friendly refers to the ease with which a software engineer can use the service.
Stability refers to how much load a service can handle or for how long the service is in the market.
Data Quality refers to how old is the data.
Scrapingdog’s LinkedIn Scraper API
Scrapingdog LinkedIn Scraper API
Scrapingdog offers a simple and easy-to-use LinkedIn Scraper API. This API can be used to scrape either a person’s profile or a company profile from Linkedin. Other than this Scrapingdog offers LinkedIn Jobs scraper to scrape job data from this platform.
Scalability
Well, you can scrape around 1 million profiles from Scrapingdog’s LinkedIn Scraping API be it for profile or jobs.
Pricing
The enterprise pack will cost $1k per month and you can scrape 110k profiles. Each profile will cost $0.009.
Developer Friendly
The documentation is self-explanatory and the user can test the API directly from the dashboard without setting up any coding environment.
Stability
Scrapingdog has been in the market for like 4 years now and has more than 200 users which proves its stability in scraping LinkedIn at scale.
Data Quality
They will scrape fresh data always.
Here’s a video that demonstrates how you can use the API to scrape data at scale.
Scrape LinkedIn Profiles at Scale Using Scrapingdog’s LinkedIn Profile Scraper API
Brightdata LinkedIn Scraper
Brightdata LinkedIn Scraper
Brightdata, along with its large proxy network also provides LinkedIn Scrapers.
Scalability
Their scalability is great but the error rate might go up due to disturbances in their proxy pool. Bright data goes down frequently.
Pricing
Their solution could be a little expensive. The per-profile cost is around $0.05.
Developer Friendly
The whole documentation is quite easy to read and there are request builders which can help you get started quickly.
Stability
No doubt Brightdata has the biggest proxy pool in the market but they frequently go down sometimes. But their overall their infrastructure is quite solid.
Phantombuster is another Linkedin scraper provider. Recently they have changed their messaging from web scraping services to lead generation services.
Scalability
Using Phantombuster you can only scrape 80 profiles in a day that too with your own credentials and cookies. This will lead to the blocking of your account. It cannot be used for mass scraping.
Pricing
Pricing is not clear for this service on their website.
Developer Friendly
No documentation is available on the website.
Stability
They are simply using your cookies to scrape the LinkedIn profile. This service is not at all stable because, after 50 profiles, LinkedIn will block your account and the cookies will no longer remain valid.
Data Quality
You will get fresh data.
People Data Labs
People Data Labs
PDL provides data enrichment technology. You can use their APIs to find valuable insights for any prospect.
Scalability
PDL is designed for small projects. You cannot scrape thousands of profiles with it in a short time frame. So, the scalability is not great.
Pricing
It will cost you $0.28 per profile. This makes them very very costly.
Developer Friendly
The documentation is nice which makes them developer-friendly.
Stability
If you are ok with old data then it is stable otherwise stability is out of the park if you need live fresh data.
Data Quality
The data you get will be from an old database because they don’t scrape it fresh. They have data sources which they renew after some interval of time.
Coresignal
Coresignal
Coresignal is another great LinkedIn scraper. You can scrape a person’s profile as well as the company profile.
Scalability
They provide data from a purchased database. So, you cannot scrape live profiles. If you want to scrape live data then you will have data from the web except from Linkedin. So, this is not scalable.
Pricing
Their minimum pack will cost $800 but the number of credits you will get is not clear on the pricing page.
Developer Friendly
There is no documentation available on their website which makes this service difficult to use.
Stability
They have a large database of companies as well as people. This service is stable for someone who is ok with stale data, but not recommended for anyone who needs fresh data.
Data Quality
The data you get will be from an old database.
Final Verdict
We have compiled the aforementioned report considering various factors. This report is the result of a comprehensive analysis of each API. Although they may appear similar at first glance, further testing reveals that only a small number of APIs (one or two) are stable and suitable for production purposes.
Therefore, it is essential to evaluate the options based on your specific requirements and choose the most appropriate one from the given list.
Web Scraping Glassdoor can provide you with some insights like what salary should one expect when applying for a job.
Employers can do Glassdoor scraping to improve their hiring strategy by comparing data with their competition. The use cases for web scraping Glassdoor are endless and here in this article, we will extract data from jobs.
Web Scraping Glassdoor
In this article, we are going to use Python & design a glassdoor scraper. At the end of this tutorial, you will be able to save this data in a CSV file too.
What You Need To Scrape Glassdoor
For this article, we will need python 3.x, and I am assuming that you have already installed it on your machine. Along with this, we have to download III party libraries likeBeautifulSoup, Selenium, and achromium driver.
Here is how you will install them
pip install selenium
pip install beautifulsoup4
Along with this, you will have to create a dedicated folder where you will keep the script file. Also, create a python file inside that folder. I am going to name it glassdoor.py
mkdir glass
What Job Details Will We Scrape from Glassdoor?
It is always recommended to decide what data are you going to scrape before even writing a single line of code. As you can see in the above image, we are going to scrape four items from each posted job.
Data Which We Will Be Scraping From Glassdoor
Name of the Company
Job Title
Location
Salary
First, we are going to extract the raw HTML using Selenium from the website and then we are going to use .find() and .find_all() methods of BS4 to parse this data out of the raw HTML.
Chromium will be used in coordination with Selenium to load the website.
Let’s Start Scraping Glassdoor Job Data
Before we start we are going to run a small test to check if our setup works or not.
from bs4 import BeautifulSoup
from selenium import webdriver
import time
PATH = 'C:\Program Files (x86)\chromedriver.exe'
l=list()
o={}
target_url = "https://www.glassdoor.com/Job/new-york-python-jobs-SRCH_IL.0,8_IC1132348_KO9,15.htm?clickSource=searchBox"
driver=webdriver.Chrome(PATH)
driver.get(target_url)
driver.maximize_window()
time.sleep(2)
resp = driver.page_source
driver.close()
Now, let me explain to you what we have done here step by step.
We have imported the libraries that were installed earlier in this article.
Then we have declared PATH where our chromium driver is installed.
An empty list and an empty object to store job data are also declared.
target_url holds the target page URL of glassdoor.
Then we created an instance using.Chromemethod.
Using.get()method we are trying to connect with the target webpage. Chromium will load this page.
Using.maximize_window()we are increasing the size of the chrome window to its maximum size.
Then we are using.sleep()method to wait before we close down the chrome instance. This will help us to load the website completely.
Then using.page_source we are collecting all the raw HTML of the page.
Then finally we are closing down the chromium instance using the.close()method provided by the Selenium API.
Once you run this code, it should open a chrome instance, load the page and then close the browser. If this too happens with your script then we can move ahead. Our main setup is ready.
One thing you will notice is that all these jobs are under ul tag with class hover p-0 my-0 css-7ry9k1 exy0tjh5. So, we have to find this class first. We will use .find() method of BS4 to find this tag inside our DOM.
Using .find() method we are searching for the ul tag and then using .find_all() method we are searching for all the li tags inside the ul tag.
Now, we can use a for loop to access all the 30 jobs available on the page.
Sometimes Glassdoorwill show you a page with no jobs. All you have to do is clear the cookies and try again.
Now, let’s find the location of each target element, one by one.
Inspecting the name of the company in source code
As you can see the name of the company can be found under the div tag with class d-flex justify-content-between align-items-start. Let’s parse it out from the raw HTML using BS4.
for job in allJobs:
try:
o["name-of-company"]=job.find("div",{"class":"d-flex justify-content-between align-items-start"}).text
except:
o["name-of-company"]=None
l.append(o)
o={}
Now let’s find the name of the job.
Inspecting the name of the job in source code
You can find this tag in a tag with the class jobLink css-1rd3saf eigr9kq2. Let’s use the same technique to find this.
In the end, we have pushed the object o inside the list l. Then we declared the object o empty.
Once you run and print the list l, you will get these results.
You will get the name of the company, the name of the job, the location, and the salary in a list.
Let’s save this data to a CSV file
For saving this data to a CSV file all we have to do is install pandas. This is just a two-line code and we will be able to create a CSV file and store this data in that file.
First, let’s install pandas.
pip install pandas
Then import this into our main script glassdoor.py file.
import pandas as pd
Now using DataFrame method we are going to convert our list l into a row and column format. Then using .to_csv() method we are going to convert a DataFrame to a CSV file.
You can add these two lines once your list l is ready with all the data. Once the program is executed you will get a CSV file by the name jobs.csv in your root folder.
Isn’t that simple? You were able to scrape and save the data to a CSV file in no time.
Complete Code
You can make more changes to scrape a little more information. But for now, the complete code will look like this.
As you can see there is no common pattern in the above URLs apart from this part —https://www.glassdoor.com/Job/new-york-python-jobs-SRCH_IL.0,8_IC1132348_KO9,15. But this is not helpful if you want to scrape other pages. So, the only solution is to use the .click() method provided by the Selenium API. Using .click() method we are going to click the next button by scrolling down.
First, scroll and then click.
So, this is how you are going to scroll down the page of any Glassdoor page.
With .find_element_by_xpath() we are finding the column where all the jobs are stored.
Once you scroll down this element you have to find the button and click it.
You have to find it using the same method of selenium .find_element_by_xpath(). And finally, you have to use .click() method to click it. This will take you to the next page.
Now, you have to use it in a loop to extract all the jobs from the particular location. I know it is a bit lengthy process, but unfortunately, this is the only way to scrape Glassdoor.
But while scraping Glassdoor might limit your search and restrict your IP. In this case, you have to use a Web Scraping API. Let’s see how you can avoid getting blocked with a Web Scraper API like Scrapingdog.
Avoid Getting Blocked While Scraping Glassdoor at Scale with Scrapingdog
You have to sign up from here for the free account to start using it. It will take just 10 seconds to get you started with Scrapingdog. In a free account, Scrapingdog offers 1000 free API calls.
Scrapingdog HomePage
Once you sign up, you will be redirected to your dashboard. The dashboard will look somewhat like this.
Scrapingdog Dashboard
You have to use your own API key.
Now, you can paste your target Glassdoor target page link to the left and then select JS Rendering as No. After this click on Copy Code from the right. Now use this API in your python script to scrape Glassdoor.
You will notice the code will remain somewhat the same as above. We just have to change one thing and that is our target URL.
As you can see we have replaced the target URL of Glassdoor with the API URL of Scrapingdog. You have to use your own API Key in order to successfully run this script.
With this script, you will be able to scrape Glassdoor with a lightning-fast speed that too without getting blocked.
Forget about getting blocked while scraping the Web
Try out Scrapingdog Web Scraping API with thousands of proxy servers and an entire headless Chrome cluster
Yes, It is legal to scrape Glassdoor as long as you are extracting publically available data. Glassdoor, however, will prevent scraping its data by anti-scraping measures & hence it is advised to use a Web Scraping API for seamless data extraction.
Conclusion
In this post, we learned to scrape Glassdoor and store the data in a CSV file. We later discovered a way to scrape all the pages for any given location. Now, you can obviously create your own logic and scrape Glassdoor but this was a pretty straightforward way to scrape it.
Of course, I would recommend a Web Scraping API if you are planning to scrape it at scale. With a normal script without proxy rotation, you will be blocked in no time and your data pipeline will be stuck. For scraping millions of such postings you can always use Scrapingdog.
I hope you like this little tutorial and if you do then please do not forget to share it with your friends and on your social media.
Additional Resources
Here are a few additional resources that you may find helpful during your web scraping journey:
In this post, we are going to learn the concept of Xpath Python for scraping web pages. I will also show you some special conditions in which we might actually need this particular concept because it might help us save a lot of effort and time.
So, this is what we are going to do in this particular tutorial. Let’s get started without any delay.
Web Scraping using XPath Python
What is Xpath
Let’s talk a bit about Xpath first. So, Xpath stands for XML path language which is actually a query language for selecting nodes from an XML document.
Now, if you do not know about XML documents then this article covers everything for you. XML stands for Extensible Markup Language which is a bit like your hypertext markup language which is HTML but there is a very distinct difference between the two.
HTML has a predefined set of tags that have a special meaning for example you have a body tag or you have a head tag or a paragraph tag. So, all these tags have a special meaning to your browser, right? But for XML there is no such thing.
In fact, you can give any name to your tags and they do not have any special meaning there. So, the design goal of XML documents is that they emphasize simplicity, generality, and usability across the internet.
That’s why you can use any name for your tags and nowadays XML is generally used for the transfer of data from one web service to another. So, that is another main use of XML.
Coming back to Xpath, well it is a query language for XML documents and the special thing to note here is that it is used for selecting nodes.
Now, you might be thinking what are these nodes or this node terminal, right? Well, you can think of any XML document or even any HTML document like a tree.
Now, why I am saying that is because if you try to see this particular XML document you have a tag called “Movie Database” in which you have multiple movie tags then in each movie you have a title tag, year tag, directed by tag, and so on.
So, in this way, we are creating a nested structure, and if you try to visualize a tree we can. We have a movie database tag in which we can have multiple movies in each movie we have a title, year, etc. Similarly, in the cast tag we have actors with different tags for first name and last name.
So, this nesting of the tags allows you to visualize the XML or HTML documents like trees. That’s why we have the concept of nodes in the trees. So, all these tag elements are the nodes of your tree. Similarly, HTML can be visualized and then parsed like a tree.
For parsing, we can use libraries like Beautifulsoup. So, HTML documents or XML documents can be visualized like a tree, and XML parts in a text can be used for querying and selecting some particular nodes which follow the pattern specified by the XPath syntax to select some particular nodes.
This is the concept behind Xpath and now let me show you some examples so that we can understand Xpath syntax a bit.
Example
We are not going to go into much detail about the Xpath syntax itself because in this video our main aim is to learn how to use Xpath for web scraping.
So, let’s say I have an XML document in which this is the code. I have a bookstore tag at the root in which I have multiple book tags and inside that, I have title and price tags. You can find this Xpath tester on this website. This is where I am testing this XML and Xpath expression.
Now, if I type “/” in that then it means I want to search from the root of your tree and I will write bookstore. So, what it will do is it will search from the root for the bookstore. So, now if I click TEST XPATH I will get this.
This is the complete bookstore. Now, let’s say in the bookstore I want to get all the books that we have. So, for that, you will do this.
And then I will get this result. I got all the books inside the bookstore.
Now, let’s say you want to get only that book whose ID is 2. So, you will just put a square bracket, and inside that, you will pass ‘@id=”2”’.
When you use @ with some attribute then you are referring to a particular attribute inside your book tag in this case and you are saying hey! find all those book tags whose ID is 2. When we run it we get this.
Look at this, we are getting only that book whose ID is 2. Now, let’s say I want to get the price of that book whose ID is 2. For that, I will simply do this.
And in response, I get this.
So, this is how Xpath works. Now, if you want to learn more about Xpath syntax then you can just visit w3schools for more details. Other than that this is all we need to know in order to create a web scraper using it.
Why Learn Xpath
XPath is a crucial skill when it comes to extracting data from web pages. It is more versatile than CSS selectors, as it allows for referencing parent elements, navigating the DOM in any direction, and matching text within HTML elements.
While entire books have been written on the subject, this article serves as an introduction to XPath and provides practical examples for using it in web scraping projects.
Let’s Web Scrape with Xpath
For example purposes only I am going to go with this webpage which is a Wikipedia page. I was going through this page a few hours ago when I thought of using it for showing you the Xpath demo.
So, on this page, there is a table of feature films from the Marvel Cinematic Universe.
So, our target is to get the list of all the links to the Wikipedia page of these films. As you can see in the first column, there is a list of all the films. For Iron Man, it is actually a link to the Wikipedia page of Iron Man 2008.
So, I want this link. Similarly, I want to get the links to The Incredible Hulk, Thor, etc. Basically, I need all the links available in the first column only.
Now, I know I can use BeautifulSoup for that, right? But there is an even more compact and easier way to do the same thing by using the concept of Xpath.
Let’s start by inspecting elements. You can open it by Ctrl+Shift+I on our target Wikipedia web page. Once done you will have to go to the target element. Our target element is Iron Man and when I inspect it I get this.
On the right, you can see the HTML code of our target element. Now, I want to search for this element in my complete HTML tree. So, for that, you need to right-click on the HTML code and then go to copy and then copy Xpath.
We have copied the Xpath of our target element. This is the Xpath of our target element Iron man — //*[@id=”mw-content-text”]/div[1]/table[2]/tbody/tr[3]/th/i/a
Let me explain this Xpath to you.
Double slash means that you do not want to start from the root node, you want to start from any particular position in the tree.
* means find any tag whose ID is mw-content-textand in that tag go to the first div then go to its second table body because we have used 2 over there inside the brackets.
After entering the table go inside the third row of that table then go to its th and then to iand then finally a
You can even confirm this in the above image. So, this is the complete Xpath syntax that we have here for that particular element.
The Xpath is unique for each element in your tree. So, now I want to find all such elements. For that, we will search for a generic Xpath. Let us first see how we can search by Xpath on the chrome inspector. By pressing ctrl+F you will get an input field where you can search for any Xpath. So, let me just paste my Xpath here and see what happens.
This is what I get when I paste my Xpath. Now, let me replace tr[3] the third row with the fourth-row tr[4], and then see what happens.
Now, we are getting The Incredible Hulk. So, this row number is our variable. Similarly, if I place 5 inside tr[5] then we will get Iron Man 2 and this will continue until the last film in the column. In this way, we are getting all the elements that we actually need if we just keep on changing the index value of the tr row.
Now, let me show you the power of XPath. We can just replace this index integer with an asterisk *and this will accept any value. Since it can accept any value then we can extract all our values from our target elements.
As you can see we are getting 23 such elements. You can go through all of them one by one by just clicking a downward button. Finally, we have managed to create a single search expression or a generic expression which is giving me 23 search results and all of them are from the first column of the table. This Xpath query can find any element in one go.
This is the power of Xpath which can be used for searching particular patterns inside the HTML. This is wherein Xpath comes in handy when you have a special pattern of different elements in your HTML document then you can think of using the Xpath instead of using the old BeautifulSoup.
I said old BeautifulSoup because it does not support the concept of Xpath. So, we will have to use something different.
Now, let’s see how we can use Xpath with Python for web scraping.
Xpath with Python
We will use lxml library to create a web scraper because as I said earlier beautifulSoup does not support Xpath. It is a third-party library that can help you to pass HTML documents or any kind of XML document and then you can search any node in it using the Xpath syntax. Let’s begin!
First, create a folder and install this library
mkdir scraper<br>pip install lxml
Once that is done, create a scraper.py file inside your folder scraper and start coding with me.
from lxml import html<br>import requests
We have imported the requests library to request because we have to get the HTML data of that web page as well.
Now, if you will run it you will get 200 code which means we have successfully scraped our target URL.
Now, let’s create a parse tree for our HTML document.
tree = html.fromstring(resp.content)
html.fromstring is a function that takes your HTML content and creates a tree out of it and it will return you the root of that tree. Now, if you print the tree you will get this <Element html at 0x1e18439ff10>. So, it says we have got html elements at some position and as you know html tag is the root of any HTML document.
Now, I want to search certain elements using Xpath. We have already discovered the Xpath earlier in this article. Our Xpath is //*[@id=”mw-content-text”]/div[1]/table[2]/tbody/tr[*]/th/i/a
elements = tree.xpath(‘//*[@id=”mw-content-text”]/div[1]/table[2]/tbody/tr[*]/th/i/a’)
We have passed our Xpath inside the tree function. Do remember to use single or triple quotes while pasting your Xpath because Python will give you an error for double quotes because our Xpath already has them.
Let’s print and run it and see what happens.
On running the code we get all the elements which are matching with this particular Xpath. Due to *, we are getting all the available elements within that column. Now, if you will try to print the 0th element.
elements[0]
you will get this <Element a at 0x1eaed41c220>. As, you can see it is an anchor tag. Now, to get the data this tag contains we have two options.
.text will return the text the contains. Like elements[0].text will return Iron Man
.attrib will return a dictionary {‘href’: ‘/wiki/Iron_Man_(2008_film)’, ‘title’: ‘Iron Man (2008 film)’}. This will provide you with the href tag which is actually the link and that is what we need. We also get the title of the movie.
But since we only need href tag value so we will do this
elements[0].attrib[‘href’]
This will return the target link.
This is what we wanted. Now, let us collect all the href tags for all the movies.
links = [base_url + element.atrrib[‘href’] for element in elements]
This is a very simple list comprehension code that we have written and yes that’s it. Let us run it.
We have got all the links to all the Wikipedia pages of all the movies from the Marvel Cinematic Universe. This was our ultimate aim for this tutorial and we have successfully managed to complete the task in a very efficient manner.
Complete Code
from lxml import html
import requests
url=”https://en.wikipedia.org/wiki/Outline_of_the_Marvel_Cinematic_Universe"
resp= requests.get(url)
tree = html.fromstring(resp.content)
elements = tree.xpath(‘//*[@id=”mw-content-text”]/div[1]/table[2]/tbody/tr[*]/th/i/a’)
base_url = “https://en.wikipedia.org"
links = [base_url + element.attrib[‘href’] for element in elements]
print(links)
Conclusion
I hope now you have got the idea of how you can use the concept of XML and the Xpath for web scraping and how it can help you to extract data where a certain pattern can be seen. After analyzing that pattern you can create a compact Xpath query for yourself and I am pretty confident that you will be able to scrape the data in a very less amount of code. You may choose to build on this knowledge and create complex web scrapers that can crawl thousands of pages.
If you don’t want to code your own scraper then you can always use our API for Web Scraping.
Additional Resources
Here are a few additional resources that you may find helpful during your web scraping journey:
Proxy has become a crucial tool in today’s digital tool. It is like a private security team for your business. Using proxies you can bypass any protection wall established by either a government or a private entity. You can look for hidden or censored data while being anonymous.
How to Use Proxy with Python Requests
In this article, we will talk about how proxies can be used with Python and Requests package to scrape the web but before we start with that we will talk about applications of using a proxy pool.
Applications of Proxy
Web Scraping– You can make multiple requests to any website from different IPs on every request. This makes you anonymous and you can gather information without getting blocked.
Load Balancing– Proxies can help you distribute the client load across multiple servers at the backend.
Geo-Fencing– You can access information that is restricted to a certain area or country.
Security– Proxies can act as a barrier between the server and the client. It can filter incoming requests just like how Cloudflare works.
Anonymity– Proxies can help you hide your real IP. This will make it challenging for websites that want to track your activity.
Setting up the prerequisites
We are going to use Python 3.x for this article. I hope you have already installed this on your machine and if not then please download it from here.
Then create a dedicated folder for this tutorial and then create a Python file inside the folder by any name you like. I am naming the file as proxy.py.
mkdir tutorial
Now, install the requests package with this command inside the folder tutorial.
pip install requests
How to use Proxy with Python Requests?
The first step would be to import requests library inside proxy.py file.
import requests
The next step would be to create a proxy dictionary containing two key-value pair, with the keys 'http' and 'https'. Each represents a communication protocol (HTTP and HTTPS) and their respective proxy server URLs.
Currently values of http and https are the same but they could be different as well. You can use different URLs for both protocols depending on the website you are going to handle with your scraper.
The third and last step would be to make an HTTP GET request to the target website using requests.
You can of course make many other kinds of HTTP requests .post().delete() or .put().
Generally when you access proxies other than the public ones (which I would suggest you avoid) requires authentication. Let’s see how to deal with those kinds of proxies.
How to Authenticate when Using a Proxy Server with Python Requests
When you buy a proxy online they require a username and password to access. You can provide the credentials using either basic authentication or an authenticated proxy URL.
You can provide the full proxy URL, including the authentication details, in the proxies dictionary.
But always remember that using proxy authentication credentials directly in your code is not recommended, especially in production environments or when sharing your code with others, as it poses a security risk. Instead, you should use environment variables or configuration files to store sensitive information securely.
This is how you can set environment variables in Python.
For a smooth flow of your code, you should always handle proxy errors that might occur while handling large concurrent requests. Not handling errors will lead to breakage of your code. These errors can occur due to incorrect proxy configurations, network issues, or server unavailability.
Here are some common proxy-related errors and how to handle them in Python:
Proxy Connection Errors
requests.exceptions.ProxyError– This exception is raised when there is an issue connecting to the proxy server. It could be due to the proxy server being down or unavailable.
requests.exceptions.ProxyError– This exception can also be raised if there are issues with proxy authentication. For authenticated proxies, make sure you provide the correct username and password.
requests.exceptions.Timeout– This exception occurs when the request to the proxy or the target server times out. You can specify a timeout in the requests.get() or requests.post() function to handle timeout errors.
Always use a broad except block to catch general exceptions (Exception) in case there are other unexpected errors not covered by the specific exception types.
This way you can make your code more robust and resilient when using proxies with Python requests. Additionally, you can log or display meaningful error messages to help with debugging and troubleshooting.
Rotating Proxies with Requests
Well, many of you might not be aware of rotating proxies so let me explain this in very simple language. Rotating proxies is like a group of friends who can help you open the doors of any specific website. This group could be in the millions. This way you will never get blocked because you have a new friend on every visit.
In technical terms, these friends are IPs from different locations in any country around the globe. While scraping any website it is always advised to use different IPs on every request because many websites have anti-scraping software like Cloudflare which prevents large amounts of requests from a single IP.
Of course, just changing IPs will not bypass this anti-scraping wall but not changing IPs could definitely lead to blockage of your data pipeline.
Let’s now write a small Python code for rotating proxies with requests. We will scrape a sample website with a new IP on every request.
import requests
import random
proxy_list = ['http://50.169.175.234:80','http://50.204.219.228:80','http://50.238.154.98:80']
scraping_url = input('Enter a url to scrape.\n')
print('We will now scrape',scraping_url)
proxies = {
'http': random.choice(proxy_list),
'https': random.choice(proxy_list),
}
try:
response = requests.get(scraping_url, proxies=proxies)
print(response.text)
except requests.exceptions.ProxyError as e:
print(f"Proxy connection error: {e}")
except requests.exceptions.RequestException as e:
print(f"Request error: {e}")
Let me break down this code for you.
import requests: This line imports the requests library, which is used to make HTTP requests and handle responses.
import random: This line imports the random module, which will be used to select a random proxy from the proxy_list.
proxy_list: This is a list that contains several proxy server URLs. Each URL represents a proxy through which the web request will be sent.
scraping_url = input('Enter a url to scrape.\n'): This line takes user input and prompts the user to enter a URL to be scraped.
print('We will now scrape',scraping_url): This line prints the provided URL to indicate that the scraping process is starting.
proxies = {'http': random.choice(proxy_list), 'https': random.choice(proxy_list)}: This creates a dictionary called proxies, which will be used to pass the randomly selected proxy to the requests.get() function. The random.choice() function selects a random proxy from the proxy_list for both HTTP and HTTPS requests.
The try block: This block is used to make the HTTP request to the provided URL using the randomly selected proxy.
response = requests.get(scraping_url, proxies=proxies): This line sends an HTTP GET request to the scraping_url using the requests.get() function. The proxies parameter is used to pass the randomly selected proxy for the request.
print(response.text): If the request is successful, the response content (HTML content of the webpage) is printed to the console.
The except block: This block is used to handle exceptions that might occur during the request.
except requests.exceptions.ProxyError as e:: If there is an issue with the selected proxy, this exception will be caught, and the error message will be printed.
except requests.exceptions.RequestException as e:: This exception is a general exception for any other request-related errors, such as connection errors or timeout errors. If such an error occurs, the error message will be printed.
But this code has a problem. The problem is we have used public proxies for this code and they are already blocked by many websites. So, here we will use something which is private and free too.
Using Scrapingdog Rotating Proxies with Requests to scrape websites
Scrapingdog provides generous free 1000 credits. You can sign up for the free account from here.
Once you sign up you will see a API key on your dashboard. You can use that API key in the code below.
import requests
import random
proxies = {
'http': 'http://scrapingdog:[email protected]:8081',
'https': 'http://scrapingdog:[email protected]:8081',
}
scraping_url = input('Enter a url to scrape.\n')
print('We will now scrape',scraping_url)
//url should be http only
try:
response = requests.get(scraping_url, proxies=proxies, verify=False)
print(response.text)
except requests.exceptions.ProxyError as e:
print(f"Proxy connection error: {e}")
except requests.exceptions.RequestException as e:
print(f"Request error: {e}")
In place of Your-API-key paste your own API key. Scrapingdog has a pool of more than 15M proxies with which you can scrape almost any website. Scrapingdog not just rotates IPs it also handles headers and retries for you. This way you always get the data you want in just a single hit.
Remember to use http scraping urls while scraping instead of https.
Conclusion
Proxies have many applications as discussed above and web scraping is one of them. Now, proxies are also of different types and if you want to learn more about the proxies then you should read best datacenter proxies.
The quality of proxies always matters when it comes to web scraping or internet browsing. To be honest there are tons of options in the market when it comes to rotating proxies but only a few of them work.
Before we wrap up I would advise you to read web scraping with Python to get an in-depth knowledge on web scraping. This article is for everyone from beginner to advance. This tutorial covers everything from data downloading to data parsing. Check that out!
I hope you like this little tutorial and if you do then please do not forget to share it with your friends and on your social media.
Additional Resources
Here are a few additional resources that you may find helpful during your web scraping journey:
Scraping Yellow Pages to get data from it or to generate leads is a great idea for businesses looking for prospects in the local area. Yellow Pages have the largest pool of data for businesses it is always great to scrape it to know how in the local area for your business.
Now, the question is how you will generate leads and extract data to get the emails or contact numbers of these prospects.
Scraping Yellow Pages Data
In this blog, we are going to create a Yellow Pages scraper using Python to get phone numbers and other details.
Let’s Scrape Yellow Pages for Leads
Let’s assume you are a kitchen utensil manufacturer or a dealer and you are searching for potential buyers for your product. Since restaurants could be one of your major targets we are going to scrape restaurant detailsfrom the Yellow Pages.
We are more interested in the phone number, address and obviously the name of the restaurant. We will target restaurants in New York. Consider this URL as our target URL.
Extracting data from a restaurant in the Yellow Pages
We are going to use Python to get data from Yellow Pages and I am assuming that you already have Python installed. Further, we are going to use libraries like requests and beautifulsoup to execute this task.
Everything is set now, let’s code. To begin with, you have to create a file, you can name it anything you like. I will use ypages.py. In that file, we will import the libraries we just installed.
import requests
from bs4 import BeautifulSoup
data=[]
obj={}
The next part would be to declare the target website for scrapingfrom the yellow pages.
We have made the GET request to our target website using the requests library. We will use BS4 on the data stored inresp variable to create an HTML tree from where we can extract our data of interest.
First, inspect the webpage to check where all these results are stored.
Checking where the results are stored in Yellow Pages
As we can see all these results are stored under div tag with the class result. We will find the name, address, and phone number inside this div so let’s find the location of those too.
Finding name, address, and phone number inside the div tag
The name is stored under a tag with the class name as “business-name”. Next, we will check for phone numbers.
Finding phone number inside div tag
The last one will be the address.
Finding an address for the restaurant from the Yellow Pages
The address is stored under the div tag with the class name as adr. Since we have all the information we need to extract the data, let’s run a for loop to extract details from these results one by one.
for i in range(0,len(allResults)):
try:
obj["name"]=allResults[i].find("a",{"class":"business-name"}).text
except:
obj["name"]=None
try:
obj["phoneNumber"]=allResults[i].find("div",{"class":"phones"}).text
except:
obj["phoneNumber"]=None
try:
obj["address"]=allResults[i].find("div",{"class":"adr"}).text
except:
obj["address"]=None
data.append(obj)
obj={}
print(data)
We are using try and except blocks in case of any errors. This for loop will help us to reach each and every result and all the data will be stored inside the array data. Once you print you will get this.
We have successfully scraped all the target data. Now, what if you want to scrape the email and website of the Restaurant as well?
For that, you have to open all the dedicated pages of each restaurant and then extract them. Let’s see how it can be done.
Scraping Emails & Website Address of Businesses from Yellow Pages
Let’s first check the location of emails and website addresses for the particular restaurant in Yellow Pages.
Finding the location of the Email & Website Address
The website is stored under a tag inside href attribute.
Finding Email Address
You can find the email inside href attribute with a tag.
The part until .com/ will remain the same but the string after that will change according to the restaurant. We can find these strings on the main page.
Here are the steps we are going to do in order to scrape our data of interest.
We will extract lateral strings from the main page.
We will make a GET request to the new URL.
Extract emails and websites from this new URL.
Repeat for every result on the main page.
We will make some changes inside the last for loop.
for i in range(0,len(allResults)):
try:
lateral_string=allResults[i].find("a",{"class":"business-name"}).get('href')
except:
lateral_string=None
target_website = 'https://www.yellowpages.com{}'.format(lateral_string)
print(lateral_string)
resp = requests.get(target_website).text
soup=BeautifulSoup(resp, 'html.parser')
Our new target_website will be a link to the dedicated restaurant page. Then we are going to extract data from these pages.
for i in range(0,len(allResults)):
try:
lateral_string=allResults[i].find("a",{"class":"business-name"}).get('href')
except:
lateral_string=None
target_website = 'https://www.yellowpages.com{}'.format(lateral_string)
print(lateral_string)
resp = requests.get(target_website).text
soup=BeautifulSoup(resp, 'html.parser')
try:
obj["Website"]=soup.find("p",{"class":"website"}).find("a").get("href")
except:
obj["Website"]=None
try:
obj["Email"]=soup.find("a",{"class":"email-business"}).get('href').replace("mailto:","")
except:
obj["Email"]=None
data.append(obj)
obj={}
print(data)
.get() function of BS4 will help us to extract data from any attribute. Once we print it we get all the emails and website URLs stored inside an array object.
Now, you can use these prospects for cold emailing or can do cold calling.
We learned how you can create a target prospect list for your company. Using this approach or the code you can scrape emails and phone numbers for any industry you like. As I said YellowPages is a data-rich website and can be used for multiple purposes.
Collecting prospects is not limited to just Yellowpages only, you can scrape Google as well to get some qualified leads. Of course, you will need an advanced web scraper to extract data from that. For that, you can always useScrapingdog’s Web Scraping API which offers a generous free 1000 calls to new users.
Forget about getting blocked while scraping the Web
Try out Scrapingdog Web Scraping API & Scrape Yellow Pages at Scale without Getting Blocked
I hope you will like this tutorial and if so then please do not hesitate to share it online. Thanks! again for reading.
This totally depends on what you are extracting from the yellow pages. However, one of the best ways to do it at scale is by using a web scraper API. Using an API allows you to extract data at a pace and without any blockage.
It might, since it has anti-scraping measures to detect any activity that is done to extract data from it. Hence, it is advisable to do scraping in a way that yellow pages can’t detect it. You can read tips to avoid being blocked from websites while scraping.
The probable reasons you want to scrape LinkedIn Jobs are: –
You want to create your own job data for a particular location
Or do you want to analyze new trends in a particular domain and salaries?
However, in both cases, you have to either scrape LinkedIn Jobs data or use APIs of the platform (if they are cheap enough or available for public use).
In this tutorial, we will learn to extract data from LinkedIn & create our own LinkedIn Job Scraper, and since it does not provide any open API for us to access this data our only choice is to scrape it. We are going to use Python 3.x.
Scraping LinkedIn Jobs with Python
Also, if you are looking to scrape LinkedIn Jobs right away, we would recommend you use LinkedIn Jobs API by Scrapingdog. It is an API made to extract job data from this platform, the output you get is parsed JSON data.
Setting up the Prerequisites for LinkedIn Job Scraping
I am assuming that you have already installed Python 3.x on your machine. Create an empty folder that will keep our Python script and then create a Python file inside that folder.
mkdir jobs
After this, we have to install certain libraries which will be used in this tutorial. We need these libraries installed before even writing the first line of code.
Requests — It will help us make a GET request to the host website.
BeautifulSoup— Using this library we will be able to parse crucial data.
Let’s install these libraries
pip install requests
pip install beautifulsoup4
Analyze how LinkedIn job search works
Python Jobs in Las Vegas on LinkedIn
This is the page for Python jobs in Las Vegas. Now, if you will look at the URL of this page then it would look like this- https://www.linkedin.com/jobs/search?keywords=Python (Programming Language)&location=Las Vegas, Nevada, United States&geoId=100293800¤tJobId=3415227738&position=1&pageNum=0
Let me break it down for you.
keywords– Python (Programming Language)
location– Las Vegas, Nevada, United States
geoId– 100293800
currentJobId– 3415227738
position– 1
pageNum– 0
On this page, we have 118 jobs, but when I scroll down to the next page (this page has infinite scrolling) the pageNum does not change. So, the question is how can we scrape all the jobs?
The above problem can be solved by using a Selenium web driver. We can use .execute_script() method to scroll down the page and extract all the pages.
The second problem is how can we get data from the box on the right of the page. Every selected job will display other details like salary, duration, etc in this box.
You can say that we can use .click() function provided by selenium. According to that logic, you will have to iterate over every listed job using a for loop and click on them to get details on the right box.
Yes, this method is correct but it is too time-consuming. Scrolling and clicking will put a load on our hardware which will prevent us from scraping at scale.
What if I told you that there is an easy way out from this problem and we can scrape LinkedIn in just a simple GET request?
Sounds unrealistic, right??
Finding the solution in the devtool
Let’s reload our target page with our dev tool open. Let’s see what appears in our network tab
We already know LinkedIn uses infinite scrolling to load the second page. Let’s scroll down to the second and see if something comes up in our network tab.
If you will click on the preview tab for the same URL then you will see all the job data.
Let’s open this URL in our browser.
Ok, we can now make a small conclusion over here that every time when you scroll and LinkedIn loads another page, Linkedin will make a GET request to the above URL to load all the listed jobs.
Let’s break down the URL to better understand how it works.
https://www.linkedin.com/jobs-guest/jobs/api/seeMoreJobPostings/search?keywords=Python (Programming Language)&location=Las Vegas, Nevada, United States&geoId=100293800¤tJobId=3415227738&position=1&pageNum=0&start=25
keywords– Python (Programming Language)
location– Las Vegas, Nevada, United States
geoId– 100293800
currentJobId– 3415227738
position– 1
pageNum– 0
start– 25
The only parameter that changes with the page is the startparameter. When you scroll down to the third page, the value of the start will become 50. So, the value of the start will increase by 25 for every new page. One more thing which you can notice is if you increase the value of start by 1 then the last job will get hidden.
Ok, now we have a solution to get all the listed jobs. What about the data that appears on the right when you click on any job? How to get that?
Here 3415227738 is the currentJobIdwhich can be found in the li tag of every listed job.
Now, we have the solution to bypass selenium and make our scraper more reliable and scalable. We can now extract all this information with just a simple GET request using requests library.
What are we going to scrape?
It is always better to decide in advance what exact data points do you want to scrape from a page. For this tutorial, we are going to scrape three things.
Name of the company
Job position
Seniority Level
Using .find_all() method of BeautifulSoup we are going to scrape all the jobs. Then we are going to extract jobids from each job. After that, we are going to extract job details from this API.
Scraping Linkedin Jobs IDs
Let’s first import all the libraries.
import requests
from bs4 import BeautifulSoup
There are 117 jobs listed on this page for Python in Las Vegas.
Since every page has 25 jobs listed, this is how our logic will help us scrape all the jobs.
Divide 117 by 25
If the value is a float number or a whole number we will use math.ceil() method over it.
import requests
from bs4 import BeautifulSoup
import math
target_url='https://www.linkedin.com/jobs-guest/jobs/api/seeMoreJobPostings/search?keywords=Python%20%28Programming%20Language%29&location=Las%20Vegas%2C%20Nevada%2C%20United%20States&geoId=100293800¤tJobId=3415227738&start={}'
number_of_loops=math.ceil(117/25)
Let’s find the location of job IDs in the DOM.
The ID can be found under div tag with the class base-card. You have to find the data-entity-urn attribute inside this element to get the ID.
We have to use nested for loops to get the Job Ids of all the jobs. The first loop will change the page and the second loop will iterate over every job present on each page. I hope it is clear.
target_url='https://www.linkedin.com/jobs-guest/jobs/api/seeMoreJobPostings/search?keywords=Python%20%28Programming%20Language%29&location=Las%20Vegas%2C%20Nevada%2C%20United%20States&geoId=100293800¤tJobId=3415227738&start={}'
for i in range(0,math.ceil(117/25)):
res = requests.get(target_url.format(i))
soup=BeautifulSoup(res.text,'html.parser')
alljobs_on_this_page=soup.find_all("li")
for x in range(0,len(alljobs_on_this_page)):
jobid = alljobs_on_this_page[x].find("div",{"class":"base-card"}).get('data-entity-urn').split(":")[3]
l.append(jobid)
Here is the step-by-step explanation of the above code.
we have declared a target URL where jobs are present.
Then we are running a for loop until the last page.
Then we made a GET request to the page.
We are using BS4 for creating a parse tree constructor.
Using .find_all() method we are finding all the li tags as all the jobs are stored inside li tags.
Then we started another loop which will run until the last job is present on any page.
We are finding the location of the job ID.
We have pushed all the IDs in an array.
In the end, array l will have all the ids for any location.
Scraping Job Details
Let’s find the location of the company name inside the DOM.
The name of the company is the value of the alt tag which can be found inside the div tag with class top-card-layout__card.
The job title can be found under the div tag with class top-card-layout__entity-info. The text is located inside the first a tag of this div tag.
Seniority level can be found in the first li tag of ul tag with class description__job-criteria-list.
We will now make a GET request to the dedicated job page URL. This page will provide us with the information that we are aiming to extract from Linkedin. We will use the above DOM element locations inside BS4 to search for these respective elements.
We have declared a URL that holds the dedicated Linkedin job URL for any given company.
For loop will run for the number of IDs present inside the array l.
Then we made a GET request to the Linkedin page.
Again created a BS4 parse tree.
Then we are using try/except statements to extract all the information.
We have pushed object o to array k.
Declared object o empty so that it can store data of another URL.
In the end, we are printing the array k.
After printing this is the result.
We have successfully managed to scrape the data from the Linkedin Jobs page. Let’s now save it to a CSV file now.
Saving the data to a CSV file
We are going to use the pandas library for this operation. In just two lines of code, we will be able to save our array to a CSV file.
How to install it?
pip install pandas
Import this library in our main Python file.
import pandas as pd
Now using DataFrame method we are going to convert our list kinto a row and column format. Then using .to_csv() method we are going to convert a DataFrame to a CSV file.
You can add these two lines once your list kis ready with all the data. Once the program is executed you will get a CSV file by the name linkedinjobs.csv in your root folder.
So, in just a few minutes we were able to scrape the Linkedin Jobs page and save it too in a CSV file. Now, of course, you can scrape many more other things like salary, location, etc. My motive was to explain to you how simple it is to scrape jobs from Linkedin without using resource-hungry Selenium.
Complete Code
Here is the complete code for scraping Linkedin Jobs.
import requests
from bs4 import BeautifulSoup
import math
import pandas as pd
l=[]
o={}
k=[]
headers={"User-Agent":"Mozilla/5.0 (Windows NT 10.0; Win64; x64) AppleWebKit/537.36 (KHTML, like Gecko) Chrome/107.0.0.0 Safari/537.36"}
target_url='https://www.linkedin.com/jobs-guest/jobs/api/seeMoreJobPostings/search?keywords=Python%20%28Programming%20Language%29&location=Las%20Vegas%2C%20Nevada%2C%20United%20States&geoId=100293800¤tJobId=3415227738&start={}'
for i in range(0,math.ceil(117/25)):
res = requests.get(target_url.format(i))
soup=BeautifulSoup(res.text,'html.parser')
alljobs_on_this_page=soup.find_all("li")
print(len(alljobs_on_this_page))
for x in range(0,len(alljobs_on_this_page)):
jobid = alljobs_on_this_page[x].find("div",{"class":"base-card"}).get('data-entity-urn').split(":")[3]
l.append(jobid)
target_url='https://www.linkedin.com/jobs-guest/jobs/api/jobPosting/{}'
for j in range(0,len(l)):
resp = requests.get(target_url.format(l[j]))
soup=BeautifulSoup(resp.text,'html.parser')
try:
o["company"]=soup.find("div",{"class":"top-card-layout__card"}).find("a").find("img").get('alt')
except:
o["company"]=None
try:
o["job-title"]=soup.find("div",{"class":"top-card-layout__entity-info"}).find("a").text.strip()
except:
o["job-title"]=None
try:
o["level"]=soup.find("ul",{"class":"description__job-criteria-list"}).find("li").text.replace("Seniority level","").strip()
except:
o["level"]=None
k.append(o)
o={}
df = pd.DataFrame(k)
df.to_csv('linkedinjobs.csv', index=False, encoding='utf-8')
print(k)
Avoid getting blocked with Scrapingdog’s Linkedin Jobs API
You have to sign up for the free account to start using it. It will take just 10 seconds to get you started with Scrapingdog.
After successful registration, you will get your own API key from the dashboard.
With this API you will get parsed JSON data from the LinkedIn jobs page. All you have to do is pass the field which is the type of job you want to scrape, then geoid which is the location id provided by LinkedIn itself. You can find it in the URL of the LinkedIn jobs page and finally the page number. For each page number, you will get 25 jobs or less.
Once you run the above code you will get this result.
Try out Scrapingdog’s LinkedIn Jobs API & extract jobs data hassle free
Conclusion
In this post, we custom-created a LinkedIn Job scraper and were able to scrape LinkedIn job postings with just a normal GET request without using a scroll-and-click method. Using the pandas library we have saved the data in a CSV file too. Now, you can create your own logic to extract job data from many other locations. But the code will remain somewhat the same.
You can use lxml it in place of BS4 but I generally prefer BS4. But if you want to scrape millions of jobs then Linkedin will block you in no time. So, I would always advise you to use a Web Scraper API which can help you scrape this website without restrictions.
I hope you like this little tutorial and if you do then please do not forget to share it with your friends and on your social media.
Yes, It is legal to scrape LinkedIn Job Postings. Any data that is publically available is legal to be scraped. However, if you try to scrape data that is not available publically, you might get into trouble. With LinkedIn jobs, since they are available for everyone, it is, therefore, no issue in scraping it.
Yes, if detected by LinkedIn, it can ban you from scraping. Hitting the request from the same IP can get you under the radar and finally can block you. We have written an article describing what challenges you can face while scraping LinkedIn.
Additional Resources
Here are a few additional resources that you may find helpful during your web scraping journey:
Scraping ZoomInfo can provide you with market intelligence solutions and a comprehensive database of company and contact information. It offers a wide range of services and tools that help businesses with sales and marketing efforts, lead generation, account targeting, and customer relationship management (CRM).
Web Scraping ZoomInfo
In this blog, we are going to learn how we can enrich our CRM panel by scraping Zoominfo. We will use Python for this task.
Setting up the Prerequisites for Scraping ZoomInfo
You will need Python 3.x for this tutorial. I hope you have already installed this on your machine, if not then you can download it from here. We will also need two external libraries of Python.
Requests– Using this library we will make an HTTP connection with the Zoominfo page. This library will help us to extract/download the raw HTML from the target page.
BeautifulSoup– This is a powerful data parsing library. Using this we will extract necessary data out of the raw HTML we get using the requests library.
We will have to create a dedicated folder for this project.
mkdir zoominfo
Now, let’s install the above two libraries.
pip install beautifulsoup4
pip install requests
Inside this folder create a python file where we will write our python script. I am naming the file as zoom.py.
Downloading raw data from zoominfo.com
The first step of every scraping task is to download the raw HTML code from the target page. We are going to scrape the Stripe company page.
Target page on Zoominfo which we want to scrape
import requests
from bs4 import BeautifulSoup
target_url="https://www.zoominfo.com/c/stripe/352810353"
headers={'User-Agent':'Mozilla/5.0 (Windows NT 10.0; Win64; x64) AppleWebKit/537.36 (KHTML, like Gecko) Chrome/114.0.0.0 Safari/537.36'}
resp = requests.get(target_url,headers=headers,verify=False)
print(resp.content)
1. The required libraries are imported:
requests is a popular library for making HTTP requests and handling responses.
BeautifulSoup is a library for parsing HTML and XML documents, making it easier to extract data from web pages.
The headers dictionary is created, and the “User-Agent” header is set to mimic a common web browser. This can help in bypassing certain restrictions or anti-bot measures on websites.
4. The web page is requested:
The requests.get() function is used to send an HTTP GET request to the target_url.
The headers parameter is passed to include the user agent header in the request.
The verify=False parameter is used to disable SSL certificate verification. This is sometimes necessary when working with self-signed or invalid certificates, but it is generally recommended to use valid certificates for security purposes.
5. The response content is printed:
The resp.content property returns the raw HTML content of the response.
This content is printed to the console using print().
Once you run this code you should get this output with a status code 200.
Output with status code 200
What are we going to scrape from Zoominfo?
Scraping zoominfo provides a lot of data for any company and it is always great to decode what exact information we need from the target page.
Information we will scrape from this page
For this tutorial, we will scrape zoominfo for this information.
Company Name
Industry
Number of Employees
Headquarters Address
Website
Social media Links
Since we have already downloaded the raw HTML from the page the only thing left is to extract the above information using BS4.
First, we will analyze the location of each data inside the DOM and then we can take the help of BS4 to parse them out.
Identifying the location of each element
Scraping the Company Name
Locating the company name in the page source code
The company name is stored inside the h1 tag. This can be scraped very easily.
The BeautifulSoup function is called with resp.text as the first argument, which represents the HTML content of the web page obtained in the previous code snippet using resp.content.
The second argument 'html.parser' specifies the parser to be used by BeautifulSoup for parsing the HTML content. In this case, the built-in HTML parser is used.
2. Extracting the company name:
The code then tries to find the company name within the parsed HTML using soup.find('h1').
The soup.find() function searches for the first occurrence of the specified HTML tag, in this case, ‘h1’ (which typically represents the main heading on a webpage).
If a matching ‘h1’ tag is found, .text is called on it to extract the textual content within the tag, which is assumed to be the company name.
The company name is then assigned to the o["company_name"] dictionary key.
3. Handling exceptions:
The code is wrapped in a try-except block to handle any exceptions that may occur during the extraction of the company name.
If an exception occurs (for example, if there is no ‘h1’ tag present in the HTML content), the except block is executed.
In the except block, o["company_name"] is assigned the value None, indicating that the company name could not be extracted or was not found.
Scraping the industry and the number of employees
Locating the industry name and the number of employees in the source code of the page
The industry name and the number of employees both are stored inside a p tag with class company-header-subtitle.
Finally, we have managed to extract all the data we decided to earlier in this post.
Complete Code
Of course, you can scrape many more data from Zoominfo. You can even collect email formats from this page to predict the email formats for any company.
Once you run this code you should see this response.
Zoominfo is a well-protected website and your scraper won’t last long as your IP will get banned. IP banning will result in the blocking of your data pipeline. But there is a solution to that too.
Scraping Zoominfo without getting Blocked using Scrapingdog
You can use Scrapingdog’s scraper API to scrape Zoominfo without any restrictions. You can start using it with just a simple sign-up. It offers you a generous 1000 free credits for you to test the service.
Scrapingdog Homepage
Once you sign up you will get your personal API key. You can place that API key in the below code.
import requests
from bs4 import BeautifulSoup
import re
l=[]
o={}
s=[]
target_url="https://api.scrapingdog.com/scrape?api_key=Your-API-Key&url=https://www.zoominfo.com/c/stripe/352810353&dynamic=false"
headers={'User-Agent':'Mozilla/5.0 (Windows NT 10.0; Win64; x64) AppleWebKit/537.36 (KHTML, like Gecko) Chrome/114.0.0.0 Safari/537.36'}
pattern = r'\b\d+\b'
resp = requests.get(target_url,headers=headers,verify=False)
print(resp.status_code)
soup=BeautifulSoup(resp.text,'html.parser')
try:
o["company_name"]=soup.find('h1').text
except:
o["company_name"]=None
try:
o['industry']=soup.find('p',{"class":"company-header-subtitle"}).text.split("·")[0]
except:
o['industry']=None
try:
o['employees']=soup.find('p',{"class":"company-header-subtitle"}).text.split("·")[1].split("·")[1]
except:
o['employees']=None
try:
o['address']=soup.find('app-icon-text',{"class":"first"}).find('span').text
except:
o['address']=None
try:
o['website']=soup.find('app-icon-text',{"class":"website-link"}).find('a').text
except:
o['website']=None
try:
mediaLinks = soup.find('div',{'id':'social-media-icons-wrapper'}).find_all('a')
except:
mediaLinks = None
for i in range(0,len(mediaLinks)):
s.append(mediaLinks[i].get('href'))
l.append(o)
l.append(s)
print(l)
One thing you might have noticed is the code did not change a bit except the target_url. With this Python code, you will be able to scrape Zoominfo at scale.
Conclusion
In this tutorial, we successfully scraped crucial data from Zoominfo. Now, in place of BS4, you can also use lxml but BS4 is more flexible comparatively.
You can create an email-finding tool with the data you get from Zoominfo pages. I have a separate guide on scraping email addresses from any website, you can refer to that too.
You can also analyze the market valuation of any product. There are many applications for this kind of data.
Combination of requests and Scrapingdog can help you scale your scraper. You will get more than a 99% success rate while scraping Zoominfo with Scrapingdog.
I hope you like this little tutorial and if you do then please do not forget to share it with your friends and on your social media.
Additional Resources
Here are a few additional resources that you may find helpful during your web scraping journey:
In this tutorial, I will explain how you can use Scrapingdog’s LinkedIn Scraping API to scrape any Person’s Public Profile and Company’s Public Profile.
How to use LinkedIn Scraping API
How To Scrape LinkedIn Public Profile via Scrapingdog
There are two kinds of public profiles on Linkedin when it comes to scraping them.
Profile with a captcha
A profile without a captcha
Let’s first discuss how you can scrape a profile without a captcha on it.
Let’s say I want to scrape this profile. Then simply you will try to scrape it like this.
This is the most basic way in which you can scrape any Linkedin Profile with our API. But sometimes some profiles throw a captcha like this.
LinkedIn throwing Captcha
In this case, our API will respond with either a 404 or 400. In this case, you can take advantage of the private parameter.
Try to open this profile in incognito mode. You will face a captcha similar to that shown in the above image. Scrapingdog’s API can scrape these profiles as well. Just add a private parameter and you are done.
When you make the above API call then you will get one of the two status codes.
200
202
When it is 200 then it means the data has been successfully scraped and returned to you.
But if it is 202 then it means your request is accepted but the profile is still being scraped. Once the profile is scraped the copy of that profile will be saved in our DB. Of course, you will be not charged when you get a 202. Now anytime after 2 to 3 minutes, you can scrape this profile and you will get a 200 in that case.
When you get a 202 you are advised to scrape other profiles in your list rather than waiting for 2 to 3 minutes. This will increase your work productivity.
Let us know if you have any questions regarding the API. You can contact us here. You can watch this quick tutorial in the video to further understand how this API works.
In 2024, the best programming language for web scraping will be the one that is best suited to the task at hand. Many languages can be used for web scraping, but the best one for a particular project will depend on the project’s goals and the programmer’s skills.
Best Programming Language for Web Scraping
Python is a good choice for web scraping because it is a versatile language used for many tasks. It is also relatively easy to learn, so it is a good choice for those who are new to web scraping.
C++ will allow you to build a unique setup of web scraping, as it offers an excellent execution solution for this task.
PHP is another popular language for web scraping. It is not as powerful as Java, but it is easier to learn and use. It is also a good choice for those who want to scrape websites built with PHP.
Other alternative languages can be used for web scraping, but these are the most popular choices. Let’s dive in and explore the best language to scrape websites with a thorough comparison of their strengths and limitations.
Which Programming Language To Choose & Why?
It’s important that a developer selects the best programming language that will help them scrape certain data that they want to scrape. These days programming languages are quite robust when it comes to supporting different use cases, such as web scraping.
When a developer wants to build a web scraper, the best programming language they can go for is the one they are most comfortable and familiar with. Web data can come in highly complex formats very often, and the structure of the web pages can rotate time and again, and it needs the developers to adjust the code accordingly.
When selecting the programming language, the first and main criterion should be proper familiarity with it. Web scraping is supported in almost any programming language, so the one a developer is most familiar with should be chosen.
For instance, if you know PHP. start with PHP only and later take it from there. It will make sure that you already have built-in resources for that language, as well as prior experience and knowledge about how it functions. It will also help you do web scraping faster.
The second consideration should be the availability of online resources for a particular programming language when it comes to solving bugs or finding standby coding solutions for different problems.
Apart from these, there are a few other parameters that you should consider when selecting any programming language for web scraping. Let’s have a look at those parameters.
Parameters to Select the Best Programming Language
Flexibility
The more flexible a programming language is, the better it will be for a developer to use it for web scraping. Before choosing a language, make sure that it’s flexible enough for your desired endeavors.
Operational ability to feed database
It’s also a highly important thing to look for when choosing a programming language.
Crawling effectiveness
The language you choose must have the ability to crawl through web pages effectively.
Ease of coding
It’s really important that you can code easily using the language you choose.
Scalability
Scalability is a technology stack. It determines the programming languages rather than the language itself. Some popular and battle-tested stacks that have proven to be capable of such scalability are Ruby on Rails (RoR), MEAN, .NET, Java Spring, and LAMP.
Maintainability
The cost of maintenance will depend on the maintainability of your technology stack, and what programming language you choose for web scraping. Based on your target and budget, you must choose a language that has maintainability that you can afford.
Top 6 Programming Languages for Effective & Seamless Web Scraping
Python
When it comes to web scraping, python is still the most popular programming language. This language is a complete product, as it can handle almost all the processes that are related to data extraction smoothly. It’s very easy to understand for beginner coders, and it’s also easy to use for web scraping. You will be able to get up to speed on web scraping with Python if you are new to this.
Core Features
Easy to understand
Follows Javascript in terms of availability of online community and resources
Comes with highly useful libraries
Pythonic Idioms works great for searching, navigating, and modifying
Advanced web scraping libraries that come in really handy while scraping web pages
Selenium – It’s a highly advanced library of Python that helps a lot with data extraction and web scraping.
BeautifulSoup – It’s a Python library designed for really efficient and fast data extraction.
Scrapy – Scrapy is a popular web crawler and web scraping, which helps a lot with its twisted library and a set of amazing tools for debugging. Since Python provides an effective Scrapy, it is highly effective and popular for web scraping.
Limitations
Too many options for data visualization can be confusing
Can be slow due to being too dynamic and line-by-line execution of codes
Weaker database access protocols
Ruby
Ruby is an open-source programming language. Its user-friendly syntax is easy to understand, and you will be able to practice and apply this language without any hassle. This language consists of multiple languages like Smalltalk, Perl, Ada, Eiffel, etc. Ruby is highly aware of the need for functional programming to be balanced with the help of imperative programming.
Core Features
HTTParty, Pry, and NokoGiri enable the setting up of your web scraper without hassles.
NokoGiri is a specific Rubygem, which offers XML, HTML, SAX, and Reader parsers with CSS and XPath selector support.
HTTParty helps send the HTTP requests to the pages from where a developer wants to extract data. It furnishes all the HTML of the page as a string.
Debugging a program is enabled by Pry
No code repetition
Simple syntax
Convention over configuration
Ruby (programming language): What is a gem?
A Ruby Gem is a library that’s built by the Ruby Community. It can also be referred to as a package of codes, which are configured in a way that it complies with the software distribution in the Ruby style. These gems contain classes and modules that can be used in your applications. You can also use them in your code by installing them through RubyGems first.
RubyGems is a manager of packages for the Ruby language, and it provides a standard format for distributing programs and libraries.
Ruby Scraping (How To Do It And Why It’s Useful)
Ruby is popular for creating web scraping tools, along with SaaS Solutions. Ruby is used for web scraping a lot, as it’s an effective web scraping solution for extracting information for businesses. It is secure, cost-effective, flexible, and highly productive too. The steps of Ruby Scraping are-
Difficult to locate good documentation, especially for less-known libraries and gems
Inefficient multithreading support
Javascript
Javascript is mainly built for front-end web development. Node.JS works as the web scraping language here that uses Javascript for functioning. Node.JS comes with libraries like Nightmare and Puppeteer that are used commonly for web scraping.
Node.Js is a highly preferred programming language when it comes to web page crawling that practices dynamic coding activities. It also supports practices of distributed crawling.
Node.JS uses Javascript for conducting non-blocking applications that can help enhance multiple simultaneous events.
Framework
ExpressJS works as a flexible and minimal web application framework of Node.JS that has features for mobile and web applications. Node.JS also allows making easy and quick HTTP calls. It also helps traverse the DOM and extract data through Cheerio, which is an implementation of core jQuery.
Performs basic data extraction and web scraping activities
Good for streaming activities
Has a built-in library
Comes with a stable and basic communication
Good for scraping large-scale data
Limitations
Best suited for basic web scraping works
Requires multiple code changes because of unstable API
Not good for long-running processes
Stability is not that good
Lacks maturity
PHP
PHP might not be much of an ideal choice when it comes to creating a crawler program. You can go for the CURL libraries while web scraping with PHP, or extracting any kind of information such as images, graphics, videos, or any other visual forms.
Helps transfer files with the help of protocol lists consisting of HTTP and FTP
Helps create web spiders that can be utilized to download any information online
Uses 3% of CPU usage
Open-source
Free of Cost
Simple to Use
Used 39 MB of RAM
It can run 723 pages per 10 minutes
Limitations
Not suitable for large-scale data extraction
Weak multithreading support
C++
C++ offers an outstanding execution for web scraping with its unique setup for this task, but it can be quite costly to set up your web scraping solution with this programming language. Make sure that your budget suits using this language for scraping the web. This language shouldn’t be used if you are not highly focused on extracting data only.
Core Features
Quite a simple user interface
Allows for efficiently parallelizing the scraper
Works great for extracting data
Conducts great web scraping if paired with dynamic coding
Can be used to write an HTML parsing library and fetch URLs
Limitations
Not great for just any web-related project, as it works better with a dynamic language
Expensive to use
Not best suited for creating crawlers
Alternative Solution: Readily Available Tools for Web Scraping
You can go for various open-source tools for web scraping that are free to use. While some of these tools require a specific amount of code modification, some don’t require any coding at all. Most of these tools have limitations to only scrape the page a user is on, and can’t be scaled to scrape web pages in thousands in an automated way.
You can also use these readily available tools like Scrapingdog to work with external web scrapers. They can offer proxy services for scraping, or scrape the data directly and deliver it in the needed format. It allows for allocating time to other development priorities instead of data pulling. Especially companies with no developers or data engineers that can support data analytics can highly benefit from these readily available tools and data.
Final Verdict: Who’s the Winner
No doubt, all the languages are great for web scraping. The best one entirely depends on your project requirements and skills. If you need a more powerful tool to handle complexities, go for C++ or Ruby. If ease of use and versatility is your thing, go for Python. And, if you want something in between, go for PHP, and its CURL library.
eBay scraper can collect a large amount of data about sellers, their offer price, their ratings, etc. This data can help you analyze the dynamic market or if you are a seller itself on eBay then you can monitor your own competitor by scraping prices. Over time once you have a large data set you can identify trends in product popularity, seller behavior, and buyer preferences, which can help you stay ahead of the curve in your industry.
eBay Scraping with Python
In this article, we are going to extract product information from eBay by creating our own eBay scraper. Through this, we will learn how we can create a seamless data pipeline from eBay by extracting crucial information for target products.
Setting up the prerequisites for eBay scraping
I hope you have already installed Python 3.x on your machine. If not then you can download it from here. Apart from this, we will require two III-party libraries of Python.
BeautifulSoup– This is a powerful data parsing library. Using this we will extract necessary data out of the raw HTML we get using the requests library.
Before we install these libraries we will have to create a dedicated folder for our project.
mkdir ebayscraper
Now, we will have to install the above two libraries in this folder. Here is how you can do it.
pip install beautifulsoup4
pip install requests
Now, you can create a Python file by any name you wish. This will be the main file where we will keep our code. I am naming it ebay.py.
Downloading raw data from ebay.com
Before we dive in let’s test type a small Python script to proof test it. This is just to determine that our code will be able to scrape eBay without getting blocked.
Well, the code is very clear and concise. But let me explain to you line by line.
The requests library is imported in the first line.
The BeautifulSoup class from the bs4 (Beautiful Soup) library is also imported.
The target_url variable is assigned the value of the desired URL to scrape, in this case, “https://www.ebay.com/itm/182905307044“. You can replace this URL with the desired target URL.
The requests.get() function is used to send an HTTP GET request to the target_url. The response from the server is stored in the resp variable.
The resp.status_code is printed, which will display the HTTP status code returned by the server in response to the GET request.
By executing this code, you will be able to retrieve the HTTP status code of the response received from the target URL. The status code can provide information about the success or failure of the request, such as 200 for a successful request or 404 for a page not found error.
Once you run this code you should see 200 on the console.
So, our setup script successfully scraped eBay and downloaded the HTML we wanted. Now, let’s decide what exact information we want to extract from the page.
What are we going to scrape from eBay?
Deciding this in advance helps us identify the location of all the data elements inside the DOM at once.
We are going to scrape seven data elements from the page.
Images of the product
Title of the product
Rating
Price
Listed Price
Discount/Savings
Shipping charges
To start, we will use the requests library to send a GET request to the target page. After that, we will utilize the BeautifulSoup library to extract the desired data from the response. While there are alternative libraries like lxml available for parsing, BeautifulSoup stands out with its robust and user-friendly API.
Prior to sending the request, we will analyze the page and determine the position of each element within the Document Object Model (DOM). It is advisable to perform this exercise in order to accurately locate each element on the page.
We will accomplish this by utilizing the developer tool. To access it, simply right-click on the desired element and select “Inspect”. This is a commonly used method, and you may already be familiar with it.
Identifying the location of each element
Scraping Title of the product
As you can see the title of the product is stored inside the h1 tag with class x-item-title__mainTitle. So, scraping this would be super simple.
First, we have declared some empty lists and an object to store all the scraped data.
The fourth line creates a BeautifulSoup object named soup by parsing the HTML content of the resp response object. The HTML parser used is specified as 'html.parser'.
The last line finds an h1 element with a class attribute of "x-item-title__mainTitle" within the parsed HTML content. It then accesses the text attribute to retrieve the text content of the h1 element. Finally, it assigns this text to the o dictionary with the key "title".
To fully grasp the meaning of the code snippet provided above, it is essential to have prior knowledge of the preceding section where we discussed the process of retrieving HTML data from the target page. Therefore, I strongly recommend reviewing the earlier section before proceeding further with the coding.
Scraping Rating of the product
As you can see in the above image, the rating is hidden inside the span tag with class ebay-review-start-rating. Scraping rating is super simple. Here is how you can do it.
When you inspect you will notice that both the listing price and the discount are listed inside the div tag with class x-additional-info. So, let’s first find this class using the .find() method of BS4.
All the product images are stored inside the div tag with the class ux-image-carousel-item. Inside each of these div tags, there is an img tag where the URL of the image is stored.
So, let’s first crawl all of these div tags and then with the help of for loop we will extract values of the src attributes of the img tag.
Here we are looking for <div> elements with the class attribute “ux-image-carousel-item”. The find_all() method returns a list of all matching elements found in the HTML document. The extracted elements are assigned to the images variable.
Now we will use for loop to iterate over all the div tags and extract the image URL.
for image in images:
image_url=image.find("img").get('data-src')
image_list.append(image_url)
l.append(o)
l.append(image_list)
print(l)
All the images are inside the src attribute. But once you scrape the page it will appear as data-src instead of simply src. That’s why we have used data-src above.
With this, we have scraped all the data we decided on earlier. You can also use try/except statement to avoid any kind of error.
Complete Code
On our target page, there is a tremendous amount of data that can be used for data analysis. You can of course make changes to the code and extract more data points from the page.
You can even use a cron job to run a crawler at a particular time and once the product is available at your target price it will send you an email.
The technique we have used will not be enough for crawling eBay at scale. Because eBay detects that the traffic is coming from a bot/script it will block our IP and your data pipeline will stop pulling data from the website.
Here you can use Web Scraping APIs like Scrapingdog which can help you pull millions of pages from eBay without getting blocked. Scrapingdog uses new IP on every request which makes scraping completely anonymous.
You can even start with 1000 free credits that you get once you sign up.
Scrapingdog Homepage
Once you sign up, you will be redirected to your dashboard. The dashboard will look somewhat like this.
You have to use your API key.
Now, you can paste your target indeed target page link to the left and then select JS Rendering as No. After this click on Copy Code from the right. Now use this API in your script to scrape eBay.
No, eBay doesn’t allow scraping. An eBay scraper customized for extracting data from this platform will doesn’t scrape at scale as the platform detects bot activity and ultimately blocks it. To mitigate these restrictions, the use of an extensive proxy set is recommended, thus obfuscating the source of the scraping requests and reducing the chance of detection and blockage. Additionally, implementing a Web Scraping API, which handles the rotation and maintenance of proxies, is beneficial for reliable data extraction.
Conclusion
In this tutorial, we scraped various data elements from eBay. First, we used the requests library to download the raw HTML, and then using BS4 we parsed the data we wanted. Finding the locations of each element was super simple in this tutorial. I must say scraping eBay is way easier than Amazon price scraping or scraping Walmart for a beginner.
Combination of requests and Scrapingdog can help you scale your eBay scraping. You will get more than a 99% success rate while scraping eBay with Scrapingdog.
I hope you like this little tutorial in which we learned how to build an eBay scraper. And if you liked it then please do not forget to share it with your friends and on your social media.
Additional Resources
Here are a few additional resources that you may find helpful during your web scraping journey:
Web scraping has become essential in today’s data-driven world, enabling individuals and businesses to gather crucial information and insights from various websites.
In the case of Expedia, a leading online travel agency (OTA) and metasearch engine, web scraping allows you to collect valuable data on hotels, flights, rental cars, cruises, and vacation packages. This data allows you to analyze price trends, track deals, and discounts, monitor customer reviews, and even create travel apps or websites.
Scraping Expedia
In this blog post, we will discuss essential web scraping concepts. To ensure you’re equipped with the necessary skills to scrape Expedia’s website, we’ll also share practical examples and step-by-step tutorials on how to effectively navigate through the intricacies of the platform.
Setting up the prerequisites for scraping Expedia
In this tutorial, we are going to use Python 3.x.
I hope you have already installed Python on your machine. If not then you can download it from here.
Then create a folder in which you will keep the Python script. Then create a Python file where you will write the code.
mkdir Expedia
Then inside this folder create a Python file that will be used to write Python code for scraping Expedia.
Installation
For scraping Expedia we will take the support of some III party libraries.
Selenium– Selenium is a popular web scraping tool for automating web browsers. It is often used to interact with dynamic websites, where the content of the website changes based on user interactions or other events. You can install it like this.
pip install selenium
2. BeautifulSoup– It will be used for parsing raw HTML. You can install it like this.
pip install beautifulsoup4
3. We also need a Chromium web driver to render Expedia. Remember to keep the version of the Chromium web driver and your Chrome browser the same otherwise, it will keep generating an error.
Let’s first create a small setup and render the website. This is just to make sure everything works fine for us later. The target URL for this tutorial will be a hotel page from Expedia.
from bs4 import BeautifulSoup
from selenium import webdriver
import time
PATH = 'C:\Program Files (x86)\chromedriver.exe'
l=list()
o={}
target_url = "https://www.expedia.com/Cansaulim-Hotels-Heritage-Village-Resort-Spa-Goa.h2185154.Hotel-Information?=one-key-onboarding-dialog&chkin=2023-05-13&chkout=2023-05-14&destType=MARKET&destination=Goa%2C%20India%20%28GOI-Dabolim%29&latLong=15.383019%2C73.838253®ionId=6028089&rm1=a2"
driver=webdriver.Chrome(PATH)
driver.get(target_url)
time.sleep(5)
resp = driver.page_source
driver.close()
print(resp)
The code is pretty straightforward but let me break it down for you.
The first three lines import the required modules, including BeautifulSoup for parsing HTML documents, Selenium WebDriver for automating web browsers, and time for pausing the program execution for a specified amount of time.
The next line sets the path for the Chrome WebDriver executable file. The WebDriver is needed to launch the Chrome browser for web scraping.
The next two lines define an empty list l and an empty dictionary o that will be used later in the program to store the scraped data.
The target_url variable contains the URL of the target Expedia page that we want to scrape. It includes the check-in and check-out dates, the destination, and other parameters needed to perform a hotel search.
The webdriver.Chrome(PATH) line launches the Chrome browser using the Chrome WebDriver executable file. The PATH variable specifies the location of the Chrome WebDriver executable file.
The driver.get(target_url) line loads the target URL in the Chrome browser.
The time.sleep(5) line pauses the program execution for 5 seconds to give the web page time to load and render.
The driver.page_source line retrieves the HTML source code of the loaded web page.
The driver.close() line closes the Chrome browser.
Finally, the print(resp) line prints the retrieved HTML source code to the console output.
I hope you have got an idea now. Before we run this code let’s see what the page actually looks like in our browser.
As you can see at the top there is the name of the hotel and at the bottom, you can find multiple room types and their pricing. Now, let’s run our code and see what appears on our screen.
This will appear on your Chrome Webdriver screen once you run your code. Did you notice the difference? Well, the prices are not visible when we run the code. Why is that? The reason behind this is HTTP headers. While scraping Expedia we have to pass multiple headers like User-Agent, Accept, Accept-Encoding, Referer, etc.
By passing all these headers in web scraping requests, we can make the request appear more like a legitimate user request, thereby reducing the chances of being detected and blocked by the website.
So, let’s make the changes to the code and then run it.
We have created a new instance webdriver.ChromeOptions() which is a class that allows you to configure options for the Chrome browser. Then we added five headers using add_argument() method. add_argument() helps us to add command-line arguments to the options.
As you can see we have managed to render the complete page of Expedia by adding custom headers. Now, let’s decide what exactly we want to scrape.
What are we going to scrape from Expedia?
It is always better to decide in advance what data you want to parse from the raw data.
For this tutorial, we are going to scrape:
Name of the hotel
Room Type
Price Before Tax
Price After Tax
I have highlighted these data points in the above image. Please refer to that if you have any confusion.
Let’s start scraping Expedia!!
Before we scrape any text we have to identify their position inside the DOM. Continuing with the above code, we will first find the locations of each element and then extract them with the help of BS4. We will use .find() and .find_all() methods provided by the BS4. If you want to learn more about BS4 then you should refer BeautifulSoup Tutorial.
Let’s start with the name first.
So, the name is stored inside the h1 tag. Scraping this would be super easy.
Here we created a BeautifulSoup object. The resulting soup the object is an instance of the BeautifulSoup class, which provides a number of methods for searching and manipulating the parsed HTML document.
Then using .find() method of BS4 we are extracting the text.
Now let’s scrape the room-type data. But before that let us examine where are these room blocks are located.
As you can see this complete section of rooms is located inside div tag with attribute data-stid whose value is section-room-list.
Now, it will be much easier to scrape room-type text.
You will notice that each room-type text is stored inside div tag with class uitk-spacing-padding-small-blockend-half and this element is inside div tag with class uitk-spacing-padding-blockstart-three.
Since there are multiple rooms then we have to run a for loop in order to access all the room details. All we have to do is run a for loop which will iterate over Offers list.
Now, both the pricing are stored inside div tag with an attribute data-test-id whose value is price-summary-message-line. We just have to find all such elements inside each room block. For that I will use find_all() method inside the loop.
Once you run this code you will get this on your console.
Using Scrapingdog for scraping Expedia
The advantages of using Scrapingdog Web Scraping API are:
You won’t have to manage headers anymore.
Every request will go through a new IP. This keeps your IP anonymous.
Our API will automatically retry on its own if the first hit fails.
Scrapingdog uses residential proxies to scrape Expedia. This increases the success rate of scraping Expedia or any other such website.
You have to sign up for the free account to start using it. It will take just 10 seconds to get you started with Scrapingdog.
Scrapingdog Home Page
Once you sign up, you will be redirected to your dashboard. The dashboard will look somewhat like this.
You have to use your API key.
Now, you can paste your Expedia page link to the left and then select JS Rendering as Yes. After this click on Copy Code from the right. Now use this API in your script to scrape Expedia.
With Scrapingdog you won’t have to worry about any Chrome drivers. It will be handled automatically for you. You just have to make a normal GET request to the API.
With Scrapingdog’s API for web scraping, you will be able to scrape Expedia with a lightning-fast speed that too without getting blocked.
Conclusion
In this tutorial, we saw how headers play a crucial role while scraping websites like Expedia itself. Using Python and Selenium we were able to download full HTML code and then using BS4 we were able to parse the data.
You can use Makcorps Hotel API to get hotel prices of more than 200 OTAs (including Expedia).
I hope you like this little tutorial and if you do then please do not forget to share it with your friends and on your social media.
The best way to scrape Expedia is by using web scraping API. Scrapingdog can help you extract data at a very economical cost. Check out our pricing plan here.
He created it when he had to test a web application multiple times, manually leading to higher inefficiency and effort. The Selenium API has the advantage of controlling Firefox, chrome through an external adaptor. It has a much larger community than Puppeteer. It is an executable module that runs a script on a browser instance & hence is also called Python headless browser scraping.
Why you should use Selenium?
Today selenium is mainly used for web scraping and automation purposes.
clicking on buttons
filling forms
scrolling
taking a screenshot
Web Scraping with Selenium & Python
Requirements for Web Scraping With Selenium & Python
Generally, web scraping is divided into two parts:
Fetching data by making an HTTP request
Extracting important data by parsing the HTML DOM
Libraries & Tools
Beautiful Soupis a Python library for pulling data out of HTML and XML files.
Seleniumis used to automate web browser interaction from Python.
Our setup is pretty simple. Just create a folder and install Beautiful Soup & requests. For creating a folder and installing libraries, type the below-given commands. I am assuming that you have already installed Python 3.x.
Once you have installed all the libraries, create a Python file inside the folder. I am using scraping.py and then importing all the libraries as shown below. Also, import time in order to let the page load completely.
from selenium import webdriver
from bs4 import BeautifulSoup
import time
What We Are Going to Scrape Using Selenium
We are going to extract the Python Book price and title from Walmart via selenium.
Scraping Book Price and Title using Selenium
Preparing the Food
Now, since we have all the ingredients to prepare the scraper, we should make a GET request to the target URL to get the raw HTML data.
Now, I am letting it sleep for four seconds. The reason behind this is to let the page load completely. Then we will use BeautifulSoup to parse HTML. driver.page_source will return raw HTML from the website.
I have also declared an empty list and dictionary to create a JSON object of the data we are going to scrape.
Book Title in Inspection of Page Source
After inspecting the title in chrome developer tools, we can see that the title is stored in a “div” tag with class “search-result-product-title listview”.
Inspecting Book Price
Similarly, the price is stored in “span” tag with class “price display-inline-block arrange-fit price price-main.” Also, we have to dive deep inside this tag to find “visuallyhidden” to find the price in text format.
We have all the titles and prices stored in a list format in variable Title and Price, respectively. We are going to start a for loop so that we can reach each and every book.
for i in range(0,len(Title)):
try:
k[“Title{}”.format(i+1)]=Title[i].text.replace(“\n”,””)
except:
k[“Title{}”.format(i+1)]=None
try:
k[“Price{}”.format(i+1)]=Price[i].find(“span”,{“class”:”visuallyhidden”}).text.replace(“\n”,””)
except:
k[“Price{}”.format(i+1)]=None
books.append(k)
k={}
So, finally, we have all the prices and titles stored inside the list books. After printing it we got.
{
“PythonBooks”: [
{
“Title1”: “Product TitlePython : Advanced Predictive Analytics”,
“Price1”: “$111.66”
},
{
“Title2”: “Product TitlePython”,
“Price2”: “$6.99”
},
{
“Title3”: “Product TitlePython : Learn How to Write Codes-Your Perfect Step-By-Step Guide”,
“Price3”: “$16.05”
},
{
“Title4”: “Product TitlePython: The Complete Beginner’s Guide”,
“Price4”: “$14.99”
},
{
“Price5”: “$48.19”,
“Title5”: “Product TitlePython : The Complete Reference”
},
{
“Title6”: “Product TitleThe Greedy Python : Book & CD”,
“Price6”: “$10.55”
},
{
“Price7”: “$24.99”,
“Title7”: “Product TitlePython: 2 Manuscripts in 1 Book: -Python for Beginners -Python 3 Guide (Paperback)”
},
{
“Title8”: “Product TitleBooks for Professionals by Professionals: Beginning Python Visualization: Crafting Visual Transformation Scripts (Paperback)”,
“Price8”: “$67.24”
},
{
“Title9”: “Product TitlePython for Kids: A Playful Introduction to Programming (Paperback)”,
“Price9”: “$23.97”
},
{
“Price10”: “$17.99”,
“Title10”: “Product TitlePython All-In-One for Dummies (Paperback)”
},
{
“Title11”: “Product TitlePython Tutorial: Release 3.6.4 (Paperback)”,
“Price11”: “$14.53”
},
{
“Price12”: “$13.58”,
“Title12”: “Product TitleCoding for Kids: Python: Learn to Code with 50 Awesome Games and Activities (Paperback)”
},
{
“Price13”: “$56.10”,
“Title13”: “Product TitlePython 3 Object Oriented Programming (Paperback)”
},
{
“Title14”: “Product TitleHead First Python: A Brain-Friendly Guide (Paperback)”,
“Price14”: “$35.40”
},
{
“Title15”: “Product TitleMastering Object-Oriented Python — Second Edition (Paperback)”,
“Price15”: “$44.99”
},
{
“Title16”: “Product TitlePocket Reference (O’Reilly): Python Pocket Reference: Python in Your Pocket (Paperback)”,
“Price16”: “$13.44”
},
{
“Title17”: “Product TitleData Science with Python (Paperback)”,
“Price17”: “$39.43”
},
{
“Title18”: “Product TitleHands-On Deep Learning Architectures with Python (Paperback)”,
“Price18”: “$29.99”
},
{
“Price19”: “$37.73”,
“Title19”: “Product TitleDjango for Beginners: Build websites with Python and Django (Paperback)”
},
{
“Title20”: “Product TitleProgramming Python: Powerful Object-Oriented Programming (Paperback)”,
“Price20”: “$44.21”
}
]
}
Similarly, you can scrape any JavaScript-enabled website using Selenium and Python. If you don’t want to run these scrapers on your server, try Scrapingdog, a proxy Web Scraping API.
Conclusion
In this article, we understood how we could scrape data using Selenium & BeautifulSoup regardless of the type of website. I hope now you feel more comfortable scraping web pages.
When building a web scraper with Ruby, one of the most important tools at your disposal is the HTTP client. An HTTP client is a software library or framework that enables you to send and receive HTTP requests(GET, POST, PUT, etc) and responses to communicate with web servers.
With so many HTTP clients available in the Ruby ecosystem, it can be challenging to choose the best one for your project.
Ruby HTTP Clients
In this article, we’ll take a look at some of the best Ruby HTTP clients available and compare their features, performance, and ease of use. Whether you’re building a simple web scraper or a complex RESTful API, choosing the right HTTP client can make all the difference in your project’s success. So, without further ado, let’s dive in!
Factors on which rank will be decided for Ruby HTTP Clients
Let me just define what set of factors I am going to consider in order to rank Ruby HTTP clients in decreasing order.
Performance– The library should be fast and lightweight. It should be able to handle a large number of concurrent requests without delaying the response.
Documentation– Clear and price documentation is another factor to benchmark any library. It should be well written so that developers can jump-start their work asap.
Community– The community should be large enough to cater to all the problems one might face while coding.
Github Star– At last, we will also look at the number of stars a library has. The number will help us understand its quality and perceived utility.
For testing the speed we are going to make GET and POST requests with libraries and then test the timing.
For the GET request, we are going to use this API and for the POST request, we are going to use this API.
You have to create a dedicated folder in which we will keep our ruby file. I am naming the file as check.rb. You can pick any name you like. To run the file you just have to open the folder in your terminal and type ruby check.rb and then hit enter.
Our setup is complete let’s start testing the libraries.
HTTParty
It is a ruby gem that is made on top of Net::HTTP library. It is super simple to use and comes with features like query parameters, request headers, and basic authentication. Let’s see how we can make a GET and a POST request with httparty and measure the time taken by the library to implement the task.
For measuring the time taken we will use the Benchmark library.
GET Request
require 'httparty'
require 'benchmark'
time = Benchmark.realtime do
response = HTTParty.get('https://httpbin.org/get')
puts response.body
end
puts "Request took #{time} seconds"
For this example, we have used realtime() method provided by the Benchmark library to measure the time taken by the request. It will return the number of seconds it took to complete the request.
Once I run this code I get Request took 0.398039 seconds on the terminal. That means this library took 0.398 seconds to complete the task. Let’s make a POST request now.
POST request
require 'httparty'
require 'benchmark'
time = Benchmark.realtime do
response = HTTParty.post('https://httpbin.org/post', body: { foo: 'bar' })
puts response.body
end
puts "Request took #{time} seconds"
Once I run this code I get Request took 0.435745 seconds on the terminal. So, this means that the library took around 0.436 seconds to complete the request.
The documentation of the library is very well written and it explains each step with an example. Other than that you can find great tutorials from other websites on httparty. This indicates the library has great community support.
HTTParty can automatically parse response bodies in various formats, including JSON, XML, and YAML, and return them as Ruby objects or hashes. Plus it can handle error messages by returning appropriate messages.
Overall any developer can kick-start his/her journey with this gem comfortably.
Faraday
This is another HTTP client that provides simple APIs for making HTTP connections with any web server. It has the capability to handle connection- timeout, errors, and it can even retry the request for you if the first connection could not go through successfully. The retry function is very helpful when it comes to web scraping. You can keep trying until a request status is 200.
It also provides adaptors for Typhoeus, Excon and Net::HTTP, it opens options for developers to choose an adaptor according to their own requirements.
Now let’s benchmark this library by making GET and POST requests.
require 'faraday'
require 'benchmark'
time = Benchmark.realtime do
connection = Faraday.new('https://httpbin.org')
response = connection.get('/get')
puts response.body
end
puts "Request took #{time} seconds"
Once I run this code I get Request took 0.054039 seconds on the terminal. That means this library took 0.054 seconds to complete the task. Let’s make a POST request now.
require 'faraday'
require 'benchmark'
time = Benchmark.realtime do
connection = Faraday.new('https://httpbin.org')
response = connection.post('/post', {foo: 'bar'})
puts response.body
end
puts "Request took #{time} seconds"
POST request with faraday took around 0.081 seconds. Well, the speed is just fantastic!
Apart from the speed the documentation of faraday is very well written. It explains every method it has to offer with an example. Faraday also uses a middleware architecture that allows you to modify requests and responses in a flexible and composable way. You can add or remove middleware to customize the behavior of your requests.
While scraping any website at scale you have to modify the headers on every new request for that faraday provides a simple way to set custom headers and options for your requests, such as authentication credentials, timeouts, and SSL settings.
When you search for faraday on google, you will find many tutorials. This means that community support is also great for this library.
Overall, Faraday is a powerful and flexible library that can simplify the process of making HTTP requests and handling responses in your Ruby applications.
RestClient
It is another popular HTTP client library. With this library too you can make GET, POST, DELETE, etc requests to any http or https API endpoint.
RestClient also allows you to set a timeout for your requests, ensuring that your application doesn’t hang or become unresponsive if a request takes too long to complete.
Let’s see how this library performs with GET and POST requests.
require 'rest-client'
require 'benchmark'
time = Benchmark.realtime do
response = RestClient.get 'https://httpbin.org/get'
puts "Response code: #{response.code}"
end
puts "Request took #{time} seconds"
After running this code I am getting 0.173 seconds. Now, let’s see how this library performs with a POST request.
require 'rest-client'
require 'benchmark'
time = Benchmark.realtime do
response = RestClient.post 'https://httpbin.org/post', { :param1 => 'value1', :param2 => 'value2' }
puts "Response code: #{response.code}"
end
puts "Request took #{time} seconds"
It took around 0.1898 seconds to make the POST request.
Just like Faraday, RestClient also allows developers to set custom headers and parameters for HTTP requests, which makes it flexible and customizable for different use cases.
I did not find any major tutorials on RestClient and the documentation is not so well written.
Typhoeus
Typhoeus is a Ruby gem that can make parallel HTTP requests with ease. Since it is built on top of libcurl library you can make asynchronous calls. It means you can make multiple API calls and then handle the response as they arrive.
Let’s check its performance with a GET request.
require 'typhoeus'
require 'benchmark'
time = Benchmark.realtime do
response = Typhoeus.get('https://httpbin.org/get')
puts "Response code: #{response.code}"
puts "Response body: #{response.body}"
end
puts "Request took #{time} seconds"
So, it took around 0.1282 seconds to implement the request. Let’s check how it performs with a POST request.
You will find the documentation of this library quite helpful. It explains everything right from installation to advanced methods with an example. You can even set the maximum concurrency of the request with it. By the way, the built-in limit of concurrency is 200.
If you are looking for a high-performance HTTP client then Typoeus could be one of the choices. Overall it’s a great library.
Excon
It is a pure Ruby HTTP client library that is built on top of the Ruby standard library Net::HTTP. It can provide SSL/TLS encryptions, and streaming responses and you can make asynchronous parallel requests. Many famous Ruby frameworks like Fog and Chef also use this library.
Let’s check the performance of this library with a simple GET request.
require 'excon'
require 'benchmark'
url = 'https://httpbin.org/get'
time = Benchmark.realtime do
Excon.get(url)
end
puts "Time taken: #{time.round(2)} seconds"
So, it took around 0.23 seconds to make the GET request. Let’s perform a test with a POST request.
require 'excon'
require 'benchmark'
url = 'https://httpbin.org/post'
payload = {key1: 'value1', key2: 'value2'}
time = Benchmark.realtime do
Excon.post(url, body: payload.to_json, headers: {'Content-Type' => 'application/json'})
end
puts "Time taken: #{time.round(2)} seconds"
POST request took around 0.28 seconds.
The documentation is quite detailed which is great news for beginners. Excon is backed by a large community that keeps this library updated. Regular new updates are released to minimize any errors.
On the other hand, Excon does not come with built-in middleware for common tasks such as JSON parsing or logging. While this allows for greater flexibility, it may require more setup time. Excon has some advanced features that make the learning curve a bit steeper.
Results!!
Let’s compare all the stats and see who is the clear winner.
As you can see Faraday is a clear winner in terms of speed. But it is in close competition with HttParty in terms of Stars marked on their GitHub repository. But overall Faraday is the winner due to its speed and great community support.
In terms of speed, HTTParty is very slow in comparison with other libraries. But since it has great community support you can consider this library for smaller projects. You will find great tutorials on this library on the internet.
Conclusion
In this article, we examined the top five popular libraries in terms of their speed of execution and community support. And Faraday came out as the clear winner. But it does not mean that other libraries are not capable of building apps and scrapers. But it is advisable to use Faraday while building any web scraper as this library can speed up web scraping. Faraday is 87% faster than HTTParty which is just tremendous. Regular updates are made to this library to make this library even more powerful.
You can of course test them all at your end with the code snippets shared above. Speed will depend on the network but overall faraday will come out as the clear winner.
I hope you like this little tutorial and if you do then please do not forget to share it with your friends and on your social media.
Additional Resources
Here are a few additional resources that you may find helpful during your web scraping journey:
The e-commerce industry has witnessed an unprecedented surge in recent years, transforming from a mere convenience to an essential facet of our daily lives.
As digital storefronts multiply and consumers increasingly turn to online shopping, there’s a burgeoning demand for data that can drive decision-making, competitive strategies, and customer engagement in the digital marketplace.
According to statistics provided by Marketsplash, e-commerce has not only etched its dominance in the retail sector but is also the largest consumer of web scraping techniques. Astoundingly, close to 50% of the market share in web scraping is dedicated to this industry alone.
This pivotal role of data extraction underscores the importance of understanding and leveraging these techniques, particularly for those looking to carve a niche in the e-commerce landscape.
In this comprehensive guide, we will be using Python to scrape Amazon and do price scraping from this platform and demonstrate how to extract crucial information to help you make well-informed decisions in your business or personal ventures.
Scraping Amazon
If you are in a hurry and have no time to look at the whole procedure in this blog, you can try our dedicated Amazon Scraper API for Free Now!! The API is designed to give you the response in JSON format.
Setting up the prerequisites
I am assuming that you have already installed python 3.x on your machine. If not then you can download it from here. Apart from this, we will require two III-party libraries of Python.
Requests– Using this library we will make an HTTP connection with the Amazon page. This library will help us to extract the raw HTML from the target page.
BeautifulSoup– This is a powerful data parsing library. Using this we will extract necessary data out of the raw HTML we get using the requests library.
Before we install these libraries we will have to create a dedicated folder for our project.
mkdir amazonscraper
Now, we will have to install the above two libraries in this folder. Here is how you can do it.
pip install beautifulsoup4
pip install requests
Now, you can create a Python file by any name you wish. This will be the main file where we will keep our code. I am naming it amazon.py.
Downloading raw data from amazon.com
Let’s make a normal GET request to our target page and see what happens. For GET request we are going to use the requests library.
This is a captcha from amazon.com and this happens once their architecture observes that the incoming request is from a bot/script and not from a real human being.
To bypass this on-site protection of Amazon we can send some headers like User-Agent. You can even check what headers are sent to amazon.com once you open the URL in your browser. You can check them from the network tab.
Once you pass this header to the request, your request will act like a request coming from a real browser. This can melt down the anti-bot wall of amazon.com. Let’s pass a few headers to our request.
import requests
from bs4 import BeautifulSoup
target_url="https://www.amazon.com/dp/B0BSHF7WHW"
headers={"accept-language": "en-US,en;q=0.9","accept-encoding": "gzip, deflate, br","User-Agent":"Mozilla/5.0 (Windows NT 10.0; Win64; x64) AppleWebKit/537.36 (KHTML, like Gecko) Chrome/111.0.0.0 Safari/537.36","accept": "text/html,application/xhtml+xml,application/xml;q=0.9,image/avif,image/webp,image/apng,*/*;q=0.8,application/signed-exchange;v=b3;q=0.7"}
resp = requests.get(target_url, headers=headers)
print(resp.text)
Once you run this code you might be able to bypass the anti-scraping protection wall of Amazon.
Now let’s decide what exact information we want to scrape from the page.
What are we going to scrape from Amazon?
It is always great to decide in advance what are you going to extract from the target page. This way we can analyze in advance which element is placed where inside the DOM.
Product details we are going to scrape from Amazon
We are going to scrape five data elements from the page.
Name of the product
Images
Price (Most important)
Rating
Specs
First, we are going to make the GET request to the target page using the requests library and then using BS4 we are going to parse out this data. Of course, there are multiple other libraries like lxml that can be used in place of BS4 but BS4 has the most powerful and easy-to-use API.
Before making the request we are going to analyze the page and find the location of each element inside the DOM. One should always do this exercise to identify the location of each element.
We are going to do this by simply using the developer tool. This can be accessed by simply right-clicking on the target element and then clicking on the inspect. This is the most common method, you might already know this.
Identifying the location of each element
Location of the title tag
Identifying location of title tag in source code of amazon website
Once you inspect the title you will find that the title text is located inside the h1 tag with the id title.
Coming back to our amazon.py file, we will write the code to extract this information from Amazon.
Here the line soup=BeautifulSoup(resp.text,’html.parser’) is using the BeautifulSoup library to create a BeautifulSoup object from an HTTP response text, with the specified HTML parser.
Then using soup.find() method will return the first occurrence of the tag h1 with id title. We are using .text method to get the text from that element. Then finally I used .strip() method to remove all the whitespaces from the text we receive.
Once you run this code you will get this.
[{'title': 'Apple 2023 MacBook Pro Laptop M2 Pro chip with 12‑core CPU and 19‑core GPU: 16.2-inch Liquid Retina XDR Display, 16GB Unified Memory, 1TB SSD Storage. Works with iPhone/iPad; Space Gray'}]
If you have not read the above section where we talked about downloading HTML data from the target page then you won’t be able to understand the above code. So, please read the above section before moving ahead.
Location of the image tag
This might be the most tricky part of this complete tutorial. Let’s inspect and find out why it is a little tricky.
Inspecting image tag in the source code of amazon website
As you can see the img tag in which the image is hidden is stored inside div tag with class imgTagWrapper.
Once you print this it will return 3. Now, there are 6 images and we are getting just 3. The reason behind this is JS rendering. Amazon loads its images through an AJAX request at the backend. That’s why we never receive these images when we make an HTTP connection to the page through requests library.
Finding high-resolution images is not as simple as finding the title tag. But I will explain to you step by step how you can find all the images of the product.
Copy any product image URL from the page.
Then click on the view page source to open the source page of the target webpage.
Then search for this image.
You will find that all the images are stored as a value for hiRes key.
All this information is stored inside a script tag. Now, here we will use regular expressions to find this pattern of “hiRes”:”image_url”
We can still use BS4 but it will make the process a little lengthy and it might slow down our scraper. For now, we will use (.+?)non-greedy matches for one or more characters. Let me explain what each character in this expression means.
The . matches any character except a newline
The + matches one or more occurrences of the preceding character.
The ? makes the match non-greedy, meaning that it will match the minimum number of characters needed to satisfy the pattern.
The regular expression will return all the matched sequences of characters from the HTML string we are going to pass.
This will return all the high-resolution images of the product in a list. In general, it is not advised to use regular expression in data parsing but it can do wonders sometimes.
Parsing the price tag
There are two price tags on the page, but we will only extract the one which is just below the rating.
We can see that the price tag is stored inside span tag with class a-price. Once you find this tag you can find the first child span tag to get the price. Here is how you can do it.
In the same manner, we can scrape the specs of the device.
Extract the specs of the device
These specs are stored inside these tr tags with class a-spacing-small. Once you find these you have to find both the span under it to find the text. You can see this in the above image. Here is how it can be done.
specs_arr=[]
specs_obj={}
specs = soup.find_all("tr",{"class":"a-spacing-small"})
for u in range(0,len(specs)):
spanTags = specs[u].find_all("span")
specs_obj[spanTags[0].text]=spanTags[1].text
specs_arr.append(specs_obj)
o["specs"]=specs_arr
Using .find_all() we are finding all the tr tags with class a-spacing-small. Then we are running a for loop to iterate over all the tr tags. Then under for loop we find all the span tags. Then finally we are extracting the text from each span tag.
Once you print the object o it will look like this.
Throughout the tutorial, we have used try/except statements to avoid any run time error. We have not managed to scrape all the data we decided to scrape at the beginning of the tutorial.
Complete Code
You can of course make a few changes to the code to extract more data because the page is filled with large information. You can even use cron jobs to mail yourself an alert when the price drops. Or you can integrate this technique into your app, this feature can mail your users when the price of any item on Amazon drops.
With the above code, your scraping journey will come to a halt, once Amazon recognizes a pattern in the request.
To avoid this you can keep changing your headers to keep the scraper running. You can rotate a bunch of headers to overcome this challenge. Here is how it can be done.
import requests
from bs4 import BeautifulSoup
import re
import random
l=[]
o={}
specs_arr=[]
specs_obj={}
useragents=['Mozilla/5.0 (Macintosh; Intel Mac OS X 10_12_2) AppleWebKit/537.36 (KHTML, like Gecko) Chrome/100.0.4896.88 Safari/537.36',
'Mozilla/5.0 (Macintosh; Intel Mac OS X 10_11_1) AppleWebKit/537.36 (KHTML, like Gecko) Chrome/100.0.4896.127 Safari/537.36',
'Mozilla/5.0 (Macintosh; Intel Mac OS X 10_14_2) AppleWebKit/537.36 (KHTML, like Gecko) Chrome/100.0.4896.127 Safari/537.36',
'Mozilla/5.0 (Macintosh; Intel Mac OS X 11_1) AppleWebKit/537.36 (KHTML, like Gecko) Chrome/100.0.4894.117 Safari/537.36',
'Mozilla/5.0 (Macintosh; Intel Mac OS X 11_4) AppleWebKit/537.36 (KHTML, like Gecko) Chrome/100.0.4855.118 Safari/537.36',
'Mozilla/5.0 (Macintosh; Intel Mac OS X 10_11_4) AppleWebKit/537.36 (KHTML, like Gecko) Chrome/100.0.4896.127 Safari/537.36',
'Mozilla/5.0 (Macintosh; Intel Mac OS X 10_12_0) AppleWebKit/537.36 (KHTML, like Gecko) Chrome/100.0.4896.127 Safari/537.36',
'Mozilla/5.0 (Macintosh; Intel Mac OS X 10_14_1) AppleWebKit/537.36 (KHTML, like Gecko) Chrome/100.0.4896.88 Safari/537.36',
'Mozilla/5.0 (Macintosh; Intel Mac OS X 10_1) AppleWebKit/537.36 (KHTML, like Gecko) Chrome/100.0.4892.86 Safari/537.36',
'Mozilla/5.0 (Macintosh; Intel Mac OS X 11_4) AppleWebKit/537.36 (KHTML, like Gecko) Chrome/100.0.4854.191 Safari/537.36',
'Mozilla/5.0 (Macintosh; Intel Mac OS X 11_1) AppleWebKit/537.36 (KHTML, like Gecko) Chrome/100.0.4859.153 Safari/537.36',
'Mozilla/5.0 (Macintosh; Intel Mac OS X 10_14_3) AppleWebKit/537.36 (KHTML, like Gecko) Chrome/100.0.4896.79 Safari/537.36',
'Mozilla/5.0 (Macintosh; Intel Mac OS X 10_15_7) AppleWebKit/537.36 (KHTML, like Gecko) Chrome/100.0.4896.127 Safari/537.36/null',
'Mozilla/5.0 (Macintosh; Intel Mac OS X 10_15_7) AppleWebKit/537.36 (KHTML, like Gecko) Chrome/100.0.4896.127 Safari/537.36,gzip(gfe)',
'Mozilla/5.0 (Macintosh; Intel Mac OS X 10_4) AppleWebKit/537.36 (KHTML, like Gecko) Chrome/100.0.4895.86 Safari/537.36',
'Mozilla/5.0 (Macintosh; Intel Mac OS X 12_3_1) AppleWebKit/537.36 (KHTML, like Gecko) Chrome/100.0.4896.127 Safari/537.36',
'Mozilla/5.0 (Macintosh; Intel Mac OS X 11_13) AppleWebKit/537.36 (KHTML, like Gecko) Chrome/100.0.4860.89 Safari/537.36',
'Mozilla/5.0 (Macintosh; Intel Mac OS X 11_5) AppleWebKit/537.36 (KHTML, like Gecko) Chrome/100.0.4885.173 Safari/537.36',
'Mozilla/5.0 (Macintosh; Intel Mac OS X 10_15_7) AppleWebKit/537.36 (KHTML, like Gecko) Chrome/100.0.4864.0 Safari/537.36',
'Mozilla/5.0 (Macintosh; Intel Mac OS X 11_12) AppleWebKit/537.36 (KHTML, like Gecko) Chrome/100.0.4877.207 Safari/537.36',
'Mozilla/5.0 (Macintosh; Intel Mac OS X 10_12_1) AppleWebKit/537.36 (KHTML, like Gecko) Chrome/100.0.4896.127 Safari/537.36',
'Mozilla/5.0 (Macintosh; Intel Mac OS X 12_2_1) AppleWebKit/537.36 (KHTML, like Gecko) Chrome/100.0.4896.60 Safari/537.36',
'Mozilla/5.0 (Macintosh; Intel Mac OS X 11_6) AppleWebKit/537.36 (KHTML, like Gecko) Chrome/100.0.4896.127 Safari/537.36',
'Mozilla/5.0 (Macintosh; Intel Mac OS X 10_12_6) AppleWebKit/537.36 (KHTML%2C like Gecko) Chrome/100.0.4896.127 Safari/537.36',
'Mozilla/5.0 (Macintosh; Intel Mac OS X 10_14_6) AppleWebKit/537.36 (KHTML, like Gecko) Chrome/100.0.4896.133 Safari/537.36',
'Mozilla/5.0 (Macintosh; Intel Mac OS X 10_16_0) AppleWebKit/537.36 (KHTML, like Gecko) Chrome/100.0.4896.75 Safari/537.36',
'Mozilla/5.0 (Macintosh; Intel Mac OS X 10_12) AppleWebKit/537.36 (KHTML, like Gecko) Chrome/100.0.4872.118 Safari/537.36',
'Mozilla/5.0 (Macintosh; Intel Mac OS X 12_3_1) AppleWebKit/537.36 (KHTML, like Gecko) Chrome/100.0.4896.88 Safari/537.36',
'Mozilla/5.0 (Macintosh; Intel Mac OS X 11_13) AppleWebKit/537.36 (KHTML, like Gecko) Chrome/100.0.4876.128 Safari/537.36',
'Mozilla/5.0 (Macintosh; Intel Mac OS X 10_14_3) AppleWebKit/537.36 (KHTML%2C like Gecko) Chrome/100.0.4896.127 Safari/537.36',
'Mozilla/5.0 (Macintosh; Intel Mac OS X 10_11_3) AppleWebKit/537.36 (KHTML, like Gecko) Chrome/100.0.4896.127 Safari/537.36']
target_url="https://www.amazon.com/dp/B0BSHF7WHW"
headers={"User-Agent":useragents[random.randint(0,31)],"accept-language": "en-US,en;q=0.9","accept-encoding": "gzip, deflate, br","accept": "text/html,application/xhtml+xml,application/xml;q=0.9,image/avif,image/webp,image/apng,*/*;q=0.8,application/signed-exchange;v=b3;q=0.7"}
resp = requests.get(target_url,headers=headers)
print(resp.status_code)
if(resp.status_code != 200):
print(resp)
soup=BeautifulSoup(resp.text,'html.parser')
try:
o["title"]=soup.find('h1',{'id':'title'}).text.lstrip().rstrip()
except:
o["title"]=None
images = re.findall('"hiRes":"(.+?)"', resp.text)
o["images"]=images
try:
o["price"]=soup.find("span",{"class":"a-price"}).find("span").text
except:
o["price"]=None
try:
o["rating"]=soup.find("i",{"class":"a-icon-star"}).text
except:
o["rating"]=None
specs = soup.find_all("tr",{"class":"a-spacing-small"})
for u in range(0,len(specs)):
spanTags = specs[u].find_all("span")
specs_obj[spanTags[0].text]=spanTags[1].text
specs_arr.append(specs_obj)
o["specs"]=specs_arr
l.append(o)
print(l)
We are using a random library here to generate random numbers between 0 and 31(31 is the length of the useragents list). These user agents are all latest so you can easily bypass the anti-scraping wall.
But again this technique is not enough to scrape Amazon at scale. What if you want to scrape millions of such pages? Then this technique is super inefficient because your IP will be blocked. So, for mass scraping one has to use a web scraping proxy API to avoid getting blocked while scraping.
Every request will go through a new IP. This keeps your IP anonymous.
Our API will automatically retry on its own if the first hit fails.
Scrapingdog uses residential proxies to scrape Amazon. This increases the success rate of scraping Amazon or any other such website.
Here’s a video that will guide you through how to use Scrapingdog to scrape Amazon.
Using Scrapingdog to Scrape Amazon
If you prefer reading though, you can follow along. Sign up for the free account to start using it. It will take just 10 seconds to get you started with Scrapingdog.
Once you sign up, you will be redirected to your dashboard. The dashboard will look somewhat like this.
You have to use your API key.
Now, you can paste your target indeed target page link to the left and then select JS Rendering as No. After this click on Copy Code from the right. Now use this API in your script to scrape Amazon.
You will notice the code will remain somewhat the same as above. We just have to change one thing and that is our target URL. I am not even passing headers anymore. Isn’t that hassle-free scraping?
With this script, you will be able to scrape Amazon with a lightning-fast speed that too without getting blocked.
Note:- We recently launched our dedicated Amazon Scraping API, the output you get is in JSON format.
Forget about getting blocked while scraping Amazon
Try out Scrapingdog Web Scraping API or Checkout Our Dedicated Amazon Scraper API
Conclusion
In this tutorial, we scraped various data elements from Amazon. First, we used requests library to download the raw HTML, and then using BS4 we parsed the data we wanted. You can also use lxml in place of BS4 to extract data. Python and its libraries make scraping very simple for even a beginner. Once you scale you can switch to web scraping APIs to scrape millions of such pages.
Combination of requests and Scrapingdog can help you scale your scraper. You will get more than a 99% success rate while scraping Amazon with Scrapingdog.
Yes, scraping Amazon is allowed as long as you are scraping public information. Extracting private data can cause you problems and legal actions can be taken against it.
Amazon detects scraping by the anti-bot mechanism which can check your IP address and thus can block you if you continue to scrape it. However, using a proxy management system will help you to bypass this security measure.
Additional Resources
Here are a few additional resources that you may find helpful during your web scraping journey:
In this tutorial, we will scrape Yelp and build our Yelp scraper using Python. We’re going to use the power of this programming language to extract valuable insights from Yelp’s rich and extensive database.
Whether you’re a budding data scientist, a curious programmer, or a business analyst seeking novel ways to obtain data, this guide will help you unravel the potential of web scraping Yelp.
From collecting customer reviews to analyzing business ratings, the opportunities are vast. So, let’s embark on this journey, turning unstructured data into meaningful insights, one scrape at a time.
To make things simple, we will use Scrapingdog’s scraping API.
Scaping Yelp Reviews With Python
Why Scrape Yelp Data?
Yelp is an American company that publishes reviews about businesses. The reviews they collect are crowd-sourced. It is the largest directory on the Internet available.
Scraping Yelp data & designing a Yelp data scraper will provide you with a large number of data trends and information. Using this data you can either improve your product or you can show it to your other free clients to convert them to your paid client.
Since Yelp is a business directory it has many businesses listed that can be in your target market. Scraping Yelp data allows you to extract valuable information like business names, contact information, location, and industry to help you create qualified leads a lot faster with a web scraper.
Our setup is pretty simple. Just create a folder and install BeautifulSoup & requests. For creating a folder and installing libraries, type the below-given commands. I assume that you have already installed Python 3. x (The latest version is 3.9 as of April 2022).
Now, create a file inside that folder by any name you like. I am using scraping.py.
Firstly, you have to sign up for the scrapingdog API. It will provide you with 1000 FREE credits. Then just import Beautiful Soup & requests in your file Like this.
from bs4 import BeautifulSoup
import requests
Let’s Start Scraping Yelp Reviews for a Random Restaurant
We are going to scrape public data for this restaurant. We will create a Yelp review scraper for that. We will extract the following information:-
Now, since we have all the ingredients to prepare the scraper, we should make a GET request to the target URL to get the raw HTML data. If you are not familiar with the scraping tool, I urge you to review its documentation.
We will scrape Yelp data using the requests library below.
r = requests.get('https://www.yelp.com/biz/sushi-yasaka-new-york').text
This will provide you with an HTML code of that target URL.
Now, you have to use BeautifulSoup to parse HTML.
soup = BeautifulSoup(r,’html.parser’)
Now, all the reviews are in the form of a list. We have to find all those lists.
We will run for a loop to reach every reviewer. To extract names, places, stars, and reviews, we must first find the tags where this data is stored. For example “Name” is stored in “lemon — a__373c0__IEZFH link__373c0__1G70M link-color — inherit__373c0__3dzpk link-size — inherit__373c0__1VFlE”. Like this, using chrome developer tools, you can find the rest of the tags.
{
“data”: [
{
“review”: “If you’re looking for great sushi on Manhattan’s upper west side, head over to Sushi Yakasa ! Best sushi lunch specials, especially for sashimi. I ordered the Miyabi — it included a fresh oyster ! The oyster was delicious, served raw on the half shell. The sashimi was delicious too. The portion size was very good for the area, which tends to be a pricey neighborhood. The restaurant is located on a busy street (west 72nd) & it was packed when I dropped by around lunchtimeStill, they handled my order with ease & had it ready quickly. Streamlined service & highly professional. It’s a popular sushi place for a reason. Every piece of sashimi was perfect. The salmon avocado roll was delicious too. Very high quality for the price. Highly recommend! Update — I’ve ordered from Sushi Yasaka a few times since the pandemic & it’s just as good as it was before. Fresh, and they always get my order correct. I like their takeout system — you can order over the phone (no app required) & they text you when it’s ready. Home delivery is also available & very reliable. One of my favorite restaurants- I’m so glad they’re still in business !”,
“name”: “Marie S.”,
“stars”: “5 star rating”,
“place”: “New York, NY”
},
{
“review”: “My friends recommended for me to try this place for take out as I was around the area. I ordered the Miyabi, all the sushi and sashimi was very fresh and tasty. They also gave an oyster which was a bonus! The price is great for the quality and amount of fish. I was happily full.”,
“name”: “Lydia C.”,
“stars”: “5 star rating”,
“place”: “Brooklyn, Brooklyn, NY”
},
{
“review”: “Best sushi on UWS and their delivery is quicker than any I’ve seen! I ordered their 3 roll lunch special around 1:40pm and by 2, I was thoroughly enjoying my sushi! Granted, I live only a few blocks away but I was BLOWN away by the quick services. I had, spicy yellowtail, jalapeño yellowtail and tuna avocado roll. Great quality of fish for such a reasonable price. $16 for 3 rolls. This has certainly come by go-to place for amazing, fresh sushi on UWS.”,
“name”: “Ella D.”,
“stars”: “5 star rating”,
“place”: “Manhattan, New York, NY”
},
{
“review”: “One of my favorite sushi places in the city. They have high-quality fish for affordable prices, something you don’t often see in the big apple. I’ve ordered in from here a handful of times and dined in only once. Both modes are equally as delicious. I actually dined in here alone for lunch on my day off and had a great experience. The waiter was friendly and the sushi lunch special (sushi + one roll + oyster) was fabulous. Fresh, affordable, and delicious. Can’t wait to return!”,
“name”: “William S.”,
“stars”: “5 star rating”,
“place”: “New Orleans, LA”
},
{
“review”: “I’d bookmarked this place for omakase a while back. I haven’t had it there yet, but I’d dined in and gotten takeout a couple times. Really fresh sushi. Everything is on point. I would absolutely do omakase here with the quality of fish and freshness. Service was pretty good to. I wish they’d deliver to my apt lol. But I’ll have to wait to be in the area to get my sushi fix there.”,
“name”: “Esther T.”,
“stars”: null,
“place”: “New York, NY”
},
{
“review”: “Sushi Yasaka is the only sushi in town (upper west side) in my mind!!! Very reasonable prices and great quality!! We order from them once a week for the past 5 years…. never disappoint!”,
“name”: “Kaori K.”,
“stars”: “5 star rating”,
“place”: “New York, NY”
},
{
“review”: “This is our go-to sushi delivery place. Very good fish and prompt service. I’ve been ordering from Yasaka for several years and it’s been consistently good. The one time I ate lunch in the restaurant it was hectic and noisy, but it’s great for delivery.”,
“name”: “Sam H.”,
“stars”: “5 star rating”,
“place”: “New York, NY”
},
{
“review”: “BEWARE!!!!! This restaurant gave out my personal information including my phone number to a third party that called the restaurant inquiring about the order that I placed. Total violation of privacy to disclose a customer’s personal information!”,
“name”: “Gina G.”,
“stars”: null,
“place”: “Kahului, HI”
},
{
“review”: “This place was on a top New York City Japanese list and also had strong Yelp review average. The place is underground — has that minimal Japanese feeling and is also cozy and dark. Bento boxes for $16 at lunch is a good deal in Manhattan. Especially for a clean and cozy spot, making this a score in value — given its atmosphere and food quality. The sushi chefs yelled at me when I walked in. I felt kinda shogun warrior. The place was empty at 12 o’clock which I thought was a weird time to open, but the place filled up fast. On the bento I chose mixed tempura for my main dish with brown rice and a spicy tuna roll. It came with a shrimp shumai dumpling and I chose a salad instead of miso soup. Everything was very good. The shrimp shumai were large with a tasty sauce. The spring roll was tasty and not greasy. The tempura also had a light batter, crunchy yet somehow melt in your mouth, with 2 shrimps, an onion, an acorn squash as well as a broccoli floret. The food was so good and reasonably priced. Lots of young bankers and real estate agents surrounded me. Service was swift and kind. This place is better than average in a cozy atmosphere with great prices.”,
“name”: “Scott L.”,
“stars”: null,
“place”: “Manhattan, NY”
},
{
“review”: “My boyfriend and I came for Valentine’s Day and each had the regular omakase, which comes with 12 pieces of nigiri and one roll, at $55 each. While the fish was fresh and satisfactorily tasty, we probably could have gotten something of better value for our experience. Because the bar was fully occupied, we didn’t have the full omakase experience. They put the pieces all on one plate — we probably have been better off ordering a set instead. I really wish that the server had recommended something else for us. Food was a 4, but experience a 3.”,
“name”: “Regina L.”,
“stars”: null,
“place”: “New York, NY”
},
{
“review”: “Its been a while since I had some good sushi so we decided to have a to-go order on a very hot summer day. Sushi delux and a spicy maki combo were packed nicely with a small ice pack. Everything wes fresh and delicious!! Love this place so much for being consistent with their quality and freshness every time we go. Highly recommended”,
“name”: “Sarah C.”,
“stars”: “5 star rating”,
“place”: “New York, NY”
},
{
“review”: “If you want high quality sushi and don’t want to break bank, go to Sushi Yasaka — small, cozy place located at Upper West Side. I came around 1:30 pm and it was packed! I’d recommend making reservations online. Here’s what we ordered: -Sushi Lunch ($16) which comes with 6 pc of sushi and one roll choice, choice of soup or salad -Chirashi Lunch ($20) which comes with 14 pc of sashimi over rice, choice of soup or salad -Two chu-toro sushi ($7/piece) Their lunch special deals are fantastic and affordable. We spent around $55 for all this! I also loved the food presentation as it was brought out on a wooden board. Service was amazing too; our host was very professional and friendly. Sushi was very fresh and for the price and quality, Sushi Yasaka is incredible! We’re definitely going to be regulars here.”,
“name”: “Judy L.”,
“stars”: “5 star rating”,
“place”: “Manhattan, New York, NY”
},
{
“review”: “I can’t eat sushi anymore without comparing it to Sushi Yasaka. The best sushi I have yet to try. Do yourself a favor and hop on over.What makes it great?No attitude or pretense — service is kind and swift. Though many of the guests are Upper West side resident and bankers, it doesn’t feel high brow. You can dress casual. Preparation — the soy sauce and/or wasabi is preapplied to the fish (when it ought). The temperature, acidity, texture of the rice are on point. The rice is evenly molded and consistent. Not dense. Fish is properly sized and proportionate to the rice. Fish is the right texture and brightness — no fishy smell. Variety — Lots of different options to choose from. There are various cuts of the same fish. Lean, medium, and fatty cuts of tuna are available, offering different flavors and textures. There are dessert options for an \”Americanized palate\” such as red bean and green tea fried ice cream. Great selection of wine and Japanese beer to complement your meal. High quality appetizers — Though the sushi is the star of the meal, the appetizers are a close second. Highly recommend the agedashi tofu.”,
“name”: “Penelope H.”,
“stars”: “5 star rating”,
“place”: “Hoboken, NJ”
},
{
“review”: “Love coming back here. It’s always packed so it’s best to come with a reservation.Instead of the omakase, we got the sushi deluxe (9 pc with roll of choice), sushi lunch, and miyabi lunch. The fish is always fresh. The eel avocado roll is some of the best I’ve had. The appetizers also come out hot and fresh (we got the age dashi tofu and the mixed tempura).This is one of the few places I’ve come back to multiple times in the city.”,
“name”: “Rebecca C.”,
“stars”: “5 star rating”,
“place”: “New York, NY”
},
{
“review”: “We came here for an early dinner with a reservation. It got pretty packed quickly so it’d be safe to make a reservation before you go. It’s a pretty small place so probably not great for large groups.For the appetizer, we got the squid. It was really good — tasted fresh and yummy sauce. I’d highly recommend you try it if you like squid.We got a mix of maki rolls (salmon, shrimp tempura, and eel) and sashimi. Everything tasted really fresh and everything is what’d you expect from a classic sushi place. Everything was decently priced too which was a bonus.I’d definitely go again if I’m craving sushi and in the area!”,
“name”: “Chengru L.”,
“stars”: null,
“place”: “Boston, MA”
},
{
“review”: “BEST. OMAKASE. SUSHI. IN. NYC. I live deep in Brooklyn and aside from Levain and the women’s march, there’s pretty limited reason for me to go to the Upper West Side. Sushi Yasaka is that reason. I’ve made the hour long commute twice and both have been exceptionally worth it. Every piece here is delectable, fresh, largely portioned, and deliciously made. The pieces range from toro, salmon, tuna, yellowtail, uni, scallop, snapper, eel, and more, and all of the highest grade and quality. The other thing that makes this place special is the price. It’s only $55 for the 12 piece omakase, but tastes like the sushi you’d get for $200. This is 100% my place of choice to wow out of towners when it comes to sushi .”,
“name”: “Lindsey O.”,
“stars”: “5 star rating”,
“place”: “Brooklyn, NY”
},
{
“review”: “Sushi Yasaka is a fun spot for decently priced sushi!I dined here on a Saturday afternoon w/ a party of 2 and no reservation. The restaurant was full, but we were able to sit at the bar. We ordered our lunch specials (a good deal for the amount of food) and had soup and salad immediately.Our meals took a little longer (maybe 20–30 min) but were worth the wait. We had a tempura bento box and a sushi roll platter. All were delicious! Servers were friendly and very aware of timing. Try this spot!”,
“name”: “Caitlin O.”,
“stars”: null,
“place”: “Coopersburg, PA”
},
{
“review”: “One of the best omakase deals in the city. We were able to snag bar seats at 5:30 PM on a Saturday by calling ahead the day of (although I recommend making a reservation online ahead of time). Each piece of sushi was delectable, and the sushi chefs weren’t overbearing. I especially enjoyed the toro sushi! We also ordered a cold bottle of sake to complement our sushi, and it was relatively affordable but delicious. Only docking down a star because I’m not DREAMING about the sushi or dying to go back as soon as possible. The non-omakase menu did look delicious and beautiful though, so perhaps I’ll try it out again at some point!”,
“name”: “Grace L.”,
“stars”: null,
“place”: “Boston, MA”
},
{
“review”: “My favorite sushi in NYC so far! We fell in love with their lunch section and have already been there twice in the same week! Their Miyabi lunch has an impressive selection of items and includes salad or soup as appetizer, rolls, and sashimi including tuna, salmon and yellowtail. A random musing but their sushi rice is my personal favorite out of all the sushi places we have tried around the country Everything was very fresh and For the price and quality this spot was incredibly tasty and affordable. Aside from the above They also have other lunch combinations with sashimi or sushi rolls only. We have brought our friends here and recommend it highly!”,
“name”: “Linda Y.”,
“stars”: “5 star rating”,
“place”: “Brooklyn, NY”
},
{
“review”: “Solid. Like your mom. Food: 4$ to portion: 3Quality: 4 Service: 3 Ambiance: busy & loud Wait time: insane BB level: 3 Date spot: 3 Han Solo: 3 This just might be the best bargain in the city for the quality of fish vs what they charge. Never had a bad meal, yet. Maybe that’s why they’re always packed! I wouldn’t say it’s a destination, but if you’re in the area, it won’t disappoint for that random Wednesday night post work pedestrian sushi night. Get reservations. You’re welcome.”,
“name”: “Your Mom’s Y.”,
“stars”: null,
“place”: “Manhattan, NY”
}
]
}
There you go!
We have the Yelp data ready to manipulate and maybe store somewhere like in MongoDB. But that is out of the scope of this tutorial.
Remember that if you aren’t using Python but other programming languages like Ruby, Nodejs, or PHP. You can easily find HTML parsing libraries to parse the results from Scrapingdog API.
We have other comprehensive guides made on other programming languages.
Scrapingdog’s API for web scraping can help you extract data from Yelp at scale without getting blocked. You just have to pass the target url and Scrapingdog will create an unbroken data pipeline for you, that too without any blockage.
Scrapingdog Home Page
Scrapingdog is fast and handles all the hassle of handling proxies and passing custom headers. It offers 1000 free API GET Requests.
Forget about getting blocked while scraping the Web
Try out Scrapingdog Web Scraping API & start extracting data from Yelp listings
We hope you enjoyed this tutorial, and we hope to see you soon in Scrapingdog. Happy Scraping!
Yes, Scrapingdog’s Web Scraping API can scrape data from any website including Yelp. The Output will be in JSON format. It offers 1000 API calls in its free plan. Check out the Pricing Plan here.
Scrapingdog offers economical web scraping API. Further, you can use it for scraping any data from the internet. The response time is quick, & the accuracy of data is 100%.
Conclusion
In this article, we understood how you can scrape Yelp data using the data scraping tool & BeautifulSoup regardless of the type of website.
Feel free to comment and ask me anything. You can follow us on Twitter and Medium. Thanks for reading, and please hit the like button!
Scraping Walmart can have many use cases. It is the leading retailer in the USA & has enormous public product data available.
When web scraping prices for Walmart products you can have a close look at any price change.
If the price is lower then you can prefer to buy it. You create a Walmart price scraper that can show trends in price change over a year or so.
In this article, we will learn how we can web scrape Walmart data & create a Walmart price scraper, we will be using Python for this tutorial.
Scraping Walmart Data
But, Why Scrape Walmart with Python?
Python is a widely used & simple language with built-in mathematical functions. It is also flexible and easy to understand even if you are a beginner. The Python community is too big and it helps when you face any error while coding.
Many forums like StackOverflow, GitHub, etc already have the answers to the errors that you might face while coding when you do Walmart scraping.
You can do countless things with Python but for the sake of this article we will be extracting product details from Walmart.
Let’s Begin Web Scraping Walmart with Python
To begin with, we will create a folder and install all the libraries we might need during the course of this tutorial.
For now, we will install two libraries
Requests will help us to make an HTTP connection with Walmart.
BeautifulSoup will help us to create an HTML tree for smooth data extraction.
Walmart loves throwing captchas when they think the request is coming from a script/crawler and not from a browser. To remove this barrier from our way we can simply send some metadata/headers which will make Walmart consider our request as a legit request from a legit browser.
Now, if you are new to web scraping then I would advise you to read more about headers and their importance in Python. For now, we will use seven different headers to bypass Walmart’s security wall.
Accept
Accept-Encoding
Accept-Language
User-Agent
Referer
Host
Connection
import requests
from bs4 import BeautifulSoup
ac="text/html,application/xhtml+xml,application/xml;q=0.9,image/avif,image/webp,image/apng,*/*;q=0.8,application/signed-exchange;v=b3;q=0.9"
target_url="https://www.walmart.com/ip/SAMSUNG-58-Class-4K-Crystal-UHD-2160P-LED-Smart-TV-with-HDR-UN58TU7000/820835173"
headers={"Referer":"https://www.google.com","Connection":"Keep-Alive","Accept-Language":"en-US,en;q=0.9","Accept-Encoding":"gzip, deflate, br","Accept":ac,"User-Agent":"Mozilla/5.0 (iPad; CPU OS 9_3_5 like Mac OS X) AppleWebKit/601.1.46 (KHTML, like Gecko) Version/9.0 Mobile/13G36 Safari/601.1"}
resp = requests.get(target_url, headers=headers)
print(resp.text)
One thing you might have noticed is Walmart sends a 200 status code even when it returns a captcha. So, to tackle this problem you can use the if/else statement.
if("Robot or human" in resp.text):
print(True)
else:
print(False)
If it is True then Walmart has thrown a captcha otherwise our request was successful. Nest step is to extract our data of interest.
Here we will use BS4 and will scrape every value step by step. We have already determined the exact location of each of these data elements.
We got all the data except “product detail”. Once you scroll down to your HTML data returned by your python script you will nowhere find this dangerous-html class.
The reason behind this is the framework used by the Walmart website. It uses the Nextjs framework which sends JSON data once the page has been rendered completely. So, when the socket connection was broken product description part of the website was not loaded.
But the solution to this problem is very easy and it can be scraped in just two steps. Every Nextjs-backed website has a script tag with id as __NEXT_DATA__.
This script will return all the JSON data that we need. Since this is done through Javascript we could not have scraped it with a simple HTTP GET request. So, first of all, you have to find it using BS4 and then load it using the JSON library.
This is a huge JSON data which might be a little intimidating. You can use tools like JSON viewer to figure out the exact location of your desired object.
We got all the data we were hunting for. By the way, this huge JSON data also contains the data we scraped earlier. You just have to figure out the exact object where it is stored. I leave that part to you.
import requests
from bs4 import BeautifulSoup
ac="text/html,application/xhtml+xml,application/xml;q=0.9,image/avif,image/webp,image/apng,*/*;q=0.8,application/signed-exchange;v=b3;q=0.9"
target_url="https://www.walmart.com/ip/SAMSUNG-58-Class-4K-Crystal-UHD-2160P-LED-Smart-TV-with-HDR-UN58TU7000/820835173"
headers={"Referer":"https://www.google.com","Connection":"Keep-Alive","Accept-Language":"en-US,en;q=0.9","Accept-Encoding":"gzip, deflate, br","Accept":ac,"User-Agent":"Mozilla/5.0 (iPad; CPU OS 9_3_5 like Mac OS X) AppleWebKit/601.1.46 (KHTML, like Gecko) Version/9.0 Mobile/13G36 Safari/601.1"}
resp = requests.get(target_url)
# print(resp.text)
# if("Robot or human" in resp.text):
# print(True)
# else:
# print(False)
soup = BeautifulSoup(resp.text,'html.parser')
l=[]
obj={}
try:
obj["price"] = soup.find("span",{"itemprop":"price"}).text.replace("Now ","")
except:
obj["price"]=None
try:
obj["name"] = soup.find("h1",{"itemprop":"name"}).text
except:
obj["name"]=None
try:
obj["rating"] = soup.find("span",{"class":"rating-number"}).text.replace("(","").replace(")","")
except:
obj["rating"]=None
import json
nextTag = soup.find("script",{"id":"__NEXT_DATA__"})
jsonData = json.loads(nextTag.text)
Detail = jsonData['props']['pageProps']['initialData']['data']['product']['shortDescription']
try:
obj["detail"] = Detail
except:
obj["detail"]=None
l.append(obj)
print(l)
How to Scrape Walmart without Code using Scrapingdog
Walmart is in business for a very long time and they know people use scraping techniques to crawl over their websites. They have an architecture that can determine if a request is coming from a bot or a real browser.
Along with that if you want to scrape millions of pages then your IP will be blocked by Walmart. To avoid this you need a rotation of IPs and headers. Scrapingdog can provide you with all of these features.
Scrapingdog provides an API for Web Scraping that can help you create a seamless data pipeline in no time. You can start by signing up and making a test call directly from your dashboard.
Let’s go step by step to understand how you can use Scrapingdog for Walmart web scraping without getting blocked.
Oh! I almost forgot to tell you that for new users 1000 calls are absolutely free.
Once you are on your dashboard you will have two options.
Either just paste the target URL in the tool and press the “Scrape” button.
Use API URL in POSTMAN or browser or a script to make a GET request.
The first one is the fastest one. So, let’s do that.
Using Scrapingdog’s dashboard to extract data from Walmart
Once you press the Scrape button you will get the complete HTML data from Walmart. You can even set locations if you really want to change that. But in this case, that was not required.
The second option was through a script. You can use the below-provided code to scrape Walmart without being blocked. You won’t have to even pass any headers to scrape it.
Do not forget to replace YOUR-API-KEY with your own API key. You can find your key on your dashboard. We have used &dynamic=false parameter to make a normal HTTP request rather than rendering the JS. This will just cost 1 API credit. You can read more about it here.
But if you want to load the JS part of the website as well then remove the &dynamic=false param because Scrapingdog by default renders JS through a real Chrome browser.
We just removed the headers and replaced the target URL with Scrapingdog’s API URL. Other than that rest of the code remains the same.
Forget about getting blocked while scraping the Web
Try out Scrapingdog Web Scraping API & Scrape Walmart at Scale without Getting Blocked
Conclusion
As we know Python is too great when it comes to web scraping. We just used two basic libraries to scrape Walmart product details and print results in JSON. But this process has certain limits and as we discussed above, Walmart will block you if you do not rotate proxies or change headers timely.
If you want to scrape thousands and millions of pages then using Scrapingdog will be the best approach.
I hope you like this little tutorial and if you do then please do not forget to share it with your friends and on social media.
Welcome to our comprehensive guide on web scraping in Python! If you’ve ever wanted to learn web scraping with Python, you’ve come to the right place. In this extensive Python tutorial for web scraping, we’ll cover everything you need to know, from the basics to more advanced techniques & we will build a web scraper of our own.
As a beginner, you may find the concept of web scraping a bit intimidating, but worry not! Our easy-to-understand tutorial is designed for learners of all levels, making it the perfect resource for those just starting out or experienced programmers looking to expand their skill set.
Web scraping is a valuable skill in today’s digital age, as it allows you to extract data from websites and use it for various purposes, such as data analysis, research, or even building your own applications. With this Python tutorial for web scraping, you’ll soon be able to navigate through the world of web data with ease.
It is a long post so fasten your seat belts and let’s get started!!
Web Scraping in Python Tutorial
Before we start to build our web scraper with Python, let us understand the importance of headers while scraping any web page. We will explore headers in-depth. You might be afraid of headers or you might get an uncomfortable feeling when you see headers like x hyphen or something.
I might be wrong but when I started coding I was very intimidated by headers. But soon I realized that it is very simple to use headers while making requests.
Why learn web scraping with Python?
Learning web scraping with Python is a skill highly sought after in numerous fields today, such as data science, digital marketing, competitive analysis, and machine learning.
Python, with its simplicity and extensive library support (like BeautifulSoup, Scrapy, and Selenium), makes web scraping an easily approachable task even for beginners.
This powerful skill allows you to extract, manipulate, and analyze data from the web, turning unstructured data into structured data ready for insights and decision-making.
By knowing how to automate these processes with Python, you can save considerable time and resources, opening up new opportunities for extracting value from the vast data landscape of the internet.
HTTP Headers
In this section, I am going to cover the concept of headers with some examples. So, let’s jump on it.
You might already know when you make API calls, you transfer a piece of information within that envelope. Let’s say one person is a client and another person is a server and an envelope is getting transferred in the form of API and that is the mode of communication.
The contents inside that envelope are actually the data that is getting transferred from one person to another but you might also know that when such communications happen in real life on the top of the envelope there is also the address to whom this data has to go. But along with that address, there is another address that is used when the letter is not received by the receiver.
This is just an analogy but what I am trying to explain to you is that header also plays a similar kind of role.
Headers are a sort of indication for the metadata of what the response or requests consist of inside. Now, to understand this let me categorize headers for you. So, mainly they can be categorized into four different categories.
Types of Headers
Request Headers
Response Headers
Payload Headers
Representation Headers
It does not mean that a request header cannot be a response header or vice-versa. Let’s understand what each of these headers actually means.
Request Headers
It is a key value pair just like other headers and they are sent by the client who is requesting the data. It is sent so that the server can understand how it has to send the response. It also helps the server to identify the request sender.
Examples of Request headers are
Host: www.medium.com
User-Agent: Mozilla/5.0 (Windows NT 10.0; Win64; x64) AppleWebKit/537.36 (KHTML, like Gecko) Chrome/74.0.3729.169 Safari/537.36
Referer: https://medium.com
Connection: close
Accept-Language: en-us
Accept-Encoding; gzip
Do remember Content-Type header is not a request header, it is a representation header. We will learn more about this but I just wanted to remove this confusion from your mind as the earliest.
From the list of sample headers shown above, the Host and User-Agent are holding the information that who is sending the request.
Accept-Language tells the server that this is the language in which I can understand your response and similarly Accept-Encoding tells the server that even if you have compressed data I can understand it.
They are just like request headers but the transmission is in reverse. Actually, these headers are sent by the server to the client. It explains to the client what to do with the response. It provides additional information about the data it has sent.
Example of Response headers:
Connection: keep-alive
Date: Mon, 08 Nov 2022
Server: nginx
Content-Type: text/html
Transfer-Encoding: chunked
Etag: W/”0815”
Etag is the response header that is used for versioning and cache. The Date is telling the client the date at which the response was sent from server to client. But again Content-Type or Content-Encoding are representation headers which we are going to cover in a bit.
Representation Headers
Representation headers represent the type of data that has been transferred. The data that has been sent from the server to the client can be in any format like JSON, HTML, XML, chunked (if the data size is huge), etc. The server also tells the client about the range of the content.
Examples of Representation headers:
Content-Type: text/html
Content-Encoding: gzip
Content-Length: 3523
Content-Range: bytes 50–1000/*
Content-Location: /docs/fo.xml
Content-Location tells the client about the alternate location of the resource or the data that is available for the client to retrieve the information. It can be a URL where that particular resource is stored.
Apart from these headers, there can be different headers like Trailer, Transfer-Encoding, Etag, if-Not-Match, Authorizations, etc.
Now, what if you are writing APIs and you want to define your own custom headers? Can you do that? You can absolutely do that. The way in which you define the request and response structure of your API similarly you can implement custom headers that you or the server is going to accept.
An example of a custom header could be the Authorization header. This header can have any value. Further, a server can use the value to identify the client or it can be used for any other logic operations.
Requests
In this section, we are going to learn about python library requests and with the help of this library, we are going to scrape a website. So, why do we need this library and how can we use it?
It is the most popular library downloaded by everyone. It allows us to make an http request to different websites. It opens a socket to the target website and asks them for their permission to connect. This is how multiple applications can talk with each other.
Now, let’s understand how we can use it with a simple web scraping example. We will scrape amazon for this example.
mkdir scraper
pip install requests
Then create a file scraper.py in this folder and then start coding with me.
import requests
This will import the requests library inside our file. Now, we can use it to create a web scraper.
Here we have declared a target_url variable that stores our target URL from amazon.com. Then we declared a header and then finally we made a GET request to our target URL. This is what happens when we run this code.
When we print the status we get the status as 200 which means we were able to scrape amazon successfully. You can even print the HTML code we received from amazon by just replacing status_code with text.
print(resp.text)
It will look something like this.
As you can see this data is not readable at all. We need to parse the data out from this junk. For this, we will use BeautifulSoup.
BeautifulSoup
It is also known as BS4. So, it is basically used for pulling data out of any HTML or XML files. It is used for searching and modifying any HTML or XML data.
Now lets us understand how we can use it. We will use HTML data from our last section. But before anything, we have to import it into our file.
from bs4 import BeautifulSoup
From our target page, we will extract a few important data like name, price, and product rating. For extracting data we will need a parse tree.
soup=BeautifulSoup(resp.text, ’html.parser’)
When you inspect the name you will see that it is stored inside a class a-size-large product-title-word-break.
name = soup.find(“span”,{“class”:”a-size-large product-title-word-break”}).text
print(name)
When we print the name we get this.
As you can see we got the name of the product. Now, we will extract the price.
By inspecting the price I can see that the price is stored inside a-offscreen class and this class is stored inside priceToPay class.
Pandas is a Python library that provides flexible data structures and makes our interaction with data very easy. We will use it to save our data in a CSV file.
First, we declared an object and an array. Then we stored all our target data inside this object. Then we pushed this object inside an array. Now, we will create a data frame using pandas with this array, and then using that data frame we will create our CSV file.
As you saw Requests, BS4, and pandas made our job of extracting data from Amazon a lot easier. Obviously, if you want to scrape millions of Amazon pages with a requests library then you will have to manage many things like proper headers, proxy rotation, and captcha handling.
But but but, if you use Scrapingdog’s Web Scraping API then you won’t have to handle those extra steps at your end. Scrapingdog will use its large pool of proxy and headers to scrape amazon successfully. This data extracting tool is not restricted to just amazon, you can scrape any website even if it requires JS rendering. Scrapingdog is the fastest and the most reliable web scraping API and of course, we provide 1000 free API credits to our new users.
If you want to learn to scrape other websites like Google, yelp, etc using requests and BS4 then read the following articles:
It is a powerful Python framework that is used to extract data from any website in a very flexible manner. It uses Xpath to search and extract data. It is lightweight and very easy for beginners to understand.
Now, to understand how Scrapy works we are going to scrape Amazon with this framework. We are going to scrape the book section of Amazon, more specifically we are going to scrape books that were released in the last 30 days.
We will start with creating a folder and installing Scrapy.
>>> mkdir scraper
>>> pip install scrapy
Now, before we start coding we have to create a project. Just type the below command in your terminal.
>>> scrapy startproject amazonscraper
This command will create a project folder inside scraper folder by the name amazonscraper.
The above command also returns some messages on the terminal where it is telling you how you can start writing your own scraper. We will use both of these commands.
Let’s go inside this amazonscraper folder first.
>>> cd amazonscraper
>>> scrapy genspider amazon_spider amazon.com
This will create a general spider for us so that we don’t have to create our own spider by going inside the spider folder, this will automatically create it for us. Then we name the spider and then we type the domain of our target website.
When you press enter you will have a file by the name amazon_spider.py inside your folder. When you open that file you will find that a parse function and an Amazonspider class have been automatically created.
import scrapy
class AmazonSpiderSpider(scrapy.Spider):
name = ‘amazon_spider’
allowed_domains = [‘amazon.com’]
start_urls = [‘http://amazon.com/']
def parse(self, response):
pass
We will remove the allowed_domains variable as we do not need that and along with that, we will declare start_urls to our target URL.
//amazon_spider.py
import scrapy
class AmazonSpiderSpider(scrapy.Spider):
name = ‘amazon_spider’
allowed_domains = [‘amazon.com’]
start_urls = [‘https://www.amazon.com/s?k=books&i=stripbooks-intl-ship&__mk_es_US=%C3%85M%C3%85%C5%BD%C3%95%C3%91&crid=11NL2VKJ00J&sprefix=bo%2Cstripbooks-intl-ship%2C443&ref=nb_sb_noss_2']
def parse(self, response):
pass
Before we begin with our scraper we need to create some items in our items.py file which are temporary containers. We will scrape the title, price, author, and image link from the Amazon page.
Since we need four items from Amazon we will add four variables for storing the values.
//items.py
import scrapy
class AmazonscraperItem(scrapy.Item):
# define the fields for your item here like:
# name = scrapy.Field()
product_name = scrapy.Field()
product_author = scrapy.Field()
product_price = scrapy.Field()
product_imagelink = scrapy.Field()
pass
Now, we will import this file into our amazon_spider.py file.
//amazon_spider.py
from ..items import AmazonscraperItem
Just type it at the top of the file. Now, inside our parse method, we are going to declare a variable which will be the instance of AmazonscraperItem class.
I have used the .extract() function to get the HTML part of all those product elements. Similarly, we are going to use the same technique to extract product price, author, and image link.
While finding CSS selectors for the author SelectorGadget will select some of them and will leave many authors unselected. So, you have to select those authors as well.
Now, as I said earlier this will only provide us with the HTML code and we need to extract the name from it. So, for that, we will use the text feature of Scrapy.
This will make sure that the whole tag does not get extracted and that only the text from this tag gets extracted.
Now product_imagelink is just selecting the image so we will not use .css() function on it. Our image is stored inside the src tag and we need its value.
Now, we just need to yield the items and this will complete our code. Our code might not at first but let’s see what we have got.
yield items
Now, to run our code run the below command on your terminal.
>>> scrapy crawl amazon_spider
As you can see we got an empty array. This is due to the anti-bot mechanism of amazon. To overcome this we are going to set a User-Agent in our settings.py file.
//items.py
import scrapy
class AmazonscraperItem(scrapy.Item):
# define the fields for your item here like:
# name = scrapy.Field()
product_name = scrapy.Field()
product_author = scrapy.Field()
product_price = scrapy.Field()
product_imagelink = scrapy.Field()
pass
The functionalities of Scrapy do not stop here!!
You can set a parallel request number in your settings.py file by changing the value of CONCURRENT_REQUESTS. This will help you to check how much load an API can handle.
It is faster than most of the HTTP libraries provided by Python.
Selenium
Selenium is a framework to test websites and other web applications. It supports multiple programming languages and on top of that, you get support from multiple browsers not just Chrome. It provides APIs to make connections with your driver.
Let’s understand this framework with a simple web scraping task. We are going to scrape a dynamic website with selenium. Our target website will be Walmart. The first step is to install selenium. Type the below command on your terminal to install Selenium.
Our job would be to open this website and extract the HTML code and print it.
So, the first step is to import all the libraries in our file.
from selenium import webdriver
from selenium.webdriver.chrome.options import Options
Then we are going to set the options which selenium provides. We will set the page size and we will run it in a headless format.
The reason behind running it in a headless form is to avoid extra usage of GUI resources. Even while using selenium in production on external servers you are advised to use it with headless mode to avoid wasting CPU resources. This will ultimately increase your cost because you will need to add more servers for load balancing.
I used the sleep method to load the website completely before printing the HTML. I just want to make sure that the website is loaded completely before printing.
While printing we have used page_source property of selenium. This will provide us with the source of the current page. This is what we get when we print the results.
We get the required HTML part. Now, Walmart also has an anti-bot detection method just like amazon but Walmart needs JS rendering also for scraping.
To scrape websites like Walmart you can always use Scrapingdog’s Web Scraping Tool to avoid managing JS rendering and proxy rotation.
The reason behind using JS rendering for certain websites is:
To load all the javascript hooks, once all of them are loaded we can easily scrape it at once by just extracting the source after loading it completely on our browser.
Some websites need lots of AJAX calls to load completely. So, in place of a normal GET HTTP call, we render JS for scraping. To verify whether a website needs a JS rendering or not you can always look at the network tab of that website.
It also provides certain properties which might help you in the future.
driver.title — This can be used for extracting the title of the page.
driver.orientation — This will provide the physical orientation of the device with respect to gravity.
Advantages of using Selenium
The best advantage I found is you can use it with any programming language.
You can find bugs at an earlier stage of your testing or production.
It has great community support.
It supports multiple browsers like Chrome, Mozilla, etc.
Very handy when it comes to data scraping.
Disadvantages of Using Selenium
Image comparison is absent in selenium.
Time-consuming.
The setup of the test environment is not that easy for beginners.
Regular Expression
Regular expression is a powerful tool to find patterns in text. They are like using Ctrl-F on a word document but much more powerful than them.
This is very helpful when you verify any type of user input and most importantly while scraping the web. The application of Regular expression is very big.
This can be challenging at first but once you are ready, believe me, it will make your job much more efficient.
Its symbols and syntax are universal in all programming languages. To understand regular expression we are going to validate certain strings which you might face while web scraping in Python.
Let’s say you want to scrape emails from the web for the lead generation process of your company. The first part of the email can consist of:
Uppercase letters [A-Z]
Lower Case letters [a-z]
numbers [0–9]
Now, if the email which is scraped does not follow this pattern then we can easily neglect that email and can move on to another email. We will write a simple code in python to identify emails like these and we are going to use re library of python.
import re
pattern = "[a-zA-Z0-9]+@"
Brackets allow us to specify that we are looking for the characters in a given string such as email. We are going to match the pattern till @ symbol and the plus sign after the bracket means we are looking for any combination of one or more of these characters.
Since emails are provided by many domains then we have to specify that we are looking for one or more upper and lowercase letters.
pattern = "[a-zA-Z0-9]+@[a-zA-Z]"
Now, let’s check whether this can work with an if and else statement.
This is how you can identify correct email strings. Now, we will learn how we can replace a character with another one using a regular expression
Replacing String
This can come in handy when you are making changes to a large database where you might have thousands of strings to update.
Now, let’s say we need every phone number entered into a continuous string of numbers with no hyphens but we want to keep the hyphens which are in word form. We will write regular expressions for that.
import re
pattern = “(\d\d\d)-(\d\d\d)-(\d\d\d\d)”
“\d” will match any single digit. Each set of parenthesis resembles a group.
new_pattern = r”\1\2\3”
So, from left to right we have three different groups. But we need to write what we want this pattern to turn into. Let’s preserve the group but remove the hyphens.
Each backslash number represents a group so our new pattern is concatenating the three groups without the hyphen. We have put r before the string to consider it as the raw string.
Now, let’s take input from the user and check whether it works or not.
This was just a basic example of how regular expression can be used in data scraping with Python. Regular expression works with any language and the rate of response is pretty fast.
You can find tons of material on regular expression online. I found this course very helpful during my Python journey. Also, if you want to test your expression then this website can help you.
XPath
XPath stands for XML path language which is actually a query language for selecting nodes from an XML document. Now, if you do not know about XML documents then web scraping with XPath covers everything for you.
XML stands for Extensible Markup Language which is a bit like your hypertext markup language which is HTML but there is a very distinct difference between the two. HTML has a predefined set of tags that have a special meaning for example you have a body tag or you have a head tag or a paragraph tag. So, all these tags have a special meaning to your browser, right? But for XML there is no such thing. In fact, you can give any name to your tags and they do not have any special meaning there.
The design goal of XML documents is that they emphasize simplicity, generality, and usability across the internet. That’s why you can use any name for your tags and nowadays XML is generally used for the transfer of data from one web service to another. So, that is another main use of XML.
Coming back to Xpath, well it is a query language for XML documents and the special thing to note here is that it is used for selecting nodes. Now, you might be thinking what are these nodes or this node terminal, right? Well, you can think of any XML document or even any HTML document like a tree.
Now, why I am saying that is because if you try to see this particular XML document you have a tag called “Movie Database” in which you have multiple movie tags then in each movie you have a title tag, year tag, directed by tag, and so on.
So, in this way, we are creating a nested structure, and if you try to visualize a tree we can. We have a movie database tag in which we can have multiple movies in each movie we have a title, year, etc. Similarly, in the cast tag we have actors with different tags for first name and last name.
So, this nesting of the tags allows you to visualize the XML or HTML documents like trees. That’s why we have the concept of nodes in the trees. So, all these tag elements are the nodes of your tree. Similarly, HTML can be visualized and then parsed like a tree.
For parsing, we can use libraries like Beautifulsoup. So, HTML documents or XML documents can be visualized like a tree, and XML parts in a text can be used for querying and selecting some particular nodes which follow the pattern specified by the Xpath syntax to select some particular nodes.
This is the concept behind Xpath and now let me show you some examples so that we can understand Xpath syntax a bit.
Example
We are not going to go into much detail about the Xpath syntax itself because in this video our main aim is to learn how to use Xpath for web scraping.
So, let’s say I have an XML document in which this is the code. I have a bookstore tag at the root in which I have multiple book tags and inside that, I have title and price tags.
You can find this Xpath tester on this website. This is where I am testing this XML and Xpath expression.
Now, if I type “/” in that then it means I want to search from the root of your tree and I will write bookstore. So, what it will do is it will search from the root for the bookstore. So, now if I click TEST XPATH I will get this.
This is the complete bookstore. Now, let’s say in the bookstore I want to get all the books that we have. So, for that, you will do this.
And then I will get this result. I got all the books inside the bookstore.
Now, let’s say you want to get only that book whose ID is 2. So, you will just put a square bracket, and inside that, you will pass ‘@id=”2”’.
When you use @ with some attribute then you are referring to a particular attribute inside your book tag in this case and you are saying hey! find all those book tags whose ID is 2. When we run it we get this.
Look at this, we are getting only that book whose ID is 2. Now, let’s say I want to get the price of that book whose ID is 2. For that, I will simply do this.
And in response, I get this.
So, this is how Xpath works. Now, if you want to learn more about Xpath syntax then you can just visit w3schools for more details. Other than that this is all we need to know in order to create a web scraper using it.
LXML
It is a third-party library for working with XML. We have learned enough about XML in the previous section.
LXML provides full XPath support and nice factory functions that make it a better choice. The goal of LXML is to work with XML using the element tree API stored in lxml etree.
LXML can read from files or string objects of XML and parse them into etree elements.
Now, let’s understand how we can use lxml while web scraping. First, create a folder and install this library.
>>> mkdir scraper
>>> pip install lxml
Once that is done, create a scraper.py file inside your folder scraper and start coding with me.
from lxml import html
import requests
We have imported the requests library to request because we have to get the HTML data of that web page as well.
Now, if you will run it you will get 200 code which means we have successfully scraped our target URL.
Now, let’s create a parse tree for our HTML document.
tree = html.fromstring(resp.content)
html.fromstring is a function that takes your HTML content and creates a tree out of it and it will return you the root of that tree. Now, if you print the tree you will get this <Element html at 0x1e18439ff10>.
So, it says we have got HTML elements at some position, and as you know HTML tag is the root of any HTML document.
Now, I want to search certain elements using Xpath. We have already discovered the Xpath earlier in this article. Xpath of our target element is //*[@id=”mw-content-text”]/div[1]/table[2]/tbody/tr[3]/th/i/a
elements = tree.xpath(‘//*[@id=”mw-content-text”]/div[1]/table[2]/tbody/tr[3]/th/i/a’)
We have passed our Xpath inside the tree function. Do remember to use single or triple quotes while pasting your Xpath because python will give you an error for double quotes because our Xpath already has them.
Let’s print and run it and see what happens.
>>> [Element a at 0x1eaed41c220]
On running the code we got our target element which was matched with this particular Xpath.
you will get this <Element a at 0x1eaed41c220>. As you can see it is an anchor tag. We have two options to get the data out of this tag.
.text will return the text the contains. Like elements[0].text will return Iron Man
.attrib will return a dictionary {‘href’: ‘/wiki/Iron_Man_(2008_film)’, ‘title’: ‘Iron Man (2008 film)’}. This will provide you with the href tag which is actually the link and that is what we need. We also get the title of the movie.
But since we only need href tag value so we will do this
elements[0].attrib[‘href’]
This will return the target link.
This is what we wanted.
Socket
The socket is used to connect two or more nodes so that they can communicate with each other. A medium server is used which transmits data from one node to another without letting them have a direct connection.
Socket
Now, how can you make an HTTP request using a socket? Well, it can be done by opening a socket. Let us understand with a simple python code.
We have created a socket constructor which accepts two parameters. One is the socket family and the other is the socket type. You can read more about it here.
Then we used a web address where we are going to establish a connection. You can pick any address.
This is where we make a GET request. It is in normal text form. Using .send() we have converted it to byte form
This is where we as a client catch the response from the server. 4096 is the number of bytes and we want to receive the maximum amount of data.
After receiving complete data from the server, we closed the connection. It is a necessary step.
We have printed the response.
I hope you must have got a basic idea of how the socket works. Examples of sockets are messaging, web browsing, etc.
Urllib3
Urllib3 is an authentic python library for making HTTP requests to any web address. Now, why it is authentic is because unlike requests it is a built-in part of python. You can use this library if you want to reduce dependencies. This package contains five modules:
request— It is used to open URLs.
response — This is used by the request module internally. You will not use it directly.
error— Provides error classes to request module.
parse– It breaks URL into schema, host, port, path, etc.
robotparser– It is used to inspect the robots.txt file for permissions.
Now, we will understand how urllib3 can be used through simple code.
Steps will look similar to the requests library. PoolManager keeps a track of a number of connections.
Then we send a normal GET request to a robots.txt URL. We can even send POST and DELETE requests with urllib3.
// POST request
import urllib3
http = urllib3.PoolManager()
r = http.request(‘POST’, ‘http://httpbin.org/post', fields={“Title”: “Scrapingdog”, “Purpose”: “Web Scraping API”, “Feature”: “Fastest Web Scraper”})
print(r.status)
print(r.data)
fields argument will send the data from the client to the server. We are sending a JSON object. The server will send a response to make the confirmation of data added to its database.
There are very high chances that as a beginner you might not use urllib3 for web scraping. Most probably you are going to use requests. But there are certain advantages of using urllib3 over requests.
For parsing data, you can use BS4 or RegEx.
MechanicalSoup
It is like the child of BS4 because it takes the support of BS4 to mechanize everything. It allows us to do so much more with fewer lines of code. It automates website scraping and on top of that, it can follow redirects and can send and store cookies on its own.
Let’s understand MechanicalSoup a little with some Python code. You need to install it before we begin coding.
.open() will return an object of type requests. Response, this is due to the fact that Mechanical Soup is using the requests module to make the call.
browser.get_current_page() will provide you with the HTML code of the page. It also provides many arguments like .find_all() and .select_form() to search for any element or tag in our HTML data.
Altogether it is a great library to try web scraping a little differently. If you want to learn more about this I would advise you to read this article.
Conclusion
We discussed eight Python libraries that can help you scrape the web. Each library has its own advantage and disadvantage. Some are easy to use but not effective and some of them could be a little difficult to understand but once you have understood them fully it will help you to get things done in no time like RegEx.
I have created a table to give you a brief idea of how all these libraries. I have rated them on the basis of difficulty, usage, and Application. I have given them numbers out of 5 so that you can understand how they can help in web scraping with Python.
Python Libraries
I hope you like this blog post, I have tried to mention all the popular Python libraries in this post.
If you think I have left some topics then please do let us know.
Python is the common language used in web scraping. It is an all round language and can handle web scraping smoothly. Therefore, python is recommended for web scraping.
This tutorial here used all the libraries that are used in python and have extensively explained all of them.
Learning web scraping with python is easy. Also, python is used world wide with ease and hence it is easy to learn web scraping with python.
Beautiful Soup is used for smaller projects while Selenium is used for a little complex projects. Hence, both have different advantages depending where we are using both libraries.
No, you can scrape any data that is available publicly on the web.
A beginner who is looking for a career in web scraping in Python can kickstart his/her journey by just reading this post.
I hope you enjoyed & learned something new by reading this comprehensive guide on web scraping with Python. Also, I hope you can now build a web scraper of your own with this guide.
Manthan Koolwal
My name is Manthan Koolwal and I am the founder of scrapingdog.com. I love creating scraper and seamless data pipelines.
cURL is a command-line library that is used for transferring data using multiple protocols such as FTP, HTTP, SMTP, IMAP, TELNET, etc. You can use it to download files, upload files, and test APIs.
Web Scraping using cURL
Features of cURL:
It provides SSL/TLS support.
You can pass cookies.
Pass custom headers like User-Agent, Accept, etc.
You can use a proxy while making a request to any host.
cURL can be used on any operating system such as Windows, MacOS, Linux, etc. cURL is already installed in all the operating systems and you can verify it by typing curl or curl --helpon your cmd.
How to use cURL?
Let’s understand how cURL can be used with multiple different examples.
The basic syntax for using cURL will always be the same.
curl [options] [url]
How to make a GET request with cURL
Let’s say you want to make an HTTP GET request to this URL. Then it can be done simply like this.
curl https://httpbin.org/ip
The response will look like this.
How to make a POST request with cURL
Let’s assume you want to make a POST request to an API that returns JSON data then this is how you can do it.
curl -X POST -d "param1=value1" "https://httpbin.org/post" -H "accept: application/json"
Here -d represents --data command line parameter. -X will tell which HTTP method will be used and -H is used for sending headers. accept: application/json is the way of telling the server that we need the response in JSON.
We have made a dedicated page on How to get JSON with cURL in brief here. You can check that out too!!
How to use authentication with cURL
curl -X GET -u admin:admin "https://httpbin.org/basic-auth/admin/admin" -H "accept: application/json"
We have used -X to specify which HTTP method we are going to use. In the current scenario, we are making a GET request.
-u is used to pass credentials. In general, it is known as Basic Authentication. Here username is admin and the password is also admin.
Then we passed our target URL. On this URL we are performing a GET request.
The last step is to pass headers. For this, we have used -H to pass accept header.
These are some of the few applications in which cURL can be used directly from your CMD. You can even download data from a website into a file or upload files to a random FTP server using cURL. Let’s try one more example.
Let’s say you want to scrape amazon.com with cURL and your target page is this.
curl -X GET "https://www.amazon.com/dp/B09ZW52XSQ" -H "User-Agent: Mozilla/5.0 (Linux; Android 8.0.0; SM-G955U Build/R16NW) AppleWebKit/537.36 (KHTML, like Gecko) Chrome/87.0.4280.141 Mobile Safari/537.36, Accept-Encoding:gzip,deflate"
With this command, you will be able to scrape data from amazon. But what if you want to scrape millions of such pages? In this case, this technique will not work because amazon will block your IP due to excessive HTTP connection at a short interval of time. The only way to bypass this limitation is to use a web scraping API or a rotating proxy.
How to use a proxy with cURL?
Passing a proxy while making a GET request through cURL is super simple.
Here -x is used to pass the proxy URL or the IP and -U is used to pass the username and password if the proxy requires authentication.
Let’s use a free proxy and understand how it can help you scrape amazon or any such website at scale.
If you sign up to Scrapingdog you will find an API Key on your dashboard. That API Key will be used as a password for the proxy. You can consider reading the docs before using the proxy but the usage is pretty straightforward.
Let’s use this information to make a request to amazon.
This cURL command will make a GET request to Amazon with new IP on every single request. This will avoid any blockage of your data pipeline from Amazon.
What if you don’t want to pass a proxy and handle retries in case a request fails? Well, then you can use a Scraping API which will handle all the retries, headers, headless chrome, etc.
How to use a Web Scraping API with cURL?
Using a scraping API with cURL is dead simple. All you have to do is to make a GET request. I have already explained to you how you can make a GET request using cURL.
To understand how the API works please read the docs from here.
This will make a GET request and will return the data from amazon.
Advantages of using API over proxy
You don’t have to manage headless chrome.
You don’t have to make retries on request failure. API will handle it on its own.
Proxy management will be done by the API itself. API has the ability to pick the right proxy on its own depending on the website you want to scrape.
Handling errors and exceptions with cURL
It is necessary to handle errors while doing web scraping. Web Scraping can be tedious if errors are not handled properly. Let’s discuss some techniques to handle such a situation.
How to check the status code of the request in cURL?
In general, we always check the status code of the response to check whether the API request was successful or not. In cURL also you can track the status of the request.
-s allows us to suppress any output to the console. That means the output will not be shown on the console.
-o will redirect the output to /dev/null instead of any file. /dev/null is kind of a black hole that discards any input. It is used when you don’t want to see it or store it.
-w will print the response code on the console. This will help us identify whether the API request was successful or not.
How to retry the request with cURL if the request fails?
What if the request fails and you have to retry manually? Well, the alternative for this is to use a for loop. If the request fails you can wait for 5 seconds and if the request was successful then you can break out of the for loop.
for i in {1..5}; do curl -s https://www.scrapingdog.com && break || sleep 5; done
The loop will run five times with a 5-second gap in case the request keeps failing.
Conclusion
Web Scraping with cURL is fun and simple. In this article, we focused on understanding the various features cURL has to offer. Right from making a GET request to error handling we covered every topic. Of course, there are endless features cURL has to offer.
cURL can be used for parsing data as well. Overall it is a reliable tool with great community support. You can customize it according to your demands. You can automate your web scraping with cURL in just a few steps.
I hope you like this little tutorial on how you can perform web scraping with cURL. It would great if you can share this article on your social platforms.
Additional Resources
Here are a few additional resources that you may find helpful during your web scraping journey:
In this tutorial, we will learn how to web scrape using Java programming language. We will code a web scraper using it!!
Java is one of the oldest and most popular programming languages. Over time it has evolved a lot and has been the go-to platform for many services and applications including web scraping.
Web scraping is a process of extracting data from websites and storing it in a format that can be easily accessed and analyzed. It can be used to gather information about a product or service, track competitors, or even monitor your own website for changes.
Web scraping can be done manually, but it is often more efficient to use a tool or script to automate the process.
Web Scraping With Java
JAVA Web Scraping Basics
There are a few different libraries that can be used for web scraping in Java. The most popular ones are Jsoup and HtmlUnit.
In order to scrape a website, you first need to connect to it and retrieve the HTML source code. This can be done using the connect() method in the Jsoup library.
Once you have the HTML source code, you can use the select() method to query the DOM and extract the data you need.
There are some libraries available to perform JAVA Web Scraping. They include:
We shall go through the three tools mentioned above to understand the integral details crucial for scraping websites using Java.
What Website We Are Going to Scrape with JAVA
We are going to scrape the Scrapingdog blog page. We shall obtain the header text from the blog list. After fetching this list, we shall proceed to output it in our program.
Web Scraping Scrapingdog’s Blog Page with JAVA
Before you scrape a website, you must understand the structure of the underlying HTML. Understanding this structure gives you an idea of how to traverse the HTML tags as you implement your scraper.
In your browser, right-click above any element on the blog list. From the menu that will be displayed, select” Inspect Element.” Optionally, you can press Ctrl + Shift + Ito inspect a web page. The list below shows the list elements as they occur repetitively on this page.
The image below shows the structuring of a single blog list div element. Our point of interest is the <h2> tag that contains the blog title. To access the h2 tag, we will have to use the following CSS query “div.blog-content div.blog-header a h2”.
HtmlUnit is a GUI-less java library for accessing websites. It is an open-source framework with 21+ contributors actively participating in its development.
1. First, we are going to define a web client that we are going to use. HtmlUnit enables you to simulate a web client of choice, Chrome, Mozilla, Safari, etc. In this case, we shall choose Chrome.
//create a chrome web client
WebClient chromeWebClient = new WebClient(BrowserVersion.CHROME);
2. Next, we shall set up configurations for the web client. Defining some of the configurations optimizes the speed of scraping.
This line makes it possible for the web client to use insecure SSL
Next, we disable Javascript exceptions that may arise while scraping the site.
chromeWebClient.getOptions().setThrowExceptionOnFailingStatusCode(false);
chromeWebClient.getOptions().setThrowExceptionOnScriptError(false);
Moreover, we disable CSS. This optimizes the scraping process
chromeWebClient.getOptions().setCssEnabled(false);
3. After configuring the web client, we are now going to fetch the HTML page. In our case, we are going to fetch https://www.scrapingdog.com/blog/.
//fetch the blog page
HtmlPage htmlPage =
chromeWebClient.getPage(“https://www.scrapingdog.com/blog/");
4. Fetch the DOM Elements of interest using CSS queries. When selecting elements in CSS, we use selectors. Selector references are used to access DOM elements in the page for styling.
As we had previously concluded, the selector reference that will give us access to the blog titles in the list is “div.blog-header a h2”.
Using HtmlUnit we shall select all the elements and store them in a DomNodeList.
//fetch the given elements using CSS query selector
DomNodeList<DomNode> blogHeadings = htmlPage.querySelectorAll(“div.blog-header a h2”);
5. Since the individual elements are contained in a DomNode data structure, we shall iterate through the DomNodeList printing out the output of the process.
//loop through the headings printing out the content
for (DomNode domNode: blogHeadings) {
System.out.println(domNode.asText());
}
DOM node extracting
Using JSOUP Java Html Parser To Web Scrape
JSOUP is an open-source Java HTML parser for working with HTML. It provides an extensive set of APIs for fetching and manipulating fetched data using DOM methods and Query selectors. JSOUP has an active community of 88+ contributors on GitHub.
Dependencies
To use Jsoup, you will have to add its dependency in your pom.xml file.
1. Firstly, we will fetch the web page of choice and store it as a Document data type.
//fetch the web page
Document page = Jsoup.connect(“https://www.scrapingdog.com/blog/").get();
2. Select the individual page elements using a CSS query selector. We shall select these elements from the page (Document) that we had previously defined.
//selecting the blog headers from the page using CSS query
Elements pageElements = page.select(“div.blog-header a h2”);
3. Declare an array list to store the blog headings.
//ArrayList to store the blog headings
ArrayList<String> blogHeadings = new ArrayList<>();
4. Create an enhanced for loop to iterate through the fetched elements, “pageElements”, storing them in the array list.
//loop through the fetched page elements adding them to the blogHeadings array list
for (Element e:pageElements) {
blogHeadings.add(“Heading: “ + e.text());
}
5. Finally, print the contents of the array list.
//print out the array list
for (String s : blogHeadings) {
System.out.println(s);
}
Printing the result
Web scraping with Java using Webmagic
Webmagic is an open-source, scalable crawler framework developed by code craft. The framework boasts developer support of 40+ contributors — the developers based this framework on Scrapy architecture, Scrapy is a Python scraping library. Moreover, the team has based several features on Jsoup library.
Dependencies
To use the library, add the following dependencies to your pom.xml file.
1. Unlike in the other previously mentioned implementations, we have to implement a Webmagic defined class in creating the class. The PageProcessor class handles the processing of the page after you define it.
//implement PageProcessor
public class WebMagicCrawler implements PageProcessor {
The page processor class implements the following methods
@Override
public void process(Page page) {
…
}
@Override
public Site getSite() {
…
}
The process() method handles the various page-related operations whereas the getSite() method returns the site.
2. Define a class variable to hold the site variable. You can define the number of times to retry in this case and the sleep time before the next retry.
private Site site = Site.me().setRetryTimes(3).setSleepTime(1000);
However, in our case, we do not need to define all that. We shall use a defined variable.
private Site site = Site.me();
3. After declaring the Site variable, in the overridden getSite() method, add the following piece of code. This makes the method return the previously defined class variable, site.
@Override
public Site getSite() {
return site;
}
4. In the processPage() method, we shall fetch the choice elements and store them in a List.
//fetch all blog headings storing them in a list
List<String> rs = page.getHtml().css(“div.blog-header a h2”).all();
5. Like in the previous libraries implementations, we shall print out the contents from our web scraping process by iterating through the string list.
//loop through the list printing out its contents
for (String s:rs ){
System.out.println(“Heading “+ s);
}
6. Create a main method, then add the following code.
//define the url to scrape
//will run in a separate thread
Spider.create(new WebMagicCrawler()).addUrl(“https://www.scrapingdog.com/blog/").thread(5).run();
In the above code, we define the URL to scrape by creating an instance of our class. Moreover, the instance runs in a separate thread.
Data crawling log
Troubleshooting Web Scraping with JAVA
If you’re web scraping with Java, and you’re having trouble getting the data you want, there are a few things you can do to troubleshoot the issues.
First, check the code that you’re using to scrape the data. Make sure that it is correctly pulling the data from the website. If you’re not sure how to do this, you can use a web scraping tool like Fiddler or Wireshark to check the code.
If the code is correct, but you’re still not getting the data you want, it could be because the website you’re scraping is blocking Java.
To check if this is the case, try opening the website in a different browser, like Chrome or Firefox. If the website doesn’t load, or you can’t access the data you want, then the website is most likely blocking Java.
There are a few ways to get around this issue. One is to use a proxy server. This will allow you to access the website without knowing that you’re using Java.
Another way to get around this issue is to use a different web scraping tool, like Python or Ruby. These languages are not as commonly blocked by websites.
If you’re still having trouble, you can try reaching out to the website directly and asking them why they’re blocking Java. Sometimes, they may be willing to whitelist your IP address so that you can access the data.
No matter what, don’t give up! With a little troubleshooting, you should be able to get the data you need.
Conclusion
In this tutorial, we guided you through developing a basic web scraper in Java. To avoid reinventing the wheel, there are several scraping libraries that you can use or customize to build your own web scraper. In this tutorial, we developed the scrapers based on the three top Java web scraping libraries.
All of these libraries are feature-rich, boasting sizeable active community support. Moreover, they are all open source as well. Webmagic happens to be extremely scalable. If you would access the source code for this tutorial, you can follow this link to Github.
If you want to learn more about web scraping with Java, I recommend checking out the following resources:
Java and Python are both most popular programming languages. Java is faster but Python is easier and simpler. To tell which one is better all together depends on how you are using them.
Additional Resources
And there’s the list! At this point, you should feel comfortable writing your first web scraper to gather data from any website using Java. Here are a few additional resources that you may find helpful during your web scraping journey:
Now, if you want to scrape dynamic websites that use JavaScript libraries like React.js, Vue.js, Angular.js, etc. you have to put in the extra effort.
It is an easy but lengthy process if you are going to install all the libraries like Selenium, Puppeteer, and headerless browsers like Phantom.js.
But, we have a tool that can handle all this load itself. That is Web Scraping Tool which offers APIs for web scraping.
This tool will help us scrape dynamic websites using millions of rotating proxies so that you don’t get blocked. It also provides a captcha-clearing facility. It uses headerless Chrome to scrape dynamic websites.
Why scrape dynamic web page content?
As the name suggests, dynamic web pages are those that change in response to user interaction. This makes them difficult to scrape, since the data you want to extract may not be present in the initial page load.
However, there are still many cases where scraping dynamic web pages can be useful. For example, if you want to get the latest prices from an online store, or extract data from a website that doesn’t have an API.
There are many reasons why you might want to scrape dynamic web pages. Some common use cases include:
Extracting data that isn’t available through an API
Getting the latest data from a website (e.g. prices from an online store)
Monitoring changes to a website
What will we need for scraping dynamic web pages content?
Web scraping is divided into two simple parts —
Fetching data by making an HTTP request
Extracting important data by parsing the HTML DOM
We will be using Python and Scrapingdog API :
Beautiful Soupis a Python library for pulling data out of HTML and XML files.
Requests allow you to send HTTP requests very easily.
Setup
Our setup is pretty simple. Just create a folder and install Beautiful Soup & requests. To create a folder and install libraries type the below-given commands. I am assuming that you have already installed Python 3.x.
Now, create a file inside that folder by any name you like. I am using scraping.py.Firstly, you have to sign up for the scrapingdog API. It will provide you with 1000 FREE credits. Then just import Beautiful Soup & requests in your file. like this.
from bs4 import BeautifulSoup
import requests
Let’s scrape the dynamic content
Now, we are familiar with Scrapingdog and how it works. But for reference, you should read the documentation of this API. This will give you a clear idea of how this API works. Now, we will scrape Amazon for Python books’ titles.
Now we have 16 books on this page. We will extract HTML from Scrapingdog API and then we will use Beautifulsoup to generate a JSON response. Now in a single line, we will be able to scrape Amazon. For requesting an API I will use requests.
r = requests.get(‘https://api.scrapingdog.com/scrape?api_key=<your-api-key>&url=https://www.amazon.com/s?k=python+books&ref=nb_sb_noss_2&dynamic=true').text
this will provide you with an HTML code of that target URL. Now, you have to use BeautifulSoup to parse HTML.
soup = BeautifulSoup(r,’html.parser’)
Every title has an attribute of “class” with the name “a-size-mini a-spacing-none a-color-base s-line-clamp-2” and tag “h2”. You can look at that in the below image.
Chrome dev tools
First, we will find out all those tags using variable soup.
Then we will start a loop to reach all the titles of each book on that page using the length of the variable “allbooks”.
l={}
u=list()
for i in range(0,len(allbooks)):
l[“title”]=allbooks[i].text.replace(“\n”,””)
u.append(l)
l={}
print({"Titles":u})
The list “u” has all the titles and we just need to print it. Now, after printing the list “u” out of the for loop we get a JSON response. It looks like…
{
“Titles”: [
{
“title”: “Python for Beginners: 2 Books in 1: Python Programming for Beginners, Python Workbook”
},
{
“title”: “Python Tricks: A Buffet of Awesome Python Features”
},
{
“title”: “Python Crash Course, 2nd Edition: A Hands-On, Project-Based Introduction to Programming”
},
{
“title”: “Learning Python: Powerful Object-Oriented Programming”
},
{
“title”: “Python: 4 Books in 1: Ultimate Beginner’s Guide, 7 Days Crash Course, Advanced Guide, and Data Science, Learn Computer Programming and Machine Learning with Step-by-Step Exercises”
},
{
“title”: “Intro to Python for Computer Science and Data Science: Learning to Program with AI, Big Data and The Cloud”
},
{
“title”: “Python for Data Analysis: Data Wrangling with Pandas, NumPy, and IPython”
},
{
“title”: “Automate the Boring Stuff with Python: Practical Programming for Total Beginners”
},
{
“title”: “Python: 2 Books in 1: The Crash Course for Beginners to Learn Python Programming, Data Science and Machine Learning + Practical Exercises Included. (Artifical Intelligence, Numpy, Pandas)”
},
{
“title”: “Python for Beginners: 2 Books in 1: The Perfect Beginner’s Guide to Learning How to Program with Python with a Crash Course + Workbook”
},
{
“title”: “Python: 2 Books in 1: The Crash Course for Beginners to Learn Python Programming, Data Science and Machine Learning + Practical Exercises Included. (Artifical Intelligence, Numpy, Pandas)”
},
{
“title”: “The Warrior-Poet’s Guide to Python and Blender 2.80”
},
{
“title”: “Python: 3 Manuscripts in 1 book: — Python Programming For Beginners — Python Programming For Intermediates — Python Programming for Advanced”
},
{
“title”: “Python: 2 Books in 1: Basic Programming & Machine Learning — The Comprehensive Guide to Learn and Apply Python Programming Language Using Best Practices and Advanced Features.”
},
{
“title”: “Learn Python 3 the Hard Way: A Very Simple Introduction to the Terrifyingly Beautiful World of Computers and Code (Zed Shaw’s Hard Way Series)”
},
{
“title”: “Python Tricks: A Buffet of Awesome Python Features”
},
{
“title”: “Python Pocket Reference: Python In Your Pocket (Pocket Reference (O’Reilly))”
},
{
“title”: “Python Cookbook: Recipes for Mastering Python 3”
},
{
“title”: “Python (2nd Edition): Learn Python in One Day and Learn It Well. Python for Beginners with Hands-on Project. (Learn Coding Fast with Hands-On Project Book 1)”
},
{
“title”: “Hands-On Machine Learning with Scikit-Learn, Keras, and TensorFlow: Concepts, Tools, and Techniques to Build Intelligent Systems”
},
{
“title”: “Hands-On Deep Learning Architectures with Python: Create deep neural networks to solve computational problems using TensorFlow and Keras”
},
{
“title”: “Machine Learning: 4 Books in 1: Basic Concepts + Artificial Intelligence + Python Programming + Python Machine Learning. A Comprehensive Guide to Build Intelligent Systems Using Python Libraries”
}
]
}
Isn’t that amazing? We managed to scrape Amazon in just 5 minutes of setup. We have an array of python Objects containing the title of the Python books from the Amazon website. In this way, we can scrape the data from any dynamic website.
Conclusion
In this article, we first understood what are dynamic websites and how we can scrape data using Scrapingdog& BeautifulSoupregardless of the type of website. Feel free to comment and ask me anything. You can follow me on Twitter and Medium. Thanks for reading and please hit the like button!
Additional Resources
Here are a few additional resources that you may find helpful during your web scraping journey:
Web scraping financial data is done widely around the globe today. With Python being a versatile language, it can be used for a wide variety of tasks, including web scraping.
In this blog post, we’ll scrape Yahoo Finance from the web using the Python programming language.
We’ll go over some of the basics of web scraping, and then we’ll get into how to scrape financial data specifically. We’ll also talk about some of the challenges in it, and how to overcome them.
Web Scraping Yahoo Finance
We will code a scraper for extracting data from Yahoo Finance. As you know I like to make things pretty simple, for that, I will also be using a web scraper which will increase your scraping efficiency.
Why use a web scraper? This tool will help us to scrape dynamic websites using millions of rotating proxies so that we don’t get blocked. It also provides a captcha-clearing facility. It uses headerless Chrome to scrape dynamic websites.
There are a number of reasons why you might want to scrape financial data from Yahoo Finance. Perhaps you’re trying to track the performance of a publicly traded company, or you’re looking to invest.
I have also scraped Nasdaq & Scraped Google Finance in my other blogs, do check it out too if you are looking to extract data from it. In any case, gathering this data can be a tedious and time-consuming process.
That’s where web scraping comes in. By writing a simple Python script, you can automate the task of extracting data. Not only will this save you time, but it will also allow you to gather data more frequently, giving you a more up-to-date picture of a company’s financial health.
Requirements for Scraping Yahoo Finance
Generally, web scraping is divided into two parts:
Fetching data by making an HTTP request
Extracting important data by parsing the HTML DOM
Libraries & Tools
Beautiful Soupis a Python library for pulling data out of HTML and XML files. BeautifulSoup is a library for parsing HTML and XML documents. It provides a number of methods for accessing and manipulating the data in the document. We’ll be using the BeautifulSoup library to parse the HTML document that we get back from the website.
Requests allow you to send HTTP requests very easily. Requests is a library that allows you to send HTTP requests. We’ll be using the requests library to make a GET request to the website that we want to scrape.
Web scraping tools like Scrapingdog that extract the HTML code of the target URL.
Putting it all together
Now that we’ve seen how to use the BeautifulSoup and requests libraries, let’s see how to put it all together to scrape Yahoo Finance.
We’ll start by making a GET request to the website that we want to scrape. We’ll then use the BeautifulSoup library to parse the HTML document that we get back. Finally, we’ll extract the data that we want from the parsed document.
Setup
Our setup is pretty simple. Just create a folder and install Beautiful Soup & requests. For creating a folder and installing libraries type below given commands. I am assuming that you have already installed Python 3.x.
Now, create a file inside that folder by any name you like. I am using scraping.py. Firstly, you have to sign up for the scrapingdog API. It will provide you with 1000 FREE credits. Then just import Beautiful Soup & requests in your file. like this.
What we are going to scrape from Yahoo Finance
Here is the list of fields we will be extracting:
Previous Close
Open
Bid
Ask
Day’s Range
52 Week Range
Volume
Avg. Volume
Market Cap
Beta
PE Ratio
EPS
Earnings Rate
Forward Dividend & Yield
Ex-Dividend & Date
1y target EST
Data We are Extracting from Yahoo Finance
Preparing the Food
Now, since we have all the ingredients to prepare the scraper, we should make a GET request to the target URL to get the raw HTML data. If you are not familiar with the scraping tool, I would urge you to go through its documentation. Now we will scrape Yahoo Finance for financial data using the requests library as shown below.
r = requests.get("https://api.scrapingdog.com/scrape?api_key=5ea541dcacf6581b0b4b4042&url=https://finance.yahoo.com/quote/AMZN?p=AMZN").text
This will provide you with an HTML code of that target URL. Now, you have to use BeautifulSoup to parse HTML.
soup = BeautifulSoup(r,’html.parser’)
Now, on the entire page, we have four “tbody” tags. We are interested in the first two because we currently don’t need the data available inside the third & fourth “tbody” tags.
Inspecting “tbody” tags in the website’s source code
First, we will find out all those “tbody” tags using variable “soup”.
alldata = soup.find_all(“tbody”)
tr & td tags inside tbody
As you can notice that the first two “tbody” has 8 “tr” tags and every “tr” tag has two “td” tags.
Now, each “tr” tag has two “td” tags. The first td tag consists of the name of the property and the other one has the value of that property. It’s something like a key-value pair.
data inside td tags
At this point, we are going to declare a list and a dictionary before starting a for loop.
l={}
u=list()
For making the code simple I will be running two different “for” loops for each table. First for “table1”
for i in range(0,len(table1)):
try:
table1_td = table1[i].find_all(“td”)
except:
table1_td = None
l[table1_td[0].text] = table1_td[1].text
u.append(l)
l={}
Now, what we have done is we are storing all the td tags in a variable “table1_td”. And then we are storing the value of the first & second td tag in a “dictionary”. Then we are pushing the dictionary into a list. Since we don’t want to store duplicate data we are going to make the dictionary empty at the end. Similar steps will be followed for “table2”.
for i in range(0,len(table2)):
try:
table2_td = table2[i].find_all(“td”)
except:
table2_td = None
l[table2_td[0].text] = table2_td[1].text
u.append(l)
l={}
Then at the end when you print the list “u” you get a JSON response.
We managed to scrape Yahoo Finance in just 5 minutes of setup. We have an array of Python objects containing the financial data of the company Amazon. In this way, we can scrape the data from any website.
The Benefits of Scraping Yahoo Finance with Python
Python is a versatile scripting language that is widely used in many different programming contexts.
Python’s “requests” and “BeautifulSoup” libraries make it easy to download and process web pages for data scraping purposes.
Python can be used to scrap financial statements from websites quickly and efficiently.
The data from financial statements can be used for various financial analyses and research purposes.
Python’s “pandas” library provides excellent tools for data analysis and manipulation, making it ideal for use with financial data.
Thus, Python is an excellent tool for scraping financial statements from websites. It is quick, efficient, and versatile, making it a great choice for those looking to gather data for financial analysis and research.
Conclusion
In this article, we understood how we can scrape data using the data scraping tool & BeautifulSoup regardless of the type of website. Feel free to comment and ask me anything. You can follow me on Twitter and Medium. Thanks for reading and please hit the like button!
Forget about getting blocked while scraping the Web
Try out Scrapingdog Web Scraping API & Start Scraping Yahoo Finance At Scale Without Any Blockage
Yes, Yahoo Finance API is set of libraries to obtain historical and real time data for financial market and products.
Additional Resources
And there’s the list! At this point, you should feel comfortable writing your first web scraper to gather data from any website. Here are a few additional resources that you may find helpful during your web scraping journey:
As we all know data has become like fuel these days and every important decision for any company or organization is backed by solid data research and analysis.
Web Scraping vs API
But how to get this data easily and seamlessly?
With many ways of extracting data, using web scrapers and APIs is one of the widely used methods.
In this blog, we will understand the difference and similarities in data extraction by using web scraping and API. Further, we will identify which method is a more reliable and scalable solution.
What is web scraping?
Web scraping or data extraction is the art of extracting data from any website and delivering it in formats like JSON, PDF, HTML, etc.
Data Extraction Process & Formats in Which Data is Extracted
Web Scraping can be done either by using coding languages like Python, NodeJs, Rust, etc or by using data extraction APIs and tools. I have written a few blogs on web scraping with these languages. You can check them out.
This data then can be used for various purposes including market analysis, lead generation, price monitoring, etc. You can automate the Web scraping process with webhooks. This improves the efficiency of your data collection and ultimately boosts the productivity of your employees.
Time-saving:Automating the process of data collection through web scraping can save a significant amount of time compared to manual data-gathering methods.
Can Increase Data Accuracy: Web scrapers can collect data consistently and accurately, reducing the risk of human error.
More Data at Scale: Web scrapers can collect data from multiple sources simultaneously, providing a more comprehensive view of the data.
Cost-effective: It can be a cost-effective way to collect data, as it eliminates the need to pay for expensive data sources or manual labor.
Flexible: Web scrapers can be customized and programmed to collect specific data, allowing for greater flexibility in data collection.
Data Freshness: They can be set up to run on a schedule, ensuring that the data is always up-to-date and relevant.
Diverse data sources: Web scraping can be used to collect data from a variety of sources, including websites, databases, and APIs.
Disadvantages of web scraping
With many advantages and automation features of web scraping, there are some limitations to it.
Here are some of the disadvantages of web scraping:
Legality issues: Web scraping may violate copyright and trademark laws, as well as terms of service agreements for websites. Some websites may also block scrapers, making it difficult to collect data.
Technical limitations: Web scraping can be limited by the structure and format of the websites it scrapes, as well as the security measures in place to prevent data scraping.
Performance issues: Web scraping can be resource-intensive and may slow down or crash a computer or server if not done correctly.
Maintenance and updating: Web scrapers need to be regularly maintained and updated to keep up with changes to websites and web technologies.
Cost: While web scraping can be cost-effective compared to manual data collection methods, it still requires a certain level of investment in hardware, software, and staffing.
What is an API?
API (Application Programming Interface) is like a bridge between two or more servers/software. There are different types of APIs, that help the two software/servers to interact with each other on demand. Using APIs servers can make seamless connections with each other.
API is the bridge between two software/servers
There are various applications of an API.
Mobile apps can communicate with their database server using an API.
III party apps can use APIs for authentication.
Exposing multiple API endpoints can help others to access your data.
Now, an API can respond in multiple ways. It can return a response in JSON, HTML, XML, text file, etc. It depends on the server which is holding the data.
Benefits of using an API
Efficient: API is an efficient way to collect content without putting additional strain on your hardware.
Ease of use: By using an API, a developer can simply provide credentials to access the data, which is usually presented in either XML or JSON format, making it easy to process.
Large-Scale Data Collection without Hindrance: This method also eliminates issues like Javascript rendering and CAPTCHA avoidance, making it ideal for collecting large amounts of data quickly and effectively, compared to web scraping.
Legal Trouble: There will be no legal trouble while using APIs, as you will have permission from the host website for data access.
Disadvantages of using an API
Dependence on the API provider: The functionality of the API may be limited and can be controlled by the provider. If the API provider changes its policies, this can directly impact the data extraction capabilities.
API rate limits: Most API providers will impose limits on the number of API requests you can make in a given time period, which translates to the limited collection of data in a set frame of time. It is a major disadvantage for those looking for scalable data harvesting solutions.
Restriction in API key: This may be limited to accessing the data via restricting it to the data extraction limit, geolocation, etc.
What is web scraping API
A web scraping API is a useful tool for extracting data from websites. It has several key benefits, such as the ability to switch between proxies, handle JavaScript rendering, bypass CAPTCHAs, and prevent blocking, all with a simple API call.
This eliminates the need to build a scraping application from scratch, as well as the hassle of managing proxies, maintaining infrastructure, and dealing with scaling issues.
With a web scraping API, you have the option of specifying various parameters for the request, such as the proxy country and type, custom headers, cookies, and waiting time. On top of that, you can select params if the website needs JS rendering before extracting the data.
So while scraping you have to make a GET request to the web scraping API instead of the target website itself. The API will handle all the hassles of retrying a request and solving a captcha.
Advantage of using web scraping API
There are several advantages of using a web scraping API over just using a web scraper or an API for data extraction:
Flexibility: Using a web scraping API you won’t have to worry about changing proxies on every request. You will be able to send custom headers. You can set geolocation as well.
Simple to use: With a web scraping API, you don’t need to write complex scraping code or manage proxies and infrastructure. Instead, you can make a simple API call to extract the data you need and too from any website.
Scalable: A web scraping API is typically hosted on a scalable infrastructure, so it can handle large amounts of data extraction without any hassle.
Reliable: A web scraping API provided is likely to be more reliable than a custom-built web scraper, as it is designed and maintained to handle a variety of scraping tasks.
Legal Issues: A web scraping API user can scrape any website without getting into legal trouble. Web scraping API will always use its own proxy cluster. This will keep the original IP of the user hidden.
Web Scraping vs API: What’s the difference
Web scraping involves gathering specific information from multiple websites and organizing it into a structured format for users. On the other hand, APIs allow seamless access to the data of an application or any software, but the owner determines the availability and limitations of this data.
They may offer it for free or charge a fee and also limit the number of requests a user can make or the amount of data they can access.
While web scraping offers the flexibility to extract data from any website using web scraping tools, APIs provide direct access to specific data. The availability of data through web scraping is limited to what is publicly available on a website, whereas API access may be limited or costly.
API typically allows for data extraction from a website, whereas web scraping enables data collection from multiple websites. Additionally, APIs provide access to a limited set of data, whereas web scraping allows for a wider range of data collection.
Web Scraping might require intense data cleaning while parsing the data but when you access an API you get data in a machine-readable format. Along with this extracting data through an API is much faster than web scraping.
Web Scraping vs API: What’s the similarity
Both web scraping and API scraping are popular techniques used by data engineers to obtain data. Although the methods differ, they both serve the purpose of providing data to the user.
These techniques allow for the collection of customer information and insights previously unavailable, as well as the gathering of emails for email marketing and lead generation & much more. There are endless possibilities with the data you collect.
No, web scraping does not necessarily require an API. Web scraping involves extracting data from websites using automated tools, while an API (Application Programming Interface) is a way for different software systems to communicate with each other. While an API can be used as a source for web scraping, it’s not a requirement for the process. Web scraping can be done on websites without APIs by directly accessing and extracting the HTML content of a page.
Scrapingdog can be used for web scraping at ease and at economical pricing. The data extraction rate is quite high and it can be used to extract data at scale without any blockage.
Yes, web scraping is part of ETL, for data extraction, you should know the basics of HTML.
Conclusion
Whether you need to use both APIs and web scraping tools depends on your skills, the websites you want to target, and your objectives.
If an API offered by the website is expensive then web scraping is the only way left for data extraction.
If you are an agency that needs help with integrating data from several APIs or other sources. Acuto can help you by creating a custom solution for you.
However, there is a middle ground where you can use both meaning an API for web scraping to make this data extraction thing more powerful.
I hope you got a clear picture now. Now you can make your own decision whether to go with APIs or web scraping or integrate both.
I hope you like this blog and if you do then please do not forget to share it with your friends and on your social media.
Additional Resources
Here are a few additional resources that you may find helpful during your web scraping journey:
In this comprehensive tutorial, we are going to scraper realtor.com using Python and we will build a realtor scraper.
Realtor is one of the biggest real estate listing platforms. Many people in and outside the United States use this website for buying, renting, or selling property. So, this website has a lot of property data and this huge data can be used to analyze future trends in any locality.
You can open this page to analyze what it looks like and what is placed where.
Setting Up the Prerequisites to Scrape Realtor.com
Before we start coding we have to install certain libraries which are going to be used in the course of this article. I am assuming that you have already installed Python 3.x on your machine.
Before installing the libraries let’s create a folder where we will keep our scraping files.
mkdir realtor
Now, let’s install the libraries.
pip install requests
pip install beautifulsoup4
Requests — This will help us to make an HTTP connection with the host website.
BeautifulSoup will help us to create an HTML tree for smooth data parsing.
You should also create a Python file where we will write the code.
What Are We Going to Extract From Realtor.com?
It is better to decide in advance what data you are going to scrape from the page. So, from our target page, we are going to scrape these details.
Before writing the code we have to find the element located inside the DOM. First, let’s find in which tag all this information is stored after that we are going to extract our target data one by one using a for loop.
Inspecting Property Details in Source Code
As you can see in the image above that all the data of all the properties is stored inside the class property-wrap of the div tag. Let’s code it in python.
The code above is pretty straightforward but let me explain the code in step by step manner.
We have imported all the libraries that we installed earlier in this post.
Declare an empty list and an object for storing data later.
Declared the target URL to target_url variable.
Headers for passing while making a GET request.
Using the requests library we made a GET request to the target website.
Created an HTML tree using BeautifulSoup aka BS4.
Using find_all method of BS4, we are going to find all the elements on the page with class property-wrap.
Now we can find our data of interest in the variable allData. We will use for loop on allData variable to iterate over all the properties one by one. But before that, we have to find the location of the price element.
Inspecting the Price of the property in the source code
As you can see the price text is stored under span the tag with the attribute data-label. Let’s implement this in our Python script.
for i in range(0, len(allData)):
o["price"]=allData[i].find("span",{"data-label":"pc-price"}).text
We are running a for loop on the list allData. Then we are going to use find() method to find the price element. The value of the attribute is pc-price. Now Let’s find the location of beds, baths, etc.
Showing Data placement in source code
All this information is stored inside ul tag with class property-meta. After finding this element using find() method we have to find all these li tags where this data is actually stored. Once we find that we are again going to use the for loop to iterate over all the li tags.
metaData = allData[i].find("ul",{"class":"property-meta"})
allMeta = metaData.find_all("li")
for x in range(0, len(allMeta)):
try:
o["bed"]=allMeta[0].text
except:
o["bed"]=None
try:
o["bath"]=allMeta[1].text
except:
o["bath"]=None
try:
o["size-sqft"]=allMeta[2].text
except:
o["size-sqft"]=None
try:
o["size-acre"]=allMeta[3].text
except:
o["size-acre"]=None
After running the for loop we are finding each element by its index in the array allMeta. We have used try/except statement to avoid any error if we could not find any text on that particular position. Last thing which is left is the address of the property. Let’s find that too.
Inspecting which tag holds the location of the property
You can simply find the address inside the div tag with the attribute data-label. The value of the attribute is pc-address.
In the end, we are storing every property data one by one inside the array l. Object o was declared empty at the end because we have to store another property data once the for loop starts again.
Finally, we managed to scrape all the data. The output will look like this.
[{'price': '$324,900', 'bed': '5bed', 'bath': '2bath', 'size-sqft': '2,664sqft', 'size-acre': '1.14acre lot', 'address': '15 Nepale Dr, New Paltz, NY 12561'}, {'price': '$299,000', 'bed': '3bed', 'bath': '1bath', 'size-sqft': '1,643sqft', 'size-acre': '2.46acre lot', 'address': '15 Shivertown Rd, New Paltz, NY 12561'}, {'price': '$429,000', 'bed': '1.8acre lot', 'bath': None, 'size-sqft': None, 'size-acre': None, 'address': '123 NY 208 Rte, New Paltz, NY 12561'}, {'price': '$250,000', 'bed': '4bed', 'bath': '1bath', 'size-sqft': '1,111sqft', 'size-acre': '2.2acre lot', 'address': '403 State Route 32 N, New Paltz, NY 12561'}, {'price': '$250,000', 'bed': '4bed', 'bath': '1bath', 'size-sqft': '1,111sqft', 'size-acre': '2.2acre lot', 'address': '403 Route 32, New Paltz, NY 12561'}, {'price': '$484,000', 'bed': '3bed', 'bath': '3bath', 'size-sqft': '1,872sqft', 'size-acre': '1.3acre lot', 'address': '21 Angel Rd, New Paltz, NY 12561'}, {'price': '$729,000', 'bed': '7,841sqft lot', 'bath': None, 'size-sqft': None, 'size-acre': None, 'address': '225 Main St, New Paltz, NY 12561'}, {'price': '$659,900', 'bed': '4bed', 'bath': '3.5bath', 'size-sqft': '3,100sqft', 'size-acre': '0.93acre lot', 'address': '8 Carroll Ln, New Paltz, NY 12561'}, {'price': '$479,000', 'bed': '3bed', 'bath': '3bath', 'size-sqft': '2,184sqft', 'size-acre': '1.1acre lot', 'address': '447 S Ohioville Rd, New Paltz, NY 12561'}, {'price': '$389,900', 'bed': '3bed', 'bath': '1.5bath', 'size-sqft': '1,608sqft', 'size-acre': '1.1acre lot', 'address': '10 Canaan Rd, New Paltz, NY 12561'}, {'price': '$829,900', 'bed': '4bed', 'bath': '2.5bath', 'size-sqft': '4,674sqft', 'size-acre': '2.81acre lot', 'address': '8 Yankee Folly Rd, New Paltz, NY 12561'}, {'price': '$639,000', 'bed': '4bed', 'bath': '2.5bath', 'size-sqft': '2,346sqft', 'size-acre': '2.1acre lot', 'address': '4 Willow Way, New Paltz, NY 12561'}, {'price': '$1,995,000', 'bed': '5bed', 'bath': '4bath', 'size-sqft': '4,206sqft', 'size-acre': '51.3acre lot', 'address': '1175 Old Ford Rd, New Paltz, NY 12561'}, {'price': '$879,000', 'bed': '8bed', 'bath': '5bath', 'size-sqft': '0.34acre lot', 'size-acre': None, 'address': '21 Grove St, New Paltz, NY 12561'}, {'price': '$209,900', 'bed': '3bed', 'bath': '1bath', 'size-sqft': '1,276sqft', 'size-acre': '0.6acre lot', 'address': '268 State Route 32 S, New Paltz, NY 12561'}, {'price': '$3,375,000', 'bed': '6bed', 'bath': '5.5+bath', 'size-sqft': '7,996sqft', 'size-acre': '108acre lot', 'address': '28 Autumn Knl, New Paltz, NY 12561'}, {'price': '$449,000', 'bed': '3bed', 'bath': '1bath', 'size-sqft': '1,662sqft', 'size-acre': '1.88acre lot', 'address': '10 Joalyn Rd, New Paltz, NY 12561'}, {'price': '$550,000', 'bed': '4bed', 'bath': '3.5bath', 'size-sqft': '2,776sqft', 'size-acre': '1.05acre lot', 'address': '19 Meadow Rd, New Paltz, NY 12561'}, {'price': '$399,000', 'bed': '3bed', 'bath': '1bath', 'size-sqft': '950sqft', 'size-acre': '2acre lot', 'address': '23 Tracy Rd, New Paltz, NY 12561'}, {'price': '$619,000', 'bed': '4bed', 'bath': '3bath', 'size-sqft': '3,100sqft', 'size-acre': '5.2acre lot', 'address': '20 Carroll Ln, New Paltz, NY 12561'}, {'price': '$1,200,000', 'bed': '6bed', 'bath': '5.5bath', 'size-sqft': '4,112sqft', 'size-acre': '3.3acre lot', 'address': '55 Shivertown Rd, New Paltz, NY 12561'}, {'price': '$425,000', 'bed': '3bed', 'bath': '1.5bath', 'size-sqft': '1,558sqft', 'size-acre': '0.88acre lot', 'address': '5 Cicero Ave, New Paltz, NY 12561'}, {'price': '$650,000', 'bed': '6bed', 'bath': '3bath', 'size-sqft': '3,542sqft', 'size-acre': '9.4acre lot', 'address': '699 N Ohioville Rd, New Paltz, NY 12561'}, {'price': '$524,900', 'bed': '4bed', 'bath': '2.5bath', 'size-sqft': '2,080sqft', 'size-acre': '0.87acre lot', 'address': '210 Horsenden Rd, New Paltz, NY 12561'}, {'price': '$379,999', 'bed': '2bed', 'bath': '1bath', 'size-sqft': '1,280sqft', 'size-acre': '0.53acre lot', 'address': '318 N State Route 32, New Paltz, NY 12561'}, {'price': '$589,999', 'bed': '4bed', 'bath': '3bath', 'size-sqft': '2,300sqft', 'size-acre': '1.5acre lot', 'address': '219 S Ohioville Rd, New Paltz, NY 12561'}, {'price': '$525,000', 'bed': '4bed', 'bath': '2.5bath', 'size-sqft': '1,812sqft', 'size-acre': '0.35acre lot', 'address': '35 Bonticou View Dr, New Paltz, NY 12561'}, {'price': '$699,000', 'bed': '3bed', 'bath': '2.5bath', 'size-sqft': '1,683sqft', 'size-acre': '10.87acre lot', 'address': '22 Cragswood Rd, New Paltz, NY 12561'}, {'price': '$1,225,000', 'bed': '3bed', 'bath': '2.5bath', 'size-sqft': '2,800sqft', 'size-acre': '5acre lot', 'address': '16 High Pasture Rd, New Paltz, NY 12561'}, {'price': '$1,495,000', 'bed': '4bed', 'bath': '2.5bath', 'size-sqft': '3,403sqft', 'size-acre': '5.93acre lot', 'address': '15 Cross Creek Rd, New Paltz, NY 12561'}, {'price': '$699,999', 'bed': '5bed', 'bath': '3bath', 'size-sqft': '1,956sqft', 'size-acre': '0.8acre lot', 'address': '265 Rt 32 N, New Paltz, NY 12561'}, {'price': '$1,495,000', 'bed': '4bed', 'bath': '2.5bath', 'size-sqft': '3,428sqft', 'size-acre': None, 'address': '430 State Route 208, New Paltz, NY 12561'}, {'price': '$599,999', 'bed': '3bed', 'bath': '3bath', 'size-sqft': '2,513sqft', 'size-acre': '0.43acre lot', 'address': '6 Old Mill Rd, New Paltz, NY 12561'}, {'price': '$2,750,000', 'bed': '3bed', 'bath': '2.5bath', 'size-sqft': '2,400sqft', 'size-acre': '20.36acre lot', 'address': '44 Rocky Hill Rd, New Paltz, NY 12561'}, {'price': '$1,100,000', 'bed': '5bed', 'bath': '3bath', 'size-sqft': '5,638sqft', 'size-acre': '5acre lot', 'address': '191 Huguenot St, New Paltz, NY 12561'}, {'price': '$1,100,000', 'bed': '4bed', 'bath': '3bath', 'size-sqft': '2,540sqft', 'size-acre': '9.7acre lot', 'address': '100 Red Barn Rd, New Paltz, NY 12561'}]
Complete Code
You can make a few more changes to get more details from the page. You can scrape images, etc. But for now, the code will look somewhat like this.
import requests
from bs4 import BeautifulSoup
l=[]
o={}
target_url = "https://www.realtor.com/realestateandhomes-search/New-Paltz_NY/type-single-family-home,multi-family-home"
head={"User-Agent":"Mozilla/5.0 (Windows NT 10.0; Win64; x64) AppleWebKit/537.36 (KHTML, like Gecko) Chrome/107.0.0.0 Safari/537.36"}
resp = requests.get(target_url, headers=head)
soup = BeautifulSoup(resp.text, 'html.parser')
allData = soup.find_all("div",{"class":"property-wrap"})
for i in range(0, len(allData)):
o["price"]=allData[i].find("span",{"data-label":"pc-price"}).text
metaData = allData[i].find("ul",{"class":"property-meta"})
allMeta = metaData.find_all("li")
for x in range(0, len(allMeta)):
try:
o["bed"]=allMeta[0].text
except:
o["bed"]=None
try:
o["bath"]=allMeta[1].text
except:
o["bath"]=None
try:
o["size-sqft"]=allMeta[2].text
except:
o["size-sqft"]=None
try:
o["size-acre"]=allMeta[3].text
except:
o["size-acre"]=None
o["address"]=allData[i].find("div",{"data-label":"pc-address"}).text
l.append(o)
o={}
print(l)
Now there is some limitation when it comes to scraping realtor like this.
Realtor.com will start blocking your IP if it finds out that a script is trying to access its data at a rapid pace.
To avoid this we are going to use Scrapingdog Web Scraping API to scrape Realtor at scale without getting blocked.
Using Scrapingdog for Scraping Realtor
Scrapingdog’s scraping API can be used to extract data from any website including Realtor.com.
You can start using Scrapingdog in seconds by just signing up. You can sign up from here and in the free pack, you will get 1000 free API credits. It will use new IP on every new request.
Scrapingdog to scrape realtor at scale
Once you sign up, you will be redirected to your dashboard. The dashboard will look somewhat like this.
Scrapingdog Dashboard
Now, you can paste your target realtor page link to the left and then select JS Rendering as No. After this click on Copy Code from the right. Now use this API in your script to scrape realtor.
The code will remain the same as above but we just have to replace the target URL with the Scraping API URL.
import requests
from bs4 import BeautifulSoup
l=[]
o={}
target_url = "https://api.scrapingdog.com/scrape?api_key=xxxxxxxxxxxxxxxxxxxxxxxxxxxxx&url=https://www.realtor.com/realestateandhomes-search/New-Paltz_NY/type-single-family-home,multi-family-home&dynamic=false"
head={"User-Agent":"Mozilla/5.0 (Windows NT 10.0; Win64; x64) AppleWebKit/537.36 (KHTML, like Gecko) Chrome/107.0.0.0 Safari/537.36"}
resp = requests.get(target_url, headers=head)
soup = BeautifulSoup(resp.text, 'html.parser')
allData = soup.find_all("div",{"class":"property-wrap"})
for i in range(0, len(allData)):
o["price"]=allData[i].find("span",{"data-label":"pc-price"}).text
metaData = allData[i].find("ul",{"class":"property-meta"})
allMeta = metaData.find_all("li")
for x in range(0, len(allMeta)):
try:
o["bed"]=allMeta[0].text
except:
o["bed"]=None
try:
o["bath"]=allMeta[1].text
except:
o["bath"]=None
try:
o["size-sqft"]=allMeta[2].text
except:
o["size-sqft"]=None
try:
o["size-acre"]=allMeta[3].text
except:
o["size-acre"]=None
o["address"]=allData[i].find("div",{"data-label":"pc-address"}).text
l.append(o)
o={}
print(l)
Do remember to use your own API key while using this script. Just like this Scrapingdog can be used for scraping any website without getting BLOCKED.
Forget about getting blocked while scraping the Web
Try out Scrapingdog Web Scraping API with thousands of proxy servers and scrape Realtor.com at scale
Conclusion
In this tutorial, we managed to scrape property prices for a given area from Realtor. If you want to scrape Realtor at scale then you might require a web scraping API that can handle all the hassle of proxy rotation and headless browsers.
You can scrape all the other pages by making changes to the target URL. You have to find the change in the URL structure once you click Next from the bottom of the page. In this manner, you will be able to scrape the data from the next page as well.
I hope you like this little tutorial and if you do then please do not forget to share it with your friends and on your social media.
The best way to scrape realtor.com property listing data is by using a web scraping API. Scrapindog offers no-blockage web scraping API with 1000 free API requests so that you get the desired data without any hassle. Also, we have a dedicated API for scraping Zillow listings, check it out here.
No, realtor.com doesn’t offer an API for its data extraction. However, you can try Scrapingdog’s web scraping API, which offers 1000 free API requests in its free plan.
Additional Resources
Here are a few additional resources that you may find helpful during your web scraping journey:
Data parsing is like extracting metals from a pile of garbage. When we deal with web scraping we receive a large amount of data that is completely useless for us. At this point, we use an HTML parser to extract useful data from the raw data we get from the target website while scraping it.
C# Html Parser
In this tutorial, we will talk about some of the most popular C#HTML parsers. We will discuss them one by one and after that, you can draw your own conclusion. In the end, you will have a clear picture of which library you should use while parsing data in C#.
Html Agility Pack(HAP)
HTML Agility Pack aka HAP is the most widely used HTML parser in the C# community. It is used for loading, parsing, and manipulating HTML documents. It has the capability of parsing HTML from a file, a string, or even a URL also. It comes with XPath support that can help you identify or find specific HTML elements within the DOM. Due to this reason, it is quite popular in web scraping projects.
Features
HAP can help you remove dangerous elements from HTML documents.
Within the .NET environment, you can manipulate HTML documents.
It comes with a low memory footprint which makes it friendly for large projects. This ultimately reduces cost as well.
Its built-in support XPath makes it the first choice for developers.
Example
Let’s see how we can use HAP to parse HTML and extract the title tag from the sample HTML given below.
We will use SelectSingleNode to find the p tag inside of this raw HTML.
using HtmlAgilityPack;
HtmlDocument doc = new HtmlDocument();
doc.LoadHtml("<div class='test1'><p class='title'>Harry Potter</p></div>");
HtmlNode title = doc.DocumentNode.SelectSingleNode("//p[@class='title']");
if (title != null)
{
Console.WriteLine(title.InnerText);
}
The output will be Harry Potter. Obviously, this is just a small example of parsing. This library can be used for heavy parsing too.
Advantages
API is pretty simple for parsing HTML. Even a beginner can use it without getting into much trouble. It is a developer-friendly library.
Since it supports multiple encoding options, parsing HTML becomes even more simple.
Due to the large community, solving errors becomes for beginners will not be a problem.
Disadvantages
It cannot parse javascript.
Still, now there is very limited support for HTML5.
Error handling is quite an old style. The community needs to focus on this issue.
It is purely designed for parsing HTML documents. So, if you are thinking of parsing XML then you have to pick another library for that.
AngleSharp
It’s a .NET based lightweight HTML and CSS parsing library. It comes with clean documentation which makes it popular among developers. AngleSharp helps you by providing an interactive DOM while scraping any website.
Features
It comes with a CSS selector feature. This makes data extraction through HTML & CSS extremely easy.
Using custom classes you can handle any specific type of element.
Built-in support for HTML5 and CSS3. With this, it becomes compatible with new technology.
It is compatible with the .NET framework too. This opens too many gates for compatibility with various libraries.
Example
Let’s see how AngleSharp works on the same HTML code used above.
using AngleSharp.Html.Parser;
var parser = new HtmlParser();
var document = parser.Parse("<div class='test1'><p class='title'>Harry Potter</p></div>");
var title = document.QuerySelector("p.title").TextContent;
Console.WriteLine(title); // Output: Harry Potter
Here at first, we have used HtmlParser to parse HTML string into an AngleSharp.Dom.IHtmlDocument object. Then with the help of QuerySelector, we selected p tag of the class title. And finally using TextContent we have extracted the text.
Advantages
It has a better error-handling mechanism than HAP.
It is faster than compared to other libraries like HAP.
It comes with built-in support for Javascript parsing.
It supports new technologies like HTML5 and CSS3.
Disadvantages
It has a smaller community than HAP which makes it difficult for beginners to overcome challenges that they might face while using AngelSharp.
It lacks support for Xpath.
You cannot parse and manipulate HTML forms using AngleSharp.
Not a good choice for parsing XML documents.
Awesomium
Awesomium can be used to render any website. By creating an instance you can navigate to the website and by using DOM API you can interact with the page as well. It is built on Chromium Embedded Framework (CEF) and provides a great API for interaction with the webpage.
Features
API is straightforward which makes interaction with the page dead simple.
Browser functionalities like notifications and dialog boxes are also supported by this library.
Works on Mac, Linux, and Windows.
Example
Since Awesomium is a web automation engine and not a parsing library. So, we will write a code to display www.scrapingdog.com using it.
using Awesomium.Core;
using Awesomium.Windows.Forms;
using System.Windows.Forms;
namespace DisplayScrapingdog
{
public partial class Form1 : Form
{
public Form1()
{
InitializeComponent();
// Initialize the WebCore
WebCore.Initialize(new WebConfig()
{
// Add any configuration options here
});
// Create a new WebControl
var webView = new WebControl();
// Add the WebControl to the form
this.Controls.Add(webView);
// Navigate to the website
webView.Source = new Uri("https://www.scrapingdog.com/");
}
}
}
Advantage
It is a lightweight library due to low memory usage.
It is compatible with HTML5, CSS3, and Javascript which makes it popular among developers.
It is an independent library that does not require any extra liability to extract raw data.
You can scrape dynamic javascript websites using Awesomium but you will require an additional library for parsing the important data from the raw data.
Disadvantage
It comes with limited community support. Solving bugs with no community support can become very hard for developers to use in their web scraping projects.
It does not support all browsers. Hence, scraping certain websites might not be possible.
It is not open source. So, you might end up paying due to copyright issues.
Fizzler
Fizzler is another parsing library that is built on top of HAP. The syntax is small and pretty self-explanatory. It uses namespaces for the unique identification of objects. It is a .NET library which does not get active support from the community.
Features
Using a CSS selector you can filter and extract elements from any HTML document.
Since it has no external dependency, it is quite lightweight.
Fizzler provides a facility for CSS selectors as well. You can easily search for ID, class, type, etc.
Example
Since it is built on top of HAP the syntax will look somewhat similar to it.
using System;
using Fizzler.Systems.HtmlAgilityPack;
using HtmlAgilityPack;
var html = "<div class='test1'><p class='title'>Harry Potter</p></div>";
var doc = new HtmlDocument();
doc.LoadHtml(html);
var title = doc.DocumentNode.QuerySelector(".title").InnerText;
Console.WriteLine(title);
Advantages
Unlike Awesomium it is a free open-source package, you won’t have to pay for anything.
CSS selector can help you parse any website even if it is a dynamic javascript website.
Its fast performance reduces server latency.
Disadvantages
It might not work as well as other libraries do with large HTML documents.
Support resources or tutorials on Fizzler are very less.
Selenium WebDriver
I think you already know what Selenium is capable of. This is the most popular web automation tool which can work with almost any programming language (C#, Python, NodeJS, etc). It can run on any browser which includes Chrome, Firefox, Safari, etc.
It provides an integration facility for testing frameworks like TestNG and JUnit.
Example
Again just like Awesomium, it is a web automation tool. So, we will display www.scrapingdog.com using Selenium.
using OpenQA.Selenium;
using OpenQA.Selenium.Chrome;
class Program
{
static void Main(string[] args)
{
IWebDriver driver = new ChromeDriver();
driver.Navigate().GoToUrl("http://books.toscrape.com/");
Console.WriteLine(driver.Title);
driver.Quit();
}
}
Here we are using the ChromeDriver constructor to open the chrome browser. Then using GoToUrl() we are navigating to the target website. driver.title will print the title of the website and then using driver.Quit() we are closing down the browser.
Features
You can record videos, take screenshots and you can even log console messages. It’s a complete web automation testing tool.
Support almost all browsers and almost all programming languages.
You can click buttons, fill out forms and navigate between multiple pages.
Advantages
A clear advantage is its capability to work with almost all browsers and programming languages.
You can run it in a headless mode which ultimately reduces resource costs and promotes faster execution.
CSS selectors and XPath both can work with Selenium.
The community is very large so even a beginner can learn and create a web scraper in no time.
Disadvantages
It does not support mobile application testing. All though there are some alternatives to that too.
It does not support SSL encryption. So, testing high-security websites with selenium would not be a great idea.
It requires a separate driver if you want to run it on multiple different browser instances.
Conclusion
Today in general Selenium Web driver is the most used web automation tool due to its compatibility with almost all programming languages but it can be slow because it used real browsers.
Awesomium and Fizzler are both great HTML parsing libraries but Awesomium offers fast website rendering APIs. On the other hand, Fizzler too can be used for small web scraping tasks but it is not fully equipped with the guns as Selenium. Personally, I prefer the combination of Selenium and Fizzler.
I hope this article has given you an insight into the most popular web scraping and HTML parsing tools/libraries available in C#. I know it can be a bit confusing while selecting the right library for your project but you have to find the right fit by trying them one by one.
I hope you like this little tutorial and if you do then please do not forget to share it with your friends and on your social media.
Additional Resources
Here are a few additional resources that you may find helpful during your web scraping journey:
In this article, we will learn web scraping through Rust. This programming language isn’t really popular and is not in much use.
This tutorial will focus on extracting data using this programming language and then I will talk about the advantages and disadvantages of using Rust.
Web Scraping with Rust
We will scrape this http://books.toscrape.com/ using two popular libraries of Rust reqwest and scraper. We will talk about these libraries in a bit.
At the end of this tutorial, you will have a basic idea of how Rust works and how it can be used for web scraping.
What is Rust?
Rust is a high-level programming language designed by Mozilla. It is built with a main focus on software building. It works great when it comes to low-level memory manipulation like pointers in C and C++.
Concurrent connections are also quite stable when it comes to Rust. Multiple components of the software can run independently and at the same time too without putting too much stress on the server.
Error handling is also top-notch because concurrency errors are compile-time errors instead of run-time errors. This saves time and a proper message will be shown about the error.
This language is also used in game development and blockchain technology. Many big companies like AWS, Microsoft, etc already use this language in their architecture.
Setting up The Prerequisites to Web Scrape with Rust
I am assuming that you have already installed Rust and Cargo(package manager of Rust) on your machine and if not then you can refer to this guide for further instructions on installing Rust. First, we have to create a rust project.
cargo new rust_tutorial
Then we have to install two Rust libraries which will be used in the course of this tutorial.
reqwest: It will be used for making an HTTP connection with the host website.
scraper: It will be used for selecting DOM elements and parsing HTML.
Both of these libraries can be installed by adding them to your cargo.toml file.
Both 0.10.8 and 0.12.0 are the latest versions of the libraries. Now finally you can access them in your main project file src/main.rs.
What Are We Scraping Using Rust?
It is always better to decide what you want to scrape. We will scrape titles and the prices of the individual books from this page.
Scraping titles and price from this page
The process will be pretty straightforward. First, we will inspect chrome to identify the exact location of these elements in the DOM, and then we will use scraper library to parse them out.
Scraping Individual Book Data
Let’s scrape book titles and prices in a step-by-step manner. First, you have to identify the DOM element location.
Identifying DOM element location
As you can see in the above book title is stored inside the titleattribute of a the tag. Now let’s see where is the price stored.
Identifying price location in page source code
Price is stored under the p tag with classprice_color. Now, let’s code it in rust and extract this data.
The first step would be to import all the relevant libraries in the main file src/main.rs.
use reqwest::Client;
use scraper::{Html, Selector};
Using reqwest we are going to make an HTTP connection to the host website and using scraper library we are going to parse the HTML content that we are going to receive by making the GET request through reqwest library.
Now, we have to create a client which can be used for sending connection requests using reqwest.
let client = Client::new();
Then finally we are going to send the GET request to our target URL using the client we just created above.
let mut res = client.get("http://books.toscrape.com/")
.send()
.unwrap();
Here we have used mut modifier to bind the value to the variable. This improves code readability and once you change this value in the future you might have to change other parts of the code as well.
So, once the request is sent you will get a response in HTML format. But you have to extract that HTML string from res variable using .text().unwrap(). .unwrap() is like a try-catch thing where it asks the program to deliver the results and if there is any error it asks the program to stop the execution asap.
let body = res.text().unwrap();
Here res.text().unwrap() will return an HTML string and we are storing that string in the body variable.
Now, we have a string through which we can extract all the data we want. Before we use the scraper library we have to convert this string into an scraper::Html object using Html::parse_document.
let document = Html::parse_document(&body);
Now, this object can be used for selecting elements and navigating to the desired element.
First, let’s create a selector for the book title. We are going to use the Selector::parse function to create a scraper::Selector object.
let book_title_selector = Selector::parse("h3 > a").unwrap();
Now this object can be used for selecting elements from the HTML document. We have passed h3 > a as arguments to the parse function. That is a CSS selector for the elements we are interested in. h3 > a means it is going to select all the a tags which are the children of h3 tags.
As you can see in the image the target a tag is the child of h3 tag. Due to this, we have used h3 > a in the above code.
Since there are so many books we are going to iterate over all of them using the for loop.
for book_title in document.select(&book_title_selector) {
let title = book_title.text().collect::<Vec<_>>();
println!("Title: {}", title[0]);
}
select method will provide us with a list of elements that matches the selector book_title_selector. Then we are iterating over that list to find the title attribute and finally print it.
Here Vec<_>> represents a dynamically sized array. It is a vector where you can access any element by its position in the vector.
The next and final step is to extract the price.
let book_price_selector = Selector::parse(".price_color").unwrap();
Again we have used Selector::parse function to create the scraper::Selector object. As discussed above price is stored under the price_colorclass. So, we have passed this as a CSS selector to the parse function.
Then again we are going to use for loop like we did above to iterate over all the price elements.
for book_price in document.select(&book_price_selector) {
let price = book_price.text().collect::<Vec<_>>();
println!("Price: {}", price[0]);
}
Once you find the match of the selector it will get the text and print it on the console.
Finally, we have completed the code which can extract the title and the price from the target URL. Now, once you save this and run the code using cargo run you will get output that looks something like this.
Title: A Light in the Attic
Price: £51.77
Title: Tipping the Velvet
Price: £53.74
Title: Soumission
Price: £50.10
Title: Sharp Objects
Price: £47.82
Title: Sapiens: A Brief History of Humankind
Price: £54.23
Title: The Requiem Red
Price: £22.65
Title: The Dirty Little Secrets of Getting Your Dream Job
Price: £33.34
Title: The Coming Woman: A Novel Based on the Life of the Infamous Feminist, Victoria Woodhull
Price: £17.93
Title: The Boys in the Boat: Nine Americans and Their Epic Quest for Gold at the 1936 Berlin Olympics
Price: £22.60
Title: The Black Maria
Price: £52.15
Complete Code
You can make more changes to the code to extract other information like star ratings and scaled-up images of books etc. You can use the same technique of first inspecting and finding the location of the element and then extracting them using the Selector function.
But for now, the code will look like this.
use reqwest::Client;
use scraper::{Html, Selector};
// Create a new client
let client = Client::new();
// Send a GET request to the website
let mut res = client.get("http://books.toscrape.com/")
.send()
.unwrap();
// Extract the HTML from the response
let body = res.text().unwrap();
// Parse the HTML into a document
let document = Html::parse_document(&body);
// Create a selector for the book titles
let book_title_selector = Selector::parse("h3 > a").unwrap();
// Iterate over the book titles
for book_title in document.select(&book_title_selector) {
let title = book_title.text().collect::<Vec<_>>();
println!("Title: {}", title[0]);
}
// Create a selector for the book prices
let book_price_selector = Selector::parse(".price_color").unwrap();
// Iterate over the book prices
for book_price in document.select(&book_price_selector) {
let price = book_price.text().collect::<Vec<_>>();
println!("Price: {}", price[0]);
}
Advantages of using Rust
Rust is an efficient programming language like C++. You can build heavy-duty games and Software using it.
It can handle a high volume of concurrent calls, unlike Python.
Rust can even interact with languages like C and Python.
Disadvantages of using Rust
Rust is a new language if we compare it to Nodejs and Python. Due to the small community, it becomes very difficult for a beginner to resolve even a small error.
Rust syntax is not that easy to understand as compared to Python or Nodejs. So, it becomes very difficult to read and understand the code.
Conclusion
We learned how Rust can be used for web scraping purposes. Using Rust you can scrape many other dynamic websites as well. Even in the above code, you can make a few more changes to scrape images and ratings. This will surely improve your web scraping skills with Rust.
I hope you like this little tutorial and if you do then please do not forget to share it with your friends and on your social media.
Additional Resources
Here are a few additional resources that you may find helpful during your web scraping journey:
Email Scraping has become a popular and efficient method for obtaining valuable contact information from the internet. By learning how to scrape emails, businesses and individuals can expand their networks, gather leads, and conduct market research more effectively. In this article, we will look at how to extract email addresses from websites using Python.
How to Scrape Email Addresses From Any Website using Python
In this tutorial, we will be using web scraping & will create an email scraper using Python and regular expression. Our target website for emails will be this webpage. Selenium will be used here because this website uses JavaScript to render its data.
Setting up the prerequisites
I am assuming that you have already installed Python 3.x on your machine. If not then you can download it from here. First, you need to create a folder where we will keep our scraper files.
mkdir email_scraper
After this, you have to install the necessary libraries and web drivers.
pip install selenium
pip install beautifulsoup4
Along with this, you have to install the Chromium web driver as well. This will be used by Selenium to render websites. You can download it from here. Everything required during the course of this article is installed.
You have to create a scraper file where we will write our scraper. I am naming it emails.py.
Let’s Start Scraping Emails
Let’s first write a small code to check if everything works fine. At first, your chromium-browser might run a little slower but it will work normally after a while.
from selenium import webdriver
import time
import re
PATH = 'C:\Program Files (x86)\chromedriver.exe'
l=list()
o={}
target_url = "https://www.randomlists.com/email-addresses"
driver=webdriver.Chrome(PATH)
driver.get(target_url)
time.sleep(10)
driver.close()
The code is pretty simple and to the point. Let me explain it step by step.
We have imported all the libraries which we have installed at the top.
We have declared the PATH of our Chromium browser. This is the path where the driver is installed.
declared the target URL.
Chrome instance is created using webdriver.Chrome()
Using .get() method we are trying to open the target URL in the browser.
Then time.sleep() method was used to wait for the complete website to load. In this example, we are waiting for 10 seconds for the complete rendering.
Finally closed the browser using .close() method.
The following is an example of what the chrome window would appear as upon a successful execution:
We will use regular expressions to identify the email and scrape it. If you are new to regular expression then read Web Scraping with Python and Regular Expression to get a better understanding of regular expressions.
Regular expressions are a powerful tool for identifying patterns within the text, similar to using the “Find” function in a word processing document, but with much greater capabilities. Regular expressions are extremely useful for validating user input and, particularly, for web scraping. They have a wide range of applications.
Let’s write the code.
from selenium import webdriver
import time
import re
PATH = 'C:\Program Files (x86)\chromedriver.exe'
l=list()
o={}
target_url = "https://www.randomlists.com/email-addresses"
driver=webdriver.Chrome(PATH)
driver.get(target_url)
email_pattern = r"[A-Za-z0-9._%+-]+@[A-Za-z0-9.-]+\.[A-Z|a-z]{2,4}"
html = driver.page_source
emails = re.findall(email_pattern, html)
time.sleep(5)
print(emails)
driver.close()
We have added just three lines in the above code. Let me explain them step by step.
email_patternvariable is a regular expression that will help us to identify emails on the web page. Now, the expression is pretty straightforward but let me explain it to you.
The first square bracket signifies one or more characters that are uppercase or lowercase letters, digits, period, underscore, percent, plus, or hyphen, followed by an “@” symbol.
The second part shows one or more characters that are uppercase or lowercase letters, digits, periods, or hyphens, followed by a “.” symbol.
The last curly bracket signifies two to four characters that are uppercase or lowercase letters.
After this, we used driver.page_source to get the raw data from the website. Then we used findall() method to get all the matching patterns in the string as a list of strings. The search for matches within the string proceeds from left to right and the matches are returned in the order in which they were found.
Once you run this code you will get the output like this.
In this tutorial, we learn about the efficient application of regular expressions to find emails using Python. With just a few more changes you can scrape emails from any website. You just have to change the target URL.
For collecting leads, Google is also a good source. You can collect emails from Google as well by making an appropriate query. Of course, you will need an API for web scraping to extract data from Google at scale as it will block you in no time.
In the modern age, the need for data continues to increase. With the volume of data ever increasing at a logarithmic rate, data analytics has become essential for organizations to survive.
Although, there are different sources via which data can be extracted. But with technology growing and new tools coming into the market, data extraction has become easy. One such technique of extracting data from the web is known as web scraping.
Web scraping is also known as data scraping, data extraction, or web harvesting. The main goal of it is to collect data from websites, convert it into a desired format, and save it for future use.
In this article, we might be using web scraping or data scraping in different places, but they have the same context altogether.
Web Scraping Definition
A good example of web scraping and crawling is search engines, which continuously crawl and store the data on the internet to build a database of websites and their content. This enables search engines like Google to quickly and easily provide users with relevant results. Without search engines, navigating the web would be much more difficult.
Price scraping is another widely known use case of web scraping. This involves regularly extracting data from a list of e-commerce websites, including both existing and new products by dedicated data scrapers.
This extracted data is then aggregated and transformed into a standardized data format that can be used for specific use cases. One popular application of this data is providing a price comparison service across all these merchants.
By leveraging the extracted data, users can easily compare prices across different e-commerce platforms and make informed purchasing decisions.
While search engines and price comparison are common examples of data scraping, there are many other applications as well.
What is Web/Data Scraping
History of Web Scraping
Web scraping has its roots in the creation of the World Wide Web by British scientist Tim Berners-Lee in 1989. Originally, the purpose of the web was to facilitate the sharing of information between scientists at universities and institutes worldwide. However, the World Wide Web also introduced several key features that are crucial to modern data scraping tools.
These include URLs, which enable scrapers to target specific websites, embedded hyperlinks that allow for easy navigation, and web pages containing various types of data such as text, images, audio, and video.
Following the creation of the World Wide Web, Tim Berners-Lee developed the first web browser in 1991. This browser was an http:// web page that was hosted on a server running on his NeXT computer. With this browser, people gained the ability to access and interact with the World Wide Web.
In 1993, the concept of web crawling was introduced with the development of the World Wide Web Wanderer by Matthew Gray at the Massachusetts Institute of Technology. This Perl-based web crawler was designed to measure the size of the web.
In the same year, the Wanderer was used to create an index called the Wandex, which had the potential to become the first general-purpose search engine for the World Wide Web. Although the author did not make this claim, the technology could perform this function.
History of Data Scraping
The very same year JumpStation was also developed, and it became the first web search engine based on crawling technology. This groundbreaking technology laid the foundation for modern search engines such as Google, Bing, and Yahoo. With JumpStation, millions of web pages were indexed, transforming the internet into an open-source platform for data in various forms.
In 2004, a Python programming library called BeautifulSoup was introduced, which allowed for easier parsing of HTML structure and content.
As the internet grew into an immense source of information that was easily searchable, people started taking advantage of the available data by extracting it. Initially, websites did not prohibit the downloading of their content, but as more data was being downloaded, manual copy-pasting was no longer a feasible option. This prompted the development of other methods for obtaining information.
So How Data Scraping is Done?
Data scraping involves making HTTP requests to a website’s server to retrieve the HTML or XML source code of a webpage and then parsing that code to extract the data you are interested in.
Collection of data from a website using GET request
Web scraping can be done manually, by writing code to make HTTP requests and parse the HTML or XML source code of a webpage, or it can be done using a web scraping tool or software. Some web scraping tools are designed to be easy to use, with a simple point-and-click interface, while others are more advanced and require programming skills to use.
Extracting data manually can take lots and lots of hours, workers, costs, and much more inputs. Web scraping can be useful for automating tasks that would be time-consuming or difficult to do manually.
For example, if you need to gather data from multiple websites regularly, you could write a web scraper to do the job for you. This would save you the time and effort of manually visiting each site and copying the data you need.
Applications of Web/Data Scraping
Web scraping is used for a variety of purposes, including:
Data mining:
Data scraping tools can be used to extract large amounts of data from websites and then analyze it to uncover patterns, trends, and insights. This can be useful for research, business intelligence, and other data-driven purposes.
Web scraping can be used to gather data from multiple online retailers and compare prices on products. This can help consumers save money by finding the best deals, and it can also be useful for businesses looking to track prices and trends in the marketplace.
Lead generation:
Data scrapers can be used to gather contact information for potential customers or clients from websites and other online sources. This can be useful for sales and marketing efforts.
Web scraping can be used to gather data from multiple sources and combine it into a single, cohesive whole. This can be useful for creating news aggregators, social media feeds, and other types of content-rich websites.
Online reputation management:
Web scrapers can be used to gather data from review sites, social media, and other online sources to track a company’s reputation and identify areas for improvement.
Overall, web scraping can be used for a wide range of purposes, and the specific applications will depend on the needs and goals of the user.
Web scraping can also be useful for tasks that involve processing large amounts of data. For instance, if you need to analyze data from a large number of web pages, it would be much more efficient to use a web scraper to extract the data and process it automatically.
Overall, web scraping can be a useful tool for overcoming manual efforts and streamlining tasks that involve collecting and processing data from the web. It can save time, reduce errors, and allow you to focus on other tasks while the scraper handles the data-gathering work.
Best Practices for Doing Web Scraping
Continuously parse & verify extracted data
After extracting data from a website, it is important to parse it into a more readable format such as JSON or CSV for further analysis by data scientists and developers. Data parsing involves converting the collected data from its original format to a more structured one. This step is necessary because data from different websites often come in different formats that are difficult to understand.
To ensure that the parsing process is working correctly, it is recommended to verify the parsed data regularly.
This can be done automatically or manually at regular intervals. Failing to do so can result in collecting thousands of pages of useless data due to websites identifying bot traffic and serving misleading data to the crawler. Therefore, it is crucial to identify any issues early on in the process to avoid wasting time and resources.
Choose the right tool for Data scraping
You can build your custom scraper or can use a pre-existing web scraping tool for your needs.
Building a scraper of your own
Python is a popular programming language for creating web scraping bots, especially for beginners. Its large and active community makes problem-solving easier. With a wide range of web scraping libraries, such as Beautifulsoup, Selenium, and Scrapy, among others, you can choose the most appropriate one for your project.
The following five steps can guide you in creating your web scraper using Python:
Identify the website from which you want to extract data.
Inspect the webpage source code to locate the elements containing the data you need.
Write your web scraping code.
Execute your code to request a connection to the targeted website.
Save the extracted data in the desired format for further analysis.
Depending on your specific requirements, you can customize your web scraper accordingly. However, building a web scraper can be a time-consuming process, as it requires manual effort.
There are many pre-built data scrapers available that are open-source or require low/no code. With these tools, you can easily extract data from multiple websites without needing to write any code. These web scrapers can also be integrated as browser extensions, making them more convenient to use.
If you have limited coding skills, these low/no-code web scrapers can be particularly useful for your tasks.
Respect Robots.txt
Robot.txt is a file that provides guidelines for web scrapers on how to crawl pages on their site. These guidelines may include rules on acceptable behavior, such as which pages can and cannot be scraped, which user agents are allowed or not allowed, and how frequently and quickly you can do it.
Before attempting web scraping, it is advisable to review the website’s robot.txt file, which is typically found in the root directory. It’s also a good idea to read the website’s terms of service to ensure compliance with their policies.
Send Request Through Proxies
When you send a request to a website’s server, they will be able to log and track your activity on their site. Websites also have a limit on the number of requests they can receive from a single IP address within a certain timeframe, and exceeding this limit can result in your IP address being blocked.
To avoid being blocked, it’s recommended to use a proxy network and regularly rotate the IP addresses being used. While free IPs are available for experimental hobby projects, for serious business use cases, a reliable and smart proxy network is necessary. There are several methods for changing your outgoing IP address.
a). VPN
A VPN can assign a new IP address to mask your original one, providing anonymity and enabling access to location-based content. While VPNs are not designed for large-scale business web scraping, they can be useful for individuals who need to remain anonymous. For small-scale use cases, a VPN may be sufficient.
b). TOR
TOR, or the Onion router, directs your internet traffic through a global volunteer network with thousands of relays, effectively hiding your location. However, using TOR for web scraping can significantly slow down the process, and it may not be ethical to place additional load on the TOR network. Therefore, for large-scale web scraping, TOR is not recommended.
c). Proxy Services
Proxy services are designed to mask your IP address, especially for business purposes. They usually have a vast pool of IP addresses to route your requests, making them more reliable and scalable.
There are different types of proxies available based on your use case and budget. Shared proxies, residential proxies, and data center proxies are some of the commonly used ones. While residential proxies are highly efficient for sending anonymous requests, they are also the most expensive and are typically used as a last resort.
Don’t follow the same crawling pattern
Web scraping bots and human users have distinct characteristics. Humans are slower and less predictable than bots, whereas bots are faster but more predictable. Anti-scraping technologies take advantage of these differences to block web scraping activities. Therefore, it’s recommended to incorporate random actions into your scraping bot to confuse the anti-scraping technology.
Is web scraping legal? What are the risks involved?
In general, data scraping is not illegal. However, the legalities of web scraping may vary depending on the specific circumstances and the laws of the country in which it is being carried out.
One factor that can affect the legality of web scraping is whether the website owner has granted permission for the scraping to take place. Some websites explicitly prohibit web scraping in their terms of service, and it is generally considered a violation of these terms to scrape the site without permission. In these cases, the website owner may choose to pursue legal action against the scraper.
Another factor that can impact the legality of web scraping is the purpose for which the data is being used. In some cases, web scraping may be considered illegal if it is being used for malicious purposes, such as spamming, phishing, or stealing sensitive data.
Risks Involved
There are also several risks involved in web scraping, including the potential of getting banned or blocked by websites, the possibility of encountering errors or bugs in the scraping process, and the risk of being sued for violating a website’s terms of service or copyright laws. It is important to be aware of these risks and to take steps to mitigate them when engaging in web scraping.
Overall, the legality of web scraping depends on the specific circumstances and laws of the jurisdiction in which it is being carried out. It is important to be aware of the legal and ethical considerations surrounding web scraping and to obtain permission from website owners before scraping their sites.
Is web scraping a useful skill to learn in 2023 & Beyond?
Yes, web scraping is a useful skill to learn in 2023. Web scraping allows you to extract data from websites and use it for a variety of purposes, such as data mining, data analysis, and machine learning. With web scraping, you can collect and structure data from websites, and use it to inform your business decisions or to create new products and services.
How One Can Learn Web Scraping?
There are many ways to learn web scraping. You can start by searching online for tutorials and resources, or by enrolling in online courses or workshops.
There are several ways to learn web scraping, depending on your background and the level of expertise you want to achieve. Here are a few options to consider:
Online tutorials and courses: There are a variety of online resources available that can teach you the basics of web scraping, including tutorials, videos, and courses. Websites like Udemy, Coursera, and edX offer a wide range of web scraping-related courses, and many are available for free.
Some popular choices for learning web scraping are Python, as it has many libraries to facilitate the process, therefore, a good starting point can be learning Python first, and then diving into web scraping.
Books: Another way to learn web scraping is through books. There are several books available that cover the basics of web scraping as well as more advanced topics. Some popular choices include “Web Scraping with Python: A Practical Guide” and “Web Scraping with Python and Beautiful Soup”
Practice: The best way to learn web scraping is by doing it yourself. Start with small projects and gradually build up to more complex projects as you gain experience and confidence.
Join online communities: Online communities, such as forums, Reddit, or Stack Overflow, can be a great resource for learning web scraping. These communities are a great place to ask questions, share knowledge, and connect with other people who are also interested in web scraping.
Hire a mentor: Another way to learn web scraping is by working with an experienced mentor. This can be done through an online mentorship program or by reaching out to someone in your professional network who has experience with web scraping.
Ultimately, the key to learning web scraping is to be persistent, patient, and to be willing to experiment and try new things. It’s important to be aware that web scraping can have legal implications, so familiarize yourself with the regulations and laws of the country you’re working with.
Languages One Can Learn to Do Web Scraping
Many programming languages can be used for web scraping, including Python, Ruby, and Java. It is also possible to use specialized tools, such as web crawlers, to extract data from websites.
Python – It is a popular choice for web scraping because of its simplicity, flexibility, and a large number of libraries and frameworks available for web scraping. It makes it easy to send requests, parse HTML, and XML, and navigate the structure of a webpage.
Javascript – JavaScript can also be used for web scraping, particularly for scraping single-page applications that use JavaScript to dynamically load content.
Java – It is another popular choice for data scraping particularly in large-scale projects.
R – R is widely used in data analysis, data visualization, and machine learning. It is also suitable for scraping websites.
Other languages like PHP, Ruby, Perl, etc., can also be used for web scraping, depending on the specific requirements of the project.
In terms of the time it takes to learn web scraping, it depends on your background and the amount of time you are willing to devote to learning. If you have some programming experience, you may be able to learn the basics of web scraping in a few days or weeks.
If you are a complete beginner, it may take longer to learn the necessary skills. In general, it is a good idea to set aside dedicated time each day or week to practice and learn web scraping. We have written some tutorials on web scraping with different programming languages. You can check them out:-
In conclusion, data scraping is a powerful technique to automatically extract information from websites.
It is important to use web scraping responsibly and be mindful of the website’s performance to avoid any legality issues. Overall, it can help you to improve your products and services, analyze customer feedback and stay ahead of the competition.
The world we live in is hungry for data and the role of proxies in web scraping is to continue the extraction process. Most businesses need data for multiple purposes which could be price monitoring, sentiment analysis, price aggregation, etc.
In this blog post, we’ll be taking a look at the best datacenter proxies in the market. We’ll be looking at their features, prices, and anything else that makes them stand out. So, without further ado, let’s get started.
Best DataCenter Proxies
Mainly people use web scraping to extract data from their target websites. But the disadvantage of using this technique is the blocking of your IP. You can also read our 10 tips to avoid getting blocked while scraping. You need proxies to escape the trap of getting blocked by any website.
What Are Datacenter Proxies
These are normal IPs that we get from the corporate datacenter. These IPs are not related to any ISP. There are basically of three types Data center proxies:
Private DataCenter Proxies
These are dedicated IPs that are allotted to you only by the service provider. These IPs could only work on certain domains.
Shared DataCenter Proxies
These proxies are used by a maximum of three users at a time. Their performance is not better than Private but works better than Public.
Public DataCenter Proxies
Public datacenter proxies are the free proxy list available. These proxies can only be used for changing your location while browsing but not for web scraping purposes. Their success rates are very low as far as data extraction is concerned.
Now, we are going to compare the 10 best data center proxy providers in the market. We scraped Google, Amazon, Yellowpages, and eBay. We have judged them on the basis of:
Price
Performance on the basis of 500 requests.
List of 9 best datacenter proxies:
Scrapingdog
Smartproxy
Oxylabs
Brightdata
Proxyrack
Crawlbase
Storm proxies
Privateproxy
Infatica
Scrapingdog
Scrapingdog is a web scraping API. By making a simple GET request you can get the raw HTML of any website. You can even render JS by using our dynamic parameter. It offers datacenter, mobile 4G, and residential proxies for different domains.
The reason it’s on the top of the list is the customization features offered by this tool. ScrapingDog is also offering economical datacenter proxies.
The Basic plans come with 250k API calls which cost $30 per month only. Then there is a standard and pro plan with 1 and 3 million API calls respectively. Standard costs $90 and pro costs $200 per month.
It also offers a generous free pack with 1000 API calls for a month.
You can also ask for a custom plan if you have bigger needs.
Testing
500 requests were sent for each website.
Testing Scrapingdog
Smartproxy
Smartproxy offers both datacenter and residential proxies with pricing based on traffic usage. They offer proxies from more than 195 countries. This makes them one of the biggest players in the proxy business. They are safe and reliable and on top of that, their overall performance is very good. Their customer support service is spot on which makes implementation, even more, easier for beginners.
Pricing
Datacenter plan goes from $50 per month for 100 GB of data to $500 per month for 1000 GB of data.
Money-back guarantee if you have used 20% or fewer resources.
Testing
500 requests were sent for each website.
Oxylabs
Oxylabs is the data-gathering proxy provider. They have a pool of 100M+ proxies from genuine suppliers. They provide both residential and datacenter proxies. One thing I personally like about their proxy is they allow geo-targeting in datacenter proxies. You can use their proxy for web scraping, ad verification, price monitoring, etc. The best part is their proxy pool keeps growing. Plus they provide a dedicated account manager for resolving any issue asap.
Pricing
Their datacenter starter proxy plan starts from $180. The starter plan will provide you with 160 proxies. Unfortunately, you cannot scrape google & other search engines using their proxies.
They also offer a free trial for their datacenter proxies. You have to contact your account manager to get this trial.
The overall performance of their proxies is great.
Testing
500 requests were sent for each website.
Testing Oxylabs
Brightdata
Brightdata provides a data extraction tool and a proxy network. They have a pool of more than 750k datacenter proxies which involve proxies from more than 95 countries. You can also use their data collection tool if you are finding it difficult to scrape a website. Their proxies work great with search engines and social media crawling. They also offer SDKs for web and mobile developers. They also have a user-friendly dashboard from where you can create your own package. You have the freedom to set your own budget. All in all, it is a great product.
Pricing
Their starter pack starts from $500 and you get proxies at $0.60 per IP. You can even select the pay-as-you-go option to use their services without any restriction.
They also offer a 14-day free trial.
Testing
500 requests were sent for each website.
Testing Brighdata
Proxyrack
Proxyrack offers datacenter proxies with unlimited bandwidth for a fixed rate. If you have a budget constraint then going with proxyrack is advisable. They offer mixed, USA, and Canadian datacenter proxies. They have a pool of 20k proxies. Yes! I know that is very low. But the interesting thing is they won’t charge you on the basis of bandwidth or the number of requests. You can even track your usage pattern by using their dashboard. You get a money-back guarantee if you found their proxies are unsuitable.
Pricing
USA & mixed datacenter proxies basic package starts from $65 per month for 100 threads.
Canada datacenter proxies start from $49 per month for 100 threads.
Static USA datacenter proxies start from $50 per month for 100 threads.
They also offer a 3-day trial for $13 for every proxy type they offer (Residential and datacenter).
Testing
500 requests were sent for each website.
Proxyrack Testing
Crawlbase Smart Proxy
Crawlbase’s Smart Proxy is an exceptional data extraction solution with a comprehensive proxy network. With about 2M+ datacenter and residential proxies across 45+ countries, Crawlbase ensures reliable and efficient web scraping capabilities. When traditional scraping methods fall short, Crawlbase’s data collection tool comes to the rescue, enabling seamless scraping of even the most challenging websites.
Their proxies seamlessly integrate with search engines and social media platforms, making them ideal for comprehensive crawling needs. For developers, Crawlbase offers user-friendly SDKs for both web and mobile applications. The customizable dashboard empowers users to tailor their own package, aligning with their specific requirements and budget. Regarding budget, Crawlbase grants users the freedom to set their spending limits. With its all-encompassing features, Crawlbase’s Smart Proxy is a remarkable solution for all your data extraction needs.
Pricing
Crawlbase’s starter pack starts at $99, offering proxies at an affordable $0.00099 per IP.
As an added benefit, they provide 5,000 free credits, giving users a head start in their data extraction endeavors and testing how it can be beneficial in their operations.
Testing
500 requests were sent for each website.
Crawlbase Smart Proxy Testing
NetNut Proxies
NetNut should be among your considerations when selecting a datacenter proxy provider. They boast an impressive pool of over 150K datacenter proxies and offer both static and rotating proxies. With a strong focus on security, NetNut ensures your requests are anonymous, safeguarding your activities from being detected. What sets them apart is their exceptional geo-targeting capabilities across 50+ countries, making them an ideal choice for businesses with varied geographical requirements.
Pricing
NetNut’s pricing model is user-friendly. Their starter package begins at a 100GB plan of $1/GB. However, the cost per GB reduces as you opt for larger packages. They also offer a free trial for new users, so you can get a feel for their service before committing.
Testing
500 requests were sent for each website.
NetNut Testing
Privateproxy
Privateproxy is another proxy provider for a small budget. They have somewhat of a unique concept of evaluating the request. After analyzing the request they apply a datacenter or residential proxy to successfully create a tunnel. Their proxies work great for SEO purposes. They offer both dedicated and rotating proxies.
Pricing
Dedicated proxies will cost $3 each and rotating proxies go from $59 for 200k requests to $999 for 15M requests.
They do offer a trial.
Testing
500 requests were sent for each website.
Privateproxy Testing
Infatica
Infatica is an expert in providing premium proxy service for web scraping. You get fresh proxies on sign-up so that you don’t have to compete with the neighbor for the bandwidth. They have a pool of 10M+ proxies, which is quite impressive. To safeguard your privacy and business secrets, your data is encrypted end to end.
Pricing
Their proxy plan starts from $360 for 40 GB of data and goes to $20000 for 10000 GB of data.
They do offer a free trial.
Testing
500 requests were sent for each website.
Infactia Testing
Analyzing the results
We used a small script to test all these data center proxy providers with 500 requests each on four websites. Now we have to aggregate all the results for a final verdict.
Google
Amazon
eBay
Yellow Pages
Final Verdict
Selecting a proxy provider for web scraping could be a tough process. In our experience, the first 2000 to 3000 requests work fine and then the websites like Google and Amazon start blocking you. You need to be careful with this while selecting a suitable proxy provider for your business. You should always consider taking a trial prior to your paid subscription. You need to be careful of the different techniques used by websites to trap a web scraper. You can read tips to avoid getting blocked while scraping.
Selecting the right proxy is driven by checking the price, speed, and reliability. With low-quality proxies, you can end up getting blocked.
We are pretty confident that the providers listed here can meet your web scraping demands.
Dedicated Data Center Proxies Use Cases
There are many reasons why one might want to use a proxy server at their data center. Below are some of the most common use cases:
Access Control – A proxy server can be used to control access to certain websites or web applications. This is often done for security or compliance reasons. For example, an organization may want to block access to social media sites like Facebook or Twitter.
Content Filtering – A proxy server can be used to filter out unwanted or inappropriate content. This is often done for security or compliance reasons. For example, an organization may want to filter out websites that contain malware or pornographic content.
Load Balancing – A proxy server can be used to balance the load across multiple back-end servers. This is often done to improve performance or to minimize the impact of server outages.
Caching – A proxy server can be used to cache frequently accessed resources. This is often done to improve performance. For example, a proxy server may cache popular websites like Facebook or Twitter.
Additional Resources
Here are a few additional resources that you may find helpful during your web scraping journey:
Often people who deal with data on a regular basis use both the terms – web scraping and data mining simultaneously. But have you wondered that both are quite different from each other?
Yes, you heard it right! Web Scraping and Data Mining might share some similarities with each other, but they are fundamentally different from each other.
Although they both are linked to extracting value from something valuable only when processed, they have distinct applications.
If you are also not sure about the true meaning of both terms, don’t worry we have got your back. In this article, we have mentioned everything that you need to understand about them both.
Data Mining vs Web Scraping
Both concepts are gaining huge popularity in recent times of advancement in technology because of their widespread usage in data-related functions. But let’s start with their respective definitions to gain an in-depth understanding of their meaning.
What is Web Scraping?
Web Scraping Definition can be best explained as a method of collecting and extracting data from required web pages to further use in crucial business operations. There are multiple web scraping tools and APIs that gather valuable data as per your needs. The information is then saved in a central database and can be extracted directly from the websites.
It eliminates all the barriers of scraping the information from official sources only and provides you access to all publicly available data on online platforms.
Data Mining Definition can be the act of deriving crucial information from the raw data by analyzing it for trends and current needs. Generally, data is sourced through a variety of pages and methods like Google Forms surveys, public records, data scraping, and much more.
But to make the maximum usage of this data and generate results that are beneficial for a particular type of business, data mining plays an essential role. It helps in deducing the key insights of the data to create and bring something meaningful out of it.
Differences in Applicationsof Data Mining & Web Scraping
Another key difference between the two terms can be explained through their usage and difference in applications.
Web Scraping applications are often centric in operations where a continuous stream of data is required. For example, marketing campaigns often require a high amount of data to ethically use as leads or base of the campaign.
Data Mining Vs Web Scraping
Similarly, pricing is another area that many businesses extract to conduct market analysis, competitive analysis, and in other product development functions.
Another usage and benefit of web scraping are in the area of live weather forecasting. By scraping real-time information through different sources, one can easily provide accurate and live data to their customers.
On the other hand, Data Mining applications are purposed to create value from the existing data. Often, the data science industry requires data mining software for its projects and day-to-day operations.
Apart from that, most businesses use data mining for their business strategy planning, predictions, and marketing functions. Since it provides meaningful insights from the existing data, it becomes easier for industry experts to further optimize their functions in a manner to deduce results.
What is the Connection Between Web Scraping and Data Mining?
Apart from the fact that both are different from each other, they hold a strong connection with each other that helps business owners leverage their business operations. Web scraping can create rich data sources and helps in the extraction of crucial data from different sites.
This data is then further analyzed and assessed with the help of data mining to deduce meaningful results from the same. In this manner, web scraping enables data mining and helps businesses to boost their performance.
For example, Scraping prices can help in the collection of commercial data like product range, features, ratings, reviews, stock status, and much more. This information is then analyzed with the help of data mining to generate powerful business insights and accordingly plan one’s own strategy.
Similarly, you can scrape off a huge amount of data posted on different social media platforms like keywords, hashtags, reviews, and much more. This enables data mining to reveal detailed information about the competitors, customer perspective, positive or negative brand image, and other insights that can help you boost your efficiency.
The Moment of Truth
We hope that you now might be able to distinguish between data mining and data scraping. But, it’s time for the moment of truth and to summarize the difference between the two terms.
So, Web scraping is the process of extracting data from web sources and structuring it into a more convenient or usable format. It is a direct process of data collection without involving any further processing or analysis.
While on the other hand, Data mining is the process of analyzing large datasets to deduce and provide valuable insights, patterns, and trends. It does not involve the collection of data like web or data scraping.
Web scraping could be used to create huge datasets and data mining could be used to analyze them for in-depth insights.
Conclusion
We hope that our article helped you understand that Web Scraping and Data Mining aren’t synonymous with each other. Rather, the confusion is the result of their relatable applications and uses.
Mostly, since both are used together to serve a greater purpose, people often end up using them interchangeably. In the emerging era of technology like today, businesses rely heavily on data and its interpretation to perform most of their functions.
Thus, it is better advised to use both data scraping and data mining tools in your operations. This will help you in getting access to the ever-changing market demands and needs of your customers. So, get started today.
Web Scraping is an important and smart solution for every other industry, irrespective of their domain. The crucial information it delivers is that it provides actionable insights to gain a competitive edge over its competitors.
If you are still skeptical about web scraping uses, we have piled all the industries in which the tool has successfully displayed its application. In this article, we have mentioned web scraping use cases and applications from the market to help you take note of its usage.
Use Cases of web scraping
Web scraping is an automated method that is used to obtain large amounts of data through various websites. The data extracted is usually in an unstructured format which is then further converted into meaningful spreadsheets to be used in various applications.
Web scraper tools can easily extract all the data on different sides that a user wants. The process gets much simpler when the user specifies the details about the data they want to target and scrape.
So, for instance, if one wants to scrape the data about the best hotels available at a particular destination, then you can specify your data search to that particular location only. It quickly crawls over different web pages available online to provide you with the best and most targeted results.
Web Scraping Use Cases & Applications in Different Areas
Web Scraping Software has drastically changed the entire working process of multiple businesses. The different areas in which web scraping is spreading its roots are as follows –
Public Relations
Every brand needs to maintain its public relations properly so that it remains in the good books of the customers. Data scraping helps companies to collect and gather crucial information about their customer’s reviews, complaints, and praises, through different platforms.
The quicker you respond to the different outlooks of the customers, the easier it is to manage your brand image. By providing real-time information on such aspects, web scraping tools help you to successfully foster smooth public relations and build a strong brand reputation.
Data Science and Analytics
As the name suggests, the entire industry is dependent largely on the amount of efficient data provided on time. Web scraping helps data scientists acquire the required data set to further use in different business operations.
They might use such crucial information in building machine-learning algorithms and thus require a large volume of data to improve the accuracy of outputs. The presence of different data scraping tools has made the process much simpler by helping them extract relevant data quickly.
Marketing and Sales
Every other business is dependent on its marketing and sales strategies. But to build an effective strategy, businesses need to catch up with the recent industry trends and market scenarios.
Web scraping helps them to collect price intelligence data, and product data, understand market demands, and conduct a competitive analysis. A quick fill-up on all this essential information can alone provide them with the advantage to gain a competitive edge over their competitors.
The data extracted is then further used in product development and setting effective pricing strategies to make a difference in their industry. It also helps them to maximize their revenue generation and achieve high profits.
Also, with a thorough knowledge of the market and its expectations, a business can successfully take hold of its marketing and sales strategy.
Customers are the core of any business on which every company builds itself. Thus, to make any venture successful, it is first important to understand customers’ sentiments thoroughly.
A Web Scraping API can help you get access to customer reviews, expectations, and their outlook on any idea in a real-time scenario so that you can accordingly optimize your functions. You can constantly keep track of your customer’s changing expectations by collecting both historical and present data to make your forecasts and predictions much stronger.
Analyzing consumer feedback and reviews can help you understand different opportunities to improve your services as well as instantly take hold of a situation to put it to your advantage. Understanding consumers’ sentiments in providing them with the best of facilities will eventually help you to stay one step ahead of your competitors.
Product Development
For any business to be successful, it is important that your product is user-friendly and as per the needs and wants of your customers. Thus, product development requires huge data to research their market and customers’ expectations.
Web scraping can help researchers enhance their product development process by providing them with detailed insights through the acquired data. You can successfully extract the data quickly to make the process much more efficient and smoother.
Lead Generation
A great lead-generation process can help businesses reach additional customers. Especially in the case of startups who rely heavily on their lead generation and conversion process to sustain themselves in the market, data scraping software has proven to be a boon.
It helps them to reach out to leads by scraping the contact details of potential customers and makes the process easier. Earlier, manually collecting and gathering such information took a lot of time and effort, which is now reduced with the help of the automated solution, web scraping.
Data enrichment is a technique to freshen up your old data with new data points. Web scraping when done on correct data sources can be used to get the latest data thus eliminating the risk of not reaching the right audience.
Data enrichment should not be confused with data cleaning which is altogether a different concept where the changes are made within the available set of data itself.
There are many use cases for data enrichment including marketing, cloud-based recruiting, investment, and many more. You can enrich old records of company, person, & employees.
Keyword Research and SEO Optimization
Every other business wants to be on the first page of any search engine to enjoy maximum brand visibility. However, these search engines run on different algorithms and keep track of numerous factors that contribute to providing any website with a suitable ranking.
Businesses strive to achieve a higher ranking by keeping track of the data of their competitors and various other factors. Data scraping helps in this data collection by successfully taking the computer strategies into account and keeping a check on what is contributing to the success.
Also, you could scrape off effective keywords and SEO strategies to utilize them in your marketing operations and deduce profitable results. This helps in minimizing research efforts by instantly providing the crucial information needed to rank higher.
Web Scraping to Identify Niched Influencers
If you are into marketing you might be aware of what influencer marketing is. Collecting a database when you are starting an influencer marketing campaign can be difficult. One such application of web scraping can be to collect an influencer list for your next marketing campaign.
Knowing which platforms your target audience hangs out on and scraping those particular platforms might help you to get niched influencers in no time. Although, there are many influencer marketing tools to find them, with web scraping you can do them at a much lower cost.
Final Words
Web scraping and its applications are vast because of the recent hype in technology advancement. Data is the building block of any industry and none could survive without its application. With the replacement of traditional methods, web scraping has made its place by automating the extraction of data.
It has brought a revolution in the entire data-reliant industry and has paved the way for a better and more efficient tomorrow. As the needs and requirements of the customers change drastically over time, business owners need to be proactive while managing their business operations more simply.
So, if you are also thriving to get your hands on effective data collection, Web Scraper API like Scrapingdog will help you leverage your functions.
Generally speaking, web scraping can be used to extract data from any source. In this blog, we have mentioned the popular use cases of web scraping. However, if your use case isn’t mentioned in this blog, you can live chat with us to know how Scrapingdog can help you extract data from specific websites relevant to your industry.
Scrapingdog offers a user-friendly solution for extracting data. Once you get the API key you can use it to scrape any website, we also offer dedicated APIs for LinkedIn, Google, Zillow etc. You can read the documentation to understand how this API works.
Additional Resources
Here are some additional resources that can help you with your journey and gathering information about web scraping: –
Extracting data from a website can be a useful skill for a wide range of applications, such as data mining, data analysis, and automating repetitive tasks.
With the vast amount of data available on the internet, being able to get fresh data and analyze it can provide valuable insights and help you make informed & data-backed decisions.
Extract Data From Any Website
Pulling information can help finance companies decide between buying or selling things at the right time. The travel industry can track prices from their niche market to get a competitive advantage.
Restaurants can use the data in the form of reviews and make necessary layoffs if some stuff is not appropriate. So, there are endless applications when you pull data from relevant websites.
In this article, we will see various methods for extracting data from a website and provide a step-by-step guide on how to do so.
Methods for extracting data from a website
There are several methods for extracting data from a website, and the best method for you will depend on your specific needs and the structure of the website you are working with. Here are some common methods for extracting data from a website:
Data Extraction Methods
1. Manual copy and paste
One of the simplest methods for extracting data from a website is to simply copy and paste the data into a spreadsheet or other document. This method is suitable for small amounts of data and can be used when the data is easily accessible on the website.
2. By Using Web browser extensions
Several web browser extensions can help you in this process. These extensions can be installed in your web browser and allow you to select and extract specific data points from a website. Some popular options include Data Miner and Web Scraper.
3. Web scraping tools
There are several no-code tools available that can help you extract data from a website. These tools can be used to navigate the website and extract specific data points based on your requirements. Some popular options include ParseHub, Import.io, etc.
4. Official Data APIs
Many websites offer APIs (Application Programming Interfaces) that allow you to access their data in a structured format. Using an API for web scraping can be a convenient way to extract data from a website, as the data is already organized and ready for use. However, not all websites offer APIs, and those that do may have restrictions on how the data can be used.
5. Web scraping services
If you don’t want to handle proxies and headless browsers then you can use a web scraping service to extract data from a website. These services handle the technical aspects of web scraping and can provide you with data in a seamless manner.
6. Creating your own scraper
You can even code your own scraper. Then you can use libraries like BS4 to extract necessary data points out of the raw data. But this process has a limitation and that is IP blocking. If you want to use this process for heavy scraping then your IP will be blocked by the host in no time. But for small projects, this process is cheaper and more manageable.
Using any of these methods you can extract data and further can do data analysis.
Creating Our Own Scraper Using Python to Extract Data
Now that you have an understanding of the different methods for extracting data from a website, let’s take a look at the general steps you can follow to extract data from a website.
General Method of Extracting the Data from the Website
Identify the data you want: Before you start with the process, it is important to have a clear idea of what data you want to extract and why. This will help you determine the best approach for extracting the data.
Inspect the website’s structure: You will need to understand how the website is structured and how the data is organized. You can use extensions like Selectorgadget to identify the location of any element.
Script: After this, you have to prepare a script through which you are going to automate this process. The script is mainly divided into two parts. First, you have to make an HTTP GET request to the target website and in the second part, you have to extract the data out of the raw HTML using some parsing libraries like BS4 and Cheerio.
Let’s understand with an example. We will use Python for this example. I am assuming that you have already installed Python on your machine.
The reason behind selecting Python is it is a popular programming language that has a large and active community of developers, and it is well-suited for web scraping due to its libraries for accessing and parsing HTML and XML data.
For this example, we are going to install two Python libraries.
Requests will help us to make an HTTP connection with Bing.
BeautifulSoup will help us to create an HTML tree for smooth data extraction.
At the start, we are going to create a folder where we will store our script. I have named the folder “dataextraction”.
We will scrape this webpage. We will extract the following data from it:
Name of the book
Price
Rating
Let’s import the libraries that we have installed.
import requests
from bs4 import BeautifulSoup
The next step would be to fetch HTML data from the target webpage. You can use the requests library to make an HTTP request to the web page and retrieve the response.
Now let’s parse the HTML code using Beautiful Soup. You can use the BeautifulSoup constructor to create a Beautiful Soup object from the HTML, and then use the object to navigate and extract the data you want.
soup = BeautifulSoup(resp.text,'html.parser')
Before moving ahead let’s find the DOM location of each element by inspecting them.
article tag holds all the book data. So, it will be better for us to extract all these tags inside a list. Once we have this we can extract all the necessary details for any particular book.
Rating is stored under the class attribute of tag p. We will use .get() method to extract this data.
o["rating"]=allBooks[0].find("p").get("class")[1]
The name of the book is stored inside the title attribute under the h3 tag.
Using a similar technique you can find data from all the books. Obviously, you will have to run for a loop for that. But the current code will look like this.
[{'rating': 'Three', 'name': 'A Light in the Attic', 'price': '£51.77'}]
How Scrapingdog can help you extract data from a website?
The Scrapingdog team has over 7+ years of experience when it comes to web scraping. Scrapingdog’s Web Scraping API is the best scraper in the market to scrape any website in a single request.
Using the API you can create a seamless unbreakable data pipeline that can deliver you data from any website. We use a proxy pool of over 10M IPs which rotates on every request, this helps in preventing any IP blocking.
Forget about getting blocked while scraping the Web
Try out Scrapingdog Web Scraping API to extract data from any website
Additional Resources
Here are a few additional resources that you may find helpful during your web scraping journey:
Web Scraping is incomplete without data extraction from the raw HTML or XML you get from the target website.
When it comes to web scraping then Python is the most popular choice among programmers because it has great community support and along with that, it is very easy to code. It is readable as well without those semicolons and curly braces.
BeautifulSoup Tutorial: Web Scraping Pages
Python also comes with a tremendous amount of libraries that help in different aspects of any web application. One of them is Beautiful Soup, which is mainly used in web scraping projects. Let’s understand what it is and how it works.
What is BeautifulSoup?
Beautiful Soup is a Python library that was named after Lewis Carroll’s poem of the same name in “Alice’s Adventures in the Wonderland”. It is also known as BS4. Basically, BS4 is used to navigate and extract data from any HTML and XML documents.
Since it is not a standard Python library you have to install it in order to use it in your project. I am assuming that you have already installed Python on your machine.
pip install beautifulsoup4
It is now installed let’s test it with a small example. For this example, we will use the requests library of Python to make an HTTP GET request to the host website. In this case, we will use Scrapingdog as our target page. In place of this, you can select any web page you like.
Getting the HTML
It’s time to use BS4, let’s make a GET request to our target website to get the HTML.
We got the complete HTML data from our target website.
Parsing HTML with BeautifulSoup
Now, we have the raw HTML data. This is where BS4 comes into action. We will kick start this tutorial by first scraping the title of the page and then by extracting all the URLs present on the page.
<title>Web Scraping API | Reliable & Fast</title>
Let’s try one more example to better understand how BS4 actually works. This time let’s scrape all the URLs available on our target page.
Getting all the Urls
Here we will use .get() method provided by BS4 for extracting value of any attribute.
from bs4 import BeautifulSoup
import requests
target_url = "https://www.scrapingdog.com/"
resp = requests.get(target_url)
soup = BeautifulSoup(resp.text, "html.parser")
allUrls = soup.find_all("a")
for i in range(0,len(allUrls)):
print(allUrls[i].get('href'))
Output of the script will look like this.
/
blog
pricing
documentation
https://share.hsforms.com/1ex4xYy1pTt6rrqFlRAquwQ4h1b2
https://api.scrapingdog.com/login
https://api.scrapingdog.com/register
javascript://
/
javascript://
blog
pricing
documentation
https://share.hsforms.com/1ex4xYy1pTt6rrqFlRAquwQ4h1b2
https://api.scrapingdog.com/login
https://api.scrapingdog.com/register
https://api.scrapingdog.com/register
/pricing
asynchronous-scraping-webhook
https://api.scrapingdog.com/register
https://api.scrapingdog.com/register
/documentation#python-linkedinuser
/documentation#python-google-search-api
/documentation#python-proxies
/documentation#python-screenshot
documentation
https://api.scrapingdog.com/register
documentation
https://share.hsforms.com/1ex4xYy1pTt6rrqFlRAquwQ4h1b2
tool
about
blog
faq
affiliates
documentation#proxies
documentation#proxies
terms
privacy
Tweets by scrapingdog
https://www.linkedin.com/company/scrapingdog
This way you can use BS4 for extracting different data elements from any web page. I hope now you have got an idea of how this library can be used for data extraction.
BeautifulSoup — Objects
Once you pass any HTML or XML document to the Beautiful Soup constructor it converts it into multiple python objects. Here is the list of objects.
Comments
BeautifulSoup
Tag
NavigableString
Comments
You might have got an idea by the name itself. This object contains all the comments available in the HTML document. Let me show you how it works.
from bs4 import BeautifulSoup
soup=BeautifulSoup('<div><!-- This is the commnet section --></div>','html.parser')
print(soup.div)
The output of the above script will look like this.
<div><!-- This is the commnet section --></div>
BeautifulSoup
It is the object which we get when we scrape any web page. It is basically the complete document.
from bs4 import BeautifulSoup
soup=BeautifulSoup('<div>This is BS4</div>','html.parser')
print(type(soup))
<class 'bs4.BeautifulSoup'>
Tag
A tag object is the same as the HTML or XML tags.
from bs4 import BeautifulSoup
soup=BeautifulSoup('<div>This is BS4</div>','html.parser')
print(type(soup.div))
<class 'bs4.element.Tag'>
There are two features of tag as well.
Name — It can be accessed with a .name suffix. It will return the type of tag.
Attributes — Any tag object can have any number of attributes. “class”, “href”, “id”, etc are some famous attributes. You can even create your own custom attribute to hold any value. This can be accessed through .attrs suffix.
NavigableString
It is the content of any tag. You can access it by using .text suffix.
from bs4 import BeautifulSoup
soup=BeautifulSoup('<div>This is BS4</div>','html.parser')
print(type(soup.text))
<class 'str'>
How to search in a parse Tree?
There are multiple Beautifulsoup methods through which you can search any element inside a parse tree. But the most commonly used methods are find() and find_all(). Let’s understand them one by one.
What is the find() method?
Let’s say you already know that there is only one element with class ‘x’ then you can use the find() method to find that particular tag. Another example could be let’s say there are multiple classes ‘x’ and you just want the first one.
The find() method will not work if you want to get the second or third element with the same class name. I hope you got the idea. Let’s understand this by an example.
Take a look at the above HTML code. We have three div tags with different class names. Let’s say I want to extract “test2” text. I know two things about this situation.
test2 text is stored in class q
class q is unique. That means there is only one class with the value q.
So, I can use the find() method here to extract the desired text.
from bs4 import BeautifulSoup
soup=BeautifulSoup('<div class="test1">test1</div><div class="q">test2</div><div class="z">test3</div>','html.parser')
data = soup.find("div",{"class":"q"}).text
print(data)
test2
Now let’s consider you have three div tags with the same classes.
In this condition, you cannot scrape “test2”. You can only scrape “test1” because it comes first in the parse tree. Here you will have to use the find_all() method.
What is the find_all() method?
Using the find_all() method you can extract all the elements with a particular tag. Unlike the find() method you can extract data from any tag even if it doesn’t appear on the top. It will return a list.
If I want to scrape “test2” text then I can easily do it by scraping all the classes at once since all of them have the same class names.
from bs4 import BeautifulSoup
soup=BeautifulSoup('<div class="q">test1</div><div class="q">test2</div><div class="q">test3</div>','html.parser')
data = soup.find_all("div",{"class":"q"})[1].text
print(data)
test2
To get the second element from the list I have used [1]. This is how find_all() method works.
How to Modify a Tree?
This is the most interesting part. Beautiful Soup allows you to make changes to the parse tree according to your own requirements. Using attributes we can make changes to the tag’s property. Using .new_string(), .new_tag(), .insert_before(), etc methods we can add new tags and strings to an existing tag.
Let’s understand this with a small example.
<div class="q">test1</div>
I want to change the name of the tag and the class.
from bs4 import BeautifulSoup
soup=BeautifulSoup('<div class="q">test1</div>','html.parser')
data = soup.div
data.name='BeautifulSoup'
data['class']='q2'
print(data)
<BeautifulSoup class="q2">test1</BeautifulSoup>
We can even delete the attribute like this.
from bs4 import BeautifulSoup
soup=BeautifulSoup('<div class="q">test1</div>','html.parser')
data = soup.div
data.name='BeautifulSoup'
del data['class']
print(data)
<BeautifulSoup>test1</BeautifulSoup>
This is just an example of how you can make changes to the parse tree using various methods provided by BS4.
Points to remember while using Beautiful Soup
As you know written HTML or XML documents use a specific encoding like ASCII or UTF-8 but when you load that document into BeautifulSoup it is converted to Unicode. BS4 by default uses a library unicode for this purpose.
While using BeautifulSoup you might face two kinds of errors. One is AttributeError and the other is the KeyError. AttributeError occurs when a sibling tag to the current element is absent and KeyError occurs when the HTML tag is missing.
You can use diagnose() function to analyze what BS4 does to our document. It will show how different parsers handle the document.
Conclusion
Beautiful Soup is a smart library. It makes our parsing job quite simple. Obviously, you can use it in more innovative ways than shown in this tutorial. While using it in a live project do remember to use try/except statements in order to avoid any production crash. You can lxml as well in place of BS4 for data extraction but personally, I like Beautiful Soup more due to vast community support.
I hope now you have a good idea of the difference between the two. Please do share this blog on your social media platforms. Let me know if you have any scraping-related queries. I would be happy to help you out.
Additional Resources
Here are a few additional resources that you may find helpful during your web scraping journey:
Web Crawling and Web Scraping are two words that are often used interchangeably and people do not recognize that the two are different from one another. They might share many similarities and work on the same base, yet there is a huge difference.
Web Crawling vs Web Scraping
In this article, we have conducted Web scraping vs. Web crawling covering all the points of difference between the two. Dive into the article to understand both terms in a better way.
To begin with, let’s start by understanding all about Web Scraping.
What is Web Scraping?
Web Scraping is the process of extraction of data from a website or webpage. It is an automated method of extracting data into specific datasets using bots. The desired information is collected separately in a new file format.
Once the desired information is scraped through the webpage, it is further used for analysis, comparisons, and verification based on a business’s goals. This is an effective tool that many business owners use to optimize and plan their business operations in a better way.
Following are the benefits of using web scraping for your business and how they help you optimize your functions.
Benefits of Web Scraping
To Conduct Research
Data plays a crucial role in any industry and holds the dynamic capability of transforming business operations for advancements. Since web scraping provides them the ability to collect user data in real time, identify behavioral patterns, and identify the specific target audience, it acts as a game-winning tool.
Market Analysis
To advance the cut-throat competition in the market, it is important for business owners to continuously perform market analysis to maintain an edge.
Relevant data that allows an insight into the key factors such as pricing trends, reviews, special offers, inventory, etc., has been a boon for the industry leaders.
By selecting and pinpointing the exact information that is useful to you, Web scraping makes the work a lot easier. This can help you save time, effort, and money over a long period.
What is Web Crawling?
Web Crawling is the process of reading and storing all of the content on a website using bots for indexing purposes. Many search engines such as Google crawl through the information on web pages to index it for ranking.
Google Bot Indexing Content
This process is usually done on a large scale mostly by search engines and captures generic information. The crawlers go through every page on a website rather than a subset of pages.
Thus, when you search anything on the search engine, they use web crawling to find all the relative links based on your search query.
Data Crawling has great benefits and is used for various purposes that further aid businesses and search engines in enhancing their process. The following are listed below-
Collects In-Depth Information
Web Crawling is an effective method to obtain in-depth information on every page. The Internet world has tons of information published online.
Web Crawling Benefits search engines with the deep underbelly content of every target page.
Provides Real-Time Information
Web Crawling is more adaptable to current events and helps businesses to collect real-time information on their target data sets.
Reliable Quality
You can rely on Web Crawlers to provide you with good-quality content that you can trust. By getting the right kind of information at the right time, you can take advantage of your competition.
Major Output Difference Between Web Scraping and Web Crawling
While both the Web Scraping and Web Crawling tools deal with data collection, they are unique in their output result. One can noticeably agree that the results generated by both tools are different.
Web Crawling outperforms its functions to typically list URLs. There might be other fields of information but predominantly, URLs are the major by-product.
In the case of Web Scraping, the major output focuses on broader information other than URLs. This might include a study of customer reviews, competitor product star ratings, product price, and other relative outputs.
Challenges For Web Scraping and Web Crawling
Even after being so advanced and effective in the relative data extraction field, both Web Scraping and Web Crawling tools face great challenges. These challenges act as a barrier in the working and procedure of these functions. Following are some of the challenges that hinder the process –
Blockage in Data Access
Many websites today use anti-scraping and anti-crawling policies which makes it quite challenging for businesses to do the job.
Labour-Intensive
Performing data crawling or scraping at a large scale can be resource-intensive. Resources include proxies, engineers, etc. So, companies operating on a large base will require high-cost inputs to continue the process.
IP Blockage
Websites that can be easily targeted can easily provide you with the target data sets. But there might be some websites(google, amazon, indeed, etc) that restrict IP addresses to prevent them from performing any web scraping or crawling. This could be a major challenge for the process performers.
Crawler Trap
A Crawler trap misguides web crawlers and scrapers to fetch malicious pages such as spam links. The crawler works on the malicious links and gets stuck in the dynamically generated spam links. This way it enters an infinite loop and gets trapped.
To sum it up, Web Crawling is the data indexing process while Data Scraping is a data extraction process. Data Scraping helps businesses with the information they need to optimize their business functions.
It is relatively used for a targeted and personal approach to getting a hold of real-time data. While in the case of Web Crawling the bot or crawlers scan the information present on the web pages to identify its URL for indexing and further ranking purposes.
But the common part with both of them is IP blocking. To overcome this you should use Web Scraping API which can help you overcome any blockage and will help you maintain your data stream
I hope now you have a good idea of the difference between the two. Please do share this blog on your social media platforms. Let me know if you have any scraping-related queries. I would be happy to help you out.
Additional Resources
Here are a few additional resources that you may find helpful during your web scraping journey:
In this blog, we will be using Node Unblocker for web scraping, and at the end, we are going to host our server on the Heroku app.
As you know proxies and VPNs are used to make your web browsing safe and secure. Once you switch on your VPN your traffic will pass through some random IP which helps in keeping your identity safe by hiding your IP and country of origin.
VPNs can also be used for accessing websites that are either geo-restricted or banned by your central government.
Web Scraping with Node-Unblocker
But how can you use this functionality in an API while web scraping? To overcome this hurdle you can use node-unblocker for web scraping. Node-unblocker can unlock rate-limiting doors of any website.
No matter what website you are trying to scrape, node-unblocker will add a layer to pass all the incoming requests through a proxy. This helps in scraping websites without getting blocked.
Web Scraping using node-unblocker has some advantages and disadvantages. In this post, we will first learn how we can use it, and then we’ll analyze its pros and cons.
What is node-unblocker & how to access blocked sites without restrictions with it?
Well, it is a kind of web proxy designed in Nodejs which can be used in the Express framework to bypass every incoming request through a proxy. They claim to be the fastest proxy available in the market today.
Node-Unblocker working
If you want to scrape something behind the login wall or if you want to scrape websites using AJAX calls for data rendering then this proxy can do wonders for you but if your target website is Facebook or Google then this proxy will not work.
But the overall impression of node-unblocker is that it can increase the rate limit (I would not say remove the rate limit). Let’s see how we can implement this in our express API.
How to use node-unblocker?
I am assuming that you have already installed Nodejs and npm on your computer. Then create a folder and install the required libraries.
mkdir playground
npm i unblocker express --save
Using the express framework we will be able to setup up a web server and using unblocker we can send an anonymous request to our target websites. Create a file inside this folder by any name you like.
I will be using unblocker.js. Let’s build a sample web server step-by-step.
var express = require('express')
var Unblocker = require('unblocker');
We have created a function reference using require of express and unblocked.
var app = express();
var unblocker = new Unblocker({prefix: '/proxy/'});
Now, we have created express and unblocker instances. Unblocker provides you with multiple config options like:
clientScripts — It is a boolean through which you can inject Javascript.
requestMiddleware — It is an array of functions that are used for processing the incoming request before sending it to the host server.
As of now, we will only use the prefix property of unblocker. Currently, we have set the prefix as /proxy/ and this is the path where we can access the proxy.
Now, to mount the middleware at the specified path we will use app.use() function.
app.use(unblocker);
Now, let’s use listen() function to listen to the incoming connection on a specified host and port.
Now, the server will run on a PORT address provided by the environment variable and by default on 8080. We have used an upgrade handler to proxy every websocket connection.
Let’s run this by passing a sample target URL from amazon.com.
node unblocker.js
Once your server is up and ready open this URL on your browser or POSTMAN.
This will open an Amazon page and the Amazon server will see the IP address of your node-unblocker server.
Since you are running on a local machine then the IP will not change but once you have hosted it on some VPS then you can use it as a proxy server.
Complete Code
In this code, you can make a few changes to make it more production ready. But so far the code will look like this.
var express = require('express')
var Unblocker = require('unblocker');
var app = express();
var unblocker = new Unblocker({prefix: '/proxy/'});
app.use(unblocker);
app.listen(process.env.PORT || 8080).on('upgrade', unblocker.onUpgrade);
Node-Unblocker Proxy Network
I hope you have got an idea of how node-unblocker really works. Now, what if you want to use it for commercial purposes? Well for that you have to host a bunch of node-unblocker servers and through that, you have to pass all the incoming traffic.
Let’s host one node-unblocker server on Heroku and then use it as a proxy server.
Once you sign up for Heroku you have to create an app. I have named it as play-unblocker.
Now, we can use the below steps to push our code to the Heroku server.
heroku login
heroku login command will help us to identify our identity to Heroku.
Now, we will initialize the git repository in the directory where our play-unblocker server is located. The second step will be to set the Heroku remote to the app we created in our Heroku dashboard. In our case it is play-unblocker.
Now, the only part left is to push the code to the server.
Since everything is set now, we can create a nodejs script where we will use this server as a proxy.
Using Node-Unblocker as a Proxy for Web Scraping
We’ll use unirest for making the GET HTTP request to the target website. You can install unirest like this.
npm i unirest --save
Let’s write a basic script to use the above server as a proxy.
var unirest = require('unirest');
async function test(){
let data = await unirest.get('https://play-unblocker.herokuapp.com/proxy/https://www.amazon.com/')
console.log(data)
return 1
}
let scraped_data = test()
Once you run this code you will get the HTML data of your target website.
Limitations of Node-Unblocker
As far as the setup is concerned then node-unblocker gets ten on ten but if you want to use it as the stand-alone proxy for your scraping projects then according to me it’s a big NO.
Running a scraper smoothly requires extensive background checks on the proxy pool as well as the data stream. Let’s check what its limitations are in detail.
Bypassing OAuth
Node-Unblocker will not work with pages using OAuth forms. On top of that, it won’t work with any page which supports postMessage method as well. So, you can only use it with normal login forms and AJAX content.
Not Capable of big websites
Websites like Amazon, Google, Facebook, etc will not work with node-unblocker. If you try to scrape it there will be no TCP connection. These websites will either throw a captcha or it will end the connection right at the beginning.
Even if you can scrape a website with node-unblocker then the biggest question will be the number of proxies and their maintenance. Since you will need a large pool of proxies for scraping you will not create millions of servers as we created above. This will increase the cost of maintenance multi-fold.
Maintaining a large proxy cluster is always a headache so in place of that, you can use Scrapingdog’s Scraping API which provides you with millions of proxies at a very economical cost.
Scrapingdog will handle all the hassle and deliver the data in a seamless manner. You can take a trial where the first 1,000 requests are on us. Using this service you can scrape any website without restriction.
Forget about getting blocked while scraping the Web
Try out Scrapingdog Web Scraping API & Start Extracting Data without any Blockage
Conclusion
Similarly, you can create more servers like this and then use it as a proxy pool in your scraping script. You can rotate these servers on every new request so that every incoming request will pass through a new IP.
Node-Unblocker will act as a backconnect proxy and you need millions of them if you want to scale some websites at scale. Obviously, you won’t host millions of servers to create your own proxy pool.
I hope now you have a good idea of what node-unblocker is and how it can be used in your node server.
Please do share this blog on your social media platforms. Let me know if you have any scraping-related queries. I would be happy to help you out.
Additional Resources
Here are a few additional resources that you may find helpful during your web scraping journey:
Bing is a great search engine not as great as Google but it beats Google in specific areas like image Search. I prefer Yandex or Bing while making an image search. Generally, search engines are scraped to analyze fresh market trends, sentiment analysis, SEO, keyword tracking, etc.
In this post, we are going to scrape search results from Bing. Once we have managed to scrape the first page we will add a pagination system to it so that we can scrape all the pages Bing has over a keyword.
By scraping Bing you can analyze the data and can prepare a better SEO strategy to rank your own website. We are going to use Python for this tutorial and I am assuming that you have already installed Python on your machine.
Why Scrape Bing using Python?
Being a very simple language it is also flexible and easy to understand even if you are a beginner. The Python community is too big and it helps when you face any error while coding. It also has many libraries for web scraping.
Many forums like StackOverflow, GitHub, etc already have the answers to the errors that you might face while coding when you scrape Bing search results.
You can do countless things with Python but for now, I even have made one tutorial on web scraping with Python in which I have covered all the libraries we can use.
Let’s Start Scraping
I have divided this part into two sections. In the first section, we are going to scrape the first page, and then in the next section, we will scale our code to scrape all the pages by adding page numbers.
In the end, you will have a script that can scrape complete Bing search results for any keyword. That is exciting, right? Let’s begin!
First part
To begin with, we will create a folder and install all the libraries we might need during the course of this tutorial. Also, our target URL will be this Bing page.
Bing Search Results
For now, we will install two libraries
Requests will help us to make an HTTP connection with Bing.
BeautifulSoup will help us to create an HTML tree for smooth data extraction.
Inside this folder, you can create a Python file where we will write our code.
Title
Link
Description
Position
import requests
from bs4 import BeautifulSoup
l=[]
o={}
target_url="https://www.bing.com/search?q=sydney&rdr=1"
headers={"User-Agent":"Mozilla/5.0 (Windows NT 10.0; Win64; x64) AppleWebKit/537.36 (KHTML, like Gecko) Chrome/107.0.0.0 Safari/537.36"}
resp=requests.get(target_url,headers=headers)
Here we have imported the libraries we just installed and then made an HTTP GET request to the target URL. Now, we are going to use BS4 to create a tree for data extraction.
This can also be done through Xpath but for now, we are using BS4.
In our soup variable, a complete HTML tree is stored through which we will extract our data of interest. completeData variable stores all the elements that we are going to scrape.
You can find it by inspecting it.
Inspecting Bing’s Search Page
Let’s find out the location of each of these elements and extract them.
Scraping Title from Bing
Inspecting Storage of Title in Bing Search Result Page
The title is stored under a tag of parent class b_algo. completeData variable will be used as the source of the data.
o["Title"]=completeData[i].find("a").text
Scraping URLs from Bing
Inspecting URL storage in Bing Search Result Page
The description is stored under div tag with class b_caption.
Let’s combine all this in a for loop and store all the data in the l array.
for i in range(0, len(completeData)):
o["Title"]=completeData[i].find("a").text
o["link"]=completeData[i].find("a").get("href")
o["Description"]=completeData[i].find("div",
{"class":"b_caption"}).text
o["Position"]=i+1
l.append(o)
o={}
print(l)
We have managed to scrape the first page. Now, let’s focus on scaling this code so that we can scrape all the pages for any given keyword.
Second Part
When you click on page two you will see a change in the URL. URL changes and a new query parameter is automatically added to it.
This indicates that the value of “first parameter” increases by 10 whenever you change the page. This observation will help us to change the URL pattern within the loop.
We will use a for loop which will increase the value by 10 every time it runs.
for i in range(0,100,10):
target_url="https://www.bing.com/search?q=sydney&rdr=1&first=
{}".format(i+1)
print(target_url)
resp=requests.get(target_url,headers=headers)
soup = BeautifulSoup(resp.text, 'html.parser')
completeData = soup.find_all("li",{"class":"b_algo"})
for i in range(0, len(completeData)):
o["Title"]=completeData[i].find("a").text
o["link"]=completeData[i].find("a").get("href")
o["Description"]=completeData[i].find("div",
{"class":"b_caption"}).text
o["Position"]=i+1
l.append(o)
o={}
print(l)
Here we are changing the target_url value by changing the value of the first parameter as we talked about earlier. This will provide us with a new URL every time the loop runs and for this tutorial, we are restricting the total pages to ten only.
Just like this, you can get data for any keyword by just changing the URL.
Complete Code
The complete code for the second section will more or less look like this.
import requests
from bs4 import BeautifulSoup
l=[]
o={}
headers={"User-Agent":"Mozilla/5.0 (Windows NT 10.0; Win64; x64)
AppleWebKit/537.36 (KHTML, like Gecko) Chrome/107.0.0.0
Safari/537.36"}
for i in range(0,100,10):
target_url="https://www.bing.com/search?q=sydney&rdr=1&first=
{}".format(i+1)
print(target_url)
resp=requests.get(target_url,headers=headers)
soup = BeautifulSoup(resp.text, 'html.parser')
completeData = soup.find_all("li",{"class":"b_algo"})
for i in range(0, len(completeData)):
o["Title"]=completeData[i].find("a").text
o["link"]=completeData[i].find("a").get("href")
o["Description"]=completeData[i].find("div",
{"class":"b_caption"}).text
o["Position"]=i+1
l.append(o)
o={}
print(l)
How can you scrape Bing search results without getting blocked?
Bing is a search engine that has a very sophisticated IP/bot detection system. If you want to scrape Bing at scale then scraping it just like we did above will not work.
You will need rotating proxies, headers, etc. Scrapingdog can help you collect data from Bing without getting blocked. You can leave the headache of proxies and headless browsers on Scrapingdog.
Let’s understand how you can scrape Bing with Scrapingdog with the free pack. In the free pack, you get 1000 free API calls.
Once you sign up you will get an API key on the dashboard. You can use the same code above but in place of the target_url use the Scrapingdog API.
Scrapingdog Website Homepage
import requests
from bs4 import BeautifulSoup
l=[]
o={}
headers={"User-Agent":"Mozilla/5.0 (Windows NT 10.0; Win64; x64)
AppleWebKit/537.36 (KHTML, like Gecko) Chrome/107.0.0.0
Safari/537.36"}
for i in range(0,100,10):
target_url="https://api.scrapingdog.com/scrape?api_key=YOUR-API-
KEY&dynamic=false&url=https://www.bing.com/search?
q=sydney%26rdr=1%26first={}".format(i+1)
print(target_url)
resp=requests.get(target_url,headers=headers)
soup = BeautifulSoup(resp.text, 'html.parser')
completeData = soup.find_all("li",{"class":"b_algo"})
for i in range(0, len(completeData)):
o["Title"]=completeData[i].find("a").text
o["link"]=completeData[i].find("a").get("href")
o["Description"]=completeData[i].find("div",
{"class":"b_caption"}).text
o["Position"]=i+1
l.append(o)
o={}
print(l)
In the above code just replace “YOUR-API-KEY” with your own key. This will create a seamless data pipeline which can help you create tools like
Rank Tracker
Backlink Analysis
News prediction
Market prediction
Image detection
Forget about getting blocked while scraping Bing
Try out Scrapingdog Web Scraping API & Scrape Bing at Scale without Getting Blocked
Conclusion
In this tutorial, you learned to scrape the Bing search engine. You can make some changes like calculating the number of pages it serves on the keyword provided and then adjusting the for loop accordingly. You can even customize this code to scrape images from Bing.
Of course, you are advised to use a Scraping API for scraping any search engine, not just Bing. Because once you are blocked your pipeline will be blocked and you will never be able to recover it.
I hope you like this tutorial. Please feel free to ask us any scraping-related questions we will respond to as many questions as possible.
Yes, Bing does provide an official API. However, it has limitations and it is costlier than 3rd party APIs that you get at a very economical price. Further, 3rd party APIs are easy to use.
Yes, as long as you are doing it for ethical purposes it is legal. In web scraping a general rule of thumb is that you can scrape any public available data from any source including search engines like bing.
Additional Resources
Here are a few additional resources that you may find helpful during your web scraping journey:
Nasdaq is a marketplace for buying and selling stocks. It was the first online stock exchange platform around the globe.
But why stock market data scraping is important? Well, it lets you do: –
Sentiment analysis using blogs, news, social media status, etc.
Stock market price prediction
Financial analysis of any company with a single click. Obviously, you have to pass that scraped data through a Machine Learning model.
Scrape Nasdaq using Python
Why use Python to Scrape Nasdaq?
Python is a flexible programming language & is used extensively for web scraping. With many Python libraries for web scraping, this language is fast and reliable & has a strong community so that you can ask questions from this community whenever you get stuck.
In this blog post, we are going to scrape Tesla’s share information from Nasdaq.
Later in this blog, we will also create an alert email through which you will be notified once the stock hits the target price.
We have installed Selenium and BeautifulSoup. Selenium is a browser automating tool, it will be used to load NASDAQ target URL in a real Chrome browser. BeautifulSoup aka BS4 will be used for clean data extraction from raw HTML returned by selenium.
We could have used the requests library also but since NASDAQ loads everything using javascript then making a normal HTTP GET request would have been useless. If you want to learn more about the difference between how websites load data using Javascript and AJAX requests then you can read this blog on web scraping Zillow for complete information on this topic.
Our target URL will be this and we will extract the following data points from the page.
Name of the stock
Current Ask Price
P/E Ratio
Dividend Rate
1-year target
For the purpose of this blog and tutorial on scraping Nasdaq, we will be extracting these data points only!
Highlighting Data Points We Would Like to Extract from Scraping Nasdaq
Create a Python file by the name you like and import all the libraries.
from bs4 import BeautifulSoup
from selenium import webdriver
import time
Let us first track the HTML location of each of these elements by inspecting them.
Locating the Name of the Stock in HTML by Inspecting
The name is stored under the span tag with the class name “symbol-page-header__name”.
Locating the Price of the Stock in HTML by Inspecting
The asking price is also stored under the span tag with a class name as “summary-data__table-body”.
P/E RatioDividend Date
Both P/E ratio and Dividend date are part of the second tbody element of the table element.
1-Year Target
1-year target is part of the first tbody element of the table element.
Finally, we have the exact locations of each of these elements. Let’s extract them all step-by-step.
We have also imported “Keys” method of selenium to scroll down the page in order to load each and every element of the page. Then we defined our Chromium browser location and along with that we also defined our target URL.
Then we extracted all the raw HTML using the Selenium web driver and after receiving all the HTML code we closed the driver using the .close() function.
Then after closing the browser, we created an HTML tree using BS4. From that tree, we are going to extract our data of interest using .find() function. We are going to use the exact same HTML location that we found out about above.
The table part might be a little confusing for you. Let me explain it.
2 tbody elements
First, we find the table element using .find(), and then we have .find_all() to find both of these tbody elements. The first tbody element consists of a 1-year target value and the other one consist of both dividend date and P/E ratio. I hope your confusion is clear now.
Once you run this code you get all the data we were looking for in an array.
What if you want to get an email alert once your target stock stocks hit a certain price? Well for that web scraping can be very helpful. Selling/buying a stock at the right time without raising your anxiety levels can be done easily with web scraping.
We will use the schedule library of Python that will help you to run the code at any given interval of time. Let’s split this section into two parts. In the first section, we will run the crawler every 15 minutes, and in the second section, we will mail ourselves once the price hits the target spot.
Part I — Running Crawler every 24 hours
We will run our main function every 15 minutes just to keep a regular check on the stock price.
Here inside our main function, we have used the schedule library for running the tracker function every 15 minutes. Now, let’s send an email to ourselves for a price alert.
Part II — Mail
You will only send an email when your target price is hit otherwise you will not send any emails. So, we have to create an if/else condition where we will mention that if the price is our target price then send an email otherwise skip it.
Let us first set this if/else condition and then we will create our mail function. I am assuming our target price is 278 and the stock is in a bull mode which means the stock is currently rising. So, once it hits the 278 price we will receive an email for selling it.
As you can see I am comparing the current price with the target price if it is greater than or equal to 278 we are going to sell it otherwise the code will keep running every 15 minutes. Now, let’s define our mail function.
from bs4 import BeautifulSoup
from selenium import webdriver
import time
from selenium.webdriver.common.keys import Keys
import schedule
import smtplib
PATH = 'C:\Program Files (x86)\chromedriver.exe'
l=list()
obj={}
target_url = "https://www.nasdaq.com/market-activity/stocks/tsla"
def mail():
Msg = "Stock has hit your target price, it's time to earn some cash."
server = smtplib.SMTP('smtp.gmail.com', 587)
server.ehlo()
server.starttls()
server.login("[email protected]", "xxxx")
SUBJECT = "Stock Price Alert"
message = 'From: [email protected] \nSubject: {}\n\n{}'.format(SUBJECT, Msg)
server.sendmail("[email protected]", '[email protected]', message)
def tracker():
driver=webdriver.Chrome(PATH)
driver.get(target_url)
html = driver.find_element_by_tag_name('html')
html.send_keys(Keys.END)
time.sleep(2)
resp = driver.page_source
driver.close()
soup=BeautifulSoup(resp,'html.parser')
try:
obj["name"]=soup.find("span",{"class":"symbol-page-header__name"}).text
except:
obj["name"]=None
try:
obj["askPrice"]=soup.find("span",{"class":"symbol-page-header__pricing-ask"}).text
except:
obj["askPrice"]=None
tables = soup.find("table",{"class":"summary-data__table"}).find_all("tbody",{"class":"summary-data__table-body"})
print(tables)
table1 = tables[0]
table2=tables[1]
try:
obj["P/E Ratio"]=table2.find_all("tr",{"class":"summary-data__row"})[0].find("td",{"class":"summary-data__cell"}).text
except:
obj["P/E Ratio"]=None
try:
obj["1-year budget"]=table1.find_all("tr",{"class":"summary-data__row"})[3].find("td",{"class":"summary-data__cell"}).text
except:
obj["1-year budget"]=None
try:
obj["Dividend"]=table2.find_all("tr",{"class":"summary-data__row"})[7].find("td",{"class":"summary-data__cell"}).text
except:
obj["Dividend"]=None
if(obj["askPrice"] == 278):
mail()
l.append(obj)
obj={}
print(l)
if __name__ == "__main__":
schedule.every().minute.at(":15").do(tracker)
while True:
schedule.run_pending()
In our mail function, we have used smtplib to send an email through Gmail id. You can set your own subject and message.
So, this was our alert mechanism which can be used on any website for price alerts. You can even use it for tracking Google keywords by scraping Google.
How to Web Scrape Nasdaq using Scrapingdog
Nasdaq is a very popular data-rich stock exchange website and many people crawl it on a regular basis. As we have discussed above Nasdaq cannot be scraped with normal HTTP GET requests, so we need headless Chrome support for scraping it and if you want to do it scale then it takes a lot of resources. Let’s see how Scrapingdog can help scrape this website.
Scrapingdog is a data scraping API that can help you create a seamless data pipeline in no time. You can start by signing up and making a test call directly from your dashboard.
Let’s go step by step to understand how you can use Scrapingdog to scrape Nasdaq without spending on some resource-hungry architecture. Oh! I almost forgot to tell you that for new users first 1000 calls are absolutely free.
You have to place your own API key in the target_url variable. Everything remains the same except we have removed the selenium driver and we are now making a normal GET request to the Scrapingdog API.
This helps you to save expenses of resources and avoid getting blocked while scraping at scale.
Forget about getting blocked while scraping the Web
Try out Scrapingdog Web Scraping API & Scrape Nasdaq at Scale without Getting Blocked
Conclusion
We can create a price-tracking alert system for any website for example flight prices from websites like Expedia, product pricing from Amazon, etc. Python can help you create these crawlers with very little effort. But obviously, there is some limitation when you scrape these websites without Web Scraping API.
I hope you like this little tutorial and if you do then please do not forget to share it with your friends and on social media.
No, It never gets blocked. Scrapingdog’s Web Scraping API is made to surpass any blockage so that you can scrape Nasdaq without any blockage. Check out our Pricing Plans here!!
Automating web scraping with Python Scripts and Spiders can help in resolving many challenges. There are numerous scrapers, both premium and open-source, that help with this. However, while choosing a scraper, one should always look for one utilizing Python Scripts and Spiders, so the gathered data is easily extractable, readable, and expressive.
Here, this article will discuss different aspects of automated web scraping using Python scripts and spiders.
Automating Web Scraping using Python Scripts & Spiders
Why Python Scripts and Spiders are Used to Automate Web Scraping?
Python is one of the easier programming languages to learn, easier to read, and simpler to write in. It has a brilliant collection of libraries, making it perfect for scraping websites. One can continue working further with the extracted data using Python scripts too.
Also, the lack of using semicolons “;” or curly brackets “{ }” makes it easier to learn Python and code in this language. The syntax in Python is clearer and easier to understand. Developers can navigate between different blocks of code simply with this language.
One can write a few lines of code in Python to complete a large scraping task. Therefore, it is quite time-efficient. Also, since Python is one of the popular programming languages, the community is very active. Thus, users can share what they are struggling with, and they will always find someone to help them with it.
On the other hand, spiders are web crawlers operated by search engines to learn what web pages on the internet contain. There are billions of web pages on the internet, and it is impossible for a person to index what each page contains manually. In this manner, the spider helps automate the indexing process and gathers the necessary information as instructed.
What are the Basic Scraping Rules?
Anyone trying to scrape data from different websites must follow basic web scraping rules. There are three basic web scraping rules:
Check the terms and conditions of the website to avoid legal issues
Avoid requesting data from websites aggressively as it can harm the website
Have adaptable code adapt to website changes
So, before using any scraping tool, users need to ensure that the tool can follow these basic rules. Most web scraping tools extract data by utilizing Python codes and spiders.
Common Python Libraries for Automating Web Crawling and Scraping
There are many web scraping libraries available for Python, such as Scrapy and Beautiful Soup. These libraries make writing a script that can easily extract data from a website.
Here are some of the most popular ones include:
Scrapy: A powerful Python scraping framework that can be used to write efficient and fast web scrapers.
BeautifulSoup: A Python library for parsing and extracting data from HTML and XML documents.
urllib2: A Python module that provides an interface for fetching data from URLs.
Selenium: A tool for automating web browsers, typically used for testing purposes.
lxml: A Python library for parsing and processing XML documents.
How to Automate Web Scraping Using Python Scripts and Spiders?
Once you have the necessary Python scripts and spiders, you can successfully start to scrape websites for data. Here are the simple 5 steps to follow:
1. Choose the website that you want to scrape data from.
2. Find the data that you want to scrape. This data can be in the form of text, images, or other elements.
3. Write a Python script that will extract this data. To make this process easier, you can use a web scraping library, such as Scrapy or Beautiful Soup
4. Run your Python script from the command line. This will start the spider and begin extracting data from the website.
5. The data will be saved to a file, which you can then open in a spreadsheet or document.
For example, here is a basic Python script:
import requests
from bs4 import BeautifulSoup
# Web URL
site_url = "https://www.scrapingdog.com/blog/automated-google-sheet-web-scraping/"
# Get URL Content
results = requests.get(site_url)
# Parse HTML Code
soup = BeautifulSoup(results.content, 'html.parser')
print(soup.prettify())
When all the steps are done properly, you will get a result like the following:
In this code, we have chosen the blog page of the Scrapingdog website and scraped it for the content on that page. Here BeautifulSoup was used to make the process easier.
Next, we will run the Python script from the command line, and with the help of the following spider, data from the chosen page will be scrapped. The spider being:
from scrapy.spiders import Spider
from scrapy.selector import Selector
class ResultsSpider(Spider):
name = "results"
start_urls = ["https://www.website.com/page"]
def parse(self, response):
sel = Selector(response)
results = sel.xpath('//div[@class="result"]')
for result in results:
yield {
'text': result.xpath('.//p/text()').extract_first()
}
Result
Run Scrappy console to run the spider properly through the webpage.
How does Automated Web Scraping work?
Most web scraping tools access the World Wide Web by using Hypertext Transfer Protocol directly or utilizing a web browser. A bot or web crawler is implemented to automate the process. This web crawler or bot decides how to crawl websites and gather and copy data from a website to a local central database or spreadsheet.
These data gathered by spiders are later extracted to analyze. These data may be parsed, reformatted, searched, copied into spreadsheets, and so on. So, the process involves taking something from a page and repurposing it for another use.
Once you have written your Python script, you can run it from the command line. This will start the spider and begin extracting data from the website. The data will be saved to a file, which you can then open in a spreadsheet or document.
Take Away
Data scraping has immense potential to help anyone with any endeavor. However, it is closer to impossible for one person to gather all the data they need manually. Therefore, automated web scraping tools come into play.
These automated scrapers utilize different programming languages and spiders to get all the necessary data, index them and store them for further analysis. Therefore, a simpler language and an effective web crawler are crucial for web scraping.
Python script and the spider are excellent in this manner. Python is easier to learn, understand, and code. On the other hand, spiders can utilize the search engine algorithm to gather data from almost 40% -70% of online web pages. Thus, whenever one is thinking about web scraping, one should give Python script and spider-based automated web scrapers a chance.
Every company for their successful growth needs a process to generate outbound leads. Lead Generation is a process where you reach out to a list of prospects who can be your next customer. But in order to create a prospect list, you need to find a source from where you can extract phone numbers or emails. There are multiple ways of collecting these details.
Advantage of Generating Leads Via Web Scraping
One of the best method to collect leads is web scraping. We have also written some great articles on how you can extract contact credentials by Scraping Yelp, Scraping YellowPages, and Scraping Google to collect emails and build a solid prospect list.
Advantages of collecting leads via web scraping
When you collect leads by scraping websites, the process becomes relatively faster than collecting leads manually.
You reach out fast and the lead pipeline never goes empty.
Ultimately customers and revenue go up.
Ways of Collecting Leads
How B2B companies can take advantage of lead generation via web scraping?
Large enterprise companies have a set goal for customer acquisition. Here marketing and sales teams can lower their burden by web scraping websites from where they think their market-fit audience can be found.
Otherwise, they have to manually visit forums, social media, and other websites to collect leads. This becomes a tedious and manually dependent task and can leave the lead pipeline dry for a period of time.
Companies can even also save bucks by not using a paid tool likeLinkedin Sales navigator, Snov, etc. IT team can create a dedicated web scraper or can use a third-party tool like Scrapingdog that can be used by the sales team.
After this sales team can refine the leads by cold calling or by either emailing them. If somebody is interested then it can be passed on to the upper management for closing the prospect.
How freelancers can take advantage of lead generation through web scraping?
Many freelancers on websites like Upwork and Fiverr work for large companies to generate leads. They can automate their work by using web scraping, which will help them in creating a seamless data pipeline.
They can forward qualified prospect lists faster. This will help them deliver data to multiple companies in a very short span of time. Of course, first, they will have to identify the market and the place where the audience can be found. In addition to lead generation, freelancers can also offer video editing services to their clients. By utilizing a handy video trimmer tool, they can efficiently edit and enhance video content as part of their service offerings.
They can even create their own tool just like Snov and can sell it to companies for a monthly subscription. This will certainly boost their monthly revenue and it will obviously reduce the workload.
How SAAS companies can take advantage of web scraping?
SAAS companies can benefit the most from web scraping. Most of the audience can be found on Linkedin. The process is represented in a pictorial form below:
Lead Generation Process for SaaS Companies
This is the most successful approach towards lead generation through web scraping for SAAS companies.
Conclusion
Web scraping can sometimes be a little rough and therefore you should avoid scraping those particular websites. For example, Linkedin does not allow the crawling of public profiles. Do remember that the quality of the audience is far better than the quantity.
Our main focus should be on finding leads that can become our customers in the future otherwise there is no point in collecting emails like a robot just for the sake of keeping the lead pipeline open.
The internet is full of data. Web scraping is the process of extracting data from websites. It can be used for a variety of purposes, including market research.
There are several ways to scrape data from websites. The most common is to use a web scraping tool. These tools are designed to extract data from websites. They can be used to extract data from a single page or multiple pages.
Web Scraping for Market Research
Web scraping can be a time-consuming process. However, having data at your end is a valuable tool asset for any market researcher.
This guide will walk you through the basics of web scraping, and scraping marketing data, which includes choosing the right data, scraping it effectively, and using it to your advantage. With this comprehensive guide to market research, you will be able to quickly gather the data you need to make informed decisions about your business.
Web scraping can be done manually, but it is usually more efficient to use a web scraping tool. Many web scraping tools are available, but not all of them are created equal.
The best web scraping tools will have the following features:
Easy to Use: The user-friendliness and ease of use of a software program make it a better choice than its competitors. The more friendly the interface of the tool will be the easier to use it will be.
Fast: The response time of a good tool will be much less. They will be able to extract data quickly without waiting for the website to load.
Accurate: Accuracy is another important aspect of a scraping tool. This tool will be able to extract data with maximum accuracy.
Reliable: The best web scraping tools will be reliable. They will be able to extract data consistently without worrying about the website going down.
These are just a few of the features you should look for in a web scraping tool. There are many web scraping tools available, so take your time and find the one that best fits your needs.
The Best Practices for Web Scraping
Steps to Keep in Note When You Web Scrape
1. Always check the website’s terms and conditions before scraping.
When scraping, there are certain things we need to be aware of. This includes making sure that the guidelines of the site you are scraping are strictly followed.
You need to treat the website owners with due respect.
Make sure that you thoroughly read the Terms and Conditions before you start scraping the site. Familiarize yourself with the legal requirements that you need to abide by.
The data scraped should not be used for any commercial activity.
Also, make sure that you are not spamming the site with too many requests.
2. Consider using a web scraping tool or service instead of writing your code.
Let’s face it, people do not like accountability and responsibility, and this is why it is so important to use a proper web scraping tool rather than sitting down to write your code. There are several advantages to this as well. Let us take a look at some of the benefits of using a web scraping tool:
Speed
Much more thorough data collection can be done at a scale
It is very cost-effective
Offers flexibility and also a systematic approach
Structured data collection is done automatically
Reliable and robust performance
Relatively cheap to maintain its effectiveness
You can choose Scrapingdog to web scrape for all your marketing needs!!
3. Be cautious when scraping sensitive or private data.
When scraping a site, you are essentially analyzing it to improve its performance. While this is all good, some ethical dilemmas are not uncommon to pop up. For example, while scraping, you may come across data that will be considered very sensitive and/or personal.
The ethical thing to do here is to make sure that this type of data is handled safely and with responsibility. Whoever does the web scraping will need to make sure of these things.
4. Review your code regularly to ensure that it is scraping data correctly.
Scraping is very much dependent on the user interface and the structure of a site. This question may have already popped into your head but what happens when the targeted website goes through a period of adjustments?
Well, a common scenario in these cases is that the scraper will crash more often than not.
This is the main reason why it is much more difficult to properly maintain scrapers than to write it.
There are tools available that will let you know if your targeted website has gone through some adjustments.
5. Keep an eye on your web scraping activities to make sure they are not impacting the website’s performance.
Finally, when conducting scraping, it is important to make sure that your scraping activities are not negatively impacting the site’s performance. The idea here is to collect data from a website.
It is not ideal if your scraping activities slow down the site or affect it in any kind of negative way which is not meant to happen in a normal scenario.
The Different Types of Data That Can Be Collected Through Web Scraping
Types of data collected via web scraping
Market trend analysis
When you have superior-quality data, it will automatically increase your chances of success. Web scraping properly is what enables analytics and research firms to conduct proper market trend analysis. When you use web and data mining to perform trend analysis, know that it is an ineffective way of conducting market trend analysis.
Proper web scraping tools will allow you to monitor the market and also industry trends by making sure that the crawling is done in real-time.
Lead Generation
For any business that is looking to expand its offerings or is even looking to enter new markets, having access to the data gathered from web scraping can be invaluable. Lead generation with web scraping techniques will give you access to data and insights that your competitors cannot see.
This can give you a tremendous advantage over your competitors.
With the help of some particular forms of web data, you will be in a much better position to understand lead generation as well. On top of that, you will have a better understanding of competitive pricing, distribution networks, product placement, influencers, and customer sentiments.
Price monitoring
Web scraping price data can be both a catalyst and also a sort of metrics engine that can help manage profitability. With proper web scraping methods employed, you will be able to gauge what the impact of pricing activities will have on your business.
You can then calculate how profitable you are at specific price points and will hence be able to optimize your pricing strategy. This can only be done with high-end price monitoring solutions.
Search Engine Optimization
No SEO expert will ever tell you that they follow a fixed and straightforward method to do their job. Search engines are constantly updating their algorithms, and this presents new challenges for companies looking to rank high.
This is why data is so important to sustain proper growth.
To be successful with it many SEO companies combine multiple different strategies that will consist of quality content, high intent keywords, high-performing websites, and many different other components. Web scraping will allow you to gather these data in much larger volumes instead of having to do it manually.
Most businesses will engage in these practices when they are keen on understanding what is missing in their strategies and what is working for their competitors.
Research & Development
When you have a whole bunch of scrapped data at your disposal, you will be in a much better position to understand the market, your competitors, your customers, etc. All of this data can thus be used very easily to conduct proper research and development as well.
A lot of businesses simply do not pay enough attention to this part of their business strategy and they fail to realize the importance of proper research and development.
Competitor social media research is also most important for analyzing data. It is also important to be aware of what tools competitors use for sales, CMS tools, video editing software, etc.
Staying ahead of the game and being updated with the current trends in the market is vital for any business to survive and thrive.
Whether you are developing a SaaS product or a Mobile app, the research is the first part you should be doing to get the best market analysis.
Web scraping will be able to give you really valuable insights that will be backed up by current, accurate, and complete information. These things are essential when it comes to outperforming the competition you have in the market. Web scrapping will help firms engage in market research by helping them collect important data about their competitors. It will be able to provide proper monitoring for your competitive landscape.
The Tools and Techniques Used for Web Scraping
Most web scraping tools and techniques revolve around using an automated web browser, such as the Selenium web driver. This web driver can be controlled programmatically to visit web pages and interact with them similarly to a real user. The web driver can extract data from web pages that would be otherwise difficult or impossible to get.
Other web scraping tools and techniques include web crawlers, which are programs that automatically similarly traverse the web to a search engine.
These crawlers can be configured to scrape specific data types from web pages, such as contact information or product pricing.
What Are Web Scraping Tools?
1. Selenium
Essentially, Selenium is a type of software testing framework that is designed for the web and facilitates the automation of your browsers. There are various types of tools that are available under the Selenium umbrella that can all perform automation testing. This includes the Selenium IDE, Selenium Grid, Selenium Remote Control, and Selenium 2.0 plus the WebDriver.
Familiarizing yourself with the many types of tools Selenium provides will help you approach different types of automation problems.
2. Selenium Grid
This is a tool that is used for executing parallel selenium scripts. If, for example, we have one single machine and this machine has the option of connecting to multiple machines along with numerous operating systems, then we will be able to run our sample cases parallel to other different machines. This can drastically reduce the total time taken.
3. Selenium IDE
This is a tool that only really works on Firefox and Chrome browsers. It is not able to generate any sort of reports and it cannot conduct multiple test cases. If you have about 5000 test cases, know that IDE will not work in that scenario. It is also unable to generate logs.
4. Selenium RC(Remote Control)
This tool helps you write dynamic scripts which can work on multiple browsers. Another thing to note is that you will need to be able to learn languages like Java and C# to execute this tool properly.
5. Selenium WebDrivers
The web driver is a sort of tool that can provide a really friendly interface. This will let you use the tool and explore its different functionalities of it quite easily.
These drivers are not particularly tied to any sort of framework. This will allow you to easily integrate with other testing frameworks like TestNG and JUnit.
6. Web crawlers
These crawlers or bots are capable of downloading and indexing content from across the internet. The main purpose of these bots is to learn what web pages are trying to convey. This is done so that this information can be accessed whenever it is needed.
It is important to note that these bots are almost always used by search engines. Through the means of a search algorithm that contains the data being collected, search engines are better able to answer search queries and provide relevant links to users.
7. Regular expressions
Regular expressions are commonly referred to as re-modules. These modules allow us to get specific text patterns and to also extract the data we want from specific sites. It allows us to do this much more efficiently and easily than when you would have to when you do it manually.
Web Scraping Theory and Techniques
Method 1: Data extraction
Web scraping is sometimes also known as data extraction. The main function of this technique is to use it for monitoring prices, pricing intelligence, monitoring news, generating leads, and also market research among many other uses.
Method 2: Data transformation
We live in a world that is completely driven by data. When talking about the amount of data and information that most organizations and businesses regularly can be best described as “big data.” The problem here is that most of the data that can be acquired is not in a very usable form and is very unstructured. This makes it difficult to make proper use of these data.
This is exactly where data transformation comes in. This is a process in which data sets of different structures are built up from scratch again. This will make two or even more data sets used to analyze it further.
Method 3: Data mining
Data mining is very similar to mining for actual gold. If you were to mine for actual gold then you would have to dig through a lot of rocks to get to the treasure. Data mining is very similar in the sense that you get to sort through a lot of big data sets to get the particular information that you want. It is a very important part of data science in general and also for the analytics process.
The Ethical Considerations of Web Scraping
This really ought not to come as a surprise but when you are actively designing a program that will enable you to download data from websites, you should most definitely ask the owner of the site if you are allowed to do this.
You need to get permission in written format. Some sites do allow others to collect data from their sites and in these cases, they will have a sort of web-based API. This will make collecting the data much easier than having to retrieve it from HTML pages.
Just to give you an example, consider the case of PaperBackSwap.com. This site allows users to exchange books online. They have a type of search system that will give you the ability to search for books using titles, names of authors, or even an ISBN.
In this case, you will be able to write a web scraper just to see if the book you are looking for is available. It is important to point out that you will have to go through HTML pages that return from the site to pinpoint what you are looking for.
One of the biggest advantages of using APIs is the fact that you will be able to access an officially sanctioned method of gathering data. Apart from being legally protected, API gives website owners and programmers access to the knowledge of who is gathering their information.
If for some reason, you are not able to use APIs, and you cannot get explicit permission from the owners of the site, then you need to check the “robot.txt” file of the site to see if they allow or ask robots to be able to crawl their sites. Make sure to check the terms and conditions of the site to make sure they do not explicitly prohibit web scraping.
The Future of Web Scraping for Market Research
Going ahead, marketing is bound to become a much greater competitive exercise. The future of marketing, if it is not so now, is completely going to be driven by data. For businesses to come to a proper marketing strategy that will get them the results they want, they will need to get access to data that accurately portrays the market and industry they are operating.
This is why you can see web scraping being an integral part of marketing as we go forward.
The analysis of data that businesses collect from various sources like media sites, web traffic, social media, etc, will be very closely linked to their business strategies. Let us, for the sake of argument, say that you have come up with a new medical product. Now, to market the said product, traditional forms of marketing will make use of advertising to generate leads. Very shortly, web scraping will be able to accelerate this process of generating leads by collecting all the relevant information about doctors from many different sources.
You will also be able to organize this data to match your particular marketing needs as well. So, similarly, you can use web scraping for both market research purposes and SEO purposes as well.
Web scraping is the process of extraction of data from web pages and further this data can be used in analyzing and planning for your next marketing campaign.
Web scraping in marketing is the act of extracting useful data that is available publicly. This data then is used to understand the market behavior and trends.
Final Word
Web scraping can be a powerful tool for market research. By automating the process of extracting data from websites, businesses can save time and resources while gathering valuable insights into their domain.
When used correctly, web scraping can provide valuable data that can help businesses make better decisions, gain a competitive edge, and improve their bottom line.
While web scraping can be a helpful tool, businesses should be aware of the potential risks and legal implications. Scraping data from websites without the permission of the site owner can result in legal action.
Furthermore, businesses should be careful to avoid scraping sensitive data, such as personal information, that could be used to commit identity theft or other crimes.
Web scraping is a process of extracting data from websites. It can be done manually, but it is usually automated. Golang is a programming language that is growing in popularity for web scraping. In this article, we will create a web scraper with Go.
Web Scraping with Golang
Is Golang good for web scraping?
Go or Golangis a good choice for web scraping for a few reasons. It is a compiled language so it runs quickly. It is also easy to learn.
Go has good support for concurrency which is important for web scraping because multiple pages can be scraped at the same time. It also has good libraries for web scraping. You can easily hire Golang developers to work on your website for you.
Well, it’s probably the best go-to program. A Go web scraper is a program that can be used to extract data from websites. It can be used to extract data from HTML pages, XML pages, or JSON pages.
Prerequisites/Packages for web scraping with Go
To web scrape with Go, you will need to install the following packages:
Initializing Project Directory and Installing Colly
To set up your project directory, create a new folder and then initialize it with a go.mod file. Install Colly with the go-get command.
Let’s Start Web Scraping with Go (Step by Step)
So, we start by creating a file by the name ghostscraper.go. We are going to use the colly framework for this. It is a very well-written framework and I highly recommend you read its documentation.
To install it we can copy the single line command and throw it in our terminal or our command prompt. It takes a little while and it gets installed.
go get -u github.com/gocolly/colly/...
Now, switch back to your file. We begin with specifying the package, and then we can write our main function.
package main
func main () {
}
Try to run this code just to verify everything is ok.
Now, the first thing we need inside the function is a filename.
package main
func main () {
fName:= "data.csv"
}
Now that we have a file name, we can create a file.
package main
func main () {
fName:= "data.csv"
file, err := os.Create(fName)
}
This will create a file by the name data.csv. Now that we have created a file we need to check for any errors.
If there were any errors during the process, this is how you can catch them.
package main
func main () {
fName:= "data.csv"
file, err := os.Create(fName)
if err != nil {
log.Fatalf("could not create the file, err :%q",err)
return
}
}
Fatalf() basically prints the message and exits the program.
The last thing you do with a file is close it.
package main
func main () {
fName:= "data.csv"
file, err := os.Create(fName)
if err != nil {
log.Fatalf("could not create the file, err :%q",err)
return
}
defer file.Close()
}
Now, here defer is very helpful. Once you write, defer anything following that will be executed afterward and not right away. So, once we are done working with the file, go will close the file for us. Isn’t that amazing? We don’t have to worry about going and closing the file manually.
Alright so we have our file ready and as we hit save, go will add a few things within your code.
package main
import (
"log"
"os"
)
func main () {
fName:= "data.csv"
file, err := os.Create(fName)
if err != nil {
log.Fatalf("could not create the file, err :%q",err)
return
}
defer file.Close()
}
Go import the necessary packages. This was really helpful.
The next thing we need is a CSV writer. Whatever data we are fetching from the website, we will write it into a CSV file. For that, we need to have a writer.
package main
import (
"encoding/csv"
"log"
"os"
)
func main () {
fName:= "data.csv"
file, err := os.Create(fName)
if err != nil {
log.Fatalf("could not create the file, err :%q",err)
return
}
defer file.Close()
writer := csv.NewWriter(file)
}
After adding a writer and saving it, go will import another package and that is encoding/csv.
The next thing we do with a writer once we are done writing the file, we throw everything from the buffer into the writer, which can later be passed onto the file. For that, we will use Flush.
package main
import (
"encoding/csv"
"log"
"os"
)
func main () {
fName:= "data.csv"
file, err := os.Create(fName)
if err != nil {
log.Fatalf("could not create the file, err :%q",err)
return
}
defer file.Close()
writer := csv.NewWriter(file)
defer writer.Flush()
}
But again this process has to be performed afterward and not right away. So, we can add the keyword defer.
So, now we have our file structures and a writer ready. Now, we can get our hands dirty with web scraping.
So, we will start with instantiating what is a collector.
package main
import (
"github.com/gocolly/colly"
"encoding/csv"
"log"
"os"
)
func main () {
fName:= "data.csv"
file, err := os.Create(fName)
if err != nil {
log.Fatalf("could not create the file, err :%q",err)
return
}
defer file.Close()
writer := csv.NewWriter(file)
defer writer.Flush()
c := colly.NewCollector(
colly.AllowedDomains("internshala.com")
)
}
Go has also imported colly for us. We have also specified what domains we are working with. We will scrape Internshala (It provides a platform for companies to post internships).
The next thing we need to do is we need to point to the web page from where we will fetch the data from. Here is how we are going to do that. We will fetch internships from this page.
We are interested in what internships we have. We will scrape every individual internship provided. If you will inspect the page you will find that internship_meta is our target tag.
package main
import (
"github.com/gocolly/colly"
"encoding/csv"
"log"
"os"
)
func main () {
fName:= "data.csv"
file, err := os.Create(fName)
if err != nil {
log.Fatalf("could not create the file, err :%q",err)
return
}
defer file.Close()
writer := csv.NewWriter(file)
defer writer.Flush()
c := colly.NewCollector(
colly.AllowedDomains("internshala.com")
)
c.onHTML(".internship_meta", func(e *colly.HTMLElement){
writer.Write( []string {
e.ChildText("a"),
})
})
}
We have created a pointer to that HTML element and it is pointing to internship_meta tag. Using the above code we are going to write the data into our CSV file. writer function will type the slice of a string.
We need to specify precisely what we need. ChildText will return concatenated and stripped text of matching elements. Inside that, we have passed a tag a to extract all the elements with tag a. We have applied a comma because we are writing a CSV file. We also need ChildText of span tag to get the stipend amount a company is offering.
So, what we have basically done is, earlier we created a collector from colly and after that, we pointed to the web structure and specified what we needed from the web page.
So, the next thing is we need to visit this website and fetch all the data. Also, we have to do it for all the pages. You can find the total pages at the bottom of the page. Right now I have like 330 pages on that website. We will use the famous for loop here.
package main
import (
"github.com/gocolly/colly"
"encoding/csv"
"log"
"os"
)
func main () {
fName:= "data.csv"
file, err := os.Create(fName)
if err != nil {
log.Fatalf("could not create the file, err :%q",err)
return
}
defer file.Close()
writer := csv.NewWriter(file)
defer writer.Flush()
c := colly.NewCollector(
colly.AllowedDomains("internshala.com")
)
c.onHTML(".internship_meta", func(e *colly.HTMLElement){
writer.Write( []string {
e.ChildText("a"),
})
})
for i=0; i<330; i++ {
fmt.Printf("Scraping Page : %d\n",i)
c.Visit("https://internshala.com/internships/page-"+strconv.Itoa(i))
}
log.Printf("Scraping Complete\n")
log.Println(c)
}
First, we used a print statement to update us about the scraped page. Then our script will visit the target page. Since there are 330 pages then we will insert the value of i after converting it to a string to our target URL. Then we printed the data that colly will bring from the website.
Let’s build it then. You just have to type go build on the terminal.
go build
It did nothing but created a file goscraper for us and we can execute that.
The next command to execute the file will be ./goscraper and a tab for compilation.
./goscraper
It will start scraping the pages.
I have just stopped the scraper in between because I don’t want to scrape all the pages. Now, if you will look at the file data.csv which Go has created for us. It will look like the one below.
That is it. Your basic go scraper is ready. If you want to make it more readable then use regex. I have also created a graph for the number of jobs vs. job sectors. I leave this activity for you as homework.
What’s Next? Advanced Topics in Web Scraping with Go
This section will discuss some advanced topics in web scraping with Go.
Pagination
Pagination is when a website splits its content up into multiple pages. Goquery has a method called FindNext which can be used to find the next page link and go to it.
Cookies
Cookies are often used to track user data. They can be set in the request headers so that the server will send them back with the response.
User-Agents
User agents are used to identify the browser or program making the request. They can be set in the request headers.
Conclusion
This tutorial discussed the various Golang open-source libraries you may use to scrape a website. If you followed along with the tutorial, you were able to create a basic scraper with Go to crawl a page or two.
While this was an introductory article, we covered most methods you can use with the libraries. You may choose to build on this knowledge and create complex web scrapers that can crawl thousands of pages.
Feel free to message us to inquire about anything you need clarification on.
Additional Resources
Here are a few additional resources that you may find helpful during your web scraping journey:
In this article, we will look at some of the best Python web scraping libraries out there. Web scraping is the process or technique used for extracting data from websites across the internet.
Other synonyms for web scraping are web crawling or web extraction. It’s a simple process with a website URL as the initial target. Web Scraping with Python is widely used in many different fields.
Python Web Scraping Libraries
Python is a general-purpose language. It has many uses ranging from web development, AI, machine learning, and much more. You can perform Python web scraping by taking advantage of some libraries and tools available on the internet.
Once you’ve checked with the prerequisites above, create a project directory and navigate into the directory. Open your terminal and run the commands below.
mkdir python_scraper
cd python_scraper
4 Python Web Scraping Libraries & Basic Scraping with Each
There are a number of great web scraping tools available that can make your life much easier. Here’s the list of top Python web scraping libraries that we choose to scrape:
BeautifulSoup: This is a Python library used to parse HTML and XML documents.
Requests: Best to make HTTP requests.
Selenium: Used to automate web browser interactions.
Scrapy Python: This is a Python framework used to build web crawlers.
Let’s get started.
1. Beautiful Soup
Beautiful Soup is one of the best Python libraries for parsing HTML and XML documents. It creates a parse tree for parsed pages that can be used to extract data from HTML, which is useful for web scraping. It is also used to extract data from some JavaScript-based web pages.
Open your terminal and run the command below:
pip install beautifulsoup4
With Beautiful Soup installed, create a new Python file, name it beautiful_soup.py
We are going to scrape (Books to Scrape)[https://books.toscrape.com/] website for demonstration purposes. The Books to Scrape website looks like this:
We want to extract the titles of each book and display them on the terminal. The first step in scraping a website is understanding its HTML layout. In this case, you can view the HTML layout of this page by right-clicking on the page, above the first book in the list. Then click Inspect.
Below is a screenshot showing the inspected HTML elements.
You can see that the list is inside the <ol class=”row”> element. The next direct child is the <li> element.
What we want is the book title, which is inside the <a>, inside the <h3>, inside the <article>, and finally inside the <li> element.
To scrape and get the book title, let’s create a new Python file and call it beautiful_soup.py
When done, add the following code to the beautiful_soup.py file:
from urllib.request import urlopen
from bs4 import BeautifulSoup
url_to_scrape = “https://books.toscrape.com/"
request_page = urlopen(url_to_scrape)
page_html = request_page.read()
request_page.close()
html_soup = BeautifulSoup(page_html, ‘html.parser’)
# get book title
for data in html_soup.select(‘ol’):
for title in data.find_all(‘a’):
print(title.get_text())
In the above code snippet, we open our webpage with the help of the urlopen() method. The read() method reads the whole page and assigns the contents to the page_html variable. We then parse the page using html.parser to help us understand HTML code in a nested fashion.
Next, we use the select() method provided by the BS4 library to get the <ol class=” row”> element. We loop through the HTML elements inside the <ol class=”row”> element to get the <a> tags which contain the book names. Finally, we print out each text inside the <a> tags on every loop it runs with the help of the get_text() method.
You can execute the file using the terminal by running the command below.
python beautiful_soup.py
This should display something like this:
Now let’s get the prices of the books too.
The price of the book is inside a <p> tag, inside a <div> tag. As you can see there is more than one <p> tag and more than one <div> tag. To get the right element with the book price, we will use CSS class selectors; lucky for us; each class is unique for each tag.
Below is the code snippet to get the prices of each book; add it at the bottom of the file:
# get book prices
for price in html_soup.find_all(“p”, class_=”price_color”):
print( price.get_text())
If you run the code on the terminal, you will see something like this:
Your completed code should look like this:
from urllib.request import urlopen
from bs4 import BeautifulSoup
url_to_scrape = “https://books.toscrape.com/"
request_page = urlopen(url_to_scrape)
page_html = request_page.read()
request_page.close()
html_soup = BeautifulSoup(page_html, ‘html.parser’)
# get book title
for data in html_soup.select(‘ol’):
for a in data.find_all(‘a’):
print(a.get_text())
# get book prices
for price in html_soup.find_all(“p”, class_=”price_color”):
print(price.get_text())
Pros
It makes parsing and navigating HTML and XML documents straightforward, even for those with limited programming experience.
BeautifulSoup can handle poorly formatted HTML or XML documents gracefully.
It has comprehensive documentation and an active community, which means you can find plenty of resources and examples to help you learn and troubleshoot any issues you encounter.
Cons
There is no major disadvantage of using this library but it might get a little slow when using it on big documents.
2. Requests
Requests is an elegant HTTP library. It allows you to send HTTP requests without the need to add query strings to your URLs.
To use the requests library, we first need to install it. Open your terminal and run the command below
pip3 install requests_html
Once you have installed it, create a new Python file for the code. We will prevent naming a file with reserved keywords such as requests. Let’s name the file
requests_scrape.py
Now add the code below inside the created file:
from requests_html import HTMLSession
session = HTMLSession()
r= session.get(‘https://books.toscrape.com/')
get_books = r.html.find(‘.row’)[2]
# get book title
for title in get_books.find(‘h3’):
print(title.text)
# get book prices
for price in get_books.find(‘.price_color’):
print(price.text)
In this code snippet. In the first line, we imported HTMLSession from the request_html library. And instantiated it. We use the session to perform a get request from the BooksToScrape URL.
After performing the get request. We get the unicorn representation of HTML content from our BooksToScrape website. From the HTML content, we get the class row. Located at index 2 contains the list of books and is assigned to the get_books variable.
We want the book title. Like in the first example, the book title is inside the <a>, inside the <h3>. We loop through the HTML content to find each <h3> element and print the title as text.
To get the prices of each book, we only change what element the find method should search for in the HTML content. Luckily, the price is inside a <p> with a unique class price_color that’s not anywhere else. We loop through the HTML content and print out the text content of each <p> tag.
Execute the code by running the following command in your terminal:
Requests provide a straightforward and user-friendly API for sending HTTP requests, making it easy for developers to work with web services and retrieve data.
You can pass headers, cookies, etc which makes web scraping super simple.
Cons
Requests is a synchronous library, meaning that it can block the execution of your program while waiting for a response.
3. Selenium
Selenium is a web-based automation tool. Its primary purpose is for testing web applications, but it can still do well in web scraping.
We are going to import various tools to help us in scraping.
First, we are going to install selenium. There are several ways to install it:
● You can install using pip with the command:
pip install selenium
● You can also install using Conda with the command:
conda install –c conda –forge selenium
● Alternatively, you can download the PyPI source archive (selenium-x.x.x.tar.gz) and install it using setup.py with the command below:
python setup.py install
We will be using the chrome browser, and for this, we need the chrome web driver to work with Selenium.
Download chrome web driver using either of the following methods:
1. You can either download it directly from the link below
Chrome driver download link You will find several download options on the page depending on your version of Chrome. To locate what version of Chrome you have, click on the three vertical dots at the top right corner of your browser window, and click ‘Help’ from the menu. On the page that opens, select “About Google Chrome.”
The screenshot below illustrates how to go about it:
After clicking, you will see your version. I have version 92.0.4515.107, shown in the screenshots below:
2. Or by running the commands below, if you are on a Linux machine:
After installing. You need to know where you saved your web driver download on your local computer. This will help us get the path to the web driver. Mine is in my home directory.
To get the path to the web driver. Open your terminal and drag the downloaded Chrome driver right into the terminal. An output of the web driver path will be displayed.
When you’re done, create a new Python file; let’s call it selenium_scrape.py.
Add the following code to the file:
from selenium import webdriver
from selenium.webdriver.common.by import By
url = ‘https://books.toscrape.com/'
driver = webdriver.Chrome(‘/home/marvin/chromedriver’)
driver.get(url)
container =
driver.find_element_by_xpath(‘//[@id=”default”]/div/div/div/div/section/div[2]/ol’)
# get book titles
titles = container.find_elements(By.TAG_NAME, ‘a’)
for title in titles:
print(title.text)
We first import a web driver from Selenium to control Chrome in the above code. Selenium requires a driver to interface with a chosen browser.
We then specify the driver we want to use, which is Chrome. It takes the path to the Chrome driver and goes to the site URL. Because we have not launched the browser in headless mode. The browser appears, and we can see what it is doing.
The variable container contains the XPath of the <a> tag with the book title. Selenium provides methods for locating elements, tags, class names, and more. You can read more from selenium location elements
To get the XPath of <a> tag. Inspect the elements, find the <a> tag with the book title, and right-click on it. A dropdown menu will appear; select Copy, then select Copy XPath.
Just as shown below:
From the variable container. We can then find the titles by the tag name <a> and loop through to print all titles in the form of text.
The output will be as shown below:
Now, let’s change the file to get book prices by adding the following code after the get book titles code.
prices = container.find_elements(By.CLASS_NAME, ‘price_color’)
for price in prices:
print(price.text)
In this code snippet. We get the prices of each book using the class name of the book price element. And loop through to print all prices in the form of text. The output will be like the screenshot below:
Next, we want to access more data by clicking the next button and collecting the other books from other pages.
Change the file to resemble the one below:
from selenium import webdriver
from selenium.webdriver.common.by import By
url = ‘https://books.toscrape.com/'
driver = webdriver.Chrome(‘/home/marvin/chromedriver’)
driver.get(url)
def get_books_info():
container =driver.find_element_by_xpath(‘//[@id=”default”]/div/div/div/div/section/div[2]/ol’)
titles = container.find_elements(By.TAG_NAME, ‘a’)
for title in titles:
print(title.text)
prices = container.find_elements(By.CLASS_NAME, ‘price_color’)
for price in prices:
print(price.text)
next_page = driver.find_element_by_link_text(‘next’)
next_page.click()
for x in range(5):
get_books_info()
driver.quit()
We have created the get_books_info function. It will run several times to scrape data from some pages, in this case, 5 times.
We then use the element_by_link_text() method. to get the text of the <a> element containing the link to the next page.
Next, we add a click function to take us to the next page. We scrape data and print it out on the console; we repeat this 5 times because of the range function. After 5 successful data scrapes, the driver.quit() method closes the browser.
You can choose a way of storing the data either as a JSON file or in a CSV file. This is a task for you to do in your spare time.
You can dive deeper into selenium and get creative with it. I have a detailed guide on web scraping with Selenium & Python, do check out it too!!
Pros
You can use selenium to scrape Javascript-enabled websites like Duckduckgo, myntra, etc.
Selenium can handle complex tasks like navigating through multiple pages, dealing with JavaScript-based interactions, and filling out forms. It can even automate CAPTCHA solving using third-party tools.
Cons
Scraping with selenium is very slow and it can it too much hardware. This just increases the total cost.
If the browser updates then selenium code might even break and stop scraping.
4. Scrapy
Scrapy is a powerful multipurpose tool used to scrape the web and crawl the web. Web crawling involves collecting URLs of websites plus all the links associated with the websites. Finally, store them in a structured format on servers.
Scrapy provides many features but is not limited to:
● Selecting and extracting data from CSS selectors
● Support for HTTP, crawl depth restriction, and user-agent spoofing features,
● Storage of structured data in various formats such as JSON, Marshal, CSV, Pickle, and XML.
Let’s dive into Scrapy. We need to make sure we have scrapy installed; install it by running the command below:
We will have to set up a new Scrapy project. Enter a directory where you’d like to store your code and run the command below:
scrapy startproject tutorial
cd tutorial
This will create a tutorial directory with the following contents:
spiders/ __init__.py # a directory where you’ll later put your spiders
tutorial/scrapy.cfg # deploy configuration file
tutorial/__init__.py # project’s Python module, you’ll import your code from here
items.py # project items definition file
Middlewares.py # project middlewares file
pipelines.py # project pipelines file
settings.py # project settings file
The screenshot below shows the project structure:
Before we add code to our created project. The best way to learn how to extract data with Scrapy is by using the Scrapy Shell.
Scraping using the Scrapy Shell
The shell comes in handy. Because it quickens debugging of our code when scrapping, without the need to run the spider. To run Scrapy shell, you can use the shell command below:
scrapy shell <url>
On your terminal, run :
scrapy shell ‘https://books.toscrape.com/’
If you don’t get any data back, you can add the user agent with the command below:
To get USER_AGENT, open your dev tools with ctrl+shift+i. Navigate to the console, clear the console; type navigator.userAgent, then hit enter.
An example of a USER AGENT can be: Mozilla/5.0 (Linux; Android 6.0; Nexus 5 Build/MRA58N) AppleWebKit/537.36 (KHTML, like Gecko) Chrome/92.0.4515.107 Mobile Safari/537.36.
The screenshot below shows how to get the name of your USER_AGENT in the dev tools:
If you’re successful in getting output from the shell command, you will see a resemblance to the one below:
Using the shell, you can try selecting elements using CSS. The shell returns a response object.
Let us get the response object containing the titles and prices of the books from our test
website Bookstoscrape. The book title is inside element <a> element, inside the <h3>, inside <article>, inside <li>, inside <ol> with a class row. And, finally inside a <div> element.
We create a variable container and assign it to the response object containing the <ol> element with a class of rows inside a <div> element.
To see the container output in our Scrapy shell,type in a container and hit enter; the output will be like below:
Now, let us find the book title of each book, using the response object we got above
Create a variable called titles; this will hold our book titles. Using the container with the response object we got above.
We will select <a> inside the <h3> element, using the CSS selectors that scrapy provides.
We then use the CSS extension provided by scrapy to get the text of the <a> element.
Finally, we use the getall() method to get all the titles. As shown below:
Run titles to get the output of all the book titles. You should see an output like the one below:
That went well.
Now, let us get prices for each book.
In the same scrapy shell, create a price variable to hold our prices. We use the same container response object. With CSS, we select <p> element with a class of price_color.
We use the CSS extension provided by scrapy to get the text from the <p> element.
Finally, the getall() method gets all the prices.
As shown below:
Run the prices; your output should look like the below:
That was quick, right? A scrapy shell saves us a lot of time debugging as it provides an interactive shell.
Now let’s try using a spider.
Scraping using spider
Let’s go back to the tutorial folder we created; we will add a spider.
A spider is what scrapy uses to scrape information from a website or a group of websites.
Create a new file. Name it books_spider.py under the tutorial/spiders directory in your project.
Add the following code to the file:
import scrapy
class BooksSpider(scrapy.Spider):
name = “books”
start_urls = [
‘https://books.toscrape.com/'
]
def parse(self, response):
for book in response.css(‘div ol.row’):
title = book.css(‘h3 a::text’).getall()
price = book.css(‘p.price_color::text’).getall()
yield {
‘title’: book.css(‘h3 a::text’).getall(),
‘price’: book.css(‘p.price_color::text’).getall()
}
The BooksSpider subclasses scapy.Spider. It has a name attribute, the name of our spider, and the start_urls attribute, which has a list of URLs.
The list with URLs will make the initial requests for the spider.
It can also define how to follow links in the pages and parse the downloaded page content to extract data.
The parse method parses the response, extracting the scraped data as dictionaries. It also finds new URLs to follow and creates new requests from them.
To get output from our code, let’s run a spider. To run a spider, you can run the command with the syntax below:
scrapy crawl <spider name>
On your terminal, run the command below:
scrapy crawl books
You will get an output resembling the one below:
We can store the extracted data in a JSON file. We can use Feed exports which scrapy provides out of the box. It supports many serialization formats, including JSON, XML, and CSV, just to name a few.
XML scraping is a process of extracting data from an XML file. This can be done manually or using a software program. Scraping data from an XML file can be a tedious process, but it is necessary in order to get the desired data.
To generate a JSON file with the scraped data, run the command below:
scrapy crawl books –o books.json
This will generate a books.json file with contents resembling the one below:
Following links with scrapy
Let’s follow the link to the next page and extract more book titles. We inspect the elements and get the link to the page we want to follow.
The link is <a> tag <li> with a class next, inside <ul> tag with class pager, finally inside a <div> tag
Below is a screenshot of the inspected element with a link to our next page:
Let’s use the scrapy shell to get the link to the next page first. Run the scrapy shell command with the books to scrape Url.
We get the href attribute to determine the specific URL the next page goes to, just like below:
Let’s now use our spider, and modify the books_spider.py file to repeatedly follow the link to the next page, extracting data from each page.
import scrapy
class BooksSpider(scrapy.Spider):
name = “books”
start_urls = [
‘https://books.toscrape.com/'
]
def parse(self, response):
for book in response.css(‘div ol.row’):
title = book.css(‘h3 a::text’).getall()
price = book.css(‘p.price_color::text’).getall()
yield {
‘title’: book.css(‘h3 a::text’).getall(), ‘price’: book.css(‘p.price_color::text’).getall()
}
next_page = response.css(‘li.next a::attr(href)’).get()
if next_page is not None:
yield response.follow(next_page, callback=self.parse)
In this code snippet. We create a variable next_page that holds the URL to the next page. We then check if the link is not empty. Next, we use the response.follow method, and pass the URL and a callback; this returns a Request instance. Finally, we yield this Request.
We can go back to the terminal and extract a list of all books and titles into an allbooks.json file.
Run the command below:
scrapy crawl books –o allbooks.json
After it’s done scraping, open the newly created allbooks.json file. The output is like below:
You can do many things with scrapy, including pausing and resuming crawls and a wide range of web scraping tasks. I have made a separate guide on web scraping with scrapy, Do check it out too!
Pros
Scrapy supports asynchronous processing, which enables concurrent requests, reducing the time required for scraping large websites with many pages.
Scrapy is highly extensible and allows you to create reusable custom middlewares, extensions, and item pipelines.
Cons
It can be intimidating at first. There the learning curve is steep.
For small scale web scraping scrapy might be too heavy weight.
Take Away
This tutorial discussed the various Python open-source libraries for website data scraping. If you followed along to the end. You can now create from simple to more complex scrapers to crawl over an unlimited number of web pages. You can dive deeper into these libraries and hone your skills. Data is a very important part of decision-making in the world we live in today. Mastering how to collect data will place you way ahead.
Web scraping can be defined as the process of extracting data from websites and storing it in a local file or database. It is a form of data mining, and can be used to gather contact information, product prices, or other data from web pages.
Scraping data from websites can be a tedious and time-consuming process, but with the help of PHP, it can be done relatively easily. PHP is a powerful scripting language that can be used to automate web scraping tasks.
With the help of PHP, web scraping can be done quickly and efficiently. In this guide, we will show you web scraping with PHP and how to setup the environment.
Web scraping refers to the act of mining data from web pages across the internet. Other synonyms for web scraping are web crawling or web data extraction.
PHP is a widely used back-end scripting language for creating dynamic websites and web applications. You can implement a web scraper using plain PHP code. However, since we do not want to reinvent the wheel, we can leverage some readily available open-source PHP web scraping libraries. By the way, we have also published some great articles on web scraping with Nodejs and web scraping with Python, do check them out.
In this tutorial, we will be discussing the various tools and services you can use with PHP to scrap a web page. The tools we will discuss include: Guzzle, Goutte, Simple HTML DOM, Headless browser Symfony Panther,
Before we begin, if you would like to follow along and try out the code, here are some prerequisites for your development environment:
● Ensure you have installed the latest version of PHP.
● Go to this link Composer to set up a composer that we will use to install the various PHP dependencies for the web scraping libraries.
● An editor of your choice.
Once you are done with the prerequisites above, create a project directory and navigate into the directory:
mkdir php_scraper
cd php_scraper
Run the following two commands in your terminal to initialize the composer.json file:
Guzzle is a PHP HTTP client that enables you to easily send HTTP requests. It provides a simple interface for building query strings. XML is a markup language for encoding documents in a human-readable and machine-readable format. XPath is a query language for navigating and selecting XML nodes. Let’s see how we can use these three tools together to scrape a website.
Start by installing Guzzle via composer by executing the following command in your terminal:
composer require guzzlehttp/guzzle
With Guzzle installed, let’s create a new PHP file in which we will be adding the code, we will call it guzzle_requests.php.
For this demonstration, we will be scraping the Books to Scrape website; you should be able to follow the same steps we define here to scrape any website of your choice.
The Books to Scrape website looks like this:
We want to extract the titles of the books and display them on the terminal. The first step in scraping a website is understanding its HTML layout. In this case, you can view the HTML layout of this page by right-clicking on the page, just above the first product in the list, and selecting Inspect.
Here is a screenshot showing a snippet of the page source:
You can see that the list is contained inside the <ol class=”row”> element. The next direct child is the <li> element.
What we want is the book title, that is inside the <a>, inside the <h3>, inside the <article>, and finally inside the <li> element.
To initialize Guzzle, XML and Xpath, add the following code to the guzzle_requests.php file:
<?php
# scraping books to scrape: https://books.toscrape.com/
require 'vendor/autoload.php';
$httpClient = new \GuzzleHttp\Client();
$response = $httpClient->get('https://books.toscrape.com/');
$htmlString = (string) $response->getBody();
//add this line to suppress any warnings
libxml_use_internal_errors(true);
$doc = new DOMDocument();
$doc->loadHTML($htmlString);
$xpath = new DOMXPath($doc);
The above code snippet will load the web page into a string. We then parse the string using XML and assign it to the $xpath variable.
The next thing you want is to target the text content inside the <a> tag. Add the following code to the file:
In the code snippet above, //ol[@class=”row”] gets the whole list.
Each item in the list has an <a> tag that we are targeting to extract the book’s actual title. We only have one <h3> tag containing the <a>, this makes it easier to target it directly.
We use the foreach loop to extract the text contents and echo them to the terminal. At this step you may choose to do something with your extracted data, maybe assign the data to an array variable, write to file, or store it in a database. You can execute the file using PHP on the terminal by running the command below. Remember, the highlighted part is how we named our file:
php guzzle_requests.php
This should display something like this:
That went well.
Now, what if we wanted to also get the price of the book?
The price happens to be inside <p> tag, inside a <div> tag. As you can see there are more than one <p> tag and more than one <div> tag. To find the right target, we will use the CSS class selectors which, lucky for us, are unique for each tag. Here is the code snippet to also get the price tag and concatenate it to the title string:
If you execute the code on your terminal, you should see something like this:
Your whole code should look like this:
<?php
# scraping books to scrape: https://books.toscrape.com/
require 'vendor/autoload.php';
$httpClient = new \GuzzleHttp\Client();
$response = $httpClient->get('https://books.toscrape.com/');
$htmlString = (string) $response->getBody();
//add this line to suppress any warnings
libxml_use_internal_errors(true);
$doc = new DOMDocument();
$doc->loadHTML($htmlString);
$xpath = new DOMXPath($doc);
$titles = $xpath->evaluate('//ol[@class="row"]//li//article//h3/a');
$prices = $xpath->evaluate('//ol[@class="row"]//li//article//div[@class="product_price"]//p[@class="price_color"]');
foreach ($titles as $key => $title) {
echo $title->textContent . ' @ '. $prices[$key]->textContent.PHP_EOL;
}
Of course, this is a basic web scraper, and you can certainly make it better. Let’s move to the next library.
2. PHP Web Scraping with Goutte
Goutte is another excellent HTTP client for PHP specifically made for web scraping. It was made by the creator of the Symfony Framework and provides a nice API to scrape data from the HTML/XML responses of websites. Below are some of the components it includes to make web crawling straightforward:
Install Goutte via composer by executing the following command on your terminal:
composer require fabpot/goutte
Once you have installed the Goutte package, create a new PHP file for our code, let’s call it goutte_requests.php.
This section will be discussing what we did with the Guzzle library in the first section. We will scrape book titles from the Books to Scrape website using Goutte. We will also show you how you can add the prices into an array variable and use the variable within the code. Add the following code inside the goutte_requests.php file:
<?php
# scraping books to scrape: https://books.toscrape.com/
require 'vendor/autoload.php';
$httpClient = new \Goutte\Client();
$response = $httpClient->request('GET', 'https://books.toscrape.com/');
$titles = $response->evaluate('//ol[@class="row"]//li//article//h3/a');
$prices = $response->evaluate('//ol[@class="row"]//li//article//div[@class="product_price"]//p[@class="price_color"]');
// we can store the prices into an array
$priceArray = [];
foreach ($prices as $key => $price) {
$priceArray[] = $price->textContent;
}
// we extract the titles and display to the terminal together with the prices
foreach ($titles as $key => $title) {
echo $title->textContent . ' @ '. $priceArray[$key] . PHP_EOL;
}
Execute the code by running the following command in the terminal:
php goutte_requests.php
Here is the output:
What we have shown above is one way of achieving web scraping with Goutte.
Let’s discuss another method using the CSSSelector component that comes with Goutte. The CSS selector is more straightforward than using the XPath shown in the previous methods.
Create another PHP file, let’s call it goutte_css_requests.php. Add the following code to the file:
<?php
# scraping books to scrape: https://books.toscrape.com/
require 'vendor/autoload.php';
$httpClient = new \Goutte\Client();
$response = $httpClient->request('GET', 'https://books.toscrape.com/');
// get prices into an array
$prices = [];
$response->filter('.row li article div.product_price p.price_color')->each(function ($node) use (&$prices) {
$prices[] = $node->text();
});
// echo titles and prices
$priceIndex = 0;
$response->filter('.row li article h3 a')->each(function ($node) use ($prices, &$priceIndex) {
echo $node->text() . ' @ ' . $prices[$priceIndex] .PHP_EOL;
$priceIndex++;
});
As you can see, using the CSSSelector component results in a cleaner and more readable code. You may have noticed that we used the & operator, this ensures that we take the reference of the variable into the “each” loop, and not just the value of the variable. If the &$prices are modified within the loop, the actual value outside the loop is also modified. You can read more on assignment by references from official docs of PHP.
Execute the file in your terminal by running the command:
php goutte_css_requests.php
You should see an output similar to the one in the previous screenshots:
Our web scraper with PHP and Goutte is going well so far. Let’s go a little deeper and see if we can click on a link and navigate to a different page.
On our demo website. Books to Scrape, if you click on a title of a book, a page will load showing details of the book such as:
We want to see if you can click on a link from the books list, navigate to the book details page and extract the description. Inspect the page to see what we will be targeting:
Our target flow will be from the <div class=”content”> element, then <div id=”content_inner”>, then the <article> tag which only appears once, and finally the <p> tag. We have several <p> tags, the tag with the description is the 4th inside the <div class=”content”> parent. Since arrays start at 0, we will be getting the node at the 3rd index.
Now that we know what we are targeting, let’s write the code.
First, add the following composer package to help with HTML5 parsing:
composer require masterminds/html5
Next, modify the goutte_css_requests.php file as follows:
<?php
# scraping books to scrape: https://books.toscrape.com/
require 'vendor/autoload.php';
$httpClient = new \Goutte\Client();
$response = $httpClient->request('GET', 'https://books.toscrape.com/');
// get prices into an array
$prices = [];
$response->filter('.row li article div.product_price p.price_color')
->each(function ($node) use (&$prices) {
$prices[] = $node->text();
});
// echo title, price, and description
$priceIndex = 0;
$response->filter('.row li article h3 a')
->each(function ($node) use ($prices, &$priceIndex, $httpClient) {
$title = $node->text();
$price = $prices[$priceIndex];
//getting the description
$description = $httpClient->click($node->link())
->filter('.content #content_inner article p')->eq(3)->text();
// display the result
echo "{$title} @ {$price} : {$description}\n\n";
$priceIndex++;
});
If you execute the file in your terminal, you should see a title, price, and description displayed:
Using the Goutte CSS Selector component and the option to click on a page, you can easily crawl an entire website with several pages and extract as much data as you need.
3. PHP Web Scraping with Simple HTML DOM
Simple HTML DOM is another minimalistic PHP web scraping library that you can use to crawl a website. Let’s discuss how you can use this library to scrape a website. Just like in the previous examples, we will be scraping the Books to Scrape website.
Before you can install the package, modify your composer.json file and add the following lines of code just below the require:{} block to avoid getting the versioning error:
“minimum-stability”: “dev”,
“prefer-stable”: true
Now, you can install the library with the following command:
composer require simplehtmldom/simplehtmldom
Once the library is installed, create a new PHP file, we will call it simplehtmldom_requests.php.
We have already discussed the layout of the web page we are scraping in the previous sections. So, we will just go straight to the code. Add the following code to the simplehtmldom_requests.php file:
<?php
# scraping books to scrape: https://books.toscrape.com/
require 'vendor/autoload.php';
$httpClient = new \simplehtmldom\HtmlWeb();
$response = $httpClient->load('https://books.toscrape.com/');
// echo the title
echo $response->find('title', 0)->plaintext . PHP_EOL . PHP_EOL;
// get the prices into an array
$prices = [];
foreach ($response->find('.row li article div.product_price p.price_color') as $price) {
$prices[] = $price->plaintext;
}
// echo titles and prices
foreach ($response->find('.row li article h3 a') as $key => $title) {
echo "{$title->plaintext} @ {$prices[$key]} \n";
}
If you execute the code in your terminal, it should display the results:
4. PHP Web Scraping with Headless Browser (Symfony Panther)
A headless browser is a browser without a graphical user interface. Headless browsers allow you to use your terminal to load a web page in an environment similar to a web browser. This allows you to write code to control the browsing as we have just done in the previous steps. Why is this necessary?
In modern web development, most developers are using JavaScript web frameworks. These frameworks generate the HTML code inside the browsers. In other cases, AJAX is used to dynamically load content. In the previous examples, we used a static HTML page, hence the output was consistent. In dynamic cases, where JavaScript and AJAX are used to generate the HTML, the output of the DOM tree may differ greatly, resulting in failures of our scrapers. Headless browsers come into the picture to handle such issues in modern websites.
A library that we can use for a headless browser is the Symfony Panther PHP library. You can use the library to Scrape websites and run tests using real browsers. In addition, it provides the same methods as the Goutte library, hence, you can use it instead of Goutte. Unlike the previous web scraping libraries discussed in this tutorial, Panther can achieve the following:
● Execute JavaScript code on web pages.
● supports remote browser testing.
● Supports asynchronous loading of elements by waiting for other elements to load before executing a line of code.
● Supports all implementations of Chrome of Firefox.
● Can take screenshots.
● Allows running your custom JS code or XPath queries within the context of the loaded page.
We have already been doing a lot of scraping, let’s try something different. We will be loading an HTML page and taking a screenshot of the page.
Create a new php file, let’s call it panther_requests.php. Add the following code to the file:
<?php
# scraping books to scrape: https://books.toscrape.com/
require 'vendor/autoload.php';
$httpClient = \Symfony\Component\Panther\Client::createChromeClient();
// for a Firefox client use the line below instead
//$httpClient = \Symfony\Component\Panther\Client::createFirefoxClient();
// get response
$response = $httpClient->get('https://books.toscrape.com/');
// take screenshot and store in current directory
$response->takeScreenshot($saveAs = 'books_scrape_homepage.jpg');
// let's display some book titles
$response->getCrawler()->filter('.row li article h3 a')
->each(function ($node) {
echo $node->text() . PHP_EOL;
});
For this code to run on your system, you must install the drivers for Chrome or Firefox, depending on which client you used in your code. Fortunately, Composer can automatically do this for you. Execute the following command in your terminal to install and detect the drivers:
composer require — dev dbrekelmans/bdi && vendor/bin/bdi detect drivers
Now you can execute the PHP file in your terminal and it will take a screenshot of the webpage and store it in the current directory, it will then display a list of titles from the website.
Conclusion
In this tutorial, we discussed the various PHP open source libraries you may use to scrape a website. If you followed along with the tutorial, you were able to create a basic scraper to crawl a page or two. While this was an introductory article, we covered most methods you can use with the libraries. You may choose to build on this knowledge and create complex web scrapers that can crawl thousands of pages. The code for this tutorial is available from this GitHub repository.
Feel free to leave us a comment to inquire about anything you need clarification on.
Q: What Is the Best Programming Language for Web Scraping
Ans: There is no one answer to this question as the best programming language for web scraping will depend on the specific needs of the project. However, some popular choices for web scraping include Python, Ruby, and PHP.
Additional Resources
Here are a few additional resources that you may find helpful during your web scraping journey:
In today’s digitally connected world, online privacy and security have become paramount. Whether you’re concerned about protecting your personal data or simply need access to geo-restricted content, proxies can be your best friend. If you’re looking for a cost-effective way to mask your online identity, you’re in luck!
Free proxies are like free advice, both can go south. In this post, we will talk about free proxy list providers and how they can be used. People use free web proxies for anonymous web browsing, web scraping, etc.
In this article, we’ve compiled a list of five free, top-tier proxy services that can help you safeguard your privacy and unlock a world of content.
Best Proxy List For Web Scraping
What is a Proxy Server?
A proxy server is like an intermediary between yours and a website, allowing you to anonymously browse the Web.
When a user requests a certain web page, the proxy responds by pulling that page. The website will see that proxy instead of your internal address. So, your identity will remain safe.
But, is it even secure to use a free proxy list service?
Christian Haschek a security researcher tested 443 free web proxies and the results he got were pretty obvious. His experiment shows that only 21 percent of the tested proxies were safe to use. This was because only 21% of proxies were allowing HTTPS traffic to go through.
Out of the total surveyed web proxies, the remaining 79 percent compelled users to access web pages in their unencrypted HTTP form. The primary drawback of relying on a free proxy list lies in the uncertainty surrounding the operators of these addresses. These operators might include spy agencies, data-harvesting enterprises, or even malicious hackers.
It’s important to remember that sheltering beneath the veil of a proxy server while visiting websites does not guarantee absolute security; the proxy server itself can monitor your online activities.
Are there any better options?
We have created a list of the 5 best free proxy list providers that you can use for your daily routine tasks like browsing, scraping, verification, etc. Remember, the only advantage they provide you is that they are free until they are not blocked. We will share those 21% proxies and the rest. Choose wisely!
In this post, we will test all these proxies on websites like Google, Amazon, eBay, and Yellowpages. We will create a web scraper to make 500 requests to each website and then we will judge them on the basis of errors, captcha, success, and response time. We have created a web scraper using Python; you can choose any language you like.
List of Best 5 Free Proxies for Web Scraping
1. Scrapingdog
Scrapingdog is a web scraping API, using this API, you can scrape any web page. You will get raw HTML in response to all the essential data from your target website. You are just a GET request away from your data.
They provide a free trial with 1000 API calls. You can test all the features in the free trial.
Other than Web Scraping API, they also provide rotating proxies. Using these proxies, you can verify ads, scrape websites, browse the internet safely, etc. Our rotating proxies are a mixed batch of residential and data center proxies.
The best part of using Scrapingdog is that if you get a response other than the 200 status code then the credit will not be deducted from your account. You can even customize the request headers by using custom_headers=true them as an extra parameter.
In the free plan, you can make a maximum of 5 concurrent requests, and they provide 24*7 support. They don’t differentiate between the free and the paid user. A free user can test all of the proxy networks before upgrading to a premium account.
Even if you are a beginner in the web scraping world, you can read these articles to get some idea of building your web scraper. If you want to build your web scraper, you can use our rotating proxies to rotate IPs to remain unblocked. Would also recommend reading 10 tips to avoid getting blocked while scraping.
Test Results of Scrapingdog
500 requests were sent for each website.
Scrapingdog Proxy Testing
2. Proxyscrape
Proxyscrape provides you with a standard list of proxies in a .txt file. You can either filter proxies according to countries or opt for a mixed batch of proxies. Not just that you can even filter proxies according to their anonymity levels.
There are three types of anonymity levels:
Transparent proxy: does not hide your IP Address.
Anonymous proxy: hides your IP address but does reveal that you are using a proxy server.
Elite proxy: hides both your IP address and the proxy server.
Plus, they also offer a choice between proxies that support SSL and proxies which do not. It’s a great package.
Another feature they offer is a timeout slider. The timeout slider helps you to decide the threshold time limit for connecting to any website. After certain milliseconds, the connection between your proxy and the target website will break if the proxy is taking too much time to connect. So, it’s a feature-packed proxy.
They offer HTTP, Socks4, and Socks5 proxy list which keeps on updating after every 24 hours. They have a large batch of Socks4 proxies as compared to the other two. Also, the filters mentioned earlier are only available for HTTP proxies except for selecting a country.
They have shut down their proxy checker tool due to abuse, but it was a great tool to check the quality of any proxy.
Proxyscrape does not offer any free trial for their premium service, which is kind of a negative point. You have to pay to test their services. For commercial usage, you have to upgrade to their premium packs without even knowing whether the proxies will satisfy your purpose or not.
Test Results of Proxyscrape
500 requests were sent for each website.
Proxyscrape Testing
3. Free Proxy List
Just like any other free web proxy provider free proxy list also provides various filters like country selection, port number, anonymity, and protocol. But the problem is you cannot download the proxies. You have to refer to the table for proxies and for more proxies, you have to scroll down to get more proxies.
In the case of Proxyscrape, you get a timeout slider but in this case, you have to select the proxy on the basis of their anonymity. You can go forelite proxies for scraping. There is a Google column as well which shows whether the proxies will be able to access Google or not. This can help you save some time.
The great part is they keep updating the proxy list on a regular basis. For support, they have provided an email.
Once again be careful while using these proxies. You can end up leaking your project modules.
Test Results of Free Proxy List
Free Proxy List Testing
4. Proxy Nova
Proxy Nova also provides a list of proxies in a table form. They claim they have the largest database of public proxies. These proxies are tested once every 15 minutes. This increases the reliability of the service. They offer a country-level filter along with that you get a filter for anonymity.
Proxy offered can be used for hiding your real IP address or maybe for unblocking some blocked websites in your country. Their proxy list is updated after every 60 seconds but the best thing is their page will not auto-refresh. This helps in using good proxies without losing them.
Test Results of Proxy Nova
500 requests were sent for each website.
Proxy Nova Testing
5. SSL Proxy
SSL Proxies provides a list of proxies in table form. The table has eight columns in which two columns are for filtering countries and anonymity, just like other proxy providers. There is a third column by the name Google which I suppose means the proxy originated from a Google source. Let me know if I am wrong.
They claim that their proxies are tested every 10 minutes, but according to their table, the claim falls flat. There are proxies that were tested like 50 minutes ago.
They only offer HTTPS proxies. You have to pay for HTTP and Socks5 proxies. Their proxy plan offers rotating proxies that rotate every minute. For mass data collection, this proxy could be banned in no time.
Test Results of SSL Proxy
500 requests were sent for each website.
SSL Proxy Testing
Verdict
As you can see, most of the free web proxies cannot scrape Google and Amazon except Scrapingdog. Many of them are already used for scraping Google or Amazon, and now they are permanently banned. While selecting a proxy provider, we mainly focus on the validity of the proxy. Getting captchas and errors on every request is frustrating.
Analyzing the results
We used a small script to test all these free proxy list providers with 500 requests each on four websites. Now we have to aggregate all the results for a final verdict.
Google
Amazon
eBay
Yellow Pages
Free web proxy is used by many developers on many different sites. Many websites like search engines, eCommerce websites, social networking websites, etc have already blocked these proxies. Many SEO agencies use these proxies to scrape emails and scrape Google search results to generate SEO reports. Search engines use honeypot traps to block proxies. This ends up increasing the error rate. Free web proxy is also blocked by many ISPs, so be careful while subscribing to services like Free proxy lists or SSL proxy.
But you can use Scrapingdog to scrape almost any website. You can also use Proxyscrape for web scraping or anonymous browsing. With low-quality proxies, you can end up getting blocked.
There are many different types of proxies for web scraping, each with its own advantages and disadvantages.
The most common type of proxy is a shared proxy, which is a proxy that is used by multiple people. This type of proxy is usually the cheapest and easiest to find, but it is also the least reliable since it is shared by so many people.
Another common type of proxy is a private proxy, which is a proxy that is only used by one person. Private proxies are more reliable than shared proxies, but they are also more expensive.
The most reliable type of proxy is a dedicated proxy, which is a proxy that is dedicated to only one person. Dedicated proxies are the most expensive, but they are also the most reliable.
When choosing a proxy for web scraping, it is important to consider your needs and budget. If you need a proxy that is very reliable, you will need to pay more for a dedicated proxy. If you are on a tight budget, a shared proxy may be a good option.
Additional Resources
Here are a few additional resources that you may find helpful during your web scraping journey:
We’ve been covering a few web scraping techniques in this blog via Scrapy. We’ve covered some Javascript web scraping libraries key, among them being puppeteer. Python, one of the most popular programming languages in the data world, has not been left out.
Our walkthrough with BeautifulSoup and selenium Python libraries should get you on your way to becoming a data master.
Web Scraping with Scrapy & Beat Captcha
In this blog post, we’ll be exploring the scrapy library with rotating proxy API and gain an understanding of the need for using these tools.
For this walkthrough, we’ll scrape data from the lonelyplanet which is a travel guide website. Specifically their experiences section. We’ll extract this data and store it in various formats such as JSON, CSV, and XML. The data can then be analyzed and used to plan our next trip!
What’s Scrapy and Why Should I Use It
Scrapy is a fast high-level web crawling and web scraping framework used to crawl websites and extract structured data from their pages. It can be used for a wide range of purposes, from data mining to monitoring and automated testing.
Scrapy lets you crawl websites concurrently without having to deal with threads, processes, synchronization, or anything else. It handles your requests asynchronously, and it is really fast. If you wanted something like this in your custom crawler, you’d have to implement it yourself or use some async library; the best part is it’s open-source!
Let’s build a scrapy captcha solver for our target site to bypass captcha or Recaptcha:
Setup
To get started, we’ll need to install the scrapy library. Remember to separate your python dependencies by using virtual environments. Once you’ve set up a virtual environment and activated it, run:
We’ll create a file in the spiders folder and name it destinations.py.This will contain most of the logic for our web scraper.
The source code in the destinations.pythe file will appear like so:
from scrapy import Request, Spider
from ..items import TripsItem
class DestinationsCrawl(Spider):
name = 'destinations'
items = TripsItem()
allowed_domains = ['lonelyplanet.com']
url_link = f'<https://www.lonelyplanet.com/europe/activities>'
start_urls = [url_link]
def __init__(self, name,continent, **kwargs):
self.continent = continent
super().__init__(name=name, **kwargs)
def start_requests(self):
if self.continent: # taking input from command line parameters
url = f'<https://www.lonelyplanet.com/{self.continent}/activities>'
yield Request(url, self.parse)
else:
for url in self.start_urls:
yield Request(url, dont_filter=True)
def parse(self, response):
experiences = response.css("article.rounded.shadow-md")
items = TripsItem()
for experience in experiences:
items["name"] = experience.css(
'h2.text-xl.leading-tight::text').extract()
items["experience_type"] = experience.css(
'span.mr-4::text').extract()
items["price"] = experience.css("span.text-green::text").extract()
items["duration"] = experience.css(
"p.text-secondary.text-xs::text").extract()
items["description"] = experience.css(
"p.text-sm.leading-relaxed::text").extract()
items[
"link"] = f'https://{self.allowed_domains[0]}{experience.css("a::attr(href)").extract()[0]}'
yield items
The code might look intimidating at first, but don’t worry; we’ll go through it line by line.
The first three lines are library imports and items we’ll need to create a functional web scraper.
from scrapy import Request, Spider
from ..items import TripsItem
Setting up a custom proxy in scrapy
We’ll define a config in the same directory as the destinations.py. This will contain the essential credentials needed to access the rotating proxy service.
So let’s have a look at this file.
# don't keep this in version control, use a tool like python-decouple
# and store sensitive data in .env file
API_KEY='your_scraping_dog_api_key'
This is a file that will host the scraping dog API key. We’ll have to set up a custom middleware in scrapy to allow us to proxy our requests through the rotating proxy pool. From the tree folder structure, we notice there’s a [middlewares.py](<http://middlewares.py>) file. We’ll write our middleware here.
from w3lib.http import basic_auth_header
from .spiders.config import API_KEY
class CustomProxyMiddleware(object):
def process_request(self, request, spider):
request.meta['proxy'] = "<http://proxy.scrapingdog.com:8081>"
request.headers['Proxy-Authorization'] = basic_auth_header('scrapingdog', API_KEY)
Finally, we’ll register the middleware in our settings file.
# Enable or disable downloader middlewares
# See <https://docs.scrapy.org/en/latest/topics/downloader-middleware.html>
DOWNLOADER_MIDDLEWARES = {
'trips.middlewares.CustomProxyMiddleware': 350,
'trips.middlewares.TripsDownloaderMiddleware': 543,
}
With this configuration, all our scraping requests have access to the proxy pool.
Let’s take a deep dive of the destinations.py
class DestinationsCrawl(Spider):
name = 'destinations'
items = TripsItem()
allowed_domains = ['lonelyplanet.com']
url_link = f'<https://www.lonelyplanet.com/europe/activities>'
start_urls = [url_link]
def __init__(self, name,continent, **kwargs):
self.continent = continent
super().__init__(name=name, **kwargs)
def start_requests(self):
if self.continent: # taking input from command line parameters
url = f'<https://www.lonelyplanet.com/{self.continent}/activities>'
yield Request(url, self.parse)
else:
for url in self.start_urls:
yield Request(url,
dont_filter=True)
The DestinationsCrawl class inherits from scrapy’s Spider class. This class will be the blueprint of our web scraper and we’ll specify the logic of the crawler in it.
The name variable specifies the name of our web scraper and the name will be used later when we want to execute the web scraper later on.
The url_linkvariable points to the default URL link we want to scrape. The start_urls variable is a list of default URLs. This list will then be used by the default implementation start_requests() to create the initial requests for our spider. However, we’ll override this method to take in command line arguments to make our web scraper a little more dynamic. By doing so, we can extract data from the various contents that our target site has to offer without needing to write web scrapers for every resource.
Since we’re inheriting from the Spider class, we have access to the start_requests()method. This method returns an iterable of Requests (you can return a list of requests or write a generator function) which the Spider will begin to crawl from. Subsequent requests will be generated successively from these initial requests. In short, all requests start here in scrapy. Bypassing in the continent name in the command line, this variable is captured by the spider’s initializer and we can then use this variable in our target link. Essentially it creates a reusable web scraper.
Remember all our requests are being proxied as the CustomProxyMiddlewareis executed on every request.
Let’s get to the crux of the web crawler, the parse()method.
The parse method is in charge of processing the response and returning scraped data and/or more URLs to follow.
What this means is that the parse method can manipulate the data received from the target website we want to manipulate. By taking advantage of patterns in the web page’s underlying code, we can gather unstructured data and process and store it in a structured format.
By identifying the patterns in the web page’s code, we can automate data extraction. These are typically HTML elements. So let’s do a quick inspection. We’ll use a browser extension called selectorGadget to quickly identify the HTML elements we need. Optionally, we can use the browser developer tools to inspect elements.
We’ll notice that the destinations contained in the article element of with classes rounded-shadow and shadow-md. Scrapy has some pretty cool CSS selectors that’ll ease the capturing of these targets. Hence, experiences = response.css("article.rounded.shadow-md")it equates to retrieving all the elements that meet these criteria.
We’ll then loop through all the elements extracting additional attributes from their child elements. Such as the name of the trip, type, price, description, and links to their main web page on lonely planet.
Before proceeding, let’s address the TripsItem()class we imported at the beginning of the script.
import scrapy
class TripsItem(scrapy.Item):
# define the fields for your item here like:
name = scrapy.Field()
experience_type = scrapy.Field()
description = scrapy.Field()
price = scrapy.Field()
duration = scrapy.Field()
link = scrapy.Field()
After successfully crawling the web page, we need to store the data in a structured format. These items objects are containers that collect the scraped data. We map the collected values to these fields, and from the field types in our items object, CSV, JSON, and XML files can be generated. For more information, please check out the scrapy documentation.
Finally, let’s run our crawler. To extract the data in CSV format, we can run
scrapy crawl destinations -a continent=asia -a name=asia -o asia.csv
-a flag means arguments, and these are used in our scraper’s init method, and this feature makes our scraper dynamic. However, one can do without this and can run the crawler as-is since the arguments are optional.
scrapy crawl destinations -o europe.csv
For other file types, we can run:
scrapy crawl destinations -a continent=africa -a name=africa -o africa.json
scrapy crawl destinations -a continent=pacific -a name=pacific -o pacific.xml
With this data, you can now automate your trip planning.
Some websites have a robots.txt which is a file that tells if the website allows scraping or if they do not. Scrapy allows you to ignore these rules by setting ROBOTSTXT_OBEY = Falsein their settings.py file. However, I’d caution against sending excessive requests to a target site while web scraping as it can ruin other people’s user experience on the platform.
Conclusion
Web scraping can be a great way to automate tasks or gather data for analysis. Scrapy and Beat Captcha can make this process easier and more efficient. With a little practice, anyone can learn to use these tools to their advantage.
In this article, we understood how we can scrape data using Python’s scrapy and the rotational proxy service.
Feel free to comment and ask our team anything. Our Twitter DM is welcome for inquiries and general questions.
Thank you for your time.
Additional Resources
And there’s the list! At this point, you should feel comfortable writing your first web scraper to gather data from any website. Here are a few additional resources that you may find helpful during your web scraping journey:
In this post, we are going to learn how we can scrape data that is behind an authentication wall using Python. We will discuss various methods through which authentication can happen and how we can use Python to scrape the data that is behind that auth wall.
Web Scraping Behind Authentication with Python
Is it even possible to scrape data that is behind the login wall?
Yes, you can definitely scrape that data but to be honest the method is not so simple and straightforward. If you are a beginner then you should have a basic understanding of how web scraping with Python works.
You can also read a guide on web scraping with Python and Selenium to better understand the role of headless browsers when it comes to scraping a website that is protected by WAF.
Authentication Mechanism
There are several common mechanisms through which authentication takes place. We will discuss all of them one by one. I will explain to you how websites using these methods for authentication can be scraped using Python.
What methods we are going to discuss?
Basic Authentication
CSRF Token Authentication
WAF Authentication
Basic Authentication
The most basic form of authentication is the username/password combination. This is the most common method for logging into websites, and it can also be used to access APIs.
Usually, there is a GET or a POST API on the host website which is expecting a username and a password to let you access their portal.
Let’s understand this by an example. We are going to scrape httpbin.org for this example.
Example
I am expecting that you have already installed Python on your machine. If that is done then just need only one library to perform this task and that is our evergreen requests library which will be used for making connections with the host website. Also, don’t forget to create a folder for this tutorial. After creating a folder you have to create a python file inside it.
mkdir auth-tutorial
After creating the folder you can install the requests library inside that using the below command.
pip install requests
Once this is done we are ready to write the Python code.
import requests
from requests.auth import HTTPBasicAuth
# Define your credentials
username = 'user'
password = 'password'
# URL of the httpbin endpoint that requires Basic Authentication
url = 'https://httpbin.org/basic-auth/web/scraper'
# Send a GET request with Basic Authentication
response = requests.get(url, auth=HTTPBasicAuth(username, password))
# Check if the request was successful (status code 200)
if response.status_code == 200:
print('Authentication successful!')
# Print the response content
print(response.text)
else:
print(f'Authentication failed. Status code: {response.status_code}')
I know I know you must be wondering why I have written complete code at once. Well, let me explain the code step by step.
We import the requests library to make HTTP requests to the website.
The HTTPBasicAuth class from requests.auth is used to provide Basic Authentication credentials.
You define your username and password. In this example, we use ‘web’ and ‘scraper’ as placeholders. Replace them with your actual credentials.
Then we define the URL of the website you want to scrape. In this case, we’re using the “httpbin” service as an example, which supports Basic Authentication.
We use the requests.get() method to send a GET request to the specified URL.
The auth parameter is used to provide Basic Authentication credentials. We pass the HTTPBasicAuth object with the username and password.
We check the HTTP status code of the response. A status code of 200 indicates a successful request.
If the authentication is successful, it prints a success message and the response content, which may include user information.
If authentication fails or if the status code is not 200, it prints an authentication failure message.
Scraping websites with CSRF token Protection
CSRF is a popular authentication protocol that provides an extra layer of protection from bots and scrapers. This is the protocol that’s used by sites like Github and Linkedin to allow users to log in with their existing accounts. You’ll need to obtain these tokens through the login pageand use them in your requests.
You have to send that token along with your Python request in order to log in. So, the first step is to find this token.
There is one question that you should ask yourself before proceeding and the question is how to identify if the website uses CSRF tokens. Let’s find the answer to this question first and then we will proceed with Python coding.
We will scrape GitHub in this example. We can take LinkedIn instead but their login process expects too many details. So, we are going to scrape github.com. Now, coming back to the question, how to identify if the website is using a CSRF token for login?
Well CSRF protection is often implemented using tokens that are included in forms. Inspect the HTML source code of web pages and look for hidden input fields within forms. These hidden fields typically contain the CSRF tokens. Open https://github.com/login and then click inspect by right-clicking on the mouse.
This proves that GitHub uses csrf token for login. Now, let’s see what happens in the Network tab when you click Sign in button(keep the username and password box empty). You will definitely see a POST request to this /session endpoint. This is our target endpoint.
Once you click the sign-in button, in the headers section you will find a POST request was made to this https://github.com/session.
Now, let’s see what payload was being passed in order to authenticate the user.
You can see that multiple payloads are being passed to authenticate the user. Now, of course, we need this token in order to log in but we cannot open this network tab again and again once the session expires. So, we have to establish a process that can extract this token automatically. I mean not just the token but other payloads as well. But the question is how.
The answer to this question lies in the HTML source code of the login page. Let’s jump back to the HTML code of the login page.
You can see that the values of timestamp, timestamp_secret and csrf token are already in the HTML source code. All we have to do is scrape this login page and extract all this payload information using BeautifulSoup. Let’s do that.
Before writing the code you have to install beautifulsoup. You can do it like this.
pip install beautifulsoup4
Let’s code now.
import requests
from bs4 import BeautifulSoup
url = 'https://github.com/login'
# Send a GET request
resp = requests.get(url)
soup=BeautifulSoup(resp.text,'html.parser')
# Check if the request was successful (status code 200)
if resp.status_code == 200:
csrf_token = soup.find("input",{"name":"authenticity_token"}).get("value")
timestamp = soup.find("input",{"name":"timestamp"}).get("value")
timestamp_secret = soup.find("input",{"name":"timestamp_secret"}).get("value")
else:
print(f'Authentication failed. Status code: {resp.status_code}')
print("csrf token is ", csrf_token)
print("timestamp is ", timestamp)
print("timestamp secret is ", timestamp_secret)
As you can see in the above image every payload is located inside an input field with name attribute. So, we extracted each of these data using .find() method provided by BS4. Amazing, isn’t it?
Now, only one thing is left and that is to make the POST request to /session using our actual username and password.
import requests
from bs4 import BeautifulSoup
session = requests.Session()
url = 'https://github.com/login'
# Send a GET request
resp = session.get(url)
soup=BeautifulSoup(resp.text,'html.parser')
# Check if the request was successful (status code 200)
if resp.status_code == 200:
csrf_token = soup.find("input",{"name":"authenticity_token"}).get("value")
timestamp = soup.find("input",{"name":"timestamp"}).get("value")
timestamp_secret = soup.find("input",{"name":"timestamp_secret"}).get("value")
else:
print(f'Authentication failed. Status code: {resp.status_code}')
payload={"login":"your-username","password":"your-password","authenticity_token":csrf_token,"timestamp":timestamp,"timestamp_secret":timestamp_secret}
print(payload)
head = {"User-Agent":"Mozilla/5.0 (Windows NT 10.0; Win64; x64) AppleWebKit/537.36 (KHTML, like Gecko) Chrome/117.0.0.0 Safari/537.36","Content-Type":"application/x-www-form-urlencoded"}
resp = session.post('https://github.com/session', data=payload, headers=head)
print(resp.url)
print(resp.status_code)
Here I have created a payload object where all the information like username, password, csrf token, timestamp and timestamp_secret are stored.
Then I created a headers object in order to make this request look legit. You can pass other headers as well but I am passing User-Agent and Content-Type.
Then finally I made the POST request to the /session endpoint. Once you run this code you will get this.
As you can see we are currently on github.com and the status code is also 200. That means we were successfully logged in. Now, you can scrape GitHub repositories and other stuff.
Finally, we were able to scrape a website that supports csrf authentication.
Scraping websites with WAF protection
What is WAF Protection?
WAF acts as a protective layer over web applications, helping filter out malicious bots and traffic while preventing data leaks and enhancing overall security.
If a request contains payloads or patterns associated with common attacks (SQL injection, cross-site scripting, etc.), the WAF may return a 403 Forbidden or 406 Not Acceptable error.
These websites cannot be scraped with a combination of Requests and BeautifulSoup. WAF protected websites require a headless browser because we have to fill in username/email and password by typing to make it look legit. WAF is not a normal site protection and the success rate of scraping such websites is super low. But we will create a Python script through which you will be able to login to any such website with ease.
Requirements
In this case, we are going to use selenium. Selenium will be used to control the Chrome driver. Remember to keep the version of the chrome driver and your Chrome browser the same otherwise your script will not work.
Using Selenium we first have to fill the email box then the password box and then click on the login button. Let’s code now.
from selenium import webdriver
from selenium.webdriver.common.keys import Keys
import time
from bs4 import BeautifulSoup
PATH = 'C:\Program Files (x86)\chromedriver.exe'
# Set up the Selenium WebDriver
options = webdriver.ChromeOptions()
options.add_argument("--headless")
driver = webdriver.Chrome(executable_path=PATH, options=options)
Import Necessary Libraries- The code begins by importing the required libraries, including selenium for web automation using a WebDriver, and time for adding pauses.
Set Up Selenium WebDriver- The code sets up a Selenium WebDriver for Chrome. It specifies the path to the ChromeDriver executable (replace ‘C:\Program Files (x86)\chromedriver.exe’ with the actual path on your system) and configures the WebDriver to run in headless mode (without a visible browser window).
driver.get("https://app.neilpatel.com/en/login")
The WebDriver navigates to the login page of the website using driver.get(). In this example, it navigates to “https://app.neilpatel.com/en/login,” which is the login page for Neil Patel’s platform (you should replace it with the URL of your target website).
The code uses driver.find_element_by_name() and driver.find_element_by_id() to locate the email and password input fields, respectively. It then simulates typing an email and password into these fields.
Then finally the code finds the login button using a CSS selector with the attribute [data-testid="login-button"]. It then simulates clicking on this button to submit the login form.
time.sleep(5)
A pause of 5 seconds (time.sleep(5)) is added to allow the login process to complete successfully.
time.sleep(2)
if "https://app.neilpatel.com/en/ubersuggest/keyword_ideas?ai-keyword=waf&keyword=scraping&lang=en&locId=2356&mode=keyword" in driver.current_url:
print("Login successful")
else:
print("Login failed")
After opening the protected page, I check the URL of the current page to make sure we are logged in successfully.
driver.get("https://app.neilpatel.com/en/ubersuggest/keyword_ideas?ai-keyword=waf&keyword=scraping&lang=en&locId=2356&mode=keyword")
# Extract data from the protected page
soup = BeautifulSoup(driver.page_source, 'html.parser')
print(soup)
# Close the browser
driver.quit()
The code uses BeautifulSoup to parse the HTML content of the protected page and store it in the soup variable. In this example, it prints the entire parsed HTML to the console. You can modify this part to extract specific data from the page as needed.
Finally, the WebDriver is closed using driver.quit() to clean up resources.
Once you run this code you should be able to see Login Successful written on your cmd along with its raw HTML code. Further, you can use .find() functions of BS4 to extract specific information.
So, we were able to scrape a WAF-protected website as well.
Conclusion
In this article, we understood how we can scrape data using Basic Authentication, CSRF tokens, and WAF-protected websites. Of course, there are more methods but these are the most popular ones.
Now, you can of course use logged-in cookies from these websites and then pass them as headers with your request but this method can get your data pipeline blocked.
For mass scraping, you are advised to use web scraping APIs like Scrapingdog which will handle proxies and headless browsers for you. You just need to send a GET request to the API and it will provide you with the data.
If you like this then please share this article on your social media channels. You can follow us on Twitter too. Thanks for reading!
Additional Resources
And there’s the list! At this point, you should feel comfortable writing your first web scraper to gather data from any website. Here are a few additional resources that you may find helpful during your web scraping journey:
JavaScript is a powerful language that enables you to create simple scripts that can do everything from extracting data from websites to managing back-end systems. Web scraping is one of the simplest and most popular ways to extract data from websites.
This guide will show you how to do puppeteer web scraping using Node.js.
Let’s Start Scraping with Puppeteer & NodeJs
Generally, web scraping is divided into two parts:
Fetching data by making an HTTP request
Extracting important data by parsing the HTML DOM
Know What Puppeteer Is
Puppeteer : Puppeteer is a Node library API that allows us to control headless Chrome.
Nodejs : Nodejs is an open-source project and a web development platform that enables developers to create and access websites and applications
What we are going to scrape using Puppeteer & NodeJs
We will scrape the Book price and title from this website, a fake bookstore specifically set up to help people practice scraping.
Setup
Our setup is pretty simple. Just create a folder and install Puppeteer for creating a folder and installing libraries, type below the given commands. I am assuming that you have already installed Node.js.
mkdir scraper
cd scraper
npm i puppeteer — save
Now, create a file inside that folder by any name you like. I am using scraping.js.
Preparing the Food
Now, insert the following boilerplate code in scraping.js
const puppeteer = require(‘puppeteer’);
let scrape = async () => {
// Actual Scraping goes Here…
// Return a value
};
scrape().then((value) => {
console.log(value); // Success!
});
Let’s walk through this example line by line.
Line 1: We require the Puppeteer dependency that we installed earlier
Line 3–7: This is our main function scrape. This function will hold all of our automation code.
Line 9: Here,we are invoking our scrape() function. (Running the function).
Something important to note is that our scrape() function is a async function and makes use of the new ES 2017 async/await features. Because this function is asynchronous when it is called, it returns a Promise. When the async function finally returns a value, the Promise will resolve (or Reject if there is an error). Since we’re using an async function, we can use the await expression, which will pause the function execution and wait for there to Promise to resolve before moving on. It’s okay if none of this makes sense right now. It will become clearer as we continue with the tutorial. We can test the above code by adding a line of code to the scrape function. Try this out:
let scrape = async () => {
return 'test';
};
Now run node scrape.js in the console. You should get test returned! Perfect, our returned value is being logged to the console. Now we can get started filling out our scrape function.
Step 1: Setup The first thing we need to do is create an instance of our browser, open up a new page, and navigate to a URL. Here’s how we do that:
Awesome! Let’s break it down line by line: First, we create our browser and set headless the mode to false. This allows us to watch exactly what is going on:
Optionally, I’ve added a delay of 1000 milliseconds. While normally not necessary, this will ensure everything on the page loads:
await page.waitFor(1000);
Finally, we’ll close the browser and return our results after everything is done.
browser.close();
return result;
The setup is complete. Now, let’s scrape!
Step 2: Scraping Probably now, you must have an idea of what we are going to scrape. We are going to scrape the Book title and its price.
Looking at the Puppeteer API, we can find the method that allows us to get the HTML out of the page. In order to retrieve these values, we’ll use the page.evaluate() method. This method allows us to use built-in DOM selectors like querySelector().First thing we’ll do is create our page.evaluate() function and save the returned value to a variable named result:
Within our function, we can select the elements we desire. We’ll use the Google Developer Tools to figure this out again. Right-click on the title and select inspect:
As you’ll see in the elements panel, the title is simply an h1 element. We can now select this element with the following code:
let title = document.querySelector('h1');
Since we want the text contained within this element, we need to add-in .innerText — Here’s what the final code looks like:
let title = document.querySelector('h1').innerText;
Similarly, we can select the price by right-clicking and inspecting the element:
As you can see, our price has a class of price_color. We can use this class to select the element and its inner text. Here’s the code:
let price = document.querySelector('.price_color').innerText;
Now that we have the text that we need, we can return it in an object:
return {
title,
price
}
Awesome! We’re now selecting the title and price, saving them to an object, and returning the value of that object to the result variable. Here’s what it looks like when it’s all put together:
const result = await page.evaluate(() => {
let title = document.querySelector('h1').innerText;
let price = document.querySelector('.price_color').innerText;return {
title,
price
}});
The only thing left to do is return our result so it can be logged into the console:
You can now run your Node file by typing the following into the console:
node scrape.js// { title: 'A Light in the Attic', price: '£51.77' }
You should see the title and price of the selected book returned to the screen! You’ve just scraped the web!
Making it Perfect
Now, in order to scrape all the book titles from the home page itself would have been a little more difficult for beginners. However, this provides the perfect opportunity for you to practice your new scraping skills!
const result = await page.evaluate(() => {
let data = []; // Create an empty array
let elements = document.querySelectorAll('xxx'); // Select all // Loop through each proudct
// Select the title
// Select the price
data.push({title, price}); // Push the data to our array return data; // Return our data array});
Conclusion
In this article, we understood how we could scrape data using Nodejs & Puppeteer regardless of the type of website. Feel free to comment and ask me anything. You can follow me on Twitter and Medium. Thanks for reading, and please hit the like button!
Additional Resources
And there’s the list! At this point, you should feel comfortable writing your first web scraper to gather data from any website. Here are a few additional resources that you may find helpful during your web scraping journey:
Top Tips for Web Scraping to Avoid Getting Blocked
Are you tired of getting blocked while web scraping?
Or you know you can get blocked when you scrape your next desired website and you must be asking yourself can I even crawl websites without getting blocked?
Well that’s probably the case and you are looking for a solution!! Right?
Well Yes. You can!!
Although web scraping challenges are far more than you can imagine & hence it is something that has to be done quite responsibly.
You have to be very cautious about the website you are scraping. It could have negative effects on the website.
There are FREE web scraping tools in the market that can smoothly scrape any website without getting blocked. Many websites on the web do not have any anti-scraping mechanism but some of the websites do block scrapers because they do not believe in open data access.
One thing you have to keep in mind is to BE NICE and FOLLOW the SCRAPING POLICIES of the website.
Prevent Getting Blacklisted While Web Scraping with These Tips
1. ROBOTS.TXT
First of all, you have to understand what is robots.txt file is and what is its functionality. So, basically, it tells search engine crawlers which pages or files the crawler can or can’t request from your site.
This is used mainly to avoid overloading any website with requests. This file provides standard rules about scraping. Many websites allow GOOGLE to let them scrape their websites.
One can find robots.txt files on websites — http://example.com/robots.txt. Sometimes certain websites have User-agent: * or Disallow:/ in their robots.txt file which means they don’t want you to scrape their websites.
Basically, the anti-scraping mechanism works on a fundamental rule which is: Is it a bot or a human? For analyzing this rule it has to follow certain criteria in order to make a decision. Points referred by an anti-scraping mechanism:
If you are scraping pages faster than a human possibly can, you will fall into a category called “bots”.
Following the same pattern while web scraping. For example, you are going through every page of that target domain just collecting images or links.
If you are scraping using the same IP for a certain period of time.
User Agent missing. Maybe you are using a headerless browser like Tor Browser
If you keep these points in mind while web scraping a website, I am pretty sure you will be able to scrape any website on the web.
2. IP Rotation
This is the easiest way for anti-scraping mechanisms to catch you red-handed. If you keep using the same IP for every request you will be blocked instantly after some time. So, for every successful scraping request, you must use a different IP for every new request you make.
You must have a pool of at least 10 IPs before making an HTTP request. To avoid getting blocked you can use proxy rotating services like Scrapingdog or any other Proxy services.
I am putting a small python code snippet that can be used to create a pool of new IP addresses before making a request.
This will provide you a JSON response with three properties which are IP, port, and country. This proxy API will provide IPs according to a country code, you can find the country code here.
But for websites that have advanced bot detection mechanisms, you have to use either mobile or residential proxies, you can again use Scrapingdog for such services. The number of IPs in the world is fixed.
By using these services you will get access to millions of IPs which can be used to scrape millions of pages. This is the best thing you can do to scrape successfully for a longer period of time.
3. User-Agent
The User-Agent request headeris a character string that lets servers and network peers identify the application, operating system, vendor, and/or version of the requesting user agent. Some websites block certain requests if they contain User-Agent that doesn’t belong to a major browser.
If user agents are not set many websites won’t allow viewing their content. You can get your user agent by typing What is my user agenton google.
The somewhat same technique is used by an anti-scraping mechanism that they use while banning IPs. If you are using the same user agent for every request you will be banned in no time.
So, what is the solution?
Well, the solution is pretty simple you have to either create a list of User-Agents or maybe use libraries like fake-useragents. I have used both techniques but for efficiency purposes, I will urge you to use the library.
4. Make Web scraping slower, keep Random Intervals in between
As you know the speed of crawling websites by humans and bots is very different. Bots can scrape websites at an instant pace. Making fast, unnecessary, or random requests to a website is not good for anyone. Due to this overloading of requests a website may go down.
To avoid this mistake, make your bot sleep programmatically in between scraping processes. This will make your bot look more human to the anti-scraping mechanism.
This will also not harm the website. Scrape the smallest number of pages at a time by making concurrent requests. Put a timeout of around 10 to 20 seconds and then continue scraping.
As I said earlier you have to respect the robots.txt file.
Use auto throttling mechanisms which will automatically throttle the crawling speed based on the load on both the spider and the website that you are crawling. Adjust the spider to an optimum crawling speed after a few trials run.
Do this periodically because the environment does change over time.
5. Change in Scraping Pattern & Detect website change
Generally, humans don’t perform repetitive tasks as they browse through a site with random actions. But web scraping bots will crawl in the same pattern because they are programmed to do so.
As I said earlier some websites have great anti-scraping mechanisms. They will catch your bot and will ban it permanently.
Now, how can you protect your bot from being caught? This can be achieved by Incorporating some random clicks on the page, mouse movements, and random actions that will make a spider look like a human.
Now, another problem is many websites change their layouts for many reasons and due to this your scraper will fail to bring the data you are expecting.
For this, you should have a perfect monitoring system that detects changes in their layouts and then alert you with the current scenario. Then this information can be used in your scraper to work accordingly.
One of my friends is working in a large online travel agency and they crawl the scrape web to get the prices of their competitors . While doing so they have a monitoring system that mails them every 15 minutes about the status of their layouts.
This keeps everything on track and their scraper never breaks.
6. Headers
When you make a request to a website from your browser it sends a list of headers. Using headers, the website analyses your identity. To make your scraper look more human you can use these headers. Just copy them and paste them into your header object inside your code. That will make your request look like it’s coming from a real browser.
On top of that using IP and User-Agent Rotation will make your scraper unbreakable. You can scrape any website be it dynamic or static. I am pretty sure using these techniques you will be able to beat 99.99% anti-scraping mechanisms.
Now, there is a header “Referer”. It is an HTTP request header that lets the site know what site you are arriving from.
Generally, it’s a good idea to set this so that it looks like you’re arriving from Google, you can do this with the header:
“Referer”: “https://www.google.com/”
You can replace it with https://www.google.co.uk or google.in if you are trying to scrape websites based in the UK or India. This will make your request look more authentic and organic.
You can also look up the most common referrers to any site using a tool like https://www.similarweb.com, often this will be a social media site like Youtube or Facebook.
7. Headless Browser
Websites display their content on the basis of which browser you are using. Certain displays differently on different browsers. Let’s take the example of Google search. If the browser (identified by the user agent) has advanced capabilities, the website may present “richer” content — something more dynamic and styled which may have a heavy reliance on Javascript and CSS.
The problem with this is that when doing any kind of web scraping, the content is rendered by the JS code and not the raw HTML response the server delivers. In order to scrape these websites, you may need to deploy your own headless browser (or have Scrapingdog do it for you!).
Automation Browsers like Selenium or Puppeteer provide APIs to control browsers and Scrape dynamic websites. I must say a lot of effort goes in for making these browsers go undetectable.
But this is the most effective way to scrape a website. You can even use certain browserless services to let you open an instance of a browser on their servers rather than increasing the load on your server. Moreover, you can even open more than 100 instances at once on their services. So, all & in all it’s a boon for the Scraping industry.
8. Captcha Solving Services
Many websites use ReCaptcha from Google which lets you pass a test. If the test goes successful within a certain time frame then it considers that you are not a bot but a real human being. If you are scraping a website on a large scale, the website will eventually block you.
You will start seeing captcha pages instead of web pages. There are services to get past these restrictions such as 2Captcha.
It is a captcha solving service that provides solutions of almost all known captcha types via a simple-to-use API. It helps to bypass captchas on sites without any human involvement in such activities as SERP and data parsing, web-scraping, web automation, etc.
There are invisible links to detect hacking or web scraping. Actually, it is an application that imitates the behavior of a real system.
Certain websites have installed honeypots on their system which are invisible by a normal user but can be seen by bots or web scrapers. You need to find out whether a link has the “display: none” or “visibility: hidden” CSS properties set, and if they do avoid following that link, otherwise a site will be able to correctly identify you as a programmatic scraper, fingerprint the properties of your requests, and block you quite easily.
Honeypots are one of the easiest ways for smart webmasters to detect crawlers, so make sure that you are performing this check on each page that you scrape.
10. Google Cache
Now, sometime google keeps a cached copy of some websites. So, rather than making a request to that website, you can also make a request to its cached copy. Simply prepend “http://webcache.googleusercontent.com/search?q=cache:” to the beginning of the URL. For example, to scrape documentation of Scrapingdog you could scrape “http://webcache.googleusercontent.com/search?q=cache:https://www.scrapingdog.com/documentation”.
But one thing you should keep in mind is that this technique should be used for websites that do not have sensitive information which also keeps changing.
For example, LinkedIn tells Google to not cache their data. Google also creates a cached copy of a website in a certain interval of time. It also depends on the popularity of the website.
Hopefully, you have learned new scraping tips by reading this article. I must remind you to keep respecting the robots.txt file. Also, try not to make large requests to smaller websites because they might not have the budget that large enterprises have.
Feel free to comment and ask me anything. You can follow me on Twitter and Medium. Thanks for reading and please hit the like button!
Frequently Asked Questions
Is web scraping detectable?
Ans: Yes, web scraping can be detected. There are a few ways to detect web scraping, but the most common is through weblogs. When a scraper hits a website, it leaves a trace in the log files. These log files can be analyzed to see what kind of traffic is coming from where, and how often. If there is a sudden spike in traffic from a particular IP address, it’s a good indication that someone is scraping the site.
How do you bypass bot detection?
Ans: There is no universal answer to this question, as the methods used to bypass bot detection vary depending on the specific bot detection system in place. However, some common methods used to bypass bot detection systems include using a proxy server or VPN, using a modified browser or user agent string, or creating a custom bot that imitates human behavior.
How do you stop a website from crawling?
Ans: There is no surefire way to stop a website from crawling, but there are some methods that may discourage crawlers. These include using a robots.txt file to block crawlers from certain areas of your website or using CAPTCHAs to make it more difficult for bots to access your site.
Is VPN good for scraping?
VPN is not a good choice when it comes to web scraping. VPN provides you with a fixed IP for a very long time and the target website might block you in no time. The host will identify that some script is operating at this IP and due to this your data pipeline will break.
Can you get blocked for web scraping?
Of course you can get blocked while scraping due to numerous factors like lack of IPs, browser fingerprinting, unusual headers, crawling at a very fast pace, etc. To avoid getting blocked while scraping you are advised to use Web Scraping Services
How do I stop IP ban from Web scraping?
To stop IP bans follow this practice: 1. Do not violate page rules for that website. 2. Do not crawl website at a ridiculously heavy pace. 3. Keep rotating your headers along with your IPs
Additional Resources
And there’s the list! At this point, you should feel comfortable writing your first web scraper to gather data from any website. Here are a few additional resources that you may find helpful during your web scraping journey: